everything useful is here
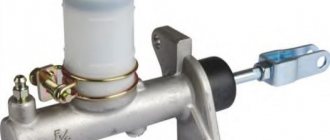
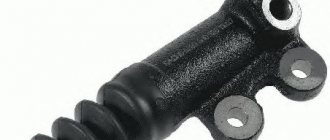
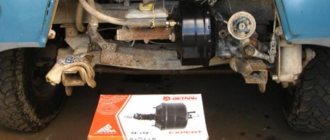
Replacing the master brake cylinder SEQUENCE OF ACTIONS Drain the brake fluid from the system
Disconnect the wire block from the brake fluid level drop sensor.
Unscrew and remove the lid of the tank with the sensor.
Using a rubber bulb or syringe, pump out the brake fluid from the reservoir.
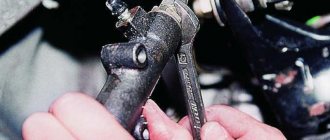
Using a 12mm wrench, unscrew the fittings of the two brake pipes and remove the pipes from the cylinder.
Using a 17mm wrench, unscrew the two nuts securing the cylinder to the vacuum booster.
One of the nuts secures the tip of the ground wire.
Remove the cylinder along with the tank.
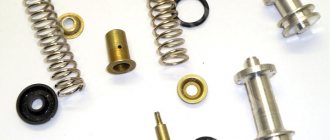
There is a washer installed between the cylinder and the amplifier.
By pulling, remove the tank from the cylinder.
Using a screwdriver, remove the rubber gaskets of the tank.
Using a 17mm wrench, unscrew the fittings of the two tubes. We rearrange the removed parts onto the new cylinder and install it in the reverse order.
For the first time in the entire life of the car, the main brake cylinder failed. The front brakes worked fine, but the rear brakes were gone. No leaks were visible either on the main or working cylinders, as well as on the system pipes. After some fuss, the UAZ master brake cylinder was replaced. But in order.
Symptoms of problems
The general technical condition of the car (including the brake system) can be checked using a personal diagnostic adapter - a car scanner. These types of devices are widespread and have a wide price range. We would like to draw your attention to the budget model of Korean production Scan Tool Pro Black Edition.
At a cost of about 2 thousand rubles. This scanner is capable of fully diagnosing your car (engine, gearbox, transmission, abs, srs and much more), which will pay for itself in 1-2 trips to the service station. The adapter is quite easy to use, has Russian-language software and is compatible with most cars produced in 1993. The device will also be useful when buying a used car, as it can show its real mileage and VIN.
The fluid brake system consists of many parts that can become unusable: pipes, wheel cylinders, calipers, drums and pads. Typical signs of a faulty master cylinder:
- After pressing the pedal, the car stops slowly. The reason is that the cuffs of one or two pistons have lost their tightness - they have cracked or “floated”.
- To slow down, you need to press the brake pedal hard. The phenomenon occurs due to swelling of the rubber of the piston seals.
- The brake pedal travel is too short. The fluid inside the cylinder has nowhere to go because the compensation hole is clogged. Another option is that the passage is blocked by a swollen rubber seal.
- A common symptom is pedal failure, the brakes coming on at the end of the stroke. This indicates complete wear of the cuffs; as a result, liquid penetrates behind the piston and rushes into the expansion tank - the cylinder “bypasses.”
- The pads do not release the brake discs and drums and get very hot when driving. Options: one of the pistons is jammed or the bypass hole is clogged.
The listed symptoms of a GTZ malfunction are similar to malfunctions of other elements. Pedal failure also occurs when a large amount of air enters the tubes or loss of fluid in one of the working cylinders. Sluggish deceleration and increased force on the pedal are often caused by a breakdown of the vacuum booster - a cracked membrane or a lack of tightness at the joints of the hose that takes off engine vacuum.
There are signs that clearly indicate the performance of the main hydraulic cylinder and the malfunction of other elements:
- during braking, the car pulls to the side - the problem lies in a certain circuit or wheel;
- jamming of the brake mechanisms of one wheel;
- creaking and squeaking when braking;
- heating the discs and pads on one wheel.
If you eliminate these symptoms, it will become easier to check the brake master cylinder in a garage. This also includes obvious brake fluid leaks and the knocking sound of worn calipers.
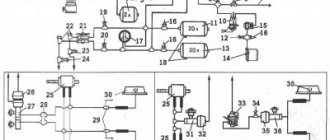
Working brake system of UAZ Bukhanka
Service brake system diagram
The diagram allows you to study how the brake system of the UAZ Bukhanka works more clearly.
Fig. 1 Diagram of the working brake system of the UAZ Bukhanka: 1 – brake disc; 2 – front wheel brake bracket; 3 – outline of the front part; 4 – main brake cylinder; 5 – reservoir equipped with a brake fluid movement sensor to the emergency level; 6 – amplifier with vacuum; 7 – pusher; 8 – brake pedal; 9 – light switch when braking; 10 – rear wheel brake pads; 11 – rear wheel braking cylinder; 12 – outline of the rear part; 13 – casing of the axle axle at the rear; 14 – load spring; 15 – pressure regulator; 16 – rear cables; 17 – equalizer; 18 – central cable; 19 – parking brake lever; 20 – indicator of brake fluid movement to the emergency level; 21 – parking brake warning switch; 22 – front wheel brake pads.
Hydraulic drive of the service brake system
Since 1985, the hydraulic drive of the UAZ service brake system began to be produced with two separate branches, one of which extends to the brake mechanisms of the front wheels, and the second extends to the brake mechanisms of the rear wheels. The drive design includes:
- master brake cylinder;
- a brake pedal, which is connected to the cylinder through its piston;
- wheel cylinders of wheel brake mechanisms, both in the front and rear of the car;
- pipelines and hoses that connect all cylinders;
- control pedal and drive force amplifiers.
The lines, the inside of the master cylinder, and all wheel cylinders contain brake fluid.
When installing a brake force regulator and an anti-lock braking system modulator on a UAZ, they are also placed in the hydraulic drive structure.
The principle of operation of the UAZ brake system
When you press the pedal, the brake system operates in the following sequence:
- The master cylinder piston moves fluid into the lines and wheel cylinders;
- in the wheel cylinders, the brake fluid causes all the pistons to move, as a result of which the brake pads move closer to the drums;
- when there is no distance left between the pads and the drums, the release of fluid from the main brake cylinder will stop;
- When you press the pedal harder, the fluid pressure in the drive rises and braking of all wheels starts at the same time.
Greater force applied to the pedal results in greater pressure exerted by the master cylinder piston on the fluid, as well as greater force exerted by all the wheel cylinder pistons on the brake shoe.
This suggests that the simultaneous operation of all brakes and the regular relationship between the force on the brake pedal and the driving forces of the brakes are created thanks to the hydraulic drive system.
When the brake pedal is released, it returns to its original position due to the functioning of the return spring. In addition, due to the spring, the piston of the main brake cylinder also moves to its original position. And the tension springs of the mechanisms, in turn, move the pads away from the drums. Brake fluid from the wheel cylinders is pushed through pipelines into the master cylinder.
Advantages and disadvantages of hydraulic drive
Advantages of hydraulic drive:
- quick response provided by the impressive rigidity of the pipelines;
- high efficiency, since energy is wasted as a result of pouring low-viscosity liquid from one device to another;
- not a complex design;
- low weight and dimensions as a result of high driving pressure;
- comfortable layout of drive devices and pipelines;
- a chance to achieve the required distribution of braking forces among the vehicle axles, obtained due to the difference between the diameters of the pistons of the wheel cylinders.
Among the disadvantages of the hydraulic drive are:
- requires special brake fluid with a high boiling point and low thickening point;
- the threat of malfunctions due to depressurization as a result of liquid leakage when damaged, or malfunctions when filling the drive with air;
- a strong decrease in efficiency at low temperatures, usually below minus 30 °C.
Brake fluid
Special brake fluids are sold for use in hydraulic drives. They are produced on alcohol, glycol or oil bases. It is prohibited to mix them with each other; this can lead to a deterioration in their quality and the appearance of flakes. Brake fluids made from petroleum products may only be used in hydraulic drives whose seals and hoses are made of oil-resistant rubber. This is done in order to prevent the destruction of rubber parts.
Replacing brake fluid
Not all car owners know that brake fluid needs to be replaced every two years when the car is used in moderate conditions. The main mistake is often that many people simply add lubricant to the required level, rather than change it completely.
UAZ loaf How to bleed the brakes alone
How to bleed your brakes alone
Before this, you need to unscrew the cylinder or caliper fitting a little so that the liquid flows out a little by gravity...
Every 60 thousand kilometers, the brake fluid needs to be replaced. Car brake fluid can withstand very serious loads. During intensive driving and sudden stops, the temperature range can vary from 170 to 2000°C. It needs to be completely changed because as it moves, water gets into the liquid and dilutes it. A lower concentration negatively affects the quality of the substance. If the liquid is too diluted and boils, it can block the brakes with steam and subsequently lead to an emergency.
Nowadays, car companies have developed a special device that determines the boiling point of brake fluid. The device diagnoses the substance and displays appropriate recommendations. It can show the condition of the fluid at the moment and how necessary it is to replace it as soon as possible. The entire procedure takes no more than a minute, but this frees car owners from unnecessary hassle.
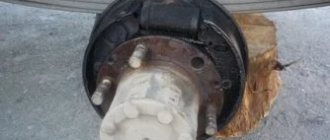
Bleeding the brakes, sequence
Before pumping the brakes on your UAZ, look for a dry, flat surface. In addition, you will need an assistant, since it is difficult to perform the operation alone, but in case of urgent need it is possible.
The sequence of the process is as follows:
- We remove valve plaque;
- We check whether there are any smudges or leaks in connections and pipes;
- We control the amount of working fluid in the container for compliance with the standard. If necessary, add “MAX” to the desired mark. We carry out manipulations, constantly check and bring the liquid to the required level; it is impossible for the mixture to drop to the “MIN” mark.
- We pump the foot brake lever without starting the power plant;
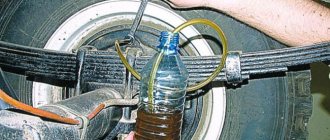
- We remove the safety cap from the cylinder bypass valve located at the rear (right) and install a light-transmitting tube, product size 400mm. We wet the unoccupied edge of the tube in a container containing half a liter of working suspension and leave the tube there;
- Press the foot lever until it stops 4-5 times;
- Holding the lever with your foot, unscrew (key 11) the bleeding valve, make ½, ¾ turns;
- We control the movement of air masses in the form of bubbles from the cavity of the tube lowered into the suspension;
- When the stop lever goes all the way down, close the bleeder valve and press out the mechanism;
- We carry out the actions in the required order as long as necessary to completely remove the bubbles;
- We remove the tube and install the safety cap;
- Using the same method, we bleed the stop cylinder located at the rear (left);
- Afterwards, we perform similar actions on the pressure regulator.
The cylinders on the front wheels are pumped in the same way, the sequence of manipulations is: bottom right, top right, bottom left, top left. It is necessary to observe the pumping order. Otherwise, a situation is possible when the brakes on the UAZ loaf are not pumped. If technically there is no wear and tear, then the problem lies in a violation of the procedure.
When the actions taken do not produce results and air is also present in the mechanism, then when force is applied, the stop lever will be elastic to the touch. In this situation, the process is repeated again until a feeling of hard leverage appears.
Air control in brakes:
When the process is completed and the liquid continues to bubble, check the seals of the joints, pipes, and cylinders (main and working). Check threaded connections, change seals, gaskets, rings, and cylinder cuffs. As for replacing working cylinders, the replacement process occurs as a complex.
At the end of the steps, fill the brake fluid to about 0, fix the cap of the container with a meter that monitors the decrease in level. The liquid is changed until the new, light consistency replaces the old, dark matter.
Bleeding brakes UAZ 469
The purpose of carrying out pumping manipulations is to remove the air contained in the internal parts of the braking mechanism. Periodically, once a week, inspect the machine for damage and leaks, paying attention to:
- Presence of mechanical damage to pipes;
- Violation of seals in joints;
- Compliance of the amount of working fluid with the required standard;
- Operation of the foot brake lever.
Braking mechanism UAZ (469, 452):
A sign that it is time to perform pumping manipulations is an increased working stroke of the foot brake lever, as well as detection of dips when pressing the foot brake. In addition, the lubricant is changed after repairs or replacement of components or parts of mechanisms. Regardless of the circumstances, you need to refill DOT-4 brake concentrate and bleed the brakes on UAZ 469 and 452 once every two years.
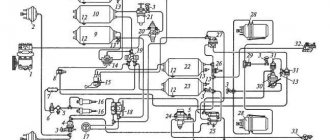
Parking brake system of UAZ vehicles
Parking mechanism diagram
Rice. 2 Parking brake system: a – view with brake drum; b – view without brake drum; 1 – adjustment fork; 2 – lock nut; 3 – drive rod; 4 – expansion cracker; 5 – plug; 6 – drive lever; 7 – adjustment screw; 8 – block support; 9 – pusher of the expansion unit; 10 – ball body; 11 – housing of the expansion unit; 12 – brake drum; 13 – first block; 14 – tension spring of pads; 15 – cap; 16 – expansion unit ball; 17 – bolt; 18 – second block; 19 – brake shield; 20 – housing of the adjustment mechanism; 21 – rod; 22 – spring; 23 – spring cup.
Operating principle of the parking mechanism
The brake mechanism of the parking system is equipped on the transfer case and brakes the rear propeller shaft of the Bukhanka. Its design includes a support disk with two pads installed on it, connected by springs. The pads act on the brake drum, which is fixed on the centering belt of the propeller shaft flange. Attached to the top of the support disk is the housing of the expansion unit with pushers, which are attached to the top of the pads. Inside, the pushers are equipped with recesses filled with balls that are located in the rod. The housing of the adjusting element is installed at the bottom of the support disk. The recesses of the housing contain pad supports that can move due to the work of the block and the adjusting screw.
The brake mechanism drive includes a lever mounted on the support disk and an expansion element supporting the rod of the balls. The free end of the lever is attached to the fork, which in turn is attached to the rod using a lock nut. The drive rod is attached to the parking brake lever, which is installed in the driver’s cab.
In addition, on the UAZ Bukhanka, the parking brake system drive is supplemented with an extension located between the parking brake lever and the brake mechanism. This extension cord is a steel cable with elements for its fastening.
Read also:
— Tuning UAZ Bukhanka — making an exclusive out of a simple bus — Tuning UAZ Hunter — a whim or necessary modifications? — How to lift a UAZ “Loaf” — A trunk on a Niva with your own hands — A trailer on a UAZ with your own hands — Are tracks effective for a Niva?
comments powered by HyperComments
Sequence of actions when bleeding the brakes of the UAZ “Loaf”
- The brake fluid identical to that previously filled should be filled into the corresponding reservoir to the required level.
- Cleaning valves that remove air. Removing the protective caps and connecting the hose, the free end of which should be lowered into a container filled with brake fluid.
- Next, you need to sharply press the brake pedal 4-5 times with an interval of 10 seconds , and after each press the pedal should be released smoothly (for these manipulations you will need an assistant). When the pedal is depressed, the bypass valve is turned half a turn with a wrench and the liquid with bubbles begins to fall into the container. After the air plugs come out, the valve screws back. A similar procedure is repeated until the release of bubbles stops and “elasticity” appears in the pedal.
- After all of the above, the bypass valve is closed, the rubber hose is removed, and the cap is attached back to its place.
When bleeding the UAZ brake system, fresh brake fluid should be added to the reservoir, if necessary. The liquid flowing from the hose is not suitable in this form for subsequent use, since it is initially subject to filtration and settling.
It is better to start pumping from the rear right wheel, then move to the rear left, then the front right and, finally, the front left. For cars with split drive, each part will need to be bled separately.
If the bubbles do not disappear after a long pumping, you should recheck the tightness of the entire system, especially the cylinders. Replace or repair if necessary.
Did you like the article? add it to your bookmarks so as not to lose it - PRESS “Ctrl + D”