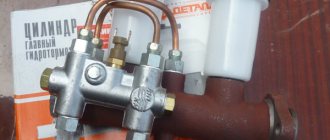
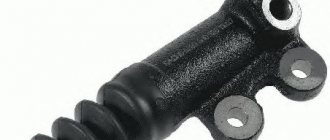
Repair kit for master brake cylinder
It was decided not to change it, but to purchase a repair kit for the main brake cylinder and repair it ourselves. After two days of operation, the cylinder literally jammed. After disassembling it turned out that the rubber bands were swollen. The same thing happened with the second repair kit. The third one lasted a week, but still refused, since the rubber bands had simply worn out.
The main brake was inspected for damage and scratches. We were unable to find anything suspicious. Repair kits were purchased in different price categories, in different stores, and everyone praised the product. Conclusion, they are selling Mr. It's a pity for the money spent, almost a third of the price of a new one.
UAZ brakes Help! | Topic author: Vikki
Tell me, who knows? ! It started like this, I stopped after driving through a puddle, and steam started pouring out of the right front wheel.
Artyom (Aatmadeva) try to bleed the front completely, maybe a piece of hose or cuff is floating in the tubes. And more precisely, let the eccentrics down. Or maybe the drums are simply worn beyond the limit.
Yulia (Gedi) Thanks, I’ll try it. Are there any other options?
Gennady (Leopold) Yulia They gave the right advice. But before this procedure, it’s better to do this - Unscrew all the tubes from the front end and blow it out - ONCE. From the main thing too - clean it - TWO. Remove the working cylinders and also wash them (required) - THREE. The thing is that a piece of hose may be floating in the system. Oh, what a phantom it is. It happened to me. Until I washed everything I couldn’t find it.
Yulia (Gedi) Thanks everyone! That's what happened, the front left tube (which was replaced) was rolled inward (either from the factory, or we twisted it that way.) What a mess due to inattention! )))))
Artyom (Aatmadeva) It's a matter of boundless muscles. All threaded connections must be pulled with force, but it turns out with a pipe.
Adriano (Takiyah) UAZ and brakes are incompatible things. )))))))) eternal struggle..))
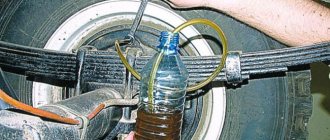
Sergey (Brigette) Guys, I really need advice too. It was like this: everything worked like clockwork. I sat in a swamp (not serious), but I couldn’t get out myself. While he was looking for assistants, he stayed with me there for two days. Pulled it out, no brakes. I thought hoses - tubes - no, everything is intact, the liquid has not escaped. After a few swings, it started to grab near the floor, but the brakes sucked. Then I took a break for a month - I practically didn’t drive it (very rarely), it seemed to be slowing down (also not very good), I thought I’d pump it up and adjust it by the fall. I looked at the pads at the beginning of summer - less than half of the output. Then I went on an urgent matter - the left front wheel jammed (the pedal was stuck, the linings were burned, the anthers too, the liquid was already boiling - it was splashing through the lid of the glass). The pads on the eccentrics were jammed, plus the pistons in the working cylinders were soured (apparently because the brakes were bad). Replaced the pads, washed the pistons, replaced the cuffs. I set everything up, set it up according to the book. I can't pump it. I do it according to the book, from the rear right wheel. There is no pressure regulator. The tubes, hoses and connections seem to be intact, otherwise there would be a leak. They pumped and pumped - to no avail, the liquid seems to be leaving the fitting and the reservoir, but slowly, the pedal to the floor remains unchanged. The vacuum seems to be working, although it hisses when you press the pedal (air comes out - is that how it should be?). The pedal is easy to press. What to do? I really don’t want to remove all the tubes and wash them. But if you wash it, then with what? I think I need to replace the fluid, apparently no one has done this before me, and flush the GTZ (the question is how?). Please advise what is best. And yet, maybe it also matters. On my 469 (1991 onwards) the brake activation sensor is hydraulic - at the beginning of summer it got stuck (the feet were constantly on fire), I turned it off and connected the wires to a regular frog under the pedal. I did not remove the sensor itself so as not to depressurize the system. Maybe he clogged something, an infection? Local men say it sucked in a lot of air, plus the liquid was boiling. So as not to worry, unscrew the fittings on the rear wheels, they say, the liquid will leak out on its own (the main thing is that not all of it), or fill it in under slight pressure, like with an aerator on a Zhiguli).
Andrey (Sioned) Go through the main brake, replace the cuffs, then pump the pipes with new brake fluid and wash them. It doesn’t matter to start pumping from the back or front. Bleed this way, open the fitting, press the pedal, the fluid comes out, squeeze the bleed tube with your hands, release the pedal, and so on until the fluid comes out it will come out clean and free of bubbles.
Andrey (Sioned) and be sure to bring the pads with eccentrics to the drum, otherwise you will never pump them up to working condition
Mikhail (Kaiea) Disc brakes solve all these problems.
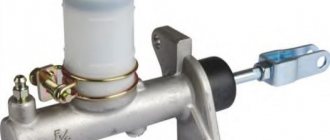
Replacing a UAZ brake cylinder
I have an old-style UAZ master brake cylinder installed, that is, it has not one fluid reservoir, but two separate ones. There is nothing complicated when replacing it, it is changed in the same way as on the UAZ 469, UAZ 3151, “loaf”. The tubes of the front and rear brake systems are unscrewed. The cylinder is unscrewed, and a new one is installed in its place, then the tubes are connected.
- fill the fluid into the reservoir (fill in high-quality DOT type fluid);
- press out the cylinder with the lever, the corresponding outlet hole should be open;
- close the hole, release the lever. The sequence is important; when the hole is closed, when the lever is released, a vacuum is created and liquid from the tank enters the cylinder;
- repeat the operation several times until liquid appears.
After the liquid appears, screw the tubes and pump the entire system. How to quickly and independently bleed the brakes in another article.
Unfortunately, there is no similar video about replacing the main brake cylinder in a UAZ, but here it’s almost the same:
Source
Diagnostics and repair
From the signs listed above, it is easy to understand that in most cases there is only one source of problems - rubber products that have become unusable. The cuffs crack and swell, as a result they leak liquid and close the discharge holes. Hence the recommendation: all “rubber bands” of the brake system should be changed at intervals of approximately 100 thousand km, without waiting for critical wear.
Reference. Many auto mechanics express the opinion that after replacing the cuffs, the main hydraulic cylinder will not last long. The statement is true if the car owner purchased cheap, low-quality spare parts or installed new o-rings in the cylinder, where internal wear has formed in the walls.
Before checking the GTZ for operability, make sure there are no other faults:
- Inspect the wheel assemblies from the inside for leakage of brake fluid from the working cylinders.
- Check the integrity of the expansion tank and the fluid level in it.
- Start the engine and at idle speed, press the vacuum take-off pipe to the amplifier. If the engine speed has increased noticeably, there is an air leak and the master cylinder is most likely working.
A clear symptom indicating a breakdown of the main hydraulic cylinder is drops of brake fluid on the body . If you discover a leak, feel free to dismantle the unit and disassemble it to look for the cause. Another common problem - fluid flowing through the seals - is diagnosed as follows:
- Open the cover of the expansion tank and place an assistant in the driver's seat.
- Listening to sounds in the tank, give the command to an assistant to press the pedal.
- If the pedal moves easily and gurgling is heard in the reservoir, liquid is entering there. The reason is that worn cuffs are unable to create pressure in the circuits; liquid seeps through the leaks and enters the container.
Also, problems with the GTZ are indicated by jamming or too little pedal travel. Sit behind the wheel, press it several times, and start the engine while holding the pedal with your foot. If it sinks to the floor or does not budge, disassemble the hydraulic cylinder.
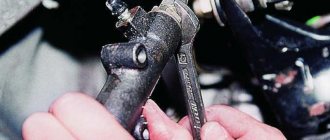
To replace or repair the master brake cylinder, you need to remove the unit from the vehicle. Work is carried out in the following order:
- Suck out the liquid from the tank with a syringe. If the cuffs are leaking, press the pedal several times and suck out the excess fluid.
- Remove the expansion tank.
- It is not necessary to drain all brake circuits. Substituting a small container, unscrew the nut of the first tube and carefully move it to the side, plugging it with a wooden stick.
- Repeat the operation with the second tube, unscrew the fastening of the GTZ flange and remove the unit.
Further actions depend on the design of the master cylinder. If the element is completely disassembled, change the rubber seals. Otherwise, you will have to replace the pistons assemblies. Pre-wash the body and all openings with alcohol; do not use gasoline. After assembly, add fluid and bleed the brake system to remove air.
Replacing the main brake cylinder of a UAZ loaf
The relationship between safety and the ability to stop in time is obvious; for this reason, bleeding the brakes of a UAZ loaf is a procedure that does not require delay. Do not forget that the correct execution and approach are directly related to the life of the driver and passengers operating the transport. Such concepts are not neglected, so studying the instructions before performing manipulations is a must.
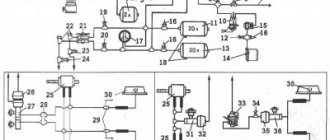
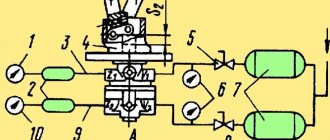
Detailed diagram of the UAZ “Bukhanka” braking system
In the diagram, numbers represent the various components.
1) Brake disc; 2) Front wheel brake caliper; 3) Front contour; 4) Master brake cylinder; 5) Reservoir with brake fluid movement sensor; 6) Vacuum booster; 7) Pusher; Brake pedal; 9) Brake light switch; 10.22) Brake pads; 11) Rear brake cylinder; 12) Back contour; 13) Rear axle housing; 14) Load spring; 15) Pressure regulator; 16) Rear cable; 17) Equalizer; 18 Central cable; 19) Parking brake lever; 20) Brake fluid emergency level indicator; 21) Parking brake warning switch.
The braking system of the UAZ “Bukhanka” has its most common breakdowns. For example: increased braking distance, sinking brake pedal, creaking and noise when braking, leaking brake fluid.
The causes of all these problems are also known. This, as a rule, is a violation of the tightness of the system, low level of brake fluid, wear of the pads and untimely replacement of consumables.
In most cases, if the problems are not related to wear of parts, simply bleeding the braking system will help. It is performed during any depressurization of circuits, during renewal of brake fluid, as well as during any replacement of system parts (pipes, hoses, cylinders).
Do not forget that for pumping you will most likely need an assistant.
Source
Features of UAZ brakes
If you are allowed to delay replacing some components of the car, then repairing the brakes cannot be postponed. A possible emergency will be costly and the cost of the issue will be many times higher than the cost of preventive measures, not to mention the possible loss of life.
Structurally, the main element of equipment brakes is the working brake mechanism. The unit includes two identical blocks. The edges of both parts are in contact with the cylinder pistons; the structure itself is supported by a special support rod. There are two holes in the cylinders, the first one performs the function of removing air during the pumping procedure, the second one removes the working fluid. The tightness of the structure is ensured by a specially designed regulator. The connection of the system elements into one mechanism is ensured by tubes; the parts connect the cylinders, the main brake cylinder and the foot brake lever.
Visually, the brake design and connection are the same front and rear. The difference is that there are two cylinders at the front, while at the rear the brake operates from a single device. This feature is explained by the need to apply more force when braking to the front wheels compared to the rear elements.
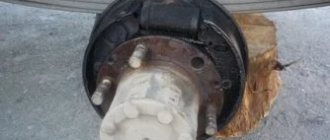
Both UAZ vehicles (469, 452) are equipped with drum brakes. The disk elements are made of steel; they are manufactured using the stamping method, a cast iron rim and an amplifier connected to the disk. It’s easy to get to the UAZ 452 drums; if you need to replace the product with a new one, removing the part is not difficult. The dismantling process does not require removing the hubs, so there is no need to worry about bearings. The drums are fixed to the hub with five screws. Thanks to the clamps, the new drum will be in the right place.
Dismantling the brake element of the UAZ-452 “Loaf”:
Removal and repair of the master cylinder of the UAZ-3151 brakes
Removal and disassembly of the master brake cylinder is carried out in the following order:
1. Disconnect the pipelines leading from the master brake cylinder to the warning device.
2. Disconnect the warning device from the master cylinder.
Rice. 1. Brake master cylinder
3. Disconnect the brake master cylinder from the vacuum booster.
4. Unscrew the thrust bolt 14 (see Fig. 1).
5. Remove the lock ring 22 and take out the thrust washer 21.
6. Remove the primary chamber piston assembly 19.
7. Unscrew plug 7, remove plug insert 9, return spring 10 and secondary chamber piston assembly 13.
It is not recommended to remove tanks 4 unless necessary. If necessary, to remove them, unscrew the plugs of the tanks 1, remove the screens 3 and unscrew the fittings 5 securing the tank bodies.
Remove piston assembly 19 only towards the flange, and piston assembly 13 towards the opposite end.
Remove the pistons carefully so as not to damage the sealing collars 18 and rings 20.
If the pistons cannot be removed freely from the cylinder, first push piston 13 slightly with piston 19, and then carefully push piston 19 by pressing (through the vacated cavity) with a screwdriver or other object onto the spring holder 16 or the spring holder screw 17.
Assembly and installation
do the master cylinder in reverse order. In this case, install the assembled pistons into the cylinder carefully and only from the side of the corresponding ends of the cylinder.
To avoid damaging the seals and rings, do not push the pistons through the entire cylinder cavity.
When assembling piston 19, screw screw 17 until it stops in the piston. Screw the thrust bolt 14 into the crankcase only after installing the assembled piston 19, washer 21 and retaining ring 22.
thrust bolt 14. 8–10 Nm (0.8–1.0 kgf m);
Bleeding brakes UAZ 469
The purpose of carrying out pumping manipulations is to remove the air contained in the internal parts of the braking mechanism. Periodically, once a week, inspect the machine for damage and leaks, paying attention to:
- Presence of mechanical damage to pipes;
- Violation of seals in joints;
- Compliance of the amount of working fluid with the required standard;
- Operation of the foot brake lever.
Braking mechanism UAZ (469, 452):
A sign that it is time to perform pumping manipulations is an increased working stroke of the foot brake lever, as well as detection of dips when pressing the foot brake. In addition, the lubricant is changed after repairs or replacement of components or parts of mechanisms. Regardless of the circumstances, you need to refill DOT-4 brake concentrate and bleed the brakes on UAZ 469 and 452 once every two years.
UAZ-469 car - characteristics, design, repair
Possible options:
- Controls of UAZ-469
- Preparing for work UAZ-469
- Engine mount UAZ-469
- Crank mechanism of the UAZ-469 engine
- Gas distribution mechanism of the UAZ-469 engine
- Lubrication system UAZ-469
- Engine crankcase ventilation system UAZ-469
- Gas exhaust system of the UAZ-469 engine
- UAZ-469 engine cooling system
- Preheater for UAZ-469 engine
- UAZ-469 engine malfunctions
- UAZ-469 frame
- Steering of UAZ-469
- Electrics UAZ-469
- Generator UAZ-469
- Voltage regulator PP132
- Battery UAZ-469
- Starter UAZ-469
- Control and measuring instruments UAZ-469
- Tools and accessories UAZ-469
- Marking UAZ-469
- Lubricants UAZ-469 and UAZ-469B
Utility vehicles UAZ-3741, UAZ-3962, UAZ-3909, UAZ-2206, UAZ-3303 are equipped with working, parking and spare brake systems. A service brake system with drum brake mechanisms on the front and rear wheels, with two separate hydraulic drive circuits to them from a two-chamber master cylinder: one to the brake mechanisms of the front wheels, the other to the brake mechanisms of the rear wheels.
The parking brake system with a drum brake mechanism located behind the transfer case and acting on the rear driveshaft has a manual mechanical drive. The spare brake system consists of each of the hydraulic drive circuits.
Installation of the service brake system of UAZ-3741, UAZ-3962, UAZ-3909, UAZ-2206, UAZ-3303, installation of front and rear brakes.
The front service brakes have two wheel cylinders, each of which acts separately on the pad. Cylinder diameter 32 mm. The rear brakes have one wheel cylinder acting on both pads. Cylinder diameter 25 mm.
Front wheel braking system.
Two wheel cylinders are secured to the brake shield using support pins and nuts. The support pins have eccentrics on which brass pad support bushings are installed. By turning the support pins with eccentrics, you can move the support ends of the pads relative to the brake shield. They adjust the brakes using support pins when assembling them at the factory or when repairing brakes with replacing pads or linings.
When correctly installing the pads with unworn linings and the brake drum, the “a” marks on the support pins (cores on the outer ends) should be located as shown in the figure above, or with deviations from this position in one direction or another up to 50 degrees. The friction linings of the pads are attached to the rim with aluminum rivets recessed into the body of the lining.
The moving ends of the brake pads fit into the grooves of the piston tips of the wheel cylinders. The pads, with the inner surface of their rims, rest on adjusting eccentrics, movably mounted on the brake shield. The eccentrics are kept from arbitrary rotation by strong springs. The pads are pressed against the eccentrics by tension springs.
The hexagonal heads of the adjusting eccentric axes are located on the outside of the brake shield. Using eccentrics, the required gap is established between the pads and the drum. The pads are kept from lateral displacement by the ends of the axes of the adjusting eccentrics and by springs installed in the middle part of the pads.
Inside each wheel cylinder there is a piston with two rubber O-rings and a spring that presses the wheel cylinder piston against the thrust end of the pad rib. The wheel cylinder has two holes. One hole is used to supply brake fluid from the hydraulic drive system, and the other is to release air from the system during bleeding.
It is closed by a bypass valve, which in the closed position ensures a tight seal. To prevent clogging, the valve opening is closed with a protective cap. The internal cavities of the wheel cylinders are protected from moisture, dust and dirt by rubber caps.
Rear wheel braking system.
In the lower part of the brake shield there are support pins, which are fitted with brass bushings similar to those of the front brakes, against which the pads swing. When correctly installing the pads with new linings and drums, the “a” marks on the supporting pins (cores on the outer ends) should be located as shown in the figure below, or with deviations from this position in one direction or another up to 50 degrees.
The rear brake pad lining is shorter than the front brake pad lining. This is designed to ensure that the wear on the rear and front pads is equal. Brake drums are the same on all wheels of the car. The drums are attached to the hub with three screws, which are unevenly spaced around the circumference.
This ensures that the drum is installed on the hub in one specific position, in which the drum assembly with the hub is processed. It is not recommended to move brake drums from one hub to another, as this will lead to increased runout of the working surfaces of the brake drum.
Hydraulic drive of the service brake system of UAZ-3741, UAZ-3962, UAZ-3909, UAZ-2206, UAZ-3303, device.
Consists of a suspended pedal, a vacuum booster, a two-chamber master cylinder, pipelines with connecting fittings and wheel working cylinders. The hydraulic drive pedal to the wheel brake mechanisms, as well as the clutch release pedal, swings on an axle on a plastic bushing, requiring no lubrication during operation.
The axis is fixedly fixed in the bracket. The return spring constantly holds the pedal in its original position by pressing it against the brake light switch cap mounted on the pedal bracket. The brake pedal is connected through a system of shafts and rods to the pusher of the vacuum booster.
Vacuum booster of the service brake system.
Serves to increase the efficiency of hydraulic brakes when the engine is running. If the amplifier fails, only the force from the driver's foot is transmitted to the pistons of the master cylinder through the brake pedal, pushrod, control valve, buffer and rod. The vacuum booster does not require adjustments.
Maintenance consists of checking the reliability of fastening, washing or replacing the amplifier air filter during seasonal maintenance before the winter operating season.
Service brake system pressure regulator.
Automatically adjusts the brake fluid pressure in the rear wheel brake circuit depending on the load on the vehicle, preventing the vehicle from skidding due to the rear wheels locking during heavy braking. It may not be installed on some modifications of UAZ-3741, UAZ-3962, UAZ-3909, UAZ-2206, UAZ-3303 vehicles.
Double-chamber master cylinder of the service brake system.
Serves to simultaneously create pressure in both circuits of the hydraulic brake drive when pressing the brake pedal. The master cylinder chambers are supplied with brake fluid from a reservoir mounted on the cylinder body. Each of the pistons has its own return spring. The relative position of the pistons is limited by a limiter sleeve and a screw.
Sources used:
- https://avtoremontnikam.ru/hodovaya/zamena-tormoznogo-cilindra-uaz.html
- https://pulyaet.ru/remont/tormoznaya-sistema-uaz-452-buhanka
- https://7gear.ru/avtomobili/glavnyj-tormoznoj-cilindr-uaz.html
- https://auto.kombat.com.ua/rabochaya-tormoznaya-sistema-uaz3741-3962-3909-2206-3303-pered-zadn-tormoza-gidroprivod-torm/
everything useful is here
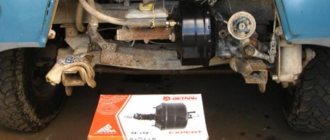
Replacing the master brake cylinder SEQUENCE OF ACTIONS Drain the brake fluid from the system
Disconnect the wire block from the brake fluid level drop sensor.
Unscrew and remove the lid of the tank with the sensor.
Using a rubber bulb or syringe, pump out the brake fluid from the reservoir.
Using a 12mm wrench, unscrew the fittings of the two brake pipes and remove the pipes from the cylinder.
Using a 17mm wrench, unscrew the two nuts securing the cylinder to the vacuum booster.
Basic malfunctions of the brake system and their elimination
Vibration when braking
Vibration when braking
Car pulls or skids when braking
| Cause of malfunction | Elimination methods |
| Brake disc deformation | Replace both drives |
| Increased axial play of the wheel (severe wear of the front wheel bearings or loosening of the hub nut) | Tighten the wheel hub nut, replace the bearing if necessary |
| Brake drum ovality | Grind or replace the drum |
| Piston stuck in rear wheel cylinder | Replace cylinder |
| The brake pad lining has peeled off from the base. | Replace the pads (all on the same axis at the same time) |
| Rear brake pad tension spring is loose or broken | Replace the spring |
Car pulls or skids when braking
Repair kit for master brake cylinder
It was decided not to change it, but to purchase a repair kit for the main brake cylinder and repair it ourselves. After two days of operation, the cylinder literally jammed. After disassembling it turned out that the rubber bands were swollen. The same thing happened with the second repair kit. The third one lasted a week, but still refused, since the rubber bands had simply worn out.
The main brake was inspected for damage and scratches. We were unable to find anything suspicious. Repair kits were purchased in different price categories, in different stores, and everyone praised the product. Conclusion, they are selling Mr. It's a pity for the money spent, almost a third of the price of a new one.
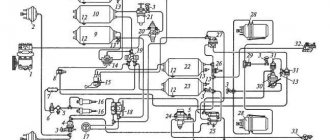
Detailed diagram of the UAZ “Bukhanka” braking system
In the diagram, numbers represent the various components.
1) Brake disc; 2) Front wheel brake caliper; 3) Front contour; 4) Master brake cylinder; 5) Reservoir with brake fluid movement sensor; 6) Vacuum booster; 7) Pusher;
Brake pedal; 9) Brake light switch; 10.22) Brake pads; 11) Rear brake cylinder; 12) Back contour; 13) Rear axle housing; 14) Load spring; 15) Pressure regulator; 16) Rear cable; 17) Equalizer; 18 Central cable; 19) Parking brake lever; 20) Brake fluid emergency level indicator; 21) Parking brake warning switch.
The braking system of the UAZ “Bukhanka” has its most common breakdowns. For example: increased braking distance, sinking brake pedal, creaking and noise when braking, leaking brake fluid.
The causes of all these problems are also known. This, as a rule, is a violation of the tightness of the system, low level of brake fluid, wear of the pads and untimely replacement of consumables.
In most cases, if the problems are not related to wear of parts, simply bleeding the braking system will help. It is performed during any depressurization of circuits, during renewal of brake fluid, as well as during any replacement of system parts (pipes, hoses, cylinders).
Do not forget that for pumping you will most likely need an assistant.
Replacing a UAZ brake cylinder
I have an old-style UAZ master brake cylinder installed, that is, it has not one fluid reservoir, but two separate ones. There is nothing complicated when replacing it, it is changed in the same way as on the UAZ 469, UAZ 3151, “loaf”. The tubes of the front and rear brake systems are unscrewed. The cylinder is unscrewed, and a new one is installed in its place, then the tubes are connected.
- fill the fluid into the reservoir (fill in high-quality DOT type fluid);
- press out the cylinder with the lever, the corresponding outlet hole should be open;
- close the hole, release the lever. The sequence is important; when the hole is closed, when the lever is released, a vacuum is created and liquid from the tank enters the cylinder;
- repeat the operation several times until liquid appears.
After the liquid appears, screw the tubes and pump the entire system. How to quickly and independently bleed the brakes in another article.
Unfortunately, there is no similar video about replacing the main brake cylinder in a UAZ, but here it’s almost the same:
Source
Parking brake system of UAZ vehicles
Parking mechanism diagram
Rice. 2 Parking brake system: a – view with brake drum; b – view without brake drum; 1 – adjustment fork; 2 – lock nut; 3 – drive rod; 4 – expansion cracker; 5 – plug; 6 – drive lever; 7 – adjustment screw; 8 – block support; 9 – pusher of the expansion unit; 10 – ball body; 11 – housing of the expansion unit; 12 – brake drum; 13 – first block; 14 – tension spring of pads; 15 – cap; 16 – expansion unit ball; 17 – bolt; 18 – second block; 19 – brake shield; 20 – housing of the adjustment mechanism; 21 – rod; 22 – spring; 23 – spring cup.
Operating principle of the parking mechanism
The brake mechanism of the parking system is equipped on the transfer case and brakes the rear propeller shaft of the Bukhanka. Its design includes a support disk with two pads installed on it, connected by springs. The pads act on the brake drum, which is fixed on the centering belt of the propeller shaft flange. Attached to the top of the support disk is the housing of the expansion unit with pushers, which are attached to the top of the pads. Inside, the pushers are equipped with recesses filled with balls that are located in the rod. The housing of the adjusting element is installed at the bottom of the support disk. The recesses of the housing contain pad supports that can move due to the work of the block and the adjusting screw.
The brake mechanism drive includes a lever mounted on the support disk and an expansion element supporting the rod of the balls. The free end of the lever is attached to the fork, which in turn is attached to the rod using a lock nut. The drive rod is attached to the parking brake lever, which is installed in the driver’s cab.
In addition, on the UAZ Bukhanka, the parking brake system drive is supplemented with an extension located between the parking brake lever and the brake mechanism. This extension cord is a steel cable with elements for its fastening.
How to adjust and repair brakes on UAZ cars: we look at them from all sides
The article discusses adjusting the brakes of the UAZ 3303 (Adjusting the brakes on the UAZ Bukhanka is similar)
As I wrote earlier here, the brake pedal went to the floor. There were no leaks in the brake system, so most likely it was necessary to separate the brake pads.
It is known that during the operation of a UAZ, the brake pads wear out, so it is necessary to periodically remove them or, in technical terms, adjust them.
Let's look at the main stages of adjusting UAZ brake pads
Theory of brake adjustment UAZ 3303
Here's what the instructions say:
In short, it’s written so ornately that without half a liter you can’t figure it out :-)