The UAZ-469 and UAZ-469B vehicles have two independently operating braking systems: drum service brakes on all wheels with a hydraulic drive and a parking brake system with a mechanical drive.
Front and rear service brakes of UAZ-469 and UAZ-469B.
The front service brakes have two wheel cylinders, each of which acts separately on the pad. The rear service brakes have one wheel cylinder acting on both pads.
Service brakes of the front wheels of UAZ-469 and UAZ-469B, design and differences.
The service brakes of the front wheels of the UAZ-469 and UAZ-469B differ in shields with different stampings, configuration, cylinders and connecting tubes of the cylinders, as well as the working position of the cylinders.
The brake shield of the UAZ-469 car is attached together with the axle to the cover of the wheel gearbox, and for the UAZ-469B car it is attached directly to the steering knuckle axle. Two wheel cylinders are secured to the shields using support pins and nuts. On the support pins, between the washers under their heads and the support lugs of the wheel cylinders, bronze eccentrics are fixedly mounted, on which the brake pads rotate.
By turning the support pins with eccentrics, you can move the support ends of the pads relative to the brake shield. They adjust the brakes using support pins when assembling them at the factory or when repairing brakes with replacing pads or linings. The friction linings of the pads are attached to the rim with aluminum rivets recessed into the body of the lining.
The moving ends of the brake pads fit into the grooves of the piston tips of the wheel cylinders. The pads, with the inner surface of their rims, rest on adjusting eccentrics, movably mounted on the brake shield. The eccentrics are kept from arbitrary rotation by springs. The pads are pressed against the eccentrics by tension springs.
The hexagonal heads of the adjusting eccentric bolts are located on the outside of the brake shield. Using eccentrics, the required gap is established between the pads and the drum. The pads are kept from lateral displacement by the ends of the adjusting eccentric bolts and springs installed in the middle part of the pads.
Inside each wheel cylinder there is a piston with two rubber O-rings and a spring that presses the wheel cylinder piston to the thrust end of the pad rib.
The wheel cylinder has two holes. One hole serves to supply brake fluid from the drive system, and the other to release air from the system during bleeding; it is closed by bypass valves, which, in the closed position, ensure tightness. To prevent clogging, the valve opening is closed with a protective cap. The internal cavities of the wheel cylinders are protected from moisture, dust and dirt by rubber caps.
Service brakes of the rear wheels of UAZ-469 and UAZ-469B cars, design and differences.
The service brakes of the rear wheels of the UAZ-469 and UAZ-469B differ only in their shields. The rear wheel brake has one wheel cylinder for both pads. The pistons, O-rings and other cylinder parts are the same as the front brake.
In the lower part of the brake shield there are support pins on which are mounted the same as on the front brakes, adjusting bronze eccentrics, against which the pads swing. The rear brake pad lining is shorter than the front brake pad lining. This is designed to ensure that the wear on the rear and front pads is equal.
Brake drums.
Same on all wheels. The drums are attached to the hub with three screws, which are unevenly spaced around the circumference, this ensures that the drum is installed on the hub in one specific position, in which the drum assembly with the hub was processed. It is not recommended to move brake drums from one hub to another, as this will increase the runout of the working surfaces of the drum relative to the brake linings.
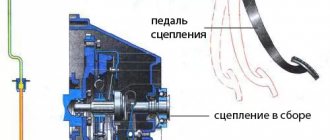
Hydraulic drive of service brakes UAZ-469 and UAZ-469B.
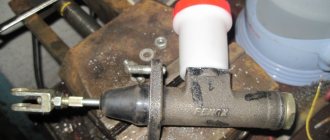
Consists of a brake pedal, master cylinder, pipelines with connecting fittings and wheel cylinders. In the initial position, the brake pedal is held by a tension spring, which constantly presses it against a rubber stop fixed to the floor of the body. The pedal at its lower end is connected through a pin to the master cylinder pusher fork.
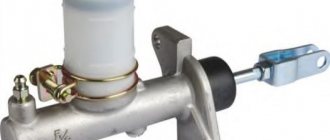
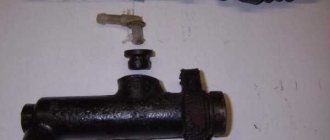
The brake master cylinder body is made in the same casting as the reservoir for the working fluid. At the top of the tank there is a lid with a hole for filling liquid, which is closed with a stopper. The cavity of the master cylinder communicates with the atmosphere through a hole in the plug. Inside the cylinder there is a piston with sealing collars, exhaust and intake valves.
A washer is installed between the piston and the inner cuff. The return spring constantly presses the master cylinder piston with sealing lips against a thrust washer held in place by a retaining ring. The opposite end of the spring presses the intake valve to the seat. The cylinder communicates with the liquid reservoir through two holes. A hole with a diameter of 0.7 mm is compensation; it connects the reservoir with the working cavity of the cylinder. This hole is located in close proximity to the edge of the inner sealing collar.
The second hole with a diameter of 6 mm is a bypass; it connects the reservoir with the non-working cavity of the cylinder, enclosed between the outer and inner sealing collars. The main cylinder on the pusher side is closed with a rubber cap that protects the internal cavity of the cylinder from dust and moisture. The master cylinder is connected to the brake wheel cylinders by a piping system consisting of copper or steel double-layer pipes, flexible hoses, fittings, couplings and tees.
The tightness of the tube connections is ensured by tightly tightening the flared end of the tube onto the conical surface of the tee seat, coupling or fitting. Couplings and fittings are sealed with washers made of soft copper.
Maintenance of service brakes UAZ-469 and UAZ-469B.
The fluid level in the master brake cylinder is systematically checked and, if necessary, brought to normal. The level should be 15-20 mm below the top edge of the filling hole. The connections of the hydraulic brake drive pipelines must be sealed, and the mountings of the tubes on the frame and rear axle must be reliable. Do not operate a vehicle with damaged pipes and hoses.
The brake drums are periodically removed and all parts are cleaned of dust and dirt. The frequency of this operation depends on the operating conditions of the vehicle. In summer and when driving on dirty roads, cleaning should be carried out more often, in winter less often. After removing the drum, the reliability of fastening the wheel cylinders to the shields is checked.
It is necessary to pay attention to the condition of the wheel cylinders, protective caps, the degree of wear of the friction linings, as well as the condition of the brake drum. Pads whose brake linings become oily during operation are dipped in gasoline for 20-30 minutes. Then the working surfaces of the pads are thoroughly cleaned with sandpaper or a wire brush. In case of significant wear, the rivets sink less than 0.5 mm, the linings are replaced.
If there are deep grooves, scuffs or uneven wear on the working surface of the drum, then the drum is bored based on the outer races of the hub bearings. With the hubs removed, the bolts securing the brake shields are tightened.
Recommendations
Comments 71
I also suffered for a week. I changed the rubber bands in the cylinder, the hose and bled all the brakes in 5 minutes.
The hose is relatively new. Today it’s a used one but I’ll install a working turbocharger and check it
I also had a barbell for a year and a half. But he took off the year without even sulking
Change the rubber bands in the cylinder, this is the first half of the year, and check the hose between the axle and the frame that goes to the rear axle.
check the pipes, look at the work on the drums, install the pads; if they are not installed correctly, the UAZ will not brake)), pour without pressure by gravity, it may take a long time, but it is 100% effective.
So why is there no pressure there when the pedal is pressed?
Because the air, if the tube is pinched, the pressure would build up, look, maybe a cylinder has come out too much, which means the rams are exhausted, or they are not supplied
Today we pumped it, the first time the pedal went away sharply, then we pump it, pump it, open it, but it barely flows. And at the same time, in one of the two brake fluid reservoirs, one seethes at full speed when the brake is pressed
Open it and wait for it to start flowing, pour it into the barrel
Bullshit. You can wait a week
Today we pumped it, the first time the pedal went away sharply, then we pump it, pump it, open it, but it barely flows. And at the same time, in one of the two brake fluid reservoirs, one seethes at full speed when the brake is pressed
This air rose during the time before the tank. You can lightly tap on it and on the tubes, this will also speed up the process of bubbles rising, if it’s up, and if it’s down, buy a “system” for a dropper and unscrew the bleeding fitting and put a long tube on it, just wait and watch how gravity squeezes all the air down, as has been described many times above
Two barrels are when the brake system is the earliest, and there is no brake regulator. But when there is, then there is one tank. at least start with what kind of tank you should have.
With two tanks, only banal threesomes go on.
I don't have any regulator
So there must be such a GTZ. The next question is whether the tubes are bent.
I also once suffered with the brakes, check the working brake cylinders, they often fail, put the brake pads on the Murzilka and bleed them, you will be happy
I have one slave cylinder, what could be wrong with it and how can I check it?
the piston may “sour”, check with two people, one presses the brake pedal, and the other controls the operation of the brake pads and working cylinder
I have one slave cylinder, what could be wrong with it and how can I check it?
You can take a photo, I have 2 working cylinders on each wheel and the GTZ is the same
1 throw this crap out of the cylinder and make straight lines 2 check if you have another crap that is at the back and connected to the rear axle, throw it out too 3 imagine that you are a truck and go through all the pipes
^ written correctly! If the diameter is small (new sample), 29mm and 32mm, if I’m not mistaken, then the rear will not slow down. Also, to diagnose the main TC, you can swap the tubes. Then the front piston will press on the rear, and if the pistons in the cylinders certainly do not move, then this is the GTZ. It is necessary to move the pads almost end-to-end, the rear will work later anyway. And one more thing: “new” does not mean “working by default”! The GTZ lasts for a year, I changed it along with the filters, it is useless to install repair kits. And also, my light was simply sawed in half and plugged with a bolt, acting as a fitting
I installed 29mm, why won’t it work with it? Pressure is not created on the cylinder itself, it barely opens, it does not have time to release the pads due to the weak pressure that is created on it
Replacing UAZ 469 brakes, UAZ 469 brakes, 31512, 31514, 31519
Task: replace drum brakes with disc brakes on the UAZ 469 and eliminate the squeaking noise when braking.
Progress of work on replacing brakes on UAZ 469
Preparing calipers for installation
I cleaned it, painted it with thermal paint, and installed a new repair kit.
Dries quickly, but according to the instructions you need to heat it up for full effect.
The complexity of the process is “3” if you prepare well beforehand and, as always, you won’t be able to do it without an angle grinder.
We remove everything unnecessary
The first to be the plan washer (the back wall was smeared with sealant)
We place a special ring inside the trunnion
We put on the trunnion
Screw on the oil deflector
We change the military hub, repressing the bearings and installing the Kortek oil seal
oil seal marking
Next is the drive from 3160
Next, we install the bracket and begin to try on the caliper. The fact that it won't fit is a fact. You will have to remove both from the caliper itself and from the final drive.
Achieving free movement of the caliper
We make an adapter for the Volga hose for UAZ or VAZ 21021
We tighten the hub nuts and install the clutch
A bit of a rut
Result: disc brakes are installed on the UAZ 469.
https://www.drive2.ru/l/6397395/
next article:
11.7. Basic brake problems
Repair or replace the cylinder.
Regrind or replace the discs in the set on one axle.
Problems that arise with the brakes while traveling are considered critical and must be corrected immediately. The culprit of the malfunction is often the main cylinder, installed in the engine compartment and rigidly connected to the pedal. To find out the cause of the breakdown and repair the unit yourself, you need to know the structure of the brake master cylinder (MBC) and its principle of operation. During the diagnostic process, it is necessary to distinguish and filter out problems with other elements of the system.
Repair kit for master brake cylinder
It was decided not to change it, but to purchase a repair kit for the main brake cylinder and repair it ourselves. After two days of operation, the cylinder literally jammed. After disassembling it turned out that the rubber bands were swollen. The same thing happened with the second repair kit. The third one lasted a week, but still refused, since the rubber bands had simply worn out.
The main brake was inspected for damage and scratches. We were unable to find anything suspicious. Repair kits were purchased in different price categories, in different stores, and everyone praised the product. Conclusion, they are selling Mr. It's a pity for the money spent, almost a third of the price of a new one.
UAZ-469 car - characteristics, design, repair
Possible options:
- Technical characteristics of UAZ-469, UAZ-469B Engine characteristics (41416, 414) UAZ-469, UAZ-469B Engine UAZ-469, UAZ-469B Transmission UAZ-469, UAZ-469B Chassis, suspension, control systems of UAZ-469, UAZ-469B Electrical equipment of UAZ-469, UAZ-469B Body of UAZ-469, UAZ-469B Adjustment data of UAZ-469, UAZ-469B Filling capacity of UAZ-469, UAZ-469B
- Controls of UAZ-469
- Preparing for work UAZ-469
- Engine mount UAZ-469
- Crank mechanism of the UAZ-469 engine
- Gas distribution mechanism of the UAZ-469 engine
- Lubrication system UAZ-469
- Engine crankcase ventilation system UAZ-469
- UAZ-469 engine power supply system K-129V carburetor Maintenance of the UAZ-469 engine power supply system
- Gas exhaust system of the UAZ-469 engine
- UAZ-469 engine cooling system
- Preheater for UAZ-469 engine
- UAZ-469 engine malfunctions
- UAZ-469 clutch UAZ-469 clutch control drive Possible malfunctions of the UAZ-469 clutch
- UAZ-469 gearbox Malfunctions of the UAZ-469 gearbox, shift mechanism
- Transfer case UAZ-469 Possible malfunctions of the transfer case UAZ-469
- UAZ-469 driveshaft Malfunctions of the UAZ-469 driveshaft Rear axle UAZ-469 Rear axle UAZ-469B Possible malfunctions of the rear axle UAZ-469B
- Front drive axle UAZ-469 Maintenance of the front axle UAZ-469
- UAZ-469 frame
- Suspension UAZ-469 Shock absorber UAZ-469 Wheels and tires UAZ-469 Possible malfunctions of wheels, tires and hubs UAZ-469
- Steering of UAZ-469
- UAZ-469 brakes Maintenance of UAZ-469 brakes Possible malfunctions of UAZ-469 service brakes UAZ-469 parking brake
- Electrics UAZ-469
- Generator UAZ-469
- Voltage regulator PP132
- Battery UAZ-469
- Ignition system of UAZ-469 Possible malfunctions of devices in the ignition system of UAZ-469
- Starter UAZ-469
- Lighting, light and sound alarm system UAZ-469 Sound signal UAZ-469
- Control and measuring instruments UAZ-469
- Tools and accessories UAZ-469
- UAZ-469 body UAZ-469 awning Ventilation of the UAZ-469 body Installation of sanitary stretchers in the UAZ-469 body
- Marking UAZ-469
- Maintenance of UAZ-469 First maintenance (TO-1) of UAZ-469 Lubrication of the UAZ-469 car
- Lubricants UAZ-469 and UAZ-469B
Repair kit for master brake cylinder
It was decided not to change it, but to purchase a repair kit for the main brake cylinder and repair it ourselves. After two days of operation, the cylinder literally jammed. After disassembling it turned out that the rubber bands were swollen. The same thing happened with the second repair kit. The third one lasted a week, but still refused, since the rubber bands had simply worn out.
The main brake was inspected for damage and scratches. We were unable to find anything suspicious. Repair kits were purchased in different price categories, in different stores, and everyone praised the product. Conclusion, they are selling Mr. It's a pity for the money spent, almost a third of the price of a new one.
Repair and replacement of the brake master cylinder repair kit
VAZ-2106, main brake cylinder operating principle, design, repair After you have found out the cause of the breakdown, you need to buy a repair kit for the main brake cylinder. They are divided into two main types - complete and incomplete. Some cars require an additional special key (for example, for a VAZ 2110). The complete set includes: plastic cones for installing new cuffs on the piston body, washers, springs, boots, all necessary cuffs. If the kit is incomplete, then, as a rule, it only includes GTZ cuffs.
How to change the brake master cylinder repair kit? The algorithm for performing the work is as follows:
GTZ repair kit for VAZ 2108-2109
- Remove the negative terminal from the battery and the terminal from the brake fluid reservoir. This is done so that the electronic control unit does not display an error message in the future.
- Next, you need to drain the working fluid from the system. This is done using a medical syringe and tubes. Some liquid will still remain in the system, so prepare a rag in advance to remove drips. All disconnected pipelines must be “plugged”.
- After this, you need to start removing the GTZ itself. This process will literally differ slightly for each car model, so it is impossible to give definite recommendations within the framework of one article, but one thing can be said with confidence that it is screwed to the vacuum seal with only two studs.