UAZ bridges
Many axle options were installed at the factory on UAZ vehicles of different models and at different times. Let's try to figure this out...
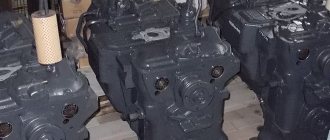
UAZ Timken bridge (civilian or collective farm)
This is a split type bridge, that is, a bridge consisting of two halves. A military bridge (also known as a gear or portal bridge) can also be classified as this type. From the factory, civilian axles are installed on UAZ trucks of the cargo range (loaf, flatbed, farmer), as well as on passenger cars of the UAZ-3151 (469) range.
Timken front civil axle for UAZ 469 and loaf cars
Rear axle Timken (civilian), for UAZ 469 and loaf cars
Photo of the gearbox of a half civil bridge
Photo of the Timken Civil Bridge tailpiece
The UAZ Hunter is equipped with so-called hybrid axles, with a stocking from conventional Timken axles and a steering knuckle from Spicer.
Gear ratios of the Timken bridge (civilian).
Until July 1989, civil axles were equipped with a main pair with a gear ratio of 5.125 (41 teeth), now - with a gear ratio of 4.625 (37 teeth), i.e., more “fast” but less “powerful”. You can find both in stores. You will most likely have to replace the “new” with the “old” main pair when installing very large wheels. It is recommended to replace the main pairs only as a complete set (in the front and rear axles), otherwise the front axle will have to be turned on only in mud, snow, sand, etc., so as not to damage the transfer case or spoil the tires. How to determine the gear ratio? You need to twist the cardan by hand and count the revolutions of the wheel. For example, 46 cardan revolutions - 10 wheels = 4.6 pair, etc.
Main pair for UAZ, Timken axles, hybrid, 37-8, 4.625
Weight of UAZ civil bridges:
- front axle - 132 kg
- rear axle - 100 kg
Geared (military) axles UAZ
Essentially this is the Timken Bridge, i.e. split, but it has a smaller central gearbox and has final drives. The factory installed military bridges on UAZ 469 vehicles for the army and UAZ, Bars. UAZ Bars bridges are military bridges, but with a wider gauge.
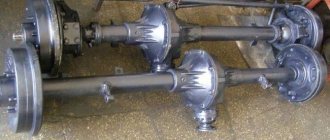
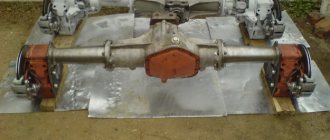
UAZ military bridges
Photos of UAZ military bridges
Photo of the final drive of the UAZ Photo of the rear military axle of the UAZ
Portal bridges UAZ Bars
UAZ Bars bridges installed on UAZ Bukhanka
Gear ratios of UAZ military bridges
The gear ratio of military axles is 5.38 (=2.77*1.94 - the gear ratios of the main and final drives, respectively) - more high-torque, but less high-speed than conventional axles.
Characteristics of a military bridge
- Ground clearance: 300 mm (with tires Ya-192 215/90 R15 (31 x 8.5 R15)
- Track: 1445 mm
- Gear axle track of UAZ Bars: 1600 mm
- Weight of the UAZ front military axle: 140 kg
- Weight of the UAZ rear military axle: 122 kg
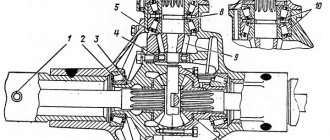
Diagram of a UAZ gear (military) axle
UAZ rear axle with final drive:
1 – main gear housing cover; 2 – differential bearing; 3,13,49 – adjusting shims; 4 – sealing gasket; 5.7 – drive gear bearings; 6.15 – adjusting rings; 8.42 – cuffs; 9 – flange; 10 – nut; 11 – mud deflector; 12 – ring; 14 – spacer sleeve; 16 – main gear drive gear; 17 – satellite; 18 – right axle shaft; 19 – final drive housing; 20.29 – oil deflectors; 21 – axle bearing; 22,26,40 – retaining rings; 23 – sealing gasket of the final drive housing; 24 – final drive housing cover; 25 – bearing; 27 – brake shield; 28 – brake drum; 30 – wheel mounting bolt; 31 – axle; 32 – hub bearing; 33.41 – gaskets; 34 – lock washer; 35 – leading flange; 36 – hub bearing nut; 37 – lock washer; 38 – bushing; 39 – final drive driven shaft; 43 – driven shaft bearing; 44 – final drive driven gear; 45 – special nut; 46.50 – drain plugs; 47 – final drive drive gear; 48 – right cup of the satellite box; 51 – main gear housing; 52 – axle gear washer; 53 – axle gear; 54 – satellite axis; 55 – driven gear of the main gear; 56 – left cup of the satellite box; 57 – left axle shaft
Scheme of the UAZ rear military axle
Steering knuckle of the UAZ front axle with final drive:
a – signal groove; I – right steering knuckle; II – left steering knuckle; III – wheel release clutch (for an alternative design, see Fig. 180, IV); 1 – oil seal; 2 – ball joint; 3 – steering knuckle hinge; 4 – gasket; 5 – grease fitting; 6 – kingpin; 7 – overlay; 8 – steering knuckle body; 9 – pin bushing; 10 – bearing; 11 – driven shaft of final drive; 12 – hub; 13 – leading flange; 14 – coupling; 15 – locking ball; 16 – protective cap; 17 – coupling bolt; 18 – axle; 19 – lock nut; 20.23 – support washers; 21 – final drive drive gear; 22 – locking pin; 24 – rubber sealing ring; 25 – thrust washer; 26 – axle shaft casing; 27 – rotation limitation bolt; 28 – wheel rotation limiter; 29 – steering knuckle lever
Diagram of the steering knuckle of the front military axle with final drive
Calculation method
Is it possible to find out the gear ratio of an unknown car without disassembling the gearbox? It turns out there is such a way. To do this, the axis on which the gearbox is installed is hung on supports. The position of the drive shaft and wheels is remembered. It is convenient to do this with simple marks. Then the wheels are turned until the marks coincide again, counting the number of revolutions of the wheels and shaft separately. It is more convenient to carry out this procedure with an assistant.
After obtaining experimental data, the number should be calculated by dividing the number of shaft revolutions by the number of wheel revolutions. The accuracy of this method is approximate and is improved only by being careful when counting and combining marks.
Front axle UAZ 469
The driving front axle of the UAZ 469 87 is designed like the rear axle of the UAZ 469. All assembly units of the units are identical:
- stocking or crankcase;
- main gear;
- differential.
The slight difference is the thread direction of the oil deflector ring installed in the front drive gear. The carving is made right-handed. In addition, the front end of the UAZ 469B is marked with the “P” stamp. Due to their absolute identity, they are regulated, maintained, disassembled, and assembled in the same way. Also similar are all breakdowns that occur during operation.
What is the difference between the VAZ 2103 gearbox and 2106?
The main difference is the different gear ratio:
The gear ratio shows how many times the wheel will turn relative to the number of revolutions of the cardan. The difference between the VAZ 2103 gearbox and the 2106 can be clearly seen by the number of teeth on the gears. The “six” has 11 teeth on the drive gear, and 43 teeth on the driven gear, while the “three” has 10 and 41, respectively. To verify this, it is not necessary to disassemble the gearbox, just look at its markings.
Many motorists believe that a gearbox with a higher gear ratio is considered traction, and one with a low gear is considered high-speed, and they try to replace one type of gearbox with another, adjusting the car to the desired parameters. But to fully modernize a car, it is not enough just to know how the VAZ 2103 gearbox differs from the 2106.
Types of drive axles of UAZ vehicles
UAZ vehicles use several types of axles that have structural differences and differences in characteristics. Today on the roads you can find cars from Ulyanovsk with three types of bridges:
• Traditional split bridge with single-stage transmission (old model, also called “regular”, “civilian” or “collective farm”, but in reality it is a “Timken” type bridge, it is named after the name of the engineer who developed it); • Bridge with final drives (also called “military”, but in the literature it appears under the name “U-shaped” or “portal”); • A modern one-piece bridge of the “Spicer” type (a new model, the bridge is also named after the engineer who developed it).
The main difference between “civilian” and “military” bridges is that the latter are equipped not only with the main gear, but also with final drives (wheel drives). The presence of final drives increases the torque that each of the wheels receives, so a car with a “military” axle has better maneuverability. Also, thanks to the final drives, the axis of the “military” bridge is 4 cm higher than the axis of the “civilian” one, which has a positive effect on the vehicle’s ground clearance.
However, “military” axles have a larger total gear ratio (which results in an increase in torque), so a car equipped with them has slightly worse speed characteristics, and a motor that constantly operates at high speeds wears out its life faster.
To be specific, the gear ratio of old-style “civilian” axles can be 4.625 or 5.125 (depending on the number of gear teeth in the driven main gear), the gear ratio of “military” axles is 5.38 (2.77 for the main gear and 1. 94 for final drives), and for Spicer-type axles - 4.111 (used on cars with a gasoline engine) or 4.625 (installed on cars with a diesel engine).
Regardless of the type, UAZ axles (rear only) can be equipped with automatic or forced differential locking. Moreover, the locking drive can be mechanical, electric or pneumatic; in the latter case, the car is retrofitted with a simple pneumatic system, which can also solve other problems.
Finally, bridges for UAZ vehicles differ in track width. All “civilian” and “military” bridges initially had a width of 1443-1445 mm, but today UAZ produces bridges with a gauge increased to 1600 mm (these are mainly modern “spicer” bridges).
As for the UAZ-452/3741 cars that interest us, until very recently they were equipped only with conventional (“civilian”) axles, and in recent years, from the assembly lines of the Ulyanovsk Automobile with axles (front and rear) of the “Spicer” type. “Military” axles were never serially installed on this model, although on the roads (or rather, off-road) you can often find shabby “Loaves” with “military” axles - usually this is a modernization carried out independently by the owner of the car.
Therefore, we will further consider the design of the UAZ-3741 front axles only of the old model (Timken type) and “spicers”.
Conclusion
The use of military bridges makes it possible to better realize the potential of the UAZ. A noticeable improvement in cross-country ability is noted by absolutely everyone who has at least once tested these designs in action. But cross-country ability is the main indicator of any SUV, especially the UAZ. It is this indicator that determines how far you can get in your car. Of course, not everyone needs gear axles. Those who rarely venture into the wilds with real off-road conditions are unlikely to experience the need for military bridges. UAZ is capable of a lot even on “collective farmers”. But for true off-road conquerors, military bridges are simply necessary, despite all their shortcomings, most of which are insignificant.
Many owners of real SUVs at some point want to improve the cross-country ability of their jeeps. The most common improvement is the replacement of "civilian" bridges with a military bridge. They are also called portal bridges. The main difference between the military bridge is the presence of a final drive gearbox.
Maintenance
Maintenance of the UAZ bridge is simple and comes down to monitoring the level of lubricant and topping it up and replacing it. The second point is to check the seals for leaks. It is regularly necessary to check the reliability of the fastenings, especially if the machine is used in difficult road conditions. Eliminate axial play in the differential bearings in a timely manner.
Assembly and connection diagram
When assembling the structure, do not remember several features:
- Press the bushing into the trunnion flush with the end of the washer socket. After completing the procedure, the sleeve must be deployed;
- Place one thrust washer inside the trunnion, the second - in the support. The oil lines in the thrust washers should face the joint. The washer is secured by punching in 3-4 places;
- When installing the hinge, add lubricant to the ball joint;
- Treat the pins and bushings with liquid lubricant.
To obtain the required axial tension, you need to select a certain number of spacers (but not less than five). They are installed on the ends of the knuckle body at the top and bottom. Their number should be the same. Soak the felt ring of the ball joint oil seal with engine oil. If possible, check the bridge on a bench after assembly. If the assembly is done correctly, the axle shafts should not heat up or make excessive noise when braking. Leaks through seals, cuffs, and bolted connections are not allowed.
How to disassemble a bridge
The first step is to remove the brake drum. Next, the hubs and hubs are dismantled. Along the way, inspect the bearings, which may have worn out and will have to buy new ones.
- Unscrew the brake system hose, it will get in the way, and remove the brake shield;
- Pull out the CV joint;
- Remove the rotating mechanism and shank;
- Divide the stocking into two parts;
- Remove the pair from one part of the bridge and the other.
Higher or lower?
Often, owners of classic Zhiguli cars use replacing the main pair as one of the types of tuning their cars. Which gearbox should I put on the VAZ-2107? It is worth choosing the gear ratio based on the engine power. If you install a pair with a low ratio (for Zhiguli the maximum parameter is 3.9), it will be easier for the car to accelerate to maximum speed. But in the range of 0-100 kilometers per hour, it will lose significant time for acceleration.
If the motor has not been modified, it is better to install a gearbox with a “4.4” ratio. The car will accelerate faster to one hundred kilometers per hour, but it will not go higher than this speed or will pick it up very slowly. Therefore, adjusting the gear ratios is not the only modification for the “seven”. In addition, the motor itself will have to be modified.
Site about off-road vehicles, SUVs, off-road vehicles
The front axle of carriage-type vehicles of the UAZ-3741, UAZ-3962, UAZ-3909, UAZ-2206, UAZ-3303 models is the drive axle. The crankcase, final drive and differential of the front axle do not differ from the corresponding parts and assemblies of the rear axle. All disassembly, assembly, maintenance and adjustment operations are the same as for the rear axle.
The design of the steering knuckle of the front drive axle of UAZ-3741, UAZ-3962, UAZ-3909, UAZ-2206, UAZ-3303.
A ball joint with pin bushings pressed into it is attached to the axle housing with five bolts. The steering knuckle housing is mounted on the ball joint using two kingpins. The steering knuckle pins are installed with a preload along their common axis, the value of which is 0.02-0.10 mm. When turning in the steering knuckle body, the pins are locked with pins.
Adjustment of the preload must be done with shims installed at the top - between the steering knuckle lever (left) or lining (right) and the steering knuckle body, at the bottom - between the linings and the steering knuckle body. To lubricate the upper kingpins and add grease to the ball joint, grease fittings are installed on the steering knuckle arm (left) and on the upper kingpin pad (right). The lower king pins are lubricated by grease supplied by gravity from the ball joint.
A constant velocity joint (CV joint) is installed inside the steering knuckle. The design of the hinge ensures the same angular speeds of the drive and driven shafts, regardless of the angle between them. The hinge consists of two forks, in the curved grooves of which four balls are located. In the central sockets of the forks there is a fifth ball, which is an adjustment ball and serves to center the forks. The hinge is limited from longitudinal movement by a thrust washer.
Clutch for disengaging the wheels of the front drive axle UAZ-3741, UAZ-3962, UAZ-3909, UAZ-2206, UAZ-3303.
The inner drive fork of the CV joint is splined to the differential side gear. At the driven end of the hinge knuckle there is a device for disconnecting the front wheels of the car, which consists of a movable coupling mounted on splines and a bolt with a spring and a ball. The movable coupling is connected by external splines to the internal splines of the drive flange, bolted to the wheel hub.
To reduce wear on parts of the front drive axle and save fuel when operating a vehicle on paved roads, along with turning off the front drive axle, it is advisable to disable the front wheel hubs.
To do this, remove the protective cap and unscrew the bolt, install the coupling in a position where the signal ring groove on its surface is located in the same plane as the end of the flange. Having installed the coupling in the required position, screw on the protective cap. The wheel is turned on by screwing in the bolt and tightening it securely.
On some vehicles UAZ-3741, UAZ-3962, UAZ-3909, UAZ-2206, UAZ-3303, it is possible to install a different design of the front wheel release clutch 31512-2304210. To disengage the wheels, you need to turn the clutch disc counterclockwise until it stops, aligning the pointer with the inscription “4×2”. Switch on by turning the dial clockwise until it stops, aligning the pointer with the inscription “4×4”.
Operations to engage and disengage the clutch must be performed on both wheels of the front drive axle simultaneously. Engaging the front axle with the wheels disconnected using clutches is not allowed.
Maintenance of the front axle of UAZ-3741, UAZ-3962, UAZ-3909, UAZ-2206, UAZ-3303.
When inspecting the steering knuckles, you need to pay attention to the serviceability of the adjusting bolts, wheel rotation stops and the reliability of their locking. The angle of rotation of the right wheel to the right, and the left wheel to the left should be no more than 27 degrees. An increased steering angle leads to destruction of the steering knuckle joints.
Adjusting the tightening of the front axle steering knuckle pins.
The tightening of the steering knuckle pins is adjusted at the factory with a preload along their common axis, and the same number of shims are installed on top and bottom. When the rubbing surfaces wear out, the preload disappears and an axial gap forms between the ends of the pins and the support rings of the ball joint. This gap is eliminated by removing the same number of shims from above and below. The difference between the total thicknesses of the upper and lower gaskets should not exceed 0.1 mm.
Adjusting the toe-in of the front axle wheels.
Wheel alignment is adjusted at normal tire pressure so that dimension A , measured along the center line of the side surface of the tires at the front, is 1.5-3.0 mm less than dimension B at the rear. Wheel alignment can be checked on the outer or inner surfaces of the tires.
Checking wheel alignment on external surfaces must be done on a special stand. In this case, it is necessary to find points of equal lateral runout of the tires and place them in a horizontal plane. Otherwise, due to significant lateral runout of the tires, the toe will be adjusted incorrectly.
Determining the toe-in of the front wheels on the inner surfaces of the tires must be done in the absence of a special stand. To do this, place the car in a viewing hole with the wheels positioned to move in a straight line. Using a rod with a movable ruler, measure the distance between the inner surfaces of the tires at the rear, approximately at the height of the center of the wheel. At the same time, install the bar horizontally, and mark the points of contact of the bar with the tires with chalk.
Then roll the car forward or backward to such an amount that the points marked on the tires are at the same height in front, and the measurement between the marked points is repeated. The difference between the first and second measurements gives the wheel toe value.
If necessary, wheel toe adjustment must be done by changing the length of the steering linkage rod by rotating the fitting after first loosening the locknuts with left and right threads. After adjustment, tighten the locknuts.
GAZ Sobol Tin Woodman › Logbook › Rear axle gearbox. Part 2.
I don’t even know what to think, yesterday’s post has over 100 likes and... and not a single comment! Either it’s so interesting that anyone needs to hold their breath, or screw it, no one is interested in this kind of hockey. When there is no feedback - it is not good(
Nevertheless, I continue!
Before further description, you need to watch 2 videos (the second of three parts) on setting up the rear axle gearbox (it is the technology from there that I will use in the future). This video will show how to select the thickness of the adjusting washer under the shank bearing without any indicators
A little tip - to save your time, press the settings button on YouTube (gear at the bottom) and select the viewing speed there as 1.5 or 2, I do this in all the videos I watch, it saves a lot of time!
https://youtube.com/watch?v=7-R8yWVxfaY
https://youtube.com/watch?v=zHvu8XzjMPk
https://youtube.com/watch?v=K9L1SKKbwsQ
there are 3 parts from which you can find out a lot of useful things, although there is a lot of water here, in fact, half of the information in this trilogy about gearbox repair is redundant for you as a user, so just look and then listen to what I tell you)
Plus, you are already looking at 1.5-2nd speed, so with this you compensate for the water and the descriptions of its repair devices that are unnecessary for you, but take a detailed look at the structure of the gazelle-sable gearbox (the Volgov one is almost the same, with the exception of a slightly simpler differential design) and great difficulty due to the non-removable gear housing
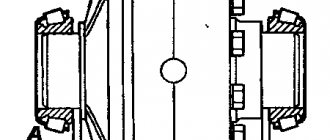
Here is the bridge tail of a 1998 Volga (left) and a 2007 Sable (right).
It’s not the years or why they are that are important, but the principle of carrying out preloading of the bearings
The bushing has a clear advantage - it maintains the required preload of the bearings even when they wear out due to elasticity
it sits between the bearings like this
when tightening, it deforms and carries out the calculated preload (pressure of the bearings) with the required thermal clearance for their correct operation
It can only be placed on shanks designed for it, and as you already understood from watching the video, it has two disadvantages. 1) it is disposable, so when replacing the shank oil seal, it must be replaced with a new one (as in any other case with unscrewing the shank nut!) 2) Buying a new, working one is a real lottery, in the video you already saw how to choose a suitable bushing based on sound (hey, I told you that you should have looked at the beginning of the post, and not look for it now!) and how important it is to take a bushing by measuring it its height
The second method of applying preload is to use such a hardened washer
And ensures precise bearing spacing this way
Its advantages are perhaps its simplicity. Set the exact size (I’ll tell you how to choose it a little later when assembling the gearbox. This won’t be in the video!). Plus when replacing the oil seal, if your bearings are not loose or worn out. then you just change it, tighten the shank with “all dope” and don’t blow it
Disadvantages - if the bearings become loose and begin to rotate, the washer can wear out and wear will occur even faster
Another disadvantage is the need to check the shank play at every oil change, so that if necessary, disassemble it and replace it with a thicker one.
How to do this and what is needed for such a replacement - again in the next bortoviks
In the meantime, I’m taking the Volgov factory main pair... its designations are filled here
“offset” is indicated on the shank
I remove the old bearing, first I plan it with a chisel to 3-4 mm
Then the easiest way, if you don’t have a “horse” puller, is to screw the nut onto the shank, insert the shank so that something gets under the bearing and hit the nut. screwed onto the shank to knock the core out of the bearing. For this I used... an old sable brake pad)
with the second shank you need to do the same
because if you're lucky, one of the two adjusting washers (it turns out they're not so easy to find!) will suit you for installing a new main pair in your case
Having watched the first video, you already understood how you will need to determine the thickness of this washer. but don’t rush to repeat it, in the next bortoviks I will show how to make such a selection even easier)
Thus, I have completely figured out the theoretical part of the shanks, all that remains is to fix it in practice. A couple more on-board shanks and you will have a description of how, in practice, using some of the first video, some of the other three, and in addition adding a little of your own to adjust the contact patch and ideal bearing preload (both at the initial stage and during further operation due to their wear).
It’s a piece of cake, you’ll do this to yourself and that guy in the future)
Possible bridge malfunctions and their causes
The front axle of the UAZ loaf car is distinguished by its reliability and unpretentiousness to operating conditions. The most common malfunctions are:
- Crankcase seal failure. Excess pressure that occurs when the oil heats up while the car is moving causes the crankcase to fail to seal. To prevent malfunction, it is necessary to regularly check the functionality of the breathing valve;
- Bearings are worn out. Occurs as a result of improper operation of the front axle of a UAZ loaf car. Switching the UAZ loaf front axle to the on position when driving on a good quality surface leads to rapid wear of the gearbox bearings. To prevent bearing damage, it is necessary to connect the front axle only for off-road driving;
- Increased wear of rotating parts. Occurs due to poor quality lubricant. It is necessary to change the oil in the front axle regularly. The cause of the malfunction may be water entering the gearbox housing when fording. To prevent water from entering the gearbox housing, the breathing valve is equipped with a hose attached under the engine compartment cover.
- Malfunction of the cross-axle differential. Often occurs due to wear on the pins. To prevent damage, it is necessary to regularly inspect the pin mechanism for play. If the permissible values are exceeded, the kingpins should be replaced;
- Breakage of the main gear drive shaft bearing. Occurs due to a malfunction of the driveshaft crosspiece. It is necessary to regularly check the integrity of the crosspiece.
- High degree of wear of conical satellites or their axes. The integrity of the conical satellites and their axles is affected by the difference in pressure in the tires of the front axle wheels. To avoid damage, it is necessary to constantly monitor tire pressure.
Diagnostics of the mechanism by sound
It is very important to catch the moment when the gearbox just begins to hum. Then there is a chance to save a little on repairs
Usually, when the main pair is exhausted, the howl begins to appear at a speed of 60-80 km/h. If you do not pay attention to it, the hum will spread over a wider range of speeds and will become audible already at 40 km/h. Completely neglected units begin to hum at 20 km/h, and at a speed of 80-100 km/h it is impossible to even talk inside the car.
Experts recognize the following types of humming sounds from the rear axle:
A whine under load indicates that wear has appeared on the gear teeth. At the initial stage, good craftsmen sometimes manage to eliminate the malfunction with adjustments, but this does not last long. You should prepare to replace the shank and planetary gear. An incessant whine indicates wear on the shank bearings. If they are not changed in a timely manner, production will appear on the main steam.
Crunching noises are produced by worn differential bearings, and the “trolleybus” appears due to a loose or completely unscrewed nut on the shank. This malfunction is especially dangerous, since if the nut is unscrewed, the teeth of the drive gear can break at any time. Therefore, it must be eliminated immediately, otherwise the broken teeth may jam the entire mechanism.
Maintenance
The design of the front axle of the UAZ 469, the diagram of which is given above, provides for a number of preventive and adjustment operations during operation. Among them:
- Periodic tightening of threaded connections.
- Checking the kingpins for gaps.
- Bearing adjustments.
- Repairing gear clutch points.
- Checking alignment.
- Regular lubrication of rubbing parts according to the table of instructions for the use of lubricants.
A visual check of the front axle structure of the UAZ 469 involves inspecting the steering knuckles for the integrity and suitability of the adjusting screws, limiting rotary stops, as well as the reliability of the stopper of these elements.
The design diagram of the unit under consideration is designed for a maximum angle of rotation of both wheels in the corresponding positions of about 27 degrees. An increase in this indicator indicates deformation of the articulated rotary cams, and this significantly complicates repairs.
Signs of gearbox problems
The rear gearbox is one of the reliable mechanisms of classic Zhiguli cars and breakdowns rarely occur with it. However, like any other unit, it may have its own malfunctions, which are determined by characteristic symptoms. They are worth dwelling on in more detail.
Noise when accelerating
If during acceleration there is an extraneous sound from the gearbox installation site, then it can be caused by:
- worn out or incorrectly adjusted differential bearings. It will require dismantling, disassembling and diagnosing parts with subsequent adjustment;
- Incorrect meshing of the teeth of the main pair gears. Eliminated by proper adjustment;
- lack of lubrication in the gearbox. The lack of oil in the crankcase is restored, after which it is checked for leaks at the places where the sealing elements are installed.
Noise when accelerating and braking the engine
If noise occurs both during acceleration and during braking by the power unit, there may not be many reasons:
- deterioration or failure of the bevel gear bearings of the main pair. Eliminated by replacing failed elements;
- Incorrect adjustment of the gap between the tip and the planetary gear. The mechanism needs to be diagnosed and replaced with damaged parts, as well as setting the required gap between the gear teeth.
Video: how to determine the source of noise in the rear axle
Knocking, crunching noise when moving
If the gearbox begins to make sounds uncharacteristic of its normal operation, then it will be possible to accurately diagnose the breakdown only after disassembling the unit. The most likely causes of a crunching or knocking sound may be:
- tooth breakage on the gears of the main pair;
- great wear of the main pair;
- Problems or incorrect adjustment of the bevel gear bearings.
Noises when turning
Noise in the gearbox is also possible when turning the car. The main reasons for this phenomenon may be:
- tight rotation of the satellites or the appearance of scratches on their surface. Eliminated by replacing damaged parts or treating roughness with sandpaper. If the defect cannot be removed, the failed parts must be replaced;
- jamming of side gears. If the gears have barely noticeable damage, clean them with sandpaper. Elements with signs of heavy wear are replaced with new ones;
- The gap between the differential gears is set incorrectly. It is necessary to set the correct gap between the gears;
- defective semi-axial bearings. The ball bearings need to be replaced with new ones.
Knock when starting to move
The appearance of a knock in the rear gearbox of a VAZ 2106 at the beginning of movement may be accompanied by:
- large gap between the splines of the bevel gear shaft and the flange. It is necessary to inspect the condition of both parts. If significant wear is detected on the splines, the elements are replaced;
- increased gap between the teeth of the main pair gears. The problem is “cured” by adjusting the gap;
- large amount of space for the pinion axle in the differential box. The box needs replacing;
- The fastening of the reaction rods of the rear beam has become loose. It is necessary to inspect and tighten the fastening.
Gearbox jammed
Sometimes the REM may jam, i.e. torque will not be transmitted to the drive wheels. The reasons that can lead to such a malfunction are as follows:
- lack of lubricant in the mechanism, which could leak due to leakage of the unit;
- failure of satellites;
- damage to the bearing on the bevel gear of the main pair.
Lack of lubrication in the gearbox leads to increased production and jamming of the mechanism.
Oil leakage can be determined without disassembling the gearbox, but it will not be possible to identify other faults without this procedure. If, after disassembly, scuffs, broken teeth or visible damage to the bearing are found on the gears, then the parts need to be replaced.
Oil leak
Lubricant leakage from the “six” gearbox is possible for two reasons:
- failure of the shank oil seal;
- damage to the gasket between the gearbox and the rear axle stocking.
To accurately determine where the oil is leaking from, you need to wipe off the lubricant with a rag and after a while inspect the gearbox: the location of the leak will be noticeable. After this, you can take further actions - remove the entire gearbox to replace the gasket, or dismantle only the cardan and flange to replace the lip seal.
An oil leak is indicated by a wet gearbox in the lower part.
Advantages
So, the first plus is ground clearance. It, unlike civilian models, is 30 centimeters. “Collective farm” UAZs have a ground clearance of 22 centimeters. The second plus is increased torque. This is a huge plus if you plan to transport large loads or tow a trailer. Due to the large size of the teeth, they do not wear out as often as on civilian ones (applies to the main pair).