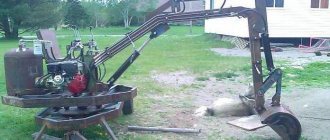
This machine will be extremely useful in agriculture, because it can be used to do a wide range of work, for example, clearing snow using a mini tractor. Therefore, even old walk-behind tractors can be very successfully used to create mini tractors that will be more than useful to you.
You can do this from a new walk-behind tractor if you think you need a compact tractor more.
In agriculture, technology plays a very important role. She is both a method of transportation, and an excellent assistant, and a tractor, and a strongman. Therefore, there is nothing better than a private house with a farm, which has a full fleet of all necessary equipment. Tractors (for example, MTZ tractors) are especially widely used.
They do not have to be large and powerful, because even a small and compact tractor can provide significant assistance and become a good transport and way of transporting goods. In a word, there can be as many applications for such equipment as are convenient, because when working on the ground, you can come up with almost any “tasks.”
But small tractors are most often used precisely as transport, as well as mobile platforms on which various agricultural equipment can be installed.
If you equip a minitractor with a bucket, you will get an analogue of an excavator (see, for example, a Hyundai excavator), with which you can dig and loosen the ground, which is simply necessary in agriculture.
In addition, with a mini-tractor you can even graze livestock comfortably, because instead of walking, you will be riding on your steel horse.
Is it possible to make a mini tractor yourself? If you have no idea how to make a mini tractor from a walk-behind tractor with your own hands, then we are ready to please you: everything is easier than it seems. To get inspired, you can watch the video on how to make a mini tractor from a walk-behind tractor with your own hands. We also suggest watching a video about homemade minitrators – here.
Breaking and remaking equipment is not the most difficult process. Plus, you don't have to do absolutely everything yourself. There are special kits that will allow you to easily transform one type of equipment into another in a short period of time. This set includes the following parts:
- Frame with special mounting space for engine
- Pedals
- Seats
- Levers for disabling the axle shaft locking
- Steering wheel
- Wings
- Front beam and rear linkage
This kit is ideal for those who are wondering how to quickly convert a walk-behind tractor into a mini tractor. But there are many people who approach this idea with genuine enthusiasm, and therefore want to carry out all the work themselves, without using ready-made sets of parts.
It is for them that we will tell you how to make a mini tractor yourself from a walk-behind tractor.
Do-it-yourself attachments for a mini tractor | With your own hands
Is it right for me?
Most equipment is true to scale, and walk-behind tractors are no exception.
You wouldn't buy a 50 horsepower tractor to mow one acre, and likewise you wouldn't want a walk-behind tractor that could mow 50 acres. For proper scaling, walkers are extremely practical. They are great for a garden or lawn of up to a couple of acres, 15 acres of hay and 10 acres of topiary. Because they are very stable on slopes and take up very little maneuvering space, the steeper and rougher the terrain, the more attractive walking becomes.
You will definitely need to be able to walk near the equipment in order to use the pusher properly. There is a seat to ride on while mowing, but it is bulky and cannot be relied upon. These cars are made to follow behind!
Pump. It can be this way, or it can be that way
When installing a pump, you are guaranteed to ask yourself the question: axial piston or gear? Let's just say that the choice is yours. The first is more expensive, but also more effective. Of the gear types, NSh-10 has proven itself well. You can borrow the experience of Russian enterprises: two NSh-10 pumps and two R-16A distributors, which are connected in parallel. Based on the performance of the pump and hydraulics, the displacement of the fuel tank is selected.
Photo source: exkavator.ru Gear pump NSh-10
homemade trailed mini excavator
Good day. I want to assemble a trailed mini excavator with my own hands, but after searching the forums I haven’t found anything useful ((In particular, I’m interested in help in terms of “materials”
I want to assemble a trailed mini excavator with my own hands,
The guys made mounted ones. It makes no difference whether you hang it or screw it onto a cart.
The guys made mounted ones. It makes no difference whether you hang it or screw it onto a cart.
There is a difference if there is no tractor
It might be cheaper to hire. and there is less hassle. manually is also quick. An excavator must move: how else can you work on it? We once had to make 2-meter holes for stepchildren at a transformer substation. You can't get in with the equipment. So 3 men dug these holes for us in a day. I couldn’t believe my eyes!
It might be cheaper to hire. and there is less hassle. manually is also quick. An excavator must move: how else can you work on it? We once had to make 2-meter holes for stepchildren at a transformer substation. You can't get in with the equipment. So 3 men dug these holes for us in a day. I couldn’t believe my eyes!
1) moving around the excavation site will be done manually (or using a bucket), transportation on a tow bar 2) I don’t want to hire and don’t want to waste my nerves. It’s better to do it myself. My construction site isn’t on fire. There’s bare earth on the site! There’s nothing yet! Imagine a foundation for a fence around 10-15 acres? + dig a trench for water + house foundation + sewerage + cesspool, etc. + garage foundation + place to work (I do auto repair) + unforeseen plans = ? 10000?20000??30000. I don't think. + his brother has another plot
Getting to the bottom of the philosophical grain
How your DIY mini excavator will dig is a rhetorical question. But, you see, assembled by you yourself, it will definitely have the right to claim even if not the title of a reliable assistant in the household, then certainly the subject of your, now unshakable, pride. So, go for it! And you can rejoice at the successes of others on numerous forums, both Russian-language and foreign.
Photo source: exkavator.ru Your work has every chance of becoming something similar
Photo source: exkavator.ru Or this. Far from the visualization object in the first photo, but still
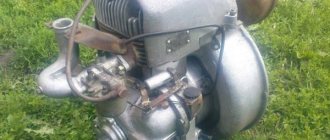
What can be made from a walk-behind tractor engine?
A homemade product with an engine from a walk-behind tractor can significantly save the family budget, as well as facilitate various work on the site.
The following inventions can be made from a walk-behind tractor:
- Vehicles (mini-tractor, all-terrain vehicle, ATV, motorcycle, snowmobile, motorized towing vehicle)
- Stationary equipment (sawmill, electric generator, pump, lathe)
- Agricultural equipment (loader, snow blower)
Vehicles made on the basis of a walk-behind tractor or its engine are not suitable for use on highways and other busy roads; they are intended for transporting goods around the site, as well as for movement in rural areas. The maximum speed of such devices is 60 km/h.
The base of the vehicle (frame) and wheels must be adapted to heavy loads, and the engine itself is selected based on the total weight of the device, the weight of the loads and the purpose of the equipment, for example, for a bicycle a motor of up to 5 hp is sufficient, for a snowmobile the engine power must be higher (7 hp).
Building stationary equipment and farm machinery can be more difficult, but videos with detailed instructions are easy to find.
Selecting the necessary nodes
In order for a compact excavator to be practically in no way inferior to heavier machines, it is made according to their model. Accordingly, a homemade model should have the following elements:
- Chassis. When creating a trailed version, a metal welded frame and one pair of wheels are suitable.
- Engine. Considering that the equipment will work with a tractor, it makes no sense to install a powerful power unit. You can get by with a small engine with a power of 6.4 kW. This is quite enough to start the hydraulic pump.
- Platform. The main components and mechanisms, steering and operator's seat will be located here.
- Hydraulic system. This includes: pump, filter, connecting hoses and hydraulic valves.
- Boom with bucket. This working element can be purchased ready-made.
Where to begin?
Of course, with visualization. So that problems associated with the further operation of a mini excavator created by yourself do not bury your time and work forever, you must approach its creation with a clear understanding of what and how to do. After all, having bought a lot of spare parts, having spent countless amounts of time and effort, it is unlikely that anyone will want to eventually realize that their “craft” turned out to be more expensive than a production copy, but at the same time less effective. After weighing all the pros and cons, the first thing you need to arm yourself with is a drawing. You can either buy it on foreign websites, or spy on the Internet. If you search for the necessary information on foreign sites, remember that, for example, the American measurement system uses inches, not meters. Don't forget to convert some values to others!
Next, to all this you need to add your ingenuity, skillful hands and a set of necessary parts. But first things first.
Photo source: exkavator.ruMini excavator. Let's visualize
One horse, two horse
What about “horses”? The question is reasonable, and the answer to it lies in the purposes and in the work that you will carry out on a mini excavator made by yourself. The calculation of the forces on the hydraulic cylinders for raising and lowering the boom and turning the handle depends on what exactly you are digging, then the speed of movement of the links and the movement of the pistons in the cylinders is determined. Typically, a power of 8-13 horses is more than enough.
Finding the necessary equipment or spare parts has become even easier - leave a request and they will call you back.
Preparatory activities
During the work process you will need the following tools and materials for the metal product:
- Bulgarian;
- welding machine;
- sheet of metal 1-1.5 mm thick 0.5x0.5 m;
- profile beams 20x40 mm 2 m and 25x25 mm 3 m long;
- ball bearing 308;
- plywood 0.5x0.5 m for the chair;
- bolts 50 mm M12 with nuts, 3 pcs. for hinged joints;
- axle for the main hinge;
- heavy base in the form of an R13 wheel disc.
One person can handle the work during the day, since there is no need to use a profile bender or make a lot of devices, as in the production of overhead gates.
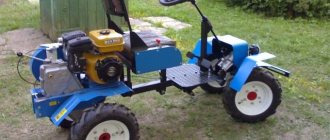
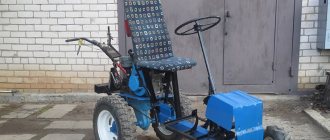
Do-it-yourself mini tractor from a walk-behind tractor
When choosing a conversion kit, you can take factory spare parts.
But this is not suitable for those who need to break a 4x4 with significant savings. For homemade tractors you should purchase:
- set of tools and welding equipment;
- channels, metal pipes;
- drill with different drill bits;
- hardware and other fasteners;
- Bulgarian
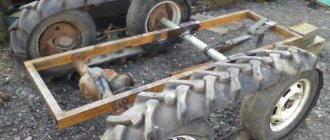
To properly remake a walk-behind tractor, you need to prepare two additional wheels, a chair, a hitch, pedals, and a steering mechanism
It is important to choose the right walk-behind tractor, choosing rather powerful units. This will allow you to get a productive mini tractor that can perform all agricultural functions
Creating a Frame
When using two small frames, you get a special axle that is connected by hinges and can move. This allows the wheels to make better contact with the ground and not overweight when driving over uneven ground.
- Transverse longitudinal-type spars need to be cut with a grinder and connected by welding or other fasteners.
- Bolted connections are secured by welding the seams for higher reliability.
- A mount for attachments is mounted to one end of the frame, and a tow bar for the trailer is welded.
Correct installation of the chassis
Once the attachment has been attached to the frame, an axle needs to be attached to both ends of the frame. The wheels that came with your walk-behind tractor are attached to the rear ones, but the front ones are fitted with wheels with deep tread, which can be bought or removed from an old car.
To create a high-quality chassis, you need to purchase a brake system with hubs, a steering wheel, a steering rod and column, and a gearbox.
Front wheel mounting steps:
- Select a steel profile pipe that will be equal to the thickness of the tractor's front axle.
- Wheel hubs are welded to the ends of this pipe.
- The structure must be attached in the center of the front of the frame.
- Secure the tie rods and align them with the gearbox.
- Next, fix the gearbox on the frame.
- Select the steering wheel, install it, and then the bar.
- Adjust the steering column.
In some cases, the tractor suspension is equipped with a spring shock absorber, which makes working with equipment more comfortable.
To install and secure the rear axle, you will need bearings. Next, it is equipped with a pulley, with the help of which the rotating components of the structure are launched and act on its wheels.
Correct installation of the motor with hydraulics
As a rule, the motor should be located in the front of the frame, which will make the tractor more stable and maintain its balance.
Where the motor will be located, you need to install a fastening system, supplementing it with tension belts. Mount the belt drive, which is needed to drive the rear wheels
In this case, it is important to ensure that the transfer case belt is located in the same plane with the belt, which is located on the rear axle of the mini tractor. The belt drive should be covered with a protective cover. After this, a hydraulic lift is installed on the tractor, consisting of an oil tank and a pump, a distributor, and a hydraulic cylinder
The system is connected with hoses. After this, a seat, headlights and dimensions are installed on the equipment.
Electrical equipment and braking system
- First you need to determine the location of the brake pedal, after which the mount for it and the main brake cylinder are mounted.
- The brakes are then attached to the brake drums (located on the front wheels) using hoses.
- The brake system must be checked for leaks, and the drawings must be reviewed to avoid errors during its installation.
An all-wheel drive tractor requires the installation of electrical equipment and sensors on the dashboard. A liquid cooling indicator, a fuel level and oil pressure sensor, and an ignition switch are required.
Additionally, you can install a canopy and casing, which will make working with the equipment more comfortable. You can watch the video on how to properly assemble a mini tractor.
Basic components - what are they, how to assemble them and is it worth buying?
Having found all the necessary drawings, or made them ourselves, we proceed to the main components of the mini excavator, simultaneously estimating their cost.
We will make the frame from channel 8 or 10 using electric welding. We will attach the old beam from the car to the resulting frame, removing the springs and springs from it. An option would be to mount the wheels on a homemade axle. Among the costs we have: about 12 meters of channel, a car beam, and your work.
Manipulator - it’s easier to make a two-arm manipulator from the same channels welded into a rectangular profile. When manufacturing a manipulator, you will need to calculate everything, and without engineering skills it will be difficult to do this . Therefore, it may be better to buy a ready-made .
As for equipment, if you still decide to make a manipulator yourself, you will need machines - milling, turning, metalworking.
The cost of a finished manipulator will be approximately 30% less than making it yourself.
Hydraulics - the choice here is wide, oil pumps are suitable, types: NSh-10, NSh-32, NSh-150, you need to buy pumps, and preferably new ones . But the cylinders for the manipulator are also suitable for used ones from MAZ or KAMAZ, size 63x40x500. For the control unit you can find, if you try, a used hydraulic distributor RGS 253, MRS 70.4.
It is advisable to take a ready-made boom and install it together with hydraulics, since there is a high possibility of errors in calculations when designing this unit. A boom from an old loader will do just fine .
We make a wood splitter
Among other things, you can make a wood splitter from a walk-behind tractor. To do this, you will need to grind a cone on a special machine, as well as a thread. After this, the finished cone must be mounted on a shaft that has suitable bearings. Then you need to install a flange at the end of the shaft, as well as a sprocket. It can be taken from a motorcycle wheel.
You can fix the cone on the shaft using a bolt. After this, between the motor and the shaft itself, you need to install a spacer made of pipes, as well as a pair of nuts. This will help tension the chain. In order to make supports for the shaft, you can take supports from Zhiguli cars. The motor must be taken from the walk-behind tractor. With the help of such a redesigned design, you can easily cope with splitting firewood.
Working equipment: ready-made or made?
The simplest option is to install a finished boom along with a hydraulic system. You can also install a boom on your homemade mini excavator, for example, from an old front-end loader. If, of course, you have access to it. In addition, it will need to be adapted for earthmoving purposes. Another “simpler” option is to make an arrow from a square pipe with your own hands.
Photo source: exkavator.ru Boom of a homemade mini excavator
Do-it-yourself mini tractor from a walk-behind tractor
The desire to have a full-fledged “iron horse” on your farm is inherent in any farmer, with all their advantages, walk-behind tractors are not a full-fledged replacement for a tractor. It’s one thing to “run” across arable land behind a walk-behind tractor, and quite another to cultivate the soil while sitting behind the wheel of a mini tractor.
Getting to know mini tractors from a walk-behind tractor with your own hands
But the cost of a mini tractor is quite high. Therefore, the desire of many involved in agriculture to create their own mini tractor from everything that is available on the farm is understandable.
Today, the construction of tractors of your own design occurs in two ways: creating equipment from car parts or agricultural machinery or upgrading walk-behind tractors into mini tractors. The latter have already been called motor tractors.
Where everyone can talk about their experience of creating a mini tractor from a walk-behind tractor with their own hands. Here you can get acquainted with the drawings of a mini tractor from a walk-behind tractor with your own hands, discuss the most important technical details, or view a photo or video of a mini tractor with your own hands.
Today, motor tractors are presented in three categories:
- completely homemade;
- modernized walk-behind tractors to the level of a mini tractor using factory kits;
- factory motor tractors made on the basis of walk-behind tractors.
DIY mini tractor
When converting walk-behind tractors into mini tractors, all sorts of parts and mechanisms available to the amateur designer are used. Often such models are made, as they say, “by eye”, without preliminary calculations. Despite the fact that DIY drawings of motorized tractors from a walk-behind tractor are available on the Internet, each master ends up with his own original model. The main disadvantage of such motorized tractors is the use of catch from equipment created to perform other tasks not related to agriculture. First of all, this concerns gearboxes that are removed from cars. And it’s not always possible to talk about the comfort of working on such a tractor. Nevertheless, those wishing to convert their walk-behind tractor into a mini tractor are only increasing.
In order to properly re-equip your car without violations, we recommend that you familiarize yourself with the list of documents that must be submitted to the traffic police.
Using factory
The demand for the modernization of walk-behind tractors has found a response both directly from their manufacturers and from companies with the production capabilities to create kits for converting walk-behind tractors.
The easiest way to bring your walk-behind tractor closer to the image of a tractor is to purchase an adapter - a two-wheeled cart with a driver’s seat, a powerful drawbar and a device for mounting towed equipment.
A complete kit, as a rule, includes a frame, footrests with pedals, a brake system, a steering column assembly, as well as a front beam with hubs and brake discs. The delivery also includes a rear linkage with a lift (usually manual), and at the customer’s request it can be equipped with an electric lift.
Having such a kit, you can assemble a mini tractor using a welding machine, plumbing tools and wrenches. You also need to worry about the wheels for the future “iron horse” - these can be wheels from a passenger car or similar ones from a walk-behind tractor.
Video of a mini tractor made from a walk-behind tractor with your own hands.
Simpler but more expensive
In order not to rack your brains over how to make a mini tractor from a walk-behind tractor with your own hands, you can purchase a ready-made motorcycle tractor produced by the manufacturer.
They are distinguished by a more advanced design than the first two options, as well as the presence of all the components necessary for agricultural machinery. The cost of such a device is lower than a mini tractor, but higher than making it yourself from a factory kit.
Where to begin?
Of course, with visualization. So that problems associated with the further operation of a mini excavator created by yourself do not bury your time and work forever, you must approach its creation with a clear understanding of what and how to do. After all, having bought a lot of spare parts, having spent countless amounts of time and effort, it is unlikely that anyone will want to eventually realize that their “craft” turned out to be more expensive than a production copy, but at the same time less effective.
After weighing all the pros and cons, the first thing you need to arm yourself with is a drawing. You can either buy it on foreign websites, or spy on the Internet. If you search for the necessary information on foreign sites, remember that, for example, the American measurement system uses inches, not meters. Don't forget to convert some values to others!
Next, to all this you need to add your ingenuity, skillful hands and a set of necessary parts. But first things first.
From general to specific
There are two most common methods for creating a mini excavator with your own hands: you can install attachments on a small tractor or build an autonomous homemade mini excavator that can move independently or with the help of other vehicles. The second option is more labor-intensive. You need to make your own frame, install at least the rear axle (can be used from an old car), and the engine. If you feel technically savvy, you can combine engine parts or use Chinese motors from different manufacturers. Just keep in mind that if you assemble parts from different machines, you will have to constantly adjust these parts and make modifications to them.
Model selection
A properly assembled mini-excavator is in no way inferior to models created according to all the rules in the factory. It has some advantages for private use: minimal fuel consumption, easy transportation, adaptability to specific needs, low weight. You can work in any area, including warehouses and other enclosed spaces. Typically, such equipment is required at dachas, near country houses, used in digging holes and ditches, for shallow communications, etc.
There are different types of mini excavators
Types of homemade models:
- An excavator made from a walk-behind tractor, based on an existing mini tractor or just a car. It uses attachments. Autonomous vehicles are assembled on tracked or wheeled vehicles, capable of moving around the site independently. Another option is a machine that can be moved using aids. If necessary, all attachments can be easily dismantled, and the used base can be used again for its intended purpose.
- Mini excavator from scratch. A labor-intensive option for the most experienced craftsmen. It is impossible for a beginner to cope with such a task; time and money will be wasted. You will need specific skills or qualified assistants, a good amount of technical knowledge.
- A simple budget solution is a trailed excavator on a T40 trailer with a frame and a wheel axle.
An autonomous engine, hydraulics and specific equipment are installed.
This is interesting: The most popular models of Russian and Asian mini-excavators: we’ll tell you in detail
Types and features of mini excavators
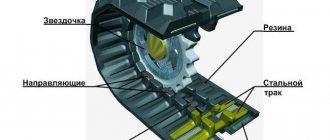
Mini excavators come in tracked and wheeled versions. Crawler mini excavators are a smaller copy of crawler excavators. They are distinguished only by a short rotating platform and different types of tracks, which can be rubber or steel. Thanks to the presence of rubber tracks, it is possible to protect the surface of asphalt and turf from damage.
Crawler mini excavators have a two-way automatic transmission. The advantages of this equipment are their small size and ease of operation, thanks to which they are able to work in hard-to-reach places. They have low ground pressure and good stability. Disadvantages include low movement speed and shallow digging depth. With this equipment it is impossible to use a number of additional equipment, such as a trencher and a loading bucket.
Wheeled mini-excavators are small-sized machines on wheels. They are used for various types of excavation work in small confined spaces. In most cases, they are used in premises where communications are laid, as well as near buildings where it is impossible to use large-sized equipment. This type of mini-excavator is used to create dams and dams, to dig trenches and pits, to transport and reload lump and bulk building materials.
Plan for making a homemade mini tractor from a Neva walk-behind tractor
The main difference between a mini tractor and a walk-behind tractor is that when performing any work, the driver sits comfortably on the seat. Therefore, when converting a Neva walk-behind tractor into a mini tractor, there are two options for completing the work:
- purchase a ready-made module with a wheel pair that allows you to control mini-equipment while sitting;
- Assemble the attachment with wheels yourself.
Let's consider this option in more detail, based on the simplest design without a drive to the second wheel pair and a full-fledged steering column.
Of course, you can design a device with a steering column and all-wheel drive, but this is more difficult to implement, and also requires many additional components and skills from the master assembling it, and does not provide any special advantages in the work. And in fact, only the motor remains from the walk-behind tractor.
To control the mini tractor, we use the rotation of the entire engine and transmission unit with a standard walk-behind tractor steering wheel, so we need a module that is attached to the unit on a hinge and has a seat, as well as a hitch for towed devices. Thus, it is like an extension of the walk-behind tractor, with trailed units attached to it.This is the simplest and most cost-effective option. A frame with a wheel pair is assembled, on which a seat is installed, and two trailer units are mounted, for attaching to a walk-behind tractor and for connecting soil-cultivating or transport units.
Selecting the necessary nodes
In order for a compact excavator to be practically in no way inferior to heavier machines, it is made according to their model. Accordingly, a homemade model should have the following elements:
- Chassis. When creating a trailed version, a metal welded frame and one pair of wheels are suitable.
- Engine. Considering that the equipment will work with a tractor, it makes no sense to install a powerful power unit. You can get by with a small engine with a power of 6.4 kW. This is quite enough to start the hydraulic pump.
- Platform. The main components and mechanisms, steering and operator's seat will be located here.
- Hydraulic system. This includes: pump, filter, connecting hoses and hydraulic valves.
- Boom with bucket. This working element can be purchased ready-made.
Let's get started
Frame. It is recommended to make this element from metal channel No. 8 or 10. The channel is cut into pieces of the required length and connected to each other by welding. A wheel axle from an old car trailer is attached to the frame. Metal sheets are welded to the channel on top; this will be a platform for the equipment. It is recommended to immediately determine the location for attaching the boom and reinforce it with additional sheets of iron and brackets.
Boom with bucket. If you do not have experience in assembling complex mechanisms, then it is better to buy a ready-made arrow. When making your own boom, it is recommended to use round or square pipes with a wall thickness of 6-8 millimeters. The boom consists of three parts, which are connected to each other by hinges or bushings.
You can weld the ladle yourself, from metal sheets. To make the structure strong enough, it is recommended to strengthen the upper part with an additional strip of metal, insert longitudinal stiffening ribs and make “fangs”. To make bucket teeth, you can use metal “fingers” borrowed from the tracks of an old tractor.
Hydraulics. This is the most complex element of a mini excavator. The hydraulic system is responsible for the operation of the boom. To lower, swing and move the boom you will need 3 hydraulic cylinders. Another one will be responsible for controlling the bucket. They can be removed from any old truck where the cylinders are responsible for lifting the cab.
For the hydraulic system to work, a pump must be installed. The NSh-10 gear type pump is ideal. Complete with the pump, you can use a four-section hydraulic distributor R-16A or RGS-253. All hydraulic equipment is connected to each other by hoses. The pump is connected to the engine, and an oil container is installed on the platform.
Manufacturing recommendations
Detailed manufacturing tips can be found on forums and specialized websites. Typical difficulties of masters and ways to eliminate them are actively discussed there.
One of the easiest ways is to install homemade excavator equipment on an existing tractor. It can also be relatively easily made from components of a trailer, engine, tank, wheel axle from an old car, however, such advice is only relevant if the master has all these components at his disposal or is easy to find at dismantling sites and in auto repair shops.
To ensure stability, it is recommended to use additional fasteners during operation. To prevent the excavator from tipping over while digging, two supports are sufficient.
Design specifics
As the name itself implies, such mini-excavators are not suitable for independent movement around the territory. To move from one construction site to another, most often, cars or tractors (see New Holland tractor) are used, acting as a kind of tugboat.
Mini excavator with supports
In addition to the bucket, the design of the mini-excavator includes a wheelbase that allows you to easily move the object around the territory. Depending on the configuration, trailed mini-excavators can have a two- or four-wheel system, as well as a support that allows the unit to be coupled to the ground.
Naturally, the more working supports are installed on the equipment, the more stable it is located on the territory, having a wider range of action.
Typology of excavators - let's decide what exactly we need.
Having decided to design it yourself, you must understand which type of mini excavator is right for you. There are autonomous and trailed types .
If you have a walk-behind tractor or a mini tractor at your disposal, it would be logical to create a trailed excavator with an additional attachment point.
If you have an old car engine available, then it is easier for you to create a stand-alone unit with a chassis and a block for earthworks .
Having been inspired by the idea of how to make a homemade trailed mini excavator with your own hands, you should take into account that the process will not be easy, you need knowledge and skills .
Constructive decisions
A homemade manual excavator is configured in the same way as factory car models. This technique contains the following nodes:
- A supporting frame mounted on tractor tracks or vehicle tracks.
- ICE for driving hydraulics.
- Rotating support part.
- Hydraulics.
- Ladle.
- Arrow.
The optimal solution would be to install equipment on the T40 or create a similar trailer with your own hands to install a motor, tank, and wheelset on it. The stability of the machine will be ensured by additional shoe fastening: a pair of “shoes” will keep it from tipping over.
The motor can be an internal combustion engine with a power of 15 kW - a Japanese or even an inexpensive Chinese model.
Mini excavator components
The boom and hydraulic system can be purchased as a kit and simply installed on the base. Such a solution will eliminate many mistakes and search for spare parts. For the entire period of operation, you can forget about setting up the earthmoving machine. But such kits are expensive, and with the proper experience, home craftsmen prefer to make all the components with their own hands. Modernized components from old equipment can also be used.
Hydraulic system
In factory excavators, the hydraulic system consists of 4 parts:
- slewing support;
- arrow;
- ladle;
- control system.
When making an earthmoving machine with your own hands, you can resort to a simplified version. In this case, you will need a slewing ring and a boom. The column is mounted on a supporting structure, the role of which can be played by a walk-behind tractor. To make the units yourself, you need to have 4 hydraulic cylinders for moving the boom down and up, controlling the bucket, and turning. Old hydraulic cylinders from Soviet-made trucks will do.
For hydraulic drive it is convenient to use an inexpensive gear pump. This is an easy to use and repair, budget solution. Most often, craftsmen choose NSh-10, combining it with the R-16A distributor.
If necessary, increasing the power of the equipment is achieved by simultaneously installing 2 pumps with 2 distribution units.
How to make a ladle
The working part of the machine is a bucket. This part is subjected to maximum loads, which is why increased demands are placed on the quality of the material. The optimal solution is sheet steel 6-9 mm thick.
Separate blanks are calculated according to the drawings and cut from a steel sheet, and securely welded together. To strengthen the sides and bottom, additional steel plates are used. The efficiency and productivity of the bucket will increase if durable “fangs” are welded on the front. The “fingers” of tracked vehicles can be used for them.
Usually, when creating homemade earth-moving equipment, a forward and a backhoe are used. But if necessary, a dragline can also be assembled - a technique designed for large pits, trenches, etc. It will be needed when working with a bucket below the platform on which a homemade excavator is installed.
The bucket is our workhorse. The direct load during excavation work falls on this important unit.
Buckets for mini excavators need to be made durable so that the equipment lasts long and efficiently. We make a bucket from two sides and a bottom using electric welding. During manufacturing, we will strengthen the bucket structure by welding stiffeners and fangs. We can make the teeth from the “fingers” from the tracks of old tractors.
You can also buy a ready-made ladle, but it’s not difficult to make it yourself, there are no complicated calculations, the choice is yours.
The choice of a mini excavator depends only on your desires and capabilities. If you have assessed your capabilities and decided to build your own mini excavator, you will get a lot of pleasure from the process and the results of your work. If your financial situation allows you to buy a new model, great, it will last a long time and be effective.
But for a technically creative person, the real pleasure will still be to create your own model
It is important here that the results of your work do not fade after calculating the costs of construction. If you are not confident in your strengths and skills, your mini excavator may cost you more than buying a ready-made one
Hydraulic system
The factory hydraulic system consists of 4 elements: slewing ring, lifting boom, control levers and bucket. To make a simpler design, you can use only the necessary components: a boom and a slewing support column, securely attached to the supporting frame, which can be any of the mini tractors. To make homemade units you will need 4 hydraulic cylinders. They will be used to raise and lower the boom, rotate and control the bucket. Hydraulic cylinders designed for lifting the cabin of Soviet trucks are quite suitable for these purposes.
Additional equipment of the walk-behind tractor
I would like to note that most homemade products can be divided into several broad categories - standard attachments and a major reconstruction of a walk-behind tractor, when a motorized unit will act as the basis. Most summer residents and gardeners have access to the following improvements for mechanized tillage devices:
- snow removal system;
- system for moving bulk building materials: sand, crushed stone, etc.;
- lawn mower for cutting lawns and removing weeds;
- a system for planting and digging potatoes, which greatly simplifies the cultivation of this vegetable crop;
- plow and devices for hilling green spaces.
But before improving the walk-behind tractor, it is important to understand that the device must have sufficient power reserves. Although in most cases, gasoline and diesel devices were developed at the production stage with a reserve of power characteristics and it would be simply stupid for a home craftsman not to take advantage of this
If we consider walk-behind tractors powered by electricity, they are not always suitable for experimentation. It is for this reason that homemade products are used for equipment that runs on liquid fuel.
This is interesting: Ways to increase speed on a walk-behind tractor - this is important to know
Drawings are not a problem.
Having calculated your finances and decided on the possibilities, have you decided to build an excavator yourself? An excellent solution, creative pleasure will be guaranteed to you!
And the next stage will be drawings of a homemade mini excavator.
To create drawings yourself, you must have engineering skills and calculation skills. Here it will be important to draw every detail and make all the calculations.
You can use the help of Internet resources, because if you know what type of mini excavator you will be making, finding drawings on the Internet will not be so difficult.
The drawings of a trailed mini excavator will be much lighter and simpler than an autonomous excavator, the manufacture of which has significantly more parts and components.
Main working body
For an excavator, this is a bucket, and it should be made only from high-quality materials. The thickness of the steel sheets for welding the ladle should not be less than 6 mm, otherwise sampling of hard soil will quickly damage this part. After preparing the cut parts, they are welded into a single structure, which must be additionally reinforced with steel plates along the bottom of the bucket and the edge of the upper part. For productive operation of the bucket, teeth made of very hard alloys must be welded onto its lower outer edge. Ordinary steel will not work for this; it is better to use ready-made parts from tracked tractors.
Making a ladle
The main working part of the excavator, which experiences the maximum load, is the bucket, so high-quality material must be used for its manufacture. The best option is a bucket made of sheet steel 6-8 mm thick.
The blanks (preliminarily calculated and cut according to the drawings) must be well welded, and the bottom and side walls of this assembly must be further strengthened with steel plates.
In order for the excavator to perform its functions well, “fangs” made of high-strength material, for example, from “fingers” from a crawler tractor, must be welded to the front part of the bucket.
To manufacture specific equipment you need a considerable amount of spare parts and materials, but the most important thing is a decent level of technical knowledge. Therefore, before you take on making the most common model of a trailed mini excavator with your own hands or another, more complex design for performing earthworks, you need to realistically assess your capabilities. Please note that you will need the help of a mechanic, welder, turner and other specialists.
If you do not have the appropriate knowledge, perhaps purchasing a small industrial excavator will be cheaper than making special equipment yourself based on a car or mini tractor. In addition, an excavator manufactured at one of the factories will be more convenient to use, and its technical characteristics will be an order of magnitude higher than those of home-made special equipment.
DIY hydraulics for a mini tractor
Mini tractor for a summer residence
Review of the model range of YuMZ excavators: technical characteristics of YuMZ-6, EO-2621, how much the Petushok tractor weighs
Technical characteristics and modifications of the EO-4225 excavator
Technical characteristics and modifications of the Korean excavator EO-33211
Single-bucket wheeled excavator EO-3322
Drive - which is better and how to choose.
Having scoured the Internet and talked on forums, you will see a strong tendency for our homemade craftsmen to use a diesel drive for hydraulics when choosing. Industrial models also use diesel
. In self-manufacturing, it is cheaper to use the Chinese Lifan engine. You can, of course, experiment with domestic engines, but it depends on your skills.
A mini excavator is a reliable assistant in excavation work; it is compact and convenient, but not without its drawbacks. The first of the disadvantages is the low speed, this equipment is not very mobile, and the digging depth is small due to the size of the mini excavator. But for small construction projects this technique is quite suitable.
How to make a ladle
The bucket is the main working part of the mini-excavator; it bears the maximum load. Therefore, it must be made of high quality material. Optimally, sheet steel is used for the bucket, the thickness of which is 6–8 mm.
DIY mini excavator - bucket drawing
It is important to pay due attention to the welding of workpieces that have been previously calculated and cut according to the drawings. At the same time, steel plates are used to strengthen the bottom and side walls of the bucket.
DIY mini excavator - bucket drawing
For greater functionality of the mini-excavator, high-strength “fangs” should be placed on the front of the bucket by welding - the “fingers” of a caterpillar tractor are perfect for this.
Let's get started
Some home craftsmen assemble a homemade mini-excavator from ready-made components. The necessary parts can be purchased in stores, but in this case, it will be much easier and cheaper to buy a ready-made model. Therefore, we will consider the option of self-assembly from old parts.
Frame. It is recommended to make this element from metal channel No. 8 or 10. The channel is cut into pieces of the required length and connected to each other by welding. A wheel axle from an old car trailer is attached to the frame. Metal sheets are welded to the channel on top; this will be a platform for the equipment. It is recommended to immediately determine the location for attaching the boom and reinforce it with additional sheets of iron and brackets.
Boom with bucket. If you do not have experience in assembling complex mechanisms, then it is better to buy a ready-made arrow. When making your own boom, it is recommended to use round or square pipes with a wall thickness of 6-8 millimeters. The boom consists of three parts, which are connected to each other by hinges or bushings.
You can weld the ladle yourself, from metal sheets. To make the structure strong enough, it is recommended to strengthen the upper part with an additional strip of metal, insert longitudinal stiffening ribs and make “fangs”. To make bucket teeth, you can use metal “fingers” borrowed from the tracks of an old tractor.
Hydraulics. This is the most complex element of a mini excavator. The hydraulic system is responsible for the operation of the boom. To lower, swing and move the boom you will need 3 hydraulic cylinders. Another one will be responsible for controlling the bucket. They can be removed from any old truck where the cylinders are responsible for lifting the cab.
For the hydraulic system to work, a pump must be installed. The NSh-10 gear type pump is ideal. Complete with the pump, you can use a four-section hydraulic distributor R-16A or RGS-253. All hydraulic equipment is connected to each other by hoses. The pump is connected to the engine, and an oil container is installed on the platform.
Excavator manufacturing procedure
To build a mini-excavator, you need to start by visualizing your model: general sketches and sketches, selecting the characteristics of all elements, components and parts. If you have technical knowledge, you can try to create an excavator design yourself. But it’s easier to use a ready-made idea, of which there are a lot on Internet forums and specialized sites. In general, the principle of manufacturing a mini-excavator of your own production is similar to industrial technology.
Before starting work, you need to select a drawing of an excavator
What needs to be done at the preliminary stage of work:
- First of all, you need to determine the type of equipment: trailed or self-propelled.
- Next, select the power. The answer lies in the purpose and intended work that the machine will do. Depending on the type of soil and its volume, the forces on the hydraulic cylinders are calculated to raise and lower the boom and rotate the handle. Usually 8-13 liters. With. more than enough for a “home” model.
- Hydraulics. It is easier to install ready-made prefabricated hydraulic systems, although they are not cheap. However, if you have the knowledge and materials, you can try to make hydraulics yourself. This is a complex, but fascinating process in its own way, which saves quite a significant amount.
- When installing a pump, the question arises: which one to choose, axial piston or gear? The first option is more expensive, but also more effective. It is possible to determine whether it will pay off only by comparing the cost with the expected amount of work. A gear pump is used more often, and not only because it costs significantly less than an axial drive one. The main advantage is that it has a simple design that rarely breaks down and in which any malfunction can be easily repaired.
- Based on the performance of the pump and hydraulics, the displacement of the fuel tank is selected.
- Working equipment. If a ready-made hydraulic system is installed, it is rational to supply a ready-made boom along with it, ordering it from the same manufacturer. You can also install a boom from an old wheel loader (if, of course, you have one). But it’s easier to make a boom from a square pipe with your own hands, and weld the bucket from sheet steel. It is simple, inexpensive and allows you to accurately adjust the equipment to the required parameters.
So, the preparation is complete, the characteristics of the future model have been thought out, and you can get to work. At the first stage of work, an estimate is drawn up. It includes:
- main components and assemblies;
- spare parts;
- equipment for manufacturing parts (for example, lathe, welding machine);
- tools.
All together will give the estimated cost of manufacturing an excavator. It is important to understand what you can do yourself, what is more profitable to order from a specialist or buy, and why it makes sense to buy equipment that can be used after the excavator is manufactured. If DIY still looks cost-effective, it's time to move on to the second part: drawing up detailed drawings. In order to create drawings yourself, you must have technical and calculation skills. It is important to draw every detail and make all the calculations. However, finding a ready-made drawing of a homemade excavator on the Internet is also not difficult.
Required tools and materials
When the drawings are ready, it’s time to order the missing tools and materials from the list. As a rule, the list of main parts includes:
- motor with starter and coil;
- hydraulic cylinders;
- hydraulic distributor;
- hydraulic pump;
- fingers;
- sheet steel and rolled metal.
Homemade excavator model
The tools you will need are a hammer drill, a compressor, hacksaws, a welding machine, wrenches, screwdrivers, etc.
Assembly order
Procedure:
- Weld a frame from pipes. The main load will occur at the reach, at the point where the boom is supported, so it makes sense to strengthen the internal walls in this place (for example, with two 10 mm plates).
- Collect the arrow. To do this, you will first need to establish the joints and hinges. This is a labor-intensive and very important stage. For fingers, you can take car kingpins with a diameter of 25 mm (for example, from a Gazelle). Bushings and spacer rings for hydraulic cylinders are selected for these fingers. If there are no suitable ones, you can order their production according to the specified dimensions marked on the drawing of the excavator boom.
- A complete excavator hydraulic system consists of four main elements: the rotary platform, bucket, boom and stick. In home-made models, turntables are usually abandoned: they are difficult to manufacture and are not needed for most “home” work. Therefore, it will be enough to install four hydraulic cylinders (for example, from the cab lifting mechanism of a MAZ or KAMAZ truck). Their power is quite enough to turn and lift the boom and arm and operate the bucket.
- Next, you can install the engine and pump bracket on the frame. They are connected by a coupling (can be used from old Zhiguli cars). The structure must first be centered and welded.
- Install a hydraulic tank - any container of a suitable size with an outlet to the pump at the bottom of the tank. The easiest way to get wheels is from a VAZ “classic” - they are often sold cheaply or even given away for free at tire shops. It is advisable to make the wheels adjustable so that there are two positions: transport and working.
- The ladle is welded from sheet steel. Since it is the one that comes into contact with the work surface, the strongest possible metal should be used. It is recommended to further strengthen the top and bottom edges with steel plates. The simplest bucket is made of three parts: two side walls and a base. Everything is welded at right angles. The required bends are created by heating with a torch. At the last stage, the teeth are welded.
- The last step after everything is assembled is painting with durable paint to protect the metal from corrosion and give the excavator its individuality.
We make a mini tractor from a Neva walk-behind tractor with our own hands
By making a mini tractor from a Neva walk-behind tractor with your own hands, you will minimize the cost of time and effort, which will result in the appearance of an excellent device for doing all the work on your garden plot. In addition to the adapter, you can purchase: a plow, hiller, harrow and other devices.
You can also upgrade a walk-behind tractor into a mini tractor with your own hands from unused parts of other equipment. This conversion option will take more time, but it will pay off with low costs.
To create a mini tractor from a Neva walk-behind tractor, you will need the following components: the walk-behind tractor itself, metal pipes, corners, sheets; two wheels; welding machine; driver's seat; set of tools.
Step-by-step process for upgrading a walk-behind tractor into a mini tractor
Step 1. We develop the design of the kinematic scheme. The main thing in this scheme is the balance of the structure so that additional loads do not destroy future equipment. This diagram is developed independently, or you can use a ready-made diagram with a kinematic image of a mini tractor. Step 2. We make a frame from angles and pipes
During the manufacture of the frame, it is important to consider the location of the fork and bushing, which ensure the rotation of the trailer. Step 3. Making the body
For the body, an excellent material for manufacturing would be steel sheet. The height of the sides of the body should not exceed 30 cm. Step 4. Install the driver's seat. Step 5. Install attachments. Step 6. We check the performance of the manufactured mini tractor. Step 7. Painting.
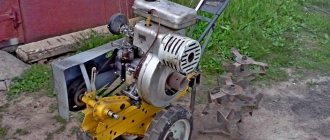
We will consider one of these options for creating a mini tractor using the example of the Neva MB-2s 7.0 PRO walk-behind tractor. This walk-behind tractor is equipped with a Subaru EX 21D engine. If you plow your garden plot with such a walk-behind tractor, then within a week it will be difficult to straighten up. To avoid such consequences, we will convert the walk-behind tractor into a mini tractor.
Since the SUBARU engine does not have a 12V output, the headlights are installed for decoration. To use them you need to install a battery pack or battery. When plowing the land, the imperfections and inconvenience of this technique are not noticed. This mini-tractor was tested on hard-to-plow land. And although during the creation of the tractor its traction characteristics were questioned, the tests were very successful.
Also, a big plus of this machine is that the driver and the front part of the mini tractor are additional weight, which helps the drive wheels to better grip the ground. Installed levers: gas lever - on the right, axle release lever - on the left. To lift the hitch, a sprocket with a diameter of 150 mm is used. It is brought out by a bicycle chain to a lever or a manual jack.
The installed Volga wheels were found in a landfill, pre-cleaned of rust and painted. The pedal arrangement is similar to that of a car: the right pedal is the brake, the left pedal is the clutch. Speeds are switched using a lever. Shoe brakes taken from the Riga-7 moped are installed.
The principle of operation of the clutch pedal is the same as that of a walk-behind tractor: when pressed, the minitractor moves, if you release it, it stops. There is a cable connected to the left armrest lever that unlocks the axles. It is used when turning is necessary. There are no special nuances when turning right or left. The right armrest houses the throttle lever. The hitch lift lever is located under the seat.
The wear on the drive belt on the gearbox is the same as on a walk-behind tractor. The sum of the weight of the driver and the front part of the tractor is 100-110 kg, which keeps the front of the mini tractor from lifting when the plow is deepened. The size of the processed track remains the same as the walk-behind tractor - 630 mm. Stability problems arise if plowing goes deeper than 20 cm.