Why the brake pedal fails: we find out the reasons and troubleshoot problems
- What is the general principle of operation of a car's braking system?
- What are the main reasons for the brake pedal to fail?
- Why does the brake pedal fail after bleeding and with the engine running?
A properly functioning braking system is an important element of safety and even a guarantee of the life of the driver and other road users. If your car's brake pedal fails, this is a danger signal. This means that you need to check the entire brake system and find out why the brake pedal is falling down.
How does the braking system work?
To understand why the brake pedal sometimes fails, you need to understand the general principle of operation, as well as the design of the braking system. It is usually hydraulic, and the problems are common for different car models. The operating principle of the system is based on the fact that a special incompressible liquid is placed in a closed volume.
Hydraulic brakes include the following elements :
- GTZ (brake master cylinder);
- RTC (brake wheel cylinders);
- hydraulic lines;
- compensatory device;
- brake discs, pads.
The working fluid here, in accordance with the name, is brake fluid, which has certain properties. The driver presses the brake, his force is transmitted to the GTZ filled with working fluid. The fact is that the device of this element contains a piston - it presses on the liquid, and through it the force is transmitted to the RTC. The latter are installed in the area where the wheels are located. Thus, the pads are pressed against the brake discs/drums. Sudden pressure on the pedal causes the pads to rigidly block the wheels.
Next, the driver releases his foot, and the return springs move the pads back. At the same time, the liquid is displaced into the GTZ. This short list represents the entire operation scheme of this system.
Why does the brake pedal fail?
Now let's move on to the main question of why the brake pedal fails. The system itself, recall, is closed, and the liquid inside is incompressible. Due to these properties, the force from the pedal is supplied to the pads. They press against the brake disc, causing the car to slow down and stop. In the event of a malfunction, pressing is not followed by braking: liquid under pressure leaves the system or air takes its place due to lack of tightness. Both options interfere with the normal functioning of the braking system, which means that such a car cannot be driven.
Let's take a closer look at the reasons for the failure of the brake pedal:
1. Brake fluid.
The reason why the brake pedal fails may be the quality of the brake fluid and its mixing with condensate. The latter is nothing more than water, which is compressible. It changes the characteristics of the brake fluid, so you feel your foot sink when braking.
Gradually accumulating condensation, the brake fluid (BF) changes color and becomes darker. To determine the water content in fuel fluid, you can use specialized instruments. According to the maintenance standards for most cars, this working fluid must be replaced every 40,000 km or every 4 years.
Elements of the brake system deteriorate over time due to contact with brake fluid if it does not meet all required standards. The following signs appear: fluid leakage, pedal failure, and if you release it, air leaks.
If the brake pedal fails, check how much brake fluid is currently in the system and whether there are any leaks in the system hydraulic circuit. Most often, leaks are found in the area of threaded connections of brake hoses and pipes with each other or with the caliper. Then the way out of the situation will be to pull the connection. Another cause of a leak may be damage to the tube or hose - in this case, the part needs to be replaced.
2. Air in the hydraulic system.
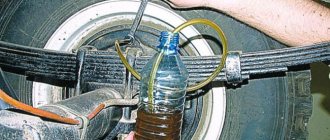
The ingress of air negatively affects the quality of the brake fluid and causes airing of the brake lines. The resulting plugs are compressed under pressure, and the pedal fails. The brake pads move little and the car does not slow down because there is no pressure to move the piston. Even if the driver presses the pedal to the floor, he will not achieve the desired effect. Fix this problem by pumping.
But air appears in the system not only due to mechanical defects. Often airing is a consequence of errors during bleeding after changing the brake fluid. Either way, you will feel like your leg is sinking when you try to brake.
3. Malfunction of the main brake cylinder (MBC).
In the absence of brake fluid leaks, a sign of a possible failure of the GTZ unit may be the fact that the pedal sinks and only after the second or third pumping becomes stable.
Most often, the reason for this behavior of the system is wear of the rubber seals. There are many reasons for this: from the chemically active composition of low-quality brake fluid to the natural wear and tear of rubber elements. The lack of the required density of the part contributes to the appearance of cracks in the system. Air easily leaks through them and the fuel fluid flows out.
Dealing with this problem and the fact that the pedal fails seems simple: just install new rubber seals. But this work cannot be done without skills and patience: you will have to change all the rubber bands, seals and brake fluid. Be sure to bleed the system to get rid of the air, otherwise you will again notice your foot sinking under braking.
4. Vacuum brake booster (VUT).
If there are problems with this unit, a specific sound similar to hissing appears during braking, which indicates depressurization in the vacuum booster. In this case, the pedal does not necessarily fail. This problem occurs due to malfunctions of the valve, diaphragm, and VUT seals.
In this case, as in most others, you will have to replace elements that have become unusable. We have already talked about the reasons that cause the failure of rubber seals and oil seals - these problems lead to the improper functioning of the VUT. Among other things, the pipes fail and the diaphragm of the unit cracks.
5. Violation of clearances in the brake system.
Too large gaps between the GTZ and the pedal cause the latter to fail, and the car brakes worse than before. Ideally, after pressing, the driver feels a smooth movement of the leg, then resistance increases. With an increased gap, you can feel that your foot sinks sharply when you press the pedal, and only at the end does resistance arise, although it is not always there. There is no talk of stable braking here.
6. Bleeding the brake pedal after installing new pads.
Clutch repair
3307 trucks often operate at maximum loads. A fully loaded car cannot drive in one gear when going uphill, and shifting gears in this mode forces the clutch to work quite hard. In addition, the 3307 gearbox is not synchronized and requires double squeezing when changing from one gear to another. Due to the heavy load on the clutch, it often fails and has to be repaired.
Signs of poor clutch are determined by pedal pressure:
- It fails, the gears cannot be engaged;
- Doesn’t squeeze out completely and sticks up;
- The pedal is too “soft”;
- Large free movement, squeezing occurs at the very end.
There are cases when the pedal pressure is normal, but when the gear is engaged, the car does not move.
Clutch diagram for GAZ 3307
The cause of the malfunction can be almost all clutch parts. Often fail:
- “Basket” and clutch disc;
- Release bearing;
- Master and slave cylinder;
- Clutch fork.
A little more detail about each detail:
- Driven clutch disc. The wear of the disc linings can be determined without removing it from the car. You need to remove the clutch housing tray - and then the disc linings can be seen. Linings that are too thin indicate the need to replace the part. Sometimes the disc hub breaks, and then the car does not move when the gear is engaged. Such a malfunction can also be determined on the spot. Two people need to do the check. One squeezes the clutch with the engine not running, the other moves the disc with a screwdriver. The break will be noticeable by the uneven movement of the disk.
- Clutch drive disc (“basket”). The “basket” of a gasoline engine is claw-type (three legs), the height of the legs is adjusted using nuts. Accuracy is very important here - incorrect adjustment affects the movement of the car: when starting off and when changing gears. The car can:
- twitch at the beginning of movement;
- gears on an unadjusted clutch engage with a crunch;
- the clutch can “drive”, but the car will not move.
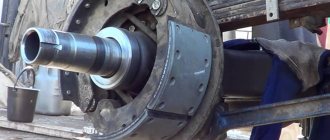
- Release bearing with bore. The unit consists of two parts - the hub and the bearing itself. The hub has an oiler - the rubbing surface on which the hub moves is lubricated. The bearing itself must have a lithol type lubricant inside. A dry bearing can jam, and in this case the varnishes of the clutch “basket” will instantly wear out.
- Clutch master and slave cylinders. If the master cylinder fails, the pedal becomes soft (“wobbly”) and the clutch periodically disappears. A faulty slave cylinder usually leaks. You can try changing the cuffs inside the cylinders, but if the parts are old enough, it is better to replace them.
- Release bearing fork (clutch fork). The part is very simple, but its malfunction can most often be seen only when the fork is removed. Three characteristic defects of the part:
- the tips in connection with the release bearing hub are worn out;
- the fork bursts in the area of the swivel joint (“soldier”) or in the place where the rod is attached;
- the fork bends.
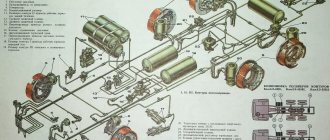
Design, malfunctions and maintenance of brakes GAZ-66, GAZ-53
The GAZ-53A and GAZ-66 vehicles are equipped with drum-type brakes with a hydraulic drive and a hydraulic vacuum booster
The brakes of the front and rear wheels of the GAZ-53A are identical in design and differ only in size.
The rear brakes of the GAZ-b6, unlike the brakes of the GAZ-53A, do not have protective screens on the brake cylinders, but have rear pads with long linings.
The front brakes of the GAZ-66 have two cylinders, each of which acts on its own pad.
https://www.youtube.com/watch?v=rWVCiUiT6Qs
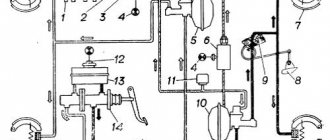
The design of the brakes is shown in Fig. 1 and 2. The action of the hydraulic vacuum booster is based on the use of vacuum in the suction pipe of the engine.
The amplifier consists of a vacuum chamber, a hydraulically driven vacuum control valve and a hydraulic cylinder.
All these parts are combined into one hermetically sealed unit, which is mounted on two brackets on the longitudinal beam of the frame.
The vacuum chamber of the amplifier is connected to the engine suction pipeline through a pipeline and a plate shut-off valve.
The shut-off valve is installed in close proximity to the vacuum source, thereby maintaining maximum vacuum in the amplifier system.
Brake Maintenance
Adjusting the gap between the pads and drums. Brakes should be adjusted when the brake drums are cool and the wheel bearings are properly adjusted.
There are two brake adjustments: current and full
Current adjustment. As the friction linings of the brakes wear out, the gaps between the linings and the brake drums increase, and the pedal begins to move closer to the cabin floor when braking.
Routine brake adjustment restores the original clearances between the friction linings of the brake pads and the brake drums, compensating for lining wear.
To adjust the brakes you need to:
— hang the wheel using a jack;
— rotating the wheel forward, slightly turn the pad eccentric in the direction of the arrows shown in Fig. 1 and 2 until the block brakes the wheel;
— gradually lower the eccentric, turning the wheel by hand in the same direction until the wheel begins to rotate freely;
- install the second pad in the same way as the first, while rotating the wheel forward for the front brake of the GAZ-66 car and backward for the rear brake of the GAZ-66 car and all brakes of the GAZ-53A car.
After adjusting the brake pad clearance, check the operation of the brakes on the road.
Fully adjustable. Wheel brakes should be fully adjusted when changing friction linings, pads or after machining the drums.
When fully adjusting the brakes, you must:
— hang the wheel using a jack;
— slightly unscrew the nuts of the support pins and set the support pins of the pads to the initial position;
— pressing the brake pedal with a constant force of 12-16 kg, turn the support fingers in the direction indicated by the arrows so that the lower part of the lining rests against the brake drum.
The moment when this happens is determined by the increase in resistance when the support pin rotates. Tighten the support pin nuts in this position;
— turn the adjusting eccentrics so that the pads rest against the brake drum;
— release the brake pedal;
— turn the adjusting eccentrics in the opposite direction so that the wheel rotates freely;
- Adjust the brakes of all wheels in this way.
After adjusting the pad clearance of all brakes, check the operation of the brakes on the road.
With correctly adjusted clearances between the shoe linings and the drums, the brake pedal should drop no more than ⅔ of its full travel during full braking.
If after adjustment, while the car is moving, the brake drums heat up slightly (the hand is comfortable when touching the drum rim), then after several braking the pads will break in and the heating will stop. If the drums are very hot, you need to find the pads touching the drums and use the adjusting eccentrics to slightly move them away from the drums.
Adjusting the gap between the pusher and the master cylinder piston
The clearance between the pusher and the master cylinder piston is necessary to prevent spontaneous braking of the car.
If the edge of the sealing collar covers the compensation hole 23 (Fig. 3), then the brakes will not be completely released, since some of the fluid cannot flow from the working part of the cylinder into the reservoir after the end of braking.
The gap should be 1.5-2.5 mm, which corresponds to 8-13 mm of pedal free play, measured in the middle of the footrest.
To measure the gap you need to change the length of the pusher.
The procedure for adjusting the gap on a GAZ-53A car is as follows:
Separate the pedal and pusher, unscrew and remove the pin.
Check the position occupied by the pedal under the action of the release spring.
The pedal should rest against a rubber buffer mounted under the inclined floor of the cabin.
Screw (or unscrew) the pedal rod into the piston pusher so much that the axis, when rolling in the master cylinder piston, is shifted back and does not reach the axis of the pedal hole by 1.5-2.5 mm. Without disturbing this position, securely lock the pedal connecting rod with the locknut.
Align the hole in the connecting rod and the pedal, place the pin and secure it with a cotter pin. Check the pedal free play.
Clutch repair
3307 trucks often operate at maximum loads. A fully loaded car cannot drive in one gear when going uphill, and shifting gears in this mode forces the clutch to work quite hard. In addition, the 3307 gearbox is not synchronized and requires double squeezing when changing from one gear to another. Due to the heavy load on the clutch, it often fails and has to be repaired.
Signs of poor clutch are determined by pedal pressure:
- It fails, the gears cannot be engaged;
- Doesn’t squeeze out completely and sticks up;
- The pedal is too “soft”;
- Large free movement, squeezing occurs at the very end.
There are cases when the pedal pressure is normal, but when turned on
transmission, the car does not move.
Clutch diagram for GAZ 3307
The cause of the malfunction can be almost all clutch parts. Often fail:
- “Basket” and clutch disc;
- Release bearing;
- Master and slave cylinder;
- Clutch fork.
A little more detail about each detail:
- Driven clutch disc. The wear of the disc linings can be determined without removing it from the car. You need to remove the clutch housing tray - and then the disc linings can be seen. Linings that are too thin indicate the need to replace the part. Sometimes the disc hub breaks, and then the car does not move when the gear is engaged. Such a malfunction can also be determined on the spot. Two people need to do the check. One squeezes the clutch with the engine not running, the other moves the disc with a screwdriver. The break will be noticeable by the uneven movement of the disk.
- Clutch drive disc (“basket”). The “basket” of a gasoline engine is claw-type (three legs), the height of the legs is adjusted using nuts. Accuracy is very important here - incorrect adjustment affects the movement of the car: when starting off and when changing gears. The car can:
- twitch at the beginning of movement;
- gears on an unadjusted clutch engage with a crunch;
- the clutch can “drive”, but the car will not move.
- Release bearing with bore. The unit consists of two parts - the hub and the bearing itself. The hub has an oiler - the rubbing surface on which the hub moves is lubricated. The bearing itself must have a lithol type lubricant inside. A dry bearing can jam, and in this case the varnishes of the clutch “basket” will instantly wear out.
- Clutch master and slave cylinders. If the master cylinder fails, the pedal becomes soft (“wobbly”) and the clutch periodically disappears. A faulty slave cylinder usually leaks. You can try changing the cuffs inside the cylinders, but if the parts are old enough, it is better to replace them.
- Release bearing fork (clutch fork). The part is very simple, but its malfunction can most often be seen only when the fork is removed. Three characteristic defects of the part:
- the tips in connection with the release bearing hub are worn out;
- the fork bursts in the area of the swivel joint (“soldier”) or in the place where the rod is attached;
- the fork bends.
How to bleed brakes on gas 3307 - Online auto workshop
Hello dear friends! In today’s article we will analyze and get acquainted with the brake system of the Gas 3307 truck.
Gas 3307 is equipped with three braking systems: a working main one, acting on all wheels; a spare one is if, say, your rear brakes fail, the front ones remain in working condition, so, like the Gas 3307, the braking system is two-circuit: one circuit for the rear wheels and the second, respectively, for the front wheels.
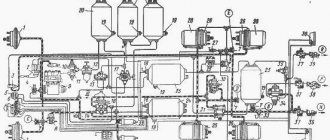
And so, if one circuit fails, the second remains operational, that is, how a spare circuit turns out. And the third system: this is, of course, the parking (hand) brake. On older Gas 3307 models, the parking brake system has a mechanical drive that acts on the drum brake mechanism mounted on the gearbox. ( see Fig. 1. )
Fig.1. Parking brake Gas 3307, old model.
On new Gas 3307 models, they have already begun to install a parking brake that acts on the rear wheels. ( See Fig. 2. ) This design of a parking brake has been used on passenger cars for quite a long time.
But on trucks not so long ago. I’m afraid of course I’ll be wrong, but I’ll say it anyway: they started installing such a parking brake system on Gas 3307 trucks around 2000.
(But if I’m wrong, I apologize, I don’t remember exactly, but it’s not that important).
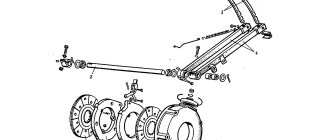
Fig.2. Hand (parking) brake Gas 3307, new model.
1. Lever; 2. Front cable; 3. Plug; 4. Adjustment screw; 5. Expansion link; 6. Support sleeve; 7. Drive lever; 8.9. Rear cables; 10. Equalizer lever; 11. Equalizer; 12. Bracket; 13. Adjusting nut; 14. Lock nut.
It is worth paying special attention to adjusting the parking brake Gas 3307. And it needs to be maintained in working condition. If not adjusted correctly, there may be self-braking or weak braking of the parking brake. There may be different consequences, therefore, it is better to adjust the parking brake in time and correctly.
To adjust the parking brake Gas 3307, you need to do the following. If, when braking with the parking brake system, lever 1 ( see Fig.
2) when a force of 600 N (60 kgf) or more is applied to it, it is fixed on the outermost upper teeth of the sector, then the drive should be adjusted in the following order:
- lower lever 1 to its lowest position and the gearbox lever to neutral;
- completely release the tension of the cables by releasing the adjusting nut 13;
- jack up the rear wheels;
- remove plug 3 in the brake mechanism;
- Using a screwdriver, turning adjusting screw 4 through the slot in the shield, select the gap between the expansion link 5 and the drive lever 7, rotating the wheel forward by hand until it slows down;
- tighten screw 4 until the wheel begins to rotate freely;
- install the plug in the brake mechanism;
- adjust the second wheel in the same sequence;
- move lever 1 by one tooth of the locking mechanism;
- by rotating the adjusting nut 13 of the front cable, tighten the rear cables until one of the wheels begins to brake;
- lower lever 1 to its lowest position and make sure that the rear wheels do not brake;
- lock the adjusting nut 13 with a locknut;
- lower the car onto its wheels.
Steering repair
Steering malfunctions also affect traffic safety, as do brake system malfunctions, and operating a vehicle with such defects is prohibited. Problems must be corrected immediately after they are discovered. Malfunctions of the model 3307 include:
- steering wheel play exceeds the permissible norm;
- knocking when turning the steering wheel;
- tight turning of the steering wheel;
- oil leak from the steering mechanism (gearbox).
Steering mechanism diagram
- play in the steering rod joints or steering tips;
- wear of the worm pair in the gearbox;
- play in the crosspieces of the steering driveshaft;
- jamming of steering joints and rods;
- play in the steering gear bearings.