In order not to rent equipment for earthworks, many people want to assemble a mini-excavator with their own hands, but not everyone achieves this dream to its logical conclusion, since the manufacture of a home-made excavator requires free time, drawings and funds to implement the plan.
Despite their small size, homemade mini-excavators are in no way inferior to factory-made equipment. They even have some advantages: light weight, low fuel consumption, ease of transportation, etc.
The size of the mini-excavator makes it possible to work in almost any area, even indoors. Such mechanisms are often used on a farm or country house for digging holes and laying underground communications to premises.
Before making a mini-excavator, you need to decide on its type. The options could be:
- Excavator based on a mini-tractor or car. The equipment will be mounted. The simplest way would be to remake it on a car basis. You can create a completely autonomous model (wheeled or tracked), which moves independently or is transported with the help of auxiliary means. The main advantage of the attachment is that it can be dismantled at any time to use the equipment for its intended purpose.
- Another option is to make a homemade mini-excavator from scratch. But this option is quite labor-intensive, as it requires specific knowledge and a huge number of spare parts.
The simplest and cheapest option is a mini-excavator based on a trailer, consisting of a supporting frame with a wheel pair, on which an autonomous internal combustion engine, hydraulic drive and specific equipment are installed.
Search for drawings
During manufacturing, you need to select a specific scheme according to which the special equipment will be assembled. The basis is taken from factory, but reduced in size, drawings of such excavators as “Belarus” or a home-made excavator at MTZ. You can also use ready-made diagrams and sketches, according to which folk craftsmen made their homemade products. Having obtained drawings of a certain design, it is necessary to draw up an estimate. From it you will be able to understand how much money will be needed to purchase consumables and spare parts to make an excavator with your own hands.
Working with drawings
When we already have drawings of certain structures, we begin to draw up estimates. From it you can see how much money you need to allocate to buy consumables and spare parts for making a mini-excavator yourself.
This is interesting: Homemade loader for the rear linkage of the MTZ tractor: materials, tools, instructions, drawings
Mini excavator design
Most homemade models have the same layout as a factory automobile excavator. The main structural elements consist of the following components:
- a supporting frame on tracks or a motorized excavator;
- a motor that drives the hydraulic system;
- rotary support system;
- hydraulics (hydraulic pump, oil filter, tank, manual control lever, hydraulic cylinders, hoses);
- two-section boom with bucket.
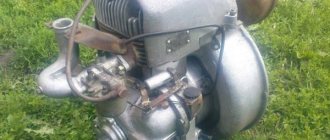
A good solution would be to install a homemade excavator on a T 40 or to make a trailer yourself from components on which to install: an engine, a tank, a wheel axle from an old car. To create stability during operation, it is advisable to provide additional reinforcement in advance, consisting of a pair of support “shoes” that will eliminate the possibility of tipping over, that is, the excavator on a vehicle chassis will stand securely during operation. The engine used is often compact Japanese or cheaper Chinese internal combustion engines, the power of which reaches 15 kW.
Do-it-yourself mini tractor from a walk-behind tractor
The desire to have a full-fledged “iron horse” on your farm is inherent in any farmer, with all their advantages, walk-behind tractors are not a full-fledged replacement for a tractor. It’s one thing to “run” across arable land behind a walk-behind tractor, and quite another to cultivate the soil while sitting behind the wheel of a mini tractor.
Description and technical characteristics of JCB 5CX.
On this page you will find a detailed review of the T-40 tractor.
Adapter for walk-behind tractor with steering control: drawings, dimensions.
Getting to know mini tractors from a walk-behind tractor with your own hands
But the cost of a mini tractor is quite high. Therefore, the desire of many involved in agriculture to create their own mini tractor from everything that is available on the farm is understandable.
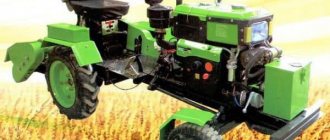
Today, the construction of tractors of your own design occurs in two ways: creating equipment from car parts or agricultural machinery or upgrading walk-behind tractors into mini tractors. The latter have already been called motor tractors.
The popularity of this design movement is evidenced by the abundance of participants in specialized forums and groups on social networks.
Where everyone can talk about their experience of creating a mini tractor from a walk-behind tractor with their own hands. Here you can get acquainted with the drawings of a mini tractor from a walk-behind tractor with your own hands, discuss the most important technical details, or view a photo or video of a mini tractor with your own hands.
Today, motor tractors are presented in three categories:
- completely homemade;
- modernized walk-behind tractors to the level of a mini tractor using factory kits;
- factory motor tractors made on the basis of walk-behind tractors.
DIY mini tractor
When converting walk-behind tractors into mini tractors, all sorts of parts and mechanisms available to the amateur designer are used. Often such models are made, as they say, “by eye”, without preliminary calculations. Despite the fact that DIY drawings of motorized tractors from a walk-behind tractor are available on the Internet, each master ends up with his own original model. The main disadvantage of such motorized tractors is the use of catch from equipment created to perform other tasks not related to agriculture. First of all, this concerns gearboxes that are removed from cars. And it’s not always possible to talk about the comfort of working on such a tractor. Nevertheless, those wishing to convert their walk-behind tractor into a mini tractor are only increasing.
Plan for manufacturing a mini tractor from a Neva walk-behind tractor.
On our website you can also learn how to make a homemade tracked all-terrain vehicle.
This link will tell you all about the biggest tractors in the world.
Using factory
The demand for the modernization of walk-behind tractors has found a response both directly from their manufacturers and from companies with the production capabilities to create kits for converting walk-behind tractors.
The easiest way to bring your walk-behind tractor closer to the image of a tractor is to purchase an adapter - a two-wheeled cart with a driver’s seat, a powerful drawbar and a device for mounting towed equipment.
A complete kit, as a rule, includes a frame, footrests with pedals, a brake system, a steering column assembly, as well as a front beam with hubs and brake discs. The delivery also includes a rear linkage with a lift (usually manual), and at the customer’s request it can be equipped with an electric lift.
Having such a kit, you can assemble a mini tractor using a welding machine, plumbing tools and wrenches. You also need to worry about the wheels for the future “iron horse” - these can be wheels from a passenger car or similar ones from a walk-behind tractor.
Video of a mini tractor made from a walk-behind tractor with your own hands.
Simpler but more expensive
In order not to rack your brains over how to make a mini tractor from a walk-behind tractor with your own hands, you can purchase a ready-made motorcycle tractor produced by the manufacturer.
They are distinguished by a more advanced design than the first two options, as well as the presence of all the components necessary for agricultural machinery. The cost of such a device is lower than a mini tractor, but higher than making it yourself from a factory kit.
Individual components of a mini-excavator
One of the simplest solutions is to purchase a set of ready-made components (boom and hydraulic system) and then install them on a homemade frame or equipment that was purchased for other purposes. This option will avoid many problems. You won’t have to look for spare parts for a long time for a homemade excavator you’ve made yourself. You can also completely eliminate the need to configure equipment during operation. But the cost of such a project will be quite high. Knowing this, most craftsmen make individual components themselves, using old components from special equipment with subsequent modernization of some components.
One horse, two horse
What about “horses”? The question is reasonable, and the answer to it lies in the purposes and in the work that you will carry out on a mini excavator made by yourself. The calculation of the forces on the hydraulic cylinders for raising and lowering the boom and turning the handle depends on what exactly you are digging, then the speed of movement of the links and the movement of the pistons in the cylinders is determined. Typically, a power of 8-13 horses is more than enough.
Finding the necessary equipment or spare parts has become even easier - leave a request and they will call you back.
Hydraulic system
The factory hydraulic system consists of 4 elements: slewing ring, lifting boom, control levers and bucket. To make a simpler design, you can use only the necessary components: a boom and a slewing support column, securely attached to the supporting frame, which can be any of the mini tractors. To make homemade units you will need 4 hydraulic cylinders. They will be used to raise and lower the boom, rotate and control the bucket. Hydraulic cylinders designed for lifting the cabin of Soviet trucks are quite suitable for these purposes.
Preparatory stage of work
First you need to decide what kind of excavator you need. There are two types of small earthmoving equipment: self-propelled or trailed. In the first case, you will need an engine so that the excavator can move independently. In the second case, the equipment can be attached to a tractor or other tractor. It is worth noting that mounted models are much easier to make with your own hands than self-propelled ones.
Any work on creating equipment begins with drawings. This will help you better calculate the traction force, determine the amount of material, and think about the appearance of the excavator. You can prepare the drawings yourself, or use ready-made sketches on the Internet.
Hydraulic drive
The choice of hydraulic drive directly depends on the financial capabilities of the craftsman who decided to make a mini-excavator on his own. In most cases, a gear pump is used, since its cost is significantly lower than an axial drive unit, and the simplicity of the design allows problems to be resolved more quickly. For the manufacture of homemade mini-excavators, NSh-10 gear pumps together with the R-16A distribution unit are widely used. Often, in order to add power to a homemade trailed excavator, 2 pumps with distributors are installed simultaneously.
Of course, to have fewer questions about how to make equipment for an excavator, it is easier to purchase a ready-made kit with an installed hydraulic system. If your financial situation does not allow you to use this option, then you can make a lifting boom and a handle from a profiled pipe according to the drawings.
Getting to the bottom of the philosophical grain
How your DIY mini excavator will dig is a rhetorical question. But, you see, assembled by you yourself, it will definitely have the right to claim even if not the title of a reliable assistant in the household, then certainly the subject of your, now unshakable, pride. So, go for it! And you can rejoice at the successes of others on numerous forums, both Russian-language and foreign.
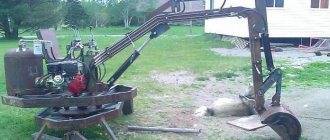
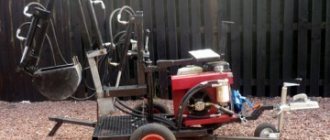
Photo source: exkavator.ru Your work has every chance of becoming something similar
Photo source: exkavator.ru Or this. Far from the visualization object in the first photo, but still
In detail
Future!
Making a ladle
The main working part of the excavator, which experiences the maximum load, is the bucket, so high-quality material must be used for its manufacture. The best option is a bucket made of sheet steel 6-8 mm thick.
The blanks (preliminarily calculated and cut according to the drawings) must be well welded, and the bottom and side walls of this assembly must be further strengthened with steel plates.
In order for the excavator to perform its functions well, “fangs” made of high-strength material, for example, from “fingers” from a crawler tractor, must be welded to the front part of the bucket.
To manufacture specific equipment you need a considerable amount of spare parts and materials, but the most important thing is a decent level of technical knowledge. Therefore, before you take on making the most common model of a trailed mini excavator with your own hands or another, more complex design for performing earthworks, you need to realistically assess your capabilities. Please note that you will need the help of a mechanic, welder, turner and other specialists.
If you do not have the appropriate knowledge, perhaps purchasing a small industrial excavator will be cheaper than making special equipment yourself based on a car or mini tractor. In addition, an excavator manufactured at one of the factories will be more convenient to use, and its technical characteristics will be an order of magnitude higher than those of home-made special equipment.
Model selection
A properly assembled mini-excavator is in no way inferior to models created according to all the rules in the factory. It has some advantages for private use: minimal fuel consumption, easy transportation, adaptability to specific needs, low weight. You can work in any area, including warehouses and other enclosed spaces. Typically, such equipment is required at dachas, near country houses, used in digging holes and ditches, for shallow communications, etc.
There are different types of mini excavators
Types of homemade models:
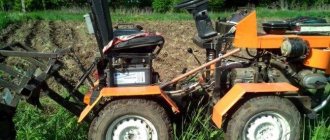
- An excavator made from a walk-behind tractor, based on an existing mini tractor or just a car. It uses attachments. Autonomous vehicles are assembled on tracked or wheeled vehicles, capable of moving around the site independently. Another option is a machine that can be moved using aids. If necessary, all attachments can be easily dismantled, and the used base can be used again for its intended purpose.
- Mini excavator from scratch. A labor-intensive option for the most experienced craftsmen. It is impossible for a beginner to cope with such a task; time and money will be wasted. You will need specific skills or qualified assistants, a good amount of technical knowledge.
- A simple budget solution is a trailed excavator on a T40 trailer with a frame and a wheel axle.
An autonomous engine, hydraulics and specific equipment are installed.
Be sure to read: Volvo Backhoe Loader
Let's get started
Some home craftsmen assemble a homemade mini-excavator from ready-made components. The necessary parts can be purchased in stores, but in this case, it will be much easier and cheaper to buy a ready-made model. Therefore, we will consider the option of self-assembly from old parts.
Frame. It is recommended to make this element from metal channel No. 8 or 10. The channel is cut into pieces of the required length and connected to each other by welding. A wheel axle from an old car trailer is attached to the frame. Metal sheets are welded to the channel on top; this will be a platform for the equipment. It is recommended to immediately determine the location for attaching the boom and reinforce it with additional sheets of iron and brackets.
Boom with bucket. If you do not have experience in assembling complex mechanisms, then it is better to buy a ready-made arrow. When making your own boom, it is recommended to use round or square pipes with a wall thickness of 6-8 millimeters. The boom consists of three parts, which are connected to each other by hinges or bushings.
You can weld the ladle yourself, from metal sheets. To make the structure strong enough, it is recommended to strengthen the upper part with an additional strip of metal, insert longitudinal stiffening ribs and make “fangs”. To make bucket teeth, you can use metal “fingers” borrowed from the tracks of an old tractor.
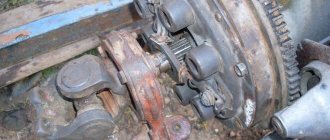
Hydraulics. This is the most complex element of a mini excavator. The hydraulic system is responsible for the operation of the boom. To lower, swing and move the boom you will need 3 hydraulic cylinders. Another one will be responsible for controlling the bucket. They can be removed from any old truck where the cylinders are responsible for lifting the cab.
It is almost impossible to make a hydraulic cylinder yourself, so do not waste time, but go to car depots and garages. There you can probably find the part you need.
For the hydraulic system to work, a pump must be installed. The NSh-10 gear type pump is ideal. Complete with the pump, you can use a four-section hydraulic distributor R-16A or RGS-253. All hydraulic equipment is connected to each other by hoses. The pump is connected to the engine, and an oil container is installed on the platform.