In the field of agriculture, there are numerous tasks that need to be completed according to routine and compliance with agronomic standards. And if we take into account that this is the twenty-first century, and life has accelerated to the limit of possibility, then the question arises: how to optimally manage the work on cultivating land plots in time and without additional material costs.
We will not consider options on an industrial scale, but what can be offered to private summer residents and farmer entrepreneurs is a mini tractor made from a walk-behind tractor. To do this, you just need to purchase a walk-behind tractor, and based on the necessary tasks and capabilities, construct a mini tractor from it. One of the samples for further design can be used a mini tractor from the Neva walk-behind tractor.
Minitractor from the Neva walk-behind tractor. Overview of options
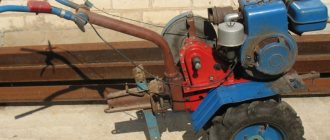
If a farmer has a walk-behind tractor, gardening work is much easier. However, walk-behind tractors have one drawback and that is that you have to walk behind them. And when it is necessary to carry out work on large areas, the legs are subjected to very great physical stress. To facilitate this process, many craftsmen are converting their walk-behind tractors into mini tractors.
Almost all Neva walk-behind tractors have sufficient power to be converted into a mini tractor. Many people believe that this is a labor-intensive process that requires practical skills, but this is not entirely true. On the Internet there are a large number of different drawings and diagrams for making a mini tractor from a Neva walk-behind tractor. These drawings have already been assembled by someone else, and their plausibility and correct dimensions have been confirmed by someone else's experience.
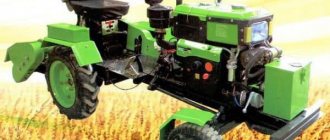
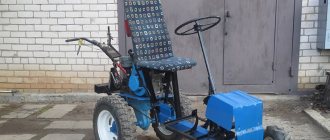
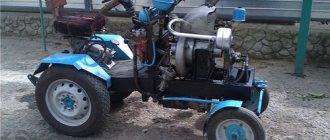
This is approximately what a mini tractor assembled from a walk-behind tractor looks like and its operation:
We make a mini tractor from a Neva walk-behind tractor with our own hands
If you have skillful hands, then you can minimize financial costs by making a mini-tractor from a Neva walk-behind tractor with your own hands. The alteration will not take much time, and the result will be a unit capable of performing almost any work on the site. For convenience, you can purchase other equipment for the adapter.
When converting a walk-behind tractor into a mini-tractor, you can use parts from unused equipment; it may take more time, but it will be cheaper.
To create a mini tractor based on the Neva walk-behind tractor, you will need the following parts: corners, sheets of metal, the walk-behind tractor itself, pipes, two wheels, a driver’s seat, a welding machine, and hand tools.
Advantages of a homemade design
- First of all, this is the cost of the final product (provided that inexpensive components are used, and if you do it yourself)
- Such a vehicle runs on several liters of fuel and can reach speeds of more than 20 km/h.
- It does not take up much space, which is vital in small farming with the capabilities of summer residents.
- The ability to assemble such a unit practically from scrap materials.
Before assembling a mini tractor from a walk-behind tractor based on the Neva unit, it will be very useful to study similar drawings of the main components, design concepts, calculate costs and possible devices for connecting both main and auxiliary devices. It should also be taken into account that the essence of the tractor’s operation lies in its mass, which is the main factor in adhesion to the ground, that is, the device must weigh more than 200 kg.
How to assemble a mini tractor with your own hands based on the Neva walk-behind tractor - drawings and diagrams
Having a walk-behind tractor greatly simplifies tillage. But it is not always convenient to follow him while working. Considering that many models have sufficient power, their owners are trying to improve the design. Even for professionals it will be useful to know that it is not so difficult to assemble a mini tractor from a Neva walk-behind tractor. Drawings and diagrams for this will serve as the basis for making a reliable and multifunctional unit.
General recommendations
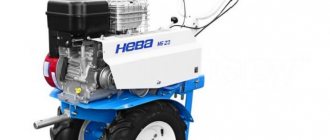
At the first stage, you need to decide on the optimal model of the power unit. It must have enough power to drive the homemade frame. It is best to use the Neva MB-23S 9.0 PRO model for this. Its four-stroke engine produces 9 hp. will provide the required traction for cultivating the land using mounted tools - cultivator, plow, etc.
Motoblock Neva MB-23S 9.0 PRO
If you have a model with less power, you can make an adapter instead of a full frame, as described here. It will be less functional, but will improve the comfort of using the walk-behind tractor.
What is needed to create a full-fledged mini tractor? Let's look at its main components first.
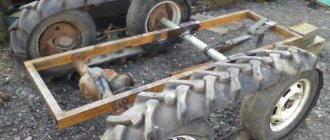
- Frame. Made from scrap metal. Rotary mechanism. The simplest disc brake system. Seat and body parts. A hitch for installing attachments, a system of levers for controlling it.
Most of the components can be purchased at scrap metal collection points or car dismantling sites. In this case, you need to pay attention to quality and absence of defects.
First, they determine the functions that a mini tractor from a walk-behind tractor should perform. Most often, a universal scheme is chosen, which involves cultivating land and transporting goods. For the second option, you will need a trailer, which you can make yourself or purchase a ready-made model.
Blueprints
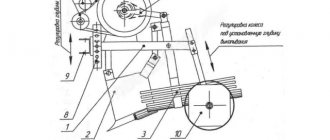
General kinematic diagram
To ensure the correct pairing of all structural components, a kinematic diagram is drawn up. It must describe in detail the connection points between the walk-behind tractor shaft and the wheelset. It is desirable that the drive be on the rear axle - this way the tractor will have better maneuverability.
It is important that all parts of the mini tractor are selected correctly. If necessary, they can be modernized - processed on a lathe. It must be remembered that the service life and performance characteristics of the future tractor will directly depend on the quality of the components.
When choosing a drawing diagram, you should pay attention to the rotating mechanism. This node can be of two types.
- Body fracture. It is reliable, but the steering column must be located exactly above the unit. A mini tractor made according to this principle will have low maneuverability when cornering. Installation of steering rods. Their installation will require more time and factory components. But at the same time, it will be possible to choose the installation location of the walk-behind tractor (on the front or rear axle), and the turning angle will also increase significantly.
Having chosen the optimal design, you can proceed directly to the manufacture of the unit.
Mini tractor frame drawing
Making a frame
To assemble the structure yourself, you will need a minimum set of tools and components. It is best to select the latter according to the diagram, and if any components are missing, make changes to the drawing taking into account the parameters of the replacement components.
- Rolled metal for frame manufacturing. A square pipe, angles and channels are used. For the manufacture of the body, it is recommended to use a steel sheet with a thickness of 1.5 mm. Ready-made suspension and steering components. Welding machine, electrodes, grinder, drill, measuring tool.
Which walk-behind tractor is suitable for conversion?
Here you should clearly determine the power that will be needed. After all, it’s not enough to just make a mini tractor. The engine must be capable of driving not only attachments, but also the weight of the walk-behind tractor itself with its frame and a person.
The Neva MB-23S 9.0 PRO model is best suited. It has a 4-stroke engine. And 9 horsepower is enough to generate traction force, which is sufficient to drive plows, cultivators, hillers, etc.
If the power is not enough, then the simplest solution is to simply buy an adapter. Convenience is certainly not at the same level, but you can move around while sitting. And that's a plus.
But the downside is that the use of some attachments is not compatible with it.
But it is compatible with a mini tractor:
Required materials and tools
To assemble a mini tractor from a walk-behind tractor with your own hands, you will need:
- rolled metal to make a welded frame (square, channel, corner, and so on);
- wheelset (with a solid axle or 2 axle axles);
- wheel bearings;
- a seat of suitable dimensions;
- hardware for assembly (nuts, studs, bolts);
- consumables for welding operations - gas, oxygen, wire, electrodes;
- lubricants;
- primer, paint for painting the assembled product.
Necessary parts for making a mini tractor
To carry out the work you will need a certain tool:
- locksmith - hammer, chisel, keys;
- welding machine for carrying out work on frame assembly;
- gas cutting kit if necessary;
- grinder for cutting and grinding metal elements;
- electric drill with a set of drills;
- taps and dies;
- devices for painting and anti-corrosion protection.
Turning equipment may also be required for working with a wheel pair.
Where to begin?
A homemade mini-tractor begins by preparing drawings and drawing kinematic diagrams. Drawings are needed in order to better imagine the future design and determine the necessary material.
Schemes are drawn in order to calculate the load on the frame and the traction force required to perform agricultural work. For example, the frame can be all-metal or fracture. The first option ensures reliability of the structure, and the second provides maneuverability.
The location of the engine also plays a role. The best option is when the power unit is located at the rear, behind the driver's seat. This will give the driving wheels of the vehicle more reliable grip on the ground, and the driver will add weight to the front driven axle. Thus, a homemade mini-tractor will not tip over when performing arable work on hard soil.
How to choose a mini tractor base
Before you make mini equipment with your own hands, you need to select a model that will act as a basis. In this case, it is necessary to take into account the following technical characteristics:
- engine power, its torque indicator;
- weight of the future mini tractor;
- type of power unit - gasoline, diesel;
- plow dimensions;
- manufacturer and price.
The area of territory that can be processed with ready-made equipment depends on the power rating of the walk-behind tractor engine. It turns out that the larger the area, the stronger the unit should be. As for the weight of the device, it must correspond to the type of soil. For dense soil, you will need a heavy mini-tractor made by yourself from Neva special equipment. Likewise, and vice versa, with soft soil you need to use a light device so that it does not compact it.
The weight of the machine must correspond to the type of soil - on dense soil you need a heavy tractor, on light, sandy soil you need a lightweight one
When calculating dimensions, the processing depth and ease of use should be taken into account. The best option is a cultivator with adjustable width. There are models on the market equipped with a gasoline or diesel engine. The first option produces minimal noise during operation, has low compression and easy starting with a half turn. The diesel version is economical and highly productive when working over large areas or with difficult soil.
What you need
Before you begin, you should make sure that you have all the necessary parts, materials, and tools.
So, what is required for work:
- Motoblock. It must be selected taking into account the above recommendations. It is this that will serve as the basis for a homemade mini tractor.
Motoblock Neva - the best option for remodeling
- Additional wheelset with axle. It is necessary to purchase bearings for the wheels, as well as a steering unit.
- Metal sheets, pipes and corners. The material is needed to create the body and frame of the structure.
- Elements for fixing parts and mechanical components. In this case, washers, bolts, nuts, and welding are used.
To carry out the assembly, in addition to the parts, you still need to prepare a number of tools:
- welder;
- drill-driver;
- a set of wrenches of different sizes;
- pliers;
- Bulgarian.
A homemade unit has a number of advantages. First of all, this is the cost. Even if a home craftsman needs to buy a cultivator, he will in any case spend less money. In addition, you can create special equipment of the required size, degree of adhesion to the ground, and performance.
As for the disadvantages, they are that equipment made by hand is much inferior to factory models in terms of reliability. Also, such equipment often requires repair work.
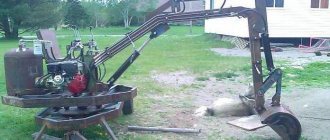
VIDEO: Fracture from a Zubr walk-behind tractor
Instructions for assembling a mini tractor from a walk-behind tractor
Those who are interested in how to make a mini tractor from a Neva, Forte walk-behind tractor, or from Zubr equipment need to know that the manufacturer does not really matter; this does not affect the efficiency of the tractor. The main thing is to correctly develop the drawing and construction diagram. Also, the owner of the equipment can use ready-made solutions.
Requirements for a homemade walk-behind tractor
- Power, taking into account the possible processing area
- What type of fuel will you use, and, accordingly, your priorities in speed or economy.
- It is worth considering the cost of the walk-behind tractor, since world-famous and well-known brands will cost an order of magnitude more. And therefore it is better to give preference to a domestic manufacturer.
Among the affordable and optimal quality walk-behind tractors, we can mention the following walk-behind tractors: AGRO, Neva, MTZ, Centaur, Zubr.
The listed models have a number of advantages and they should be chosen based on subjective needs and tasks.
DIY making
The first step is to decide on the options that the mini-tractor will perform. A multi-purpose practice that involves cultivating the soil and transporting goods is generally preferred. For the 2nd option, you will need a cart, which you can make yourself or buy an already working model.
Blueprints
For proper installation of all structural elements, a graphical diagram for displaying working units and blocks of the mechanism is developed. It reflects in detail the areas where the walk-behind tractor shaft merges with the chassis. It is necessary that all elements of the unit are correctly selected. If necessary, they can be processed using turning equipment. We must not forget that the service life and operating parameters of the unit under construction directly depend on the quality of the elements.
When creating a drawing, you need to pay attention to the rotating device. This node comes in 2 types.
- Breaking frame. It is characterized by strength, but the steering rack must be located directly above the unit. An agricultural machine created using this method will have little mobility when turning.
- Tie Rod. Its installation requires more time and additional industrial parts. However, it will be possible to choose the installation location (on the front or rear axle), in addition, the degree of rotation will increase significantly.
Having completed the optimal scheme, you can begin creating the unit.
Mini tractor
Before you start creating a mini-tractor based on a walk-behind tractor, you will need to prepare the necessary tools for the event. Conversion kit contains:
- welder;
- screwdrivers and wrenches;
- electric drill and a set of different drills;
- an angle grinder and a set of discs for working with iron;
- bolts and nuts.
The conversion of a walk-behind tractor into a mini-tractor is carried out in the following sequence.
- A unit on a walk-behind tractor must, of course, be equipped with a strong, durable chassis. It must carry an auxiliary pair of wheels plus a load moved in the tractor, which will exert pressure on the supporting frame. To create a strong frame, the best options would be a corner or steel pipes. Keep in mind that the heavier the frame, the more effective the unit’s traction with the ground will be and the better the soil will be plowed. The thickness of the frame walls does not matter much; the main condition is that they do not bend under the influence of the transported load. You can cut the elements to create a frame using an angle grinder. After this, all the elements are assembled together, first with bolts, and then thoroughly welded. To make the frame stronger and more reliable, equip it with a crossbar.
- Directly after creating the chassis, it can be equipped with an attachment, with which the miniature tractor will be provided with auxiliary devices. Attachments can be mounted both in front and behind the supporting system. If the unit being created is subsequently planned to be used together with a cart, then a towing device must be welded to the rear of its frame.
- At the next stage, the homemade unit is equipped with front wheels. To do this, it is advisable to equip the assembled mini-tractor with 2 already prepared hubs with a brake system pre-installed on them. Then you need to fix the wheels themselves. To do this, take a piece of iron pipe, the diameter of which will fit the front axle. The wheel hubs are then fixed to the pipe. Make a hole in the middle of the pipe that is needed to mount the product to the front of the frame. Install the tie rods and adjust them relative to the frame using a worm gear. After installing the gearbox, install the steering column or rack (if the option with a steering rack is selected). The axle at the rear is installed through press-fit bearing bushings.
The wheels used must have a diameter of no more than 15 inches. Parts of a smaller diameter will cause the front of the unit to “bury”, and larger wheels will seriously reduce the mobility of the mini-tractor.
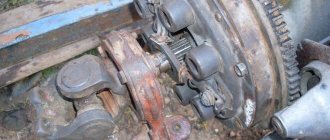
- At the next stage, you need to equip the unit with a motor from a walk-behind tractor. The best option would be to install the engine in the front part of the structure, since in this way you will increase the balance of the agricultural machine when using it with a loaded cart. To mount the engine, prepare a thorough mounting system. When installing the engine, remember that the splined output shaft (or PTO) must be fixed on the same axis with the pulley located on the rear axle of the mini-tractor. The force on the chassis must be transmitted via a V-belt drive.
Selection of walk-behind tractor
When choosing a walk-behind tractor in the Neva line for a future miniature tractor, you need to take into account the following parameters: power, weight, engine type, plow parameters, price aspects.
Power . It is determined by the area of the zone where the work will be carried out. The larger it is, the more powerful the walk-behind tractor should be. The best option here is the Neva MB-23. Today it is the leader in power among all representatives of this line. Can also work on very hard soils. Creates a traction force of 180 kgf. Can unlock one of the wheels. Improves maneuverability. Engines of various powers can be installed in it. Today there is a very wide range of them. Thanks to this, each master will be able to choose the appropriate option.
Usually Neva MB-23 is presented in the following variations: 10.0 and 8.0.
Data of the first: Briggs&Stratton engine, its power is 10 l, the number of gears is 4 (2), the role of transmission is performed by a gear reducer filled with oil, suitable gasoline AI-92 and AI-95, processing parameter 86 - 127 cm, milling speed from 20 to 160 (per minute), carries out processing at a level of 20 cm. Second data: the engine is the same, only with the parameter 8 l, all other indicators are identical. Today you need to pay from 43,000 to 45,000 rubles for the Neva MB-23. The modification you purchase matters.
If you need a more modest unit, you can purchase the Neva MB-2. This is also a very productive technique, but with a less powerful engine. It has many modifications, for example “6.5 Pro” and “7.5 Pro”.
Be sure to read: Minitractor MTZ 082
They are powered by the same brand of engine. In one modification its power is 6.5 liters, in the second - 7.5 liters. Their similar characteristics: a chain reducer as a transmission, suitable gasoline AI 95 and 92, processing level 20 cm, its width - 86-127, milling speed from 20 to 160 (per minute), weight - 98 kg, number of gears 4 (2 ). Distinctive indicators: - functional volume, in the 6.5 model it is 205 cc, in the 7.5 version it reaches 215 cc, - fuel tank, its volume in the first model is 3.8 liters, in the second - 4.6 . Today the price of the Neva MB-2 is in the range of 33,000 - 45,000 rubles. Weight. The following rule applies here: the more complex the excavation work, the higher the weight of the walk-behind tractor, and the reverse principle. When choosing between a gasoline or diesel engine, base it on the factors that are more important to you. If you need a quiet device that starts quickly in cold weather, then give preference to the gasoline type. If you need a more economical device with stronger traction and stable speed, purchase the diesel version. This version also works better with difficult soils and large areas. Plow parameter. It depends on the depth of the upcoming processing. It is better to take a collapsible modification in which you can adjust the width. This way you can configure the plow for a given situation
Mini tractor made from Agro walk-behind tractor
Before you start remaking walk-behind tractors of this brand, you should stock up on the material and necessary tools. To work you will need:
- stainless steel sheets and profiles;
- seat and steering wheel - can be removed from an old car;
- a pair of wheels – their diameter should not exceed 15 '';
- set of fastening elements;
- grinder and electric drill;
- hammer and welding machine.
After preparing everything you need, we advise you to study the diagrams, which will tell you the correct procedure for installing tractor elements.
We also advise you to look at the photos, which will certainly help you in the manufacture of an agricultural implement.
Unlike walk-behind tractors from the manufacturers listed above, Agro brand equipment has one significant drawback, which must be taken into account when converting a walk-behind tractor into a mini tractor. It lies in the fact that the axis of the walk-behind tractor has very weak fracture strength. This kind of fracture will definitely have an effect if you exceed the maximum permissible load on the frame of the mini-tractor. To avoid further malfunction, the minitractor will need to be equipped with wheel gears.
The procedure for assembling the unit is as follows:
- At the first stage, you need to weld a strong frame for the tractor. To do this, use steel profiles and pipes. Be sure to keep in mind that the heavier the frame made, the better the grip of the minitractor with the ground. At the rear of the supporting structure, weld a towbar, which will be required to couple the trailer to the unit;
- Then proceed to manufacturing and arranging the chassis of the mini tractor. To do this, you can purchase a pair of ready-made front wheels, as well as hubs equipped with brakes. After purchasing the parts, attach the hubs to a steel pipe, and drill holes in the front of the frame that will be required to mount the hubs on the mini tractor. Next, install the tie rods using a worm gear. Following the rods, secure the steering column and rear axle. When installing the latter, press the bearings into the bushings used for installation. Install a pulley on the rear axle and securely fasten the wheels;
- After this, install the engine on the front of the frame. We recommend doing this using an additional frame placed on special shock absorbers - this will avoid strong vibrations under high loads on the engine;
- Next, install the driver’s seat on the mini-tractor, connecting it to the frame through springs - thanks to them, working with the mini-tractor will be much more convenient.
If desired, a compact tractor made by yourself can be equipped with a canopy that will protect you from rain and sun. To make it, 4 steel pipes need to be welded to the frame next to the seat and steering column, to which a steel sheet must be secured by spot welding. As a result, you will receive a reliable unit for your garden that will quickly cope with all the tasks assigned to it.