The walk-behind tractor has a simple but effective design that allows you to carry out many types of excavation work yourself. For a small area, the unit will become an indispensable assistant. Many owners additionally buy or create a trailer so that they can use the walk-behind tractor for transporting goods. If you assemble it yourself, from scrap materials, it is important to figure out how to make brakes on a trailer for a walk-behind tractor with your own hands in order to stop smoothly when the engine is on.
Trailer for walk-behind tractor: types of trailers and recommendations for making it yourself
Using a trailer for a walk-behind tractor allows you to significantly expand the functionality of this popular technical tool.
However, purchasing a ready-made device is not financially feasible for all owners of personal plots. In such a situation, you can think about making a trailer yourself. Trailers have different load capacities, and this is one of the criteria used to classify them. Most often, at home there is no need to use devices with a high load capacity. In addition, all trailers for walk-behind tractors can be divided into groups according to their design:
- Solid - have the simplest design, in which the bottom and walls are connected motionlessly.
- With folding sides - great for transporting large cargo.
- Tipper - convenient during unloading operations and allows you to increase their productivity.
When planning to purchase a trailer or make a cart for a walk-behind tractor with your own hands, it is important to take into account some design features
If everything is quite simple with solid towbars, then in the case of other types this must be done
Particular attention should be paid to the following factors:
- Two-axle dump trucks with a large load capacity are equipped with a hydraulic drive to make work easier.
- In single-axle models, tipping is most often carried out due to the special location of the center of gravity and it is quite enough to equip them with a manual device.
- Trailers with a load capacity of more than 350 kg are equipped with a mechanical braking system.
Making a trailer with your own hands
After studying all the design options, when making a homemade trailer for a walk-behind tractor, the simplest options are most often used. A dumping device is certainly more difficult to make, but its functionality is an order of magnitude higher.
Work on creating a tow hitch for a walk-behind tractor with your own hands begins with a drawing. Thanks to this, you can determine the amount of materials needed and select complex components that require the development of more accurate diagrams.
It should be remembered that the center of gravity of a properly balanced trailer should be located closer to the front side, but not exceed the level of the wheel axle.
Frame assembly
The reliability of the frame is determined by the durability and strength that the towbar will have. This should be taken into account when creating a project for a future trailer hitch. Thus, the following materials can be used in the manufacture of a trailer frame:
- Angle and rectangular pipe.
- The front and rear crossbars can be made from a corner measuring 25x25 mm.
- For spars, a 60x30 mm pipe would be an excellent choice.
- To connect all the elements, it is necessary to make five additional crossbars forming a lattice frame.
- Four vertical posts are attached to the longitudinal pipes of this lattice in the corners.
Making a one-piece trailer is quite simple. Some homestead owners decide to make more complex devices. In such a situation, all subsequent actions depend on the choice of a specific type of trailer:
- On a dump trailer, the tailgate must be hinged.
- If you plan to manufacture a trailer with folding sides, then all three sides, except the front one, must have such a design.
- The frames of the folding elements should be made separately from the general frame. For simple models they can be its common elements.
Frame covering
This is one of the easiest steps in creating a tow hitch. However, some nuances are present and must be taken into account. To carry out work on framing the frame, it is worth choosing those materials that cannot increase the cost of the tow hitch:
- Wood is the most affordable material, but not the most practical due to its low resistance to moisture. In order for the boards to last as long as possible, it is imperative to treat them with special compounds and constantly monitor the integrity of the coating.
- Plastic lacks the main drawback of wood, but at the same time has poor resistance to mechanical damage.
- Metal sheets must first be treated with anti-corrosion compounds and are the most durable, but also quite expensive material.
First you need to sheathe the bottom (floor) of the trailer, and then work on its sides.
Construction of a simple cart
The most common trailer can carry from 450 to 500 kg of cargo and hold approximately 8 full bags of potatoes. If you study the drawing, it will become clear that a self-propelled cart will consist of such common parts as a body, carrier, frame, wheels and others.
It is best to weld the frame from docked tubes with a round or rectangular cross-section, as well as steel angles. This will have to be done on a flat surface, using electric arc welding. During work, it is necessary that the seam is uniform on all joints, which are then sanded with a grinder.
In addition, it is recommended to install springs to minimize the shaking that occurs when driving over potholes. A dump cart will not be able to function without the help of a wheel axle, which is a pin 1 meter long, the diameter of which does not exceed three centimeters.
It is important to ensure that when choosing a rod, its wheels do not extend beyond the boundaries of the body. The parts can be assembled by welding through the support corners, as well as frame beams with gussets with longitudinal hinges. By the way, since the main load will fall on the point where the trailer is directly attached, as well as on the turning area, they would need to be further strengthened.
The dump trailer body is made either of metal or wood - boards or plywood. In any case, the thickness of the material should be at least 20 millimeters, and it would be better to reinforce it with steel corners. To connect the frame and body, you will need supports.
In addition, it is important to think about the purposes for which the cart will be used. If bags with cargo will be transported in it, then folding sides are not at all necessary. However, for unloading it is worth providing an opening rear wall of the body or tipping mechanisms to turn the device over. Of course, all sides are allowed to be fixed. In addition, they should be smooth on the inside.
In order for the resulting trailer to be attached to an existing walk-behind tractor, you will need a special part called a console. In this case, the connecting mechanism must be removed into the cylindrical body of the longitudinal hinge and secured with a special thrust ring.
This will make the wheels of the cart independent from the wheels of a walk-behind tractor or other agricultural machinery, and therefore simplify the process of driving a moving vehicle. The hitch is formed from any suitable metal fragment, the length of which is determined so that the transport device is convenient to operate.
Wheels are usually assembled from scrap materials - motorized stroller tires combined with a central part taken from other spare parts. Both axles are sharpened to the diameter of the bearings of a motorcycle hub taken from a sidecar. For the wheel axle, you will need a steel circle, the diameter of which reaches at least three centimeters, which will then be combined by welding with a longitudinal hinge and corner supports.
It is more convenient to construct the bottom of the cart itself from a metal plate, the thickness of which varies from 2 to 3 millimeters. An edged board is also suitable, which is more affordable, but less stable.
Among other things, a seat and leg support are required for the driver. The seat is either attached to the hitch or mounted directly in the body.
How to make a homemade cart - step by step with drawings and dimensions
As the drawing of the cart for the walk-behind tractor shows, the design has four main components that are connected together using welds: body, carrier, frame and wheels. All nodes are first assembled separately, and only then connected together.
The frame of the product is manufactured first. It needs to be set as level as possible using a level and placed on tacks. Metal expands when heated, so it will need to be re-exposed. Next, you need to weld all the joints of the frame on both sides.
Next, crossbars and side members are welded, which form a kind of mesh onto which the bottom of the trailer will eventually be attached. The body doors can be made non-sliding or folding - both options have their pros and cons.
In any case, fastenings must be attached to the sides of both options to secure the load.
The carrier, one of the chassis components, can be made from channels or pipes with a round cross-section. The pipe must have a fairly thick layer of metal and be strong - it will be difficult to further strengthen it along the length. It is tightly fastened to the trailer axle using several beams and angles.
This mount is very important, because it essentially holds the balance of the entire chassis - thanks to it, the cart goes where it is directed. And at a certain point it is subjected to heavy loads - when turning with a full, loaded trailer and while driving on uneven roads.
Axle installation
The wheel axle can also be made independently. To do this, take a steel rod at least 1.07 cm in length and 30 mm in diameter. The length should be taken into account and adjusted based on the dimensions of the trailer body. Wheels can be selected from old garden equipment, from a hand truck, a motorcycle, a moped or a car - it all depends on the dimensions of the future product. Schemes of 2 mounting options for the wheeled chassis are shown in the figures below.
The wheel axle can also be made independently. To do this, take a steel rod at least 1.07 cm in length and 30 mm in diameter. The length should be taken into account and adjusted based on the dimensions of the trailer body. Wheels can be selected from old garden equipment, from a hand truck, a motorcycle, a moped or a car - it all depends on the dimensions of the future product. Schemes of 2 mounting options for the wheeled chassis are shown in the figures below. A single-axle trailer has a significant drawback - a displaced center of gravity. Because of this, the body and the cargo in it may overturn, or it may even lead to equipment breakdown. For a large wheelbarrow designed to transport large loads, a two-axle structure should be designed. The basic mountings and parts will remain the same as for the single axle cart project.
Making a homemade trailer for a walk-behind tractor with your own hands
To make a homemade trailer for a walk-behind tractor with your own hands, you should follow a certain sequence of actions. We invite you to get to know her.
PHOTO: ad-cd.net Case frame
To manufacture the frame, rolled metal with a suitable shape and cross-sectional size is taken. The work is performed in the following sequence:
Chassis
Assembly work for the manufacture of the chassis of a homemade trailer is carried out in the following sequence:
| Illustration | Procedure |
| When making a trailer axle with your own hands, axle shafts from a Zhiguli are welded into the pipe. Channels are welded along the edges and in the center of the pipe, to which the frame will be attached | |
| The frame is welded to the beam. To do this, the structure is turned over and a weld is formed on the reverse side. | |
| The structure is turned over. In places where the frame touches the axle, the elements are welded together, having previously installed the corners | |
| To further strengthen the frame, cross members are welded. They are placed in accordance with the drawing | |
| Install the wheels. Check their parallelism. Its design is welded correctly, the wheels will fit correctly | |
| The drawbar is welded if this has not been done previously |
Body, frame trim
The formation of the body is carried out in the following sequence:
| Illustration | Procedure |
| Vertical posts are welded to the frame. Their height depends on the volume of the trailer being manufactured for the walk-behind tractor. On average their height is 42 cm | |
| Vertical posts are connected to each other by horizontal elements. The spatial position of everyone is carefully controlled. If necessary, the seat is welded. The structure is installed assembled | |
| To attach the casing to the frame, additional elements are welded. Provides horizontal and vertical parts | |
| The pallet is attached. Sheet metal up to 2 mm thick can be used. First, the pallet is grabbed and then carefully welded around the entire perimeter | |
| The sides are installed. For their manufacture, sheet metal or metal profiles are used. | |
| Hinges for the tailgate are welded to the frame. The counter part is welded to the folding side itself. The element is installed in place | |
| A structure is welded to allow the tailgate to be secured while driving. |
Do-it-yourself trailer brakes for a walk-behind tractor: manufacturing procedure
To prevent the trailer to the walk-behind tractor from accidentally rolling, you should think about how to make the brakes. If they are present, the safety of operation of the towed structure will significantly increase. To make brakes for a trailer for a walk-behind tractor with your own hands, you need to have a rod, a cable and a drum. The work is performed in the following sequence:
- we attach the drum to the hub of one of the wheels;
- We weld a piece of pipe to the brake disc;
- put the mechanism on the axle;
- We attach the brake pads with a cable to the axle. We extend the latter to the lever, which we install next to the driver’s seat.
We invite you to watch a video that tells you how to make trailer brakes for a walk-behind tractor with your own hands:
Other details
In addition to the listed elements, it is possible to install additional parts that will expand the functionality of the trailer for the walk-behind tractor. When making a tow hitch with your own hands, you can provide for the installation of:
- folding bench. It is attached to the front side of the body, using the side parts as support;
- spare tire, which may be required when working outside the home. Most often, the side board or bottom of the pallet is chosen for its placement. To prevent its displacement, special fasteners are used;
- small boxes or special bags located near the driver’s seat. They are used to store small tools that may be required when performing repair work.
PHOTO: ad-cd.net Fixing the spare wheel can be done in different ways
Trailer braking system
Before figuring out how to make brakes on a walk-behind tractor, it is advisable to familiarize yourself with such elements in more detail. They seem necessary for any walk-behind tractor with a trailer, since they allow you to quickly stop a moving unit even with an impressive load.
This makes its transportation safer, which is especially important when traveling on uneven terrain with a lot of slopes. To manufacture such elements, it is strongly recommended to use ready-made parts from various automobile and motorcycle equipment, which will significantly simplify the task
At the same time, brake systems come in different types and not all of them are suitable for use in the walk-behind tractor design.
Band-type brakes are not suitable for solving such a problem, due to their low power, as well as rapid wear.
The simplest and most effective option, which should be used as a basis for homemade brakes, are similar parts from an old motorcycle. Such spare parts are easy to find, they are affordable, which allows you to install brakes on a walk-behind tractor without extra costs.
If desired, you can use the parking brake from the car, which will allow you to easily stop on slopes even for a long time. However, the process of dismantling and subsequent installation of this type of brake is much more complicated and the cost is higher, which makes this option less popular.
Control of the system is extremely simple, since it is identical to standard analogues used in other types of equipment. Braking occurs when the lever is shifted, which leads to tension in the cable, and for further movement you will need to turn the lever to the reverse position.
How necessary are brakes?
First you need to understand why trailers need brakes. The need for braking devices for towed vehicles, primarily due to the requirements of regulatory documents, appears in accordance with the rules of the road: all trailers must have braking systems.
In addition, if there is a slope, then the presence of brakes completely ensures the safety of the device. As a starting material, you can use brakes from a motorcycle or car. In this case, attention should be paid to the different types of brakes. For example, the parking brake (also known as the “handbrake”) does not provide complete braking of a loaded trailer (if the trailer with a walk-behind tractor is moving). Therefore, you should not use such a device for brakes on a walk-behind tractor.
Some craftsmen use various belt mechanisms of their own design to solve the problem, however, they are not a way out of the situation. The belt mechanism is not capable of stopping a moving trailer immediately, regardless of its load; in addition, as the belt wears out, braking will occur with an increasing braking distance. This is unsafe, so it is recommended not to implement such braking devices.
Another interesting article: How to make a hitch for a walk-behind tractor?
You should also take into account the fact that in rural areas it is easier to get an old motorcycle and spare parts for it; motorcycle brakes are cheaper in auto parts stores, which makes them more accessible.
Converting a brake from a motorcycle into a braking device for a walk-behind tractor with your own hands does not require large investments and a significant investment of time. Trailer brakes are much simpler to make from motorcycle brakes. If the trailer uses motorcycle wheels, then the modifications will be minimal. Such a device will provide quick braking while moving and reliably hold the trailer motionless when parked.
Preparation
When it is decided what parameters the planned cart meets, it is worth making drawings and then calculating the amount of material required, including the channel. Craftsmen recommend relying on those parts that are already at hand, and, if necessary, purchasing something in addition. A profile pipe of rectangular or square cross-section can be easily replaced with a round one available in stock. All detected parts must be cleaned of corrosion stains and coated with a rust converter with a priming function. In accordance with the drawings, some of them will have to be adjusted by removing unnecessary elements. Then all that remains is to adjust and combine them.
Among the tools that may be useful during work, experts name a welding machine, a drill or a full-fledged drilling machine, an angle grinder with roughing and cutting discs, as well as a special device equipped with rivets.
Many professionals also recommend stocking up on oil paint for metal or a special product with a polymer filler. In the second case, the painting will be more stable, and the body will not have to be painted again by the end of the season. Painting is carried out before assembling large parts of the trailer.
Self-production
This device will simplify the processing of a summer cottage, and will also help transport various loads, from hay and crops to the remaining garbage. Its manufacture does not require expensive or complex materials; rather, most of them will be found in the home workshop. In this case, a homemade cart will turn out to be much more economical than a purchased one, because the latter will cost from 12 thousand rubles in the case of a new design and from 8 thousand when choosing a used one. The dimensions of the trailer being designed depend on the load it will have to handle. For example, to transport 2.5 centners of cargo, the cart must have a width of 1150 millimeters, a length of 1500 millimeters and a height of 280 millimeters.
How to make brakes on a trailer for a walk-behind tractor
After the first trip, everyone who has made a homemade trailer asks themselves the question: how to make brakes on a trailer for a walk-behind tractor, because it is not possible to brake downhill, and you risk getting into an accident.
If you want to put brakes on your purchased trailer, or want to equip a homemade cart with them, keep in mind that the brake system is an organ of the unit that is almost always removed from a passenger car and slightly altered to suit new needs.
Brakes and brakes are different. If you listen to mechanics, you will hear about parking brakes that do not brake the trailer well when it is loaded, especially if you park it on a slope. Why do we need brakes that only stop the trailer when it is empty?
You can install band brakes on the trailer, but they are practically useless and do not perform their function. I know of one successful case when a man attached brakes to his trailer for a walk-behind tractor. But only he made them on one wheel. It's good if you have an old motorcycle. Remove the brake pads and drum from it.
You will also need a motorcycle wheel. Throw away the spokes from the wheel, get rid of the rim. What you need is a metal drum. Remove the rod and cable from the disk. Make a groove (if you can’t, give the disc to a familiar turner).
When work with the disc is ready, proceed to assembling the brake for the walk-behind trailer. Place the drum on the hub. Secure it at the back, wrap thick wire around the space of the drum between its ribs.
We place the metal disk with a groove above it on the axle and secure it with a bushing. To prevent the disk from turning, take a welding machine and weld a piece of pipe to it. In order to control the brake system, we make a lever and pull the cable to it. Basically, that's all.
Hitch and seat
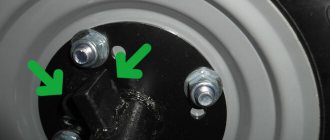
Upon completion of the main work, after fastening all the main structural components, you can begin assembling the remaining parts of the trailer. The most important ones are the hitch and the seat. The hitch can be made from 3 pieces of pipe and a towing mechanism (in our case it is a tee designed specifically for the hitch unit of a walk-behind tractor). This hitch is attached to the frame with bolts. The coupling device is shown in more detail in the diagram below.
Upon completion of the main work, after fastening all the main structural components, you can begin assembling the remaining parts of the trailer. The most important ones are the hitch and the seat. The hitch can be made from 3 pieces of pipe and a towing mechanism (in our case it is a tee designed specifically for the hitch unit of a walk-behind tractor). This hitch is attached to the frame with bolts. The coupling device is shown in more detail in the diagram below. The seat can be welded to a regular one, for example, from an old car, or you can equip a seat-box for a tool on the front of the trailer. Its dimensions will depend on the overall design of the trailer. The main thing is not to use too thin boards and securely fasten the box.
Is it possible to assemble an adapter for the Neva walk-behind tractor?
For the Neva walk-behind tractor, an adapter operating in a 4x4 pattern is sold in an agricultural equipment store.
It is recommended to prepare all the necessary materials and tools. A homemade adapter for the Neva walk-behind tractor helps you save money and spend it on other parts needed to upgrade the device.
It’s worth considering what the front adapter to the Neva walk-behind tractor looks like.
An adapter for a Neva motor-cultivator means a trailer with a seat made on the basis of a two-wheeled frame. The functional purpose of such equipment is to make working with a walk-behind tractor simple, convenient and comfortable. The adapter allows you to upgrade the cultivator into a small tractor, which is suitable for various types of work in the country, on a farm, or in a personal plot.
Neva walk-behind tractors with a homemade adapter come in 2 types:
- Heavy, which are divided into short and long. They are suitable for different types of motor cultivators, making work on the ground easy.
- Lightweight, which are installed on cutters. This means that the mechanism will be attached to one of the 4 wheels of the walk-behind tractor.
Adapter KTZ-03
The front adapter with a removable body KTZ-03, which is suitable for the Neva MB-1 and MB-2 walk-behind tractors, allows you to provide the user with comfort and convenience when working. It is equipped with brakes, steering and swivel wheels.
Technical characteristics according to the instructions for use:
- overall dimensions (l/w/h) - 1560/870/740 mm;
- operating speed - up to 10 km/h;
- track width - 700 mm;
- ground clearance - 170 mm;
- weight - 93 kg.
The diagram of the KTZ-03 front adapter for the Neva walk-behind tractor shows the presence of the following structural elements on the mechanism:
- Hitches, one of which is needed to connect the adapter and the walk-behind tractor, and the second is for hanging one or another auxiliary equipment.
- Seat.
- Drawbar of short or extended type.
Harrows, plows, diggers, and mowers can be used as attachments. To secure them, it is enough to provide one hitch. The devices used can be moved to the working position using a manual drive. Another feature of the commercial-industrial adapter is its versatility; it allows you to use attachments such as brushes, a snow blower, a mower and others in the coupling. This is possible due to the rigid connection of the KTZ-03 with the Neva walk-behind tractor and thanks to the swinging front controlled axle of the device.
Device drawings are required.
Drawings with adapter dimensions will help you make similar equipment yourself. The price of a homemade device will be several times less than the original one, which the manufacturer offers to buy for 38 – 42 thousand rubles.
Adapter APM-16 front with body
The front adapter for the Neva MB-2 APM-16 walk-behind tractor, together with the Neva agricultural machine, can easily replace a mini-tractor. It is possible to use a walk-behind tractor with an adapter in conjunction with a cart. The unit is equipped with disc brakes and a steering gear - this improves controllability and increases driving safety. It can be completely disassembled, making the device easy to transport.
Specifications:
- dimensions (l/w/h) - 1300/800/1100 mm;
- Body dimensions: top - 700x700 mm, bottom - 700x500 mm, height - 250 mm, depth - 200 mm;
- operating speed - up to 10 km/h;
- ground clearance - 200 mm;
- weight - 85 kg.
Previously, the stages of manufacturing a mechanism operating on all-wheel drive and steering were described. To make such a device yourself, you will need the following materials:
- rectangular steel frame;
- 2 wheels;
- an old seat from a tractor or combine;
- corners;
- steel sheet;
- metal pipes.
You need to prepare a welding machine and a lathe, a set of tools, and tools for gardening work.
Before assembling the structure, it is necessary to make a kinematic diagram. The principle of its operation is as follows:
- The powertrain motor, which is necessary to drive the front wheels, must transmit torque through a chain.
- Then this force goes to the reverse gearbox.
- The cardan transmission allows torque to be transmitted to the rear axle, which drives the rear wheels, which are the drive wheels.
Homemade brake for walk-behind tractor trolley
The Centaur 1080d has a brake, but it is considered a parking brake and if the cart is heavily loaded and there is a steep descent, it may not help. An acquaintance made band brakes for a trolley (converted from a car trailer), but they turned out to be ineffective and braked poorly. So far the most successful homemade option (from whom I have seen) is from the same friend. This brake is for one wheel, but according to him it works great. He took the drum, brake pads and disc (in short, the old wheel assembly cut off the spokes and threw out the rim) of the front wheel of an MT motorcycle. Having previously removed the rods and the cable on the disk, he gave it to the turner for grooving. He placed the drum tightly on the hub at the back, fixed it by welding pieces of thick wire between the ribs of the drum, and firmly placed the disk on the bogie axle, also secured it with a bushing and so that the disk did not turn, welded a piece of pipe (where the disk on the MT it rested on the fork. Then I made a lever, pulled the cable to it and the brake was ready. Maybe you still have some ideas on how to quite simply make a brake for a walk-behind tractor trolley.
Nik_n63 wrote: The Centaur 1080d has a brake, but it is considered a parking brake and if the cart is heavily loaded and there is a steep descent it may not help. An acquaintance made band brakes for a trolley (converted from a car trailer), but they turned out to be ineffective and braked poorly. So far the most successful homemade option (from whom I have seen) is from the same friend. This brake is for one wheel, but according to him it works great. He took the drum, brake pads and disc (in short, the old wheel assembly cut off the spokes and threw out the rim) of the front wheel of an MT motorcycle. Having previously removed the rods and the cable on the disk, he gave it to the turner for grooving. He placed the drum tightly on the hub at the back, fixed it by welding pieces of thick wire between the ribs of the drum, and firmly placed the disk on the bogie axle, also secured it with a bushing and so that the disk did not turn, welded a piece of pipe (where the disk on the MT it rested on the fork. Then I made a lever, pulled the cable to it and the brake was ready. Maybe you still have some ideas on how to quite simply make a brake for a walk-behind tractor trolley.
Or maybe we’ll read and see here” >
Not bad, but complicated and time-consuming. Need something simpler and on a ready-made cart.
Nik_n63 wrote: The Centaur 1080d has a brake, but it is considered a parking brake and if the cart is heavily loaded and there is a steep descent it may not help. An acquaintance made band brakes for a trolley (converted from a car trailer), but they turned out to be ineffective and braked poorly. So far the most successful homemade option (from whom I have seen) is from the same friend. This brake is for one wheel, but according to him it works great. He took the drum, brake pads and disc (in short, the old wheel assembly cut off the spokes and threw out the rim) of the front wheel of an MT motorcycle. Having previously removed the rods and the cable on the disk, he gave it to the turner for grooving. He placed the drum tightly on the hub at the back, fixed it by welding pieces of thick wire between the ribs of the drum, and firmly placed the disk on the bogie axle, also secured it with a bushing and so that the disk did not turn, welded a piece of pipe (where the disk on the MT it rested on the fork. Then I made a lever, pulled the cable to it and the brake was ready. Maybe you still have some ideas on how to quite simply make a brake for a walk-behind tractor trolley.
Rework
Before starting work, it is necessary to perform some preparatory operations with finished materials. To do this, remove the cables and rods from the disks, after which the disks must be sharpened. Installing such brakes on a trailer is quite simple - to do this, you need to put the machined drums on the hubs and secure them in their rear part. This creates free space between the ribs of the drums. It must be closed by winding a strong metal wire around the ribs. After this, the disk is placed on the axle and secured with bushings. It is necessary to take measures to prevent the disc from moving in any direction. To do this, a piece of metal (angle or pipe) is welded onto the axle using a welding machine.
Next, the cables are mounted on the drums and pulled to the control point. To implement the control system, a lever with a gear must be used. For these purposes, a control mechanism (with a lever) for the parking brake of a car is suitable, but you can make a control system yourself using available means
It is important that a two-wire trailer brake control valve be installed along with the control lever. This is a simple way to create a trailer with practical brakes.
Body
Making the body is not particularly difficult. A wide variety of materials are selected here. You can use a board, steel sheets, and if desired, a complex option is also suitable.
Metal body trim
It is better to make the base of the body from metal. Several sheets of metal are selected that will correspond to the drawings. Next the base is welded. The sides are aligned along the edges, while being welded or bolted at the bottom and in the corners. In order to strengthen such sides in the corners, you can weld corners. You can also strengthen the bottom of the trailer. To do this, another additional layer is screwed or welded to it.
Here it is important to consider whether the trailer will be a tipper. If not, then the sides can be made folding by attaching them to the bottom with a movable connection, and a clutch mechanism can be made in the corners. The body is attached to the frame by three metal beams and secured with bolts.
Making a simple trailer for a walk-behind tractor with your own hands
It is difficult to completely repeat an existing product design, since each of us has our own set of materials and components, homemade experience and operating conditions for the trailer. The main design elements are the suspension and frame, so we’ll start with their consideration.
Often, the rear Zhiguli beam along with hubs from front-wheel drive cars is used as the basis for the suspension. The solution is simple and reliable.
The beam is welded to the trailer frame in a vertical position. At the same time, the loading platform turns out to be quite high. The beam dictates the dimensions of the trailer, so it is heavy and of substantial size. For a weak walk-behind tractor with an air engine, this option is useless.
To reduce the dimensions of the suspension, you can cut out the central part of the beam, and instead weld a pipe with a cross-section of 50x50 mm of the required length to the hubs as an axis. The version of the stroller shown in the photo is easily rearranged by an adult with his hands. The manufacturing process of this structure can be assessed in more detail using the following video.
Theoretically, you can use the rear beam from any passenger car. In this case, it is more convenient to use the rear suspension of a front-wheel drive car with the least possible weight and size. The suspension of the Oka car is well suited for load capacity.
The photo shows two options for trailers with a rear axle from a classic VAZ as an axle. The gearbox should be removed and its place covered with a metal plate with bolts. The axle shafts must be pulled out, cut to 200 mm and inserted back. Practice has shown that they successfully stay on the bearings and do not come out. The bridge is welded to the frame with two jibs on each side.
A trailer with soft suspension is noticeably more comfortable, although more complex. The load does not bounce in the cart at every bump, and the driver’s “fifth point” does not experience unnecessary overloads. Probably, installing springs and springs at the same time is clearly overkill. At the same time, making levers on silent blocks and installing springs is not so difficult.
The trolley for transporting bulk materials must be folding. In this example, the frame is made from a 50x50 mm corner. Hinges are welded to its rear and body. The trolley axis is located exactly at the center of gravity of the load. To unload the trailer, you need to place it on a stand, disconnect it from the walk-behind tractor, and then tilt it, lifting the drawbar up. Be careful not to move the drawbar suddenly.
Preparatory work
First of all, you need to think about what size the trailer should be so that it fits a specific walk-behind tractor and is convenient to use. After this, you will need to sketch out a drawing or sketch of the cart, on which you will display the structure from different angles, put down all the dimensions and draw the nodes.
Trailer mechanisms
You need to think through everything down to the smallest detail so that no difficulties arise during assembly of the equipment. To do this you need to understand:
- non-separable units and parts will be connected by screwing, riveting or welding;
- how the axles, bearings, bushings, hinges will be connected;
- which seat is better to install (simple or rotating);
- what to make the stand for the parking leg from;
- do you need a tipping body, to which you will have to add a mechanical tipper or a self-resetting unit with a special handle;
- which connection unit to the walk-behind tractor to choose (on bearings, bushings or hinged).
Having dealt with all these issues, you can begin to prepare a list of necessary materials and calculate the approximate cost of the future trailer.
Where to begin?
The first step in creating a trailer for a walk-behind tractor with your own hands will be to develop a drawing. He will help you choose the right quality materials, determine their sizes, make a clear action plan, and think through funny moments in advance.
Drawing of a trailer for a walk-behind tractor
The process must be taken as seriously as possible. In the drawing, the trailer is drawn from different sides, the dimensions of the parts are signed next to each of them. It is desirable that when creating a drawing the proportions are strictly maintained. Separate, more complex nodes need to be drawn individually in close-up and also from different sides.
While working on a drawing, it is important to think through the following points:
- it is necessary to foresee in advance which parts and assemblies need to be interconnected, and what type of connection will be used. Prepare in advance the required number of rivets, bolts or welding machine;
- a decision was made to make a dump trailer (with automatic tipping) or a regular one with manual unloading;
- what scheme to use in rotary units. This could be a bearing, axle, bushing. They will also need to be prepared in advance.
After the drawing has been drawn in detail, you need to study it again and think through the key points. After this, you can already purchase materials. In order to save money, it is better to first carefully review your stock of metal and wood structures. Perhaps something can be used at work.
What will you need?
To install brakes on a trailer, you first need to acquire the following materials for their manufacture:
- Brake drum from a motorcycle.
- Motorcycle brake pads.
- Motorcycle wheel spokes.
- It is recommended to make a trailer with brakes on each wheel - this will avoid problems when braking (the block with the trailer will not turn).
It is worth highlighting the following tools that are necessary to remake these brakes:
- Welding machine.
- Pliers.
It is better to order disc sharpening from a professional technician at a car service center - they have all the necessary equipment.
Required tools and materials
The scheme is ready, now we need to collect the necessary materials and a set of tools for work. The basis of the future braking system can be parts from a motorcycle:
- brake drum;
- wheel spokes;
- pads.
If they fit the walk-behind tractor in size. The craftsman will need standard tools and a welding machine, with which the structural parts will be firmly connected.
Additionally you will need:
- pedal/lever;
- cables;
- wire made of durable metal;
- piece of pipe.
Take ready-made or make separately a special mechanism - a handbrake.
Example Example
Photos and descriptions of interesting options
DIYers have already come up with a considerable number of original trailer options. Perhaps one of the following will suit you as a sample.
The small dump truck has small wheels, a simple frame design and no brakes. At the same time, making a tipping trailer is not at all difficult; you just need to provide turning hinges and provide for fixing the body when moving.
A two-axis option is also possible. Such a trolley is suitable for transporting heavy and bulky cargo paired with a powerful walk-behind tractor; in this case, a rotating mechanism for the front axle is required and a braking system will obviously not be superfluous.
READ What kind of oil to pour into a Viking walk-behind tractor
It is very smart to use part of the structure from a heavy motorcycle. In this case, a soft suspension with springs and shock absorbers is provided. The wheels of the motorcycle are light in weight and fit well with the load. A luxurious car seat increases the comfort of movement.
Seeing a wide bench, it’s hard to resist saying: “Give us a ride on your tractor, Petrusha.” If two people are going to use the walk-behind tractor, of course, you should provide appropriate seating.
If you have to transport hay, you should provide high sides. To do this, you need nests along the perimeter of the sides.
Just like a mining dump truck, not a trolley for a walk-behind tractor. However, the powerful water-cooled engine allows for the transportation of large amounts of soil.
This unsightly-looking option seemed the most practical. The loading platform is located low, which makes loading easier and increases the trailer's stability when driving. Suspension with springs and shock absorbers plus a car seat promise comfort to the driver of the motor vehicle. In general, if not a Mercedes, then it will definitely be a cool bike.
Probably, such a car is not even a “Zaporozhets”?! At least he has a trunk in front, but here, where should I put the cargo? The owner will have to sit on a pile of sand...
What will you need?
To install brakes on a trailer, you first need to acquire the following materials for their manufacture:
- Brake drum from a motorcycle.
- Motorcycle brake pads.
- Motorcycle wheel spokes.
- It is recommended to make a trailer with brakes on each wheel - this will avoid problems when braking (the block with the trailer will not turn).
It is worth highlighting the following tools that are necessary to remake these brakes:
- Welding machine.
- Pliers.
It is better to order disc sharpening from a professional technician at a car service center - they have all the necessary equipment.