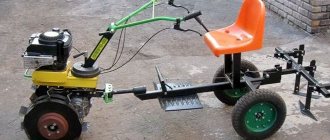
Any activity on a plot of land takes a lot of time and effort. For this reason, gardeners are increasingly using special equipment, such as walk-behind tractors. However, it is impossible to do everything with this unit. Without a special adapter, you will not be able to weed or hill up the ground, or clear the area of snow and construction debris. A cart with a seat for a walk-behind tractor nowadays costs quite a lot of money. However, there is a way out. Today we will talk about how you can make a homemade adapter for a home walk-behind tractor without any special effort.
Types of front adapters for walk-behind tractors
Converted technical devices are of the following types:
- With telescopic drawbar type. Thanks to this part, the width of the adapter for the walk-behind tractor is adjustable.
- With drawbar of various lengths. The short clamp is designed for light weight devices, the long clamp is suitable for heavy mechanisms.
- The purpose of the equipment is to transport goods. The models have a special body that can withstand increased load.
- With lifting lever mechanism. Equipment that has suspended equipment is easy to control and move.
Adapter with steering type control
How to make a steering adapter for a walk-behind tractor?
The type of structure in which the steering wheel is provided must have a rigid fixation. The steering gear is performed as a separate independent unit. A pair of wheels and an axle, which serves as a steering gear, are installed in the front and rear. Places of fixation are selected based on individual characteristics. The location of the steering gear depends on the type of spare parts. When assembling, it is recommended to perform just such an improved model. A motor cultivator with steering control has many positive qualities:
- the operator will not waste energy when moving behind the unit;
- the equipment has maneuverability and increased functionality;
- traction force is realized at 100%;
- you can drive a walk-behind tractor to your workplace without the use of additional equipment;
- ease of management compared to other options.
Working on a walk-behind tractor with steering control
Let's say a few words about the control features of a walk-behind tractor with a steering wheel, and why it is recommended to use this option during assembly. It’s not for nothing that this type of conventional and home-made machines is so popular, because it has a lot of advantages:
- the operator will not have to waste his energy walking behind the mini tractor;
- the traction potential of the equipment is realized one hundred percent;
- such a mini tractor is more maneuverable and functional;
- Now, in order to cultivate a plot far from home, you will not have to additionally transport a walk-behind tractor - you can simply drive it, like a regular car or tractor;
- control is more lightweight and convenient than other types;
- Now you don’t need to hold the entire mass of this heavy and bulky device in your hands,
- it becomes possible to quickly assemble and disassemble the unit;
- control parts are not significantly modified during rework;
- good balance in weight along the axes.
We will not mention here the noise of operation and other characteristic features of, in principle, all tractors . Let's just talk about one characteristic drawback - not very reliable stability, which is associated with a movable coupling. However, the advantages are, of course, more impressive.
Purpose
The main objective of the equipment with a front adapter is to speed up and facilitate the processing of the garden.
If you attach additional devices to the device, you can expand the range of applications:
- remove hay;
- cultivate the land - plant and harvest;
- clear the area of snow;
- level the soil surface;
- transfer small-sized cargo.
Advantages and disadvantages
After the walk-behind tractor has undergone modernization, the designers note the positive qualities of the front adapter:
- ease of operation;
- disclosure of traction resource - existing abilities increase;
- the possibilities of work are expanded - soil cultivation will speed up;
- if necessary, the unit is disassembled and assembled;
- good balance in weight and axles;
- You can move around on the device.
The disadvantages include the fact that in the presence of a movable coupling, stability deteriorates.
The adapter for the walk-behind tractor consists of the following structural elements:
- The frame is built central or staircase. Suitable materials are metal pipes and corners. The design model must include a fork and bushing that will ensure free rotation of the trailer. There are converted vehicles in which the aggregate device and the trailer are combined. In this option, you should make a new stand for the transmission and engine.
- Suspension systems can be axial, bridge, rotary, portal. It is constructed without the use of elastic fragments.
- A steel sheet is used for the body.
- The hitch is an important element of the converter; it makes the walk-behind tractor stable and securely connected. The coupling unit is made of a 15 cm pin.
- The seat is the driver's workplace.
- The steering is used with a rigid connection. You can build it with your own hands or purchase it in a special store. Craftsmen install steering rods and racks from a VAZ or Volga car.
Design and principle of operation
Essentially, the adapter is presented in the form of a trolley that is attached to the walk-behind tractor. After which the structure turns into a mini-tractor. The main details of such a unit:
- a frame to which other constituent elements are attached;
- driver's seat with lift lever;
- 2 wheels;
- clutch device;
- wheel axle.
In this video we will analyze the front adapter:
It is one of the most important elements of the device, since other elements are connected to it. Therefore, it must be made of high-quality and durable materials.
Driver's seat
One of the main advantages of the adapter is a comfortable seat for the operator.
Wheels
There are 2 types of wheels available - metal and rubber. The former are used for heavy types of work in the field. The latter are designed for driving on dirt roads.
Clutch device
The hitch is responsible for connecting the attachments and the mechanical unit itself. This fastening is defined as one of the most important, therefore it is made of high-strength metals - steel or cast iron.
The length of such a device is about 2 meters, width – 80 centimeters.
Depending on the clutch, the following design options can be considered:
- with movable clutch. This device is the lightest. The clutch here is located in the front, but control in this case is more difficult, since it is necessary to deploy the entire power unit;
- with steering. The clutch here is rigid, and control is achieved through a mechanical steering unit. This control is easier to use, but more difficult to produce.
There are different adapters for walk-behind tractors of different performance. For mechanisms with low power - with a short mount, for powerful ones - with a long one.
Algorithm of actions
To begin assembling additional equipment for a motor cultivator, you will need a drawing, in accordance with which the fastening elements and the construction of fragments will be made. If you have special skills and experience, you can make a homemade adapter for a walk-behind tractor and a drawing yourself. If you are afraid of making a mistake, you should take ready-made drawings. Before designing, it is recommended to check and verify the compliance of dimensions and numbers.
Tools and consumables:
- metal corners, square profile;
- bearings for the steering wheel and column;
- metal sheets;
- a pair of wheels, preferably on an axle;
- drills, electrodes, discs for grinders;
- fasteners;
- wrenches of various sizes;
- electric welding machine;
- lubricants – grease;
- Bulgarian;
- screwdriver;
- drill.
At the preparatory stage, it is necessary to select a kinematic diagram that provides indicators of the equilibrium of the entire structure. Overload warning must also be provided. It is recommended to use ready-made drawings of an adapter with a steering wheel to a walk-behind tractor.
Work progress:
- The beginning of work is the manufacture of the frame. The structure is made from cut parts of the selected steel building material. The metal is cut to the required length using a grinder. The fragments are fastened with bolts or welding.
- A 1.8 m piece of square metal profiled product is welded to a metal profile 60 cm long. The elements are placed perpendicularly. This fragment will serve as a mount for tires. The wheel stand must be at least thirty centimeters high.
- The spacers are welded to the main frame and wheel bushings. The size of the frame is 40x40 cm, it can vary depending on the individual project.
- A profile is welded to the edge of the frame. The axial pipes are bolted together.
- The control lever is welded to the frame. To increase power performance during control, the lever is constructed with one or more elbows with a length of 70-80 centimeters. The knee fragments are fastened with bolts. It is recommended to check the dimensions of the adapter for the walk-behind tractor with the drawings and diagrams, because they will help you create an error-free design with your own hands.
- A pipe 30-40 cm long serves as a stand under the seat; it is welded to the main frame. With a driver's seat, the equipment is easier to control during gardening.
- The coupling part of the mechanism is welded to the walk-behind tractor at the rear. The fastening is made of steel or cast iron material. An electric welding machine is used to connect spare parts. The fastener is an important component that ensures reliable coupling. The most suitable is a U-shaped connecting node. Thanks to this spare part, transport becomes sustainable.
- There are two types of wheels suitable for the walk-behind tractor adapter - rubber or metal. The latter option is used for work in the field. The rubber wheel has a deep tread, which will allow you to move on unpaved roads and, if necessary, drive off-road. Wheel radius fits 15 to 18 inches. Suitable wheels are from the domestic automobile industry - VAZ, Moskvich.
- I treat the resulting device with a primer and paint it. This technique will prevent metal corrosion.
Video review of the front adapter
Making the front adapter - video
How to make an adapter for a walk-behind tractor with your own hands
Specialized equipment is an integral part of working on site. A walk-behind tractor helps to loosen or dig up the area and hill up the beds. However, working with it takes a lot of time and effort. To speed up the process of working on the unit, many gardeners buy or make a homemade adapter for a walk-behind tractor. Most people buy it in specialized stores, but if you want a unique adapter that will 100% fit an existing device, you need to make it yourself.
Types of adapters for walk-behind tractors
Externally, the adapter looks like a two-wheeled trailer with a driver's seat. When installing such a trailer, almost all work performed is automated. The walk-behind tractor itself becomes almost a mini-tractor. In addition, several models have a special lever that allows you to raise and lower the seat, making work even more comfortable.
Adapters for walk-behind tractors can be of several types. To make the unit yourself, you need to decide which type will be more convenient and comfortable for the owner. Depending on the type of clutch, they come with steering and a movable joint. Depending on how the main power plant is located, there are two types: front and rear adapters.
Adapter with steering
This type is on a rigid joint with a walk-behind tractor. The steering is represented by a separate unit, and options with both rear and front wheels are possible. The walk-behind tractor becomes practically a self-propelled machine, which is quite simple and easy to operate, practically no different from motorcycles or cars.
Movable joint adapter
With a movable joint, the angle relative to the vertical axis between the adapter and the walk-behind tractor changes. Making such a trailer is much easier, but making a turn will require more effort. However, this type of adapter is inferior in geometry: the turning radius, as well as its angle, is much larger.
Front and rear adapters
The name itself determines the meaning of the type: front - it is located in front of the walk-behind tractor, rear - at the back. Which one is better cannot be determined, since it all depends on individual preferences, as well as the purposes for using the walk-behind tractor.
For loosening and digging up the area, the front adapter will be more convenient, since here, mainly, the power of the walk-behind tractor is needed; it is not necessary to see the area. But for hilling beds, etc., the rear adapter will be more comfortable, since you need to carefully watch the work going on.
It is recommended to create the adapter closest to the drive axle, since the driver’s weight will put additional weight on the walk-behind tractor, pressing it even more tightly to the ground. In this case, the wheels will not slip.
Owner reviews
On forums, adapter owners express their opinions on the use of this design, its characteristics and how you can make the device yourself. Here are reviews from some owners of this equipment.
Sergey Petrovich, 53 years old, farmer
For several years, when using a walk-behind tractor, I had to constantly walk behind it and hold it by the handle. Our site is located at a great distance from the house. Therefore, on the advice of friends, we purchased an adapter that comes with a steering wheel and a seat. Now it has become convenient to work. Labor productivity has increased. In addition, with the help of the new device it is possible to transport crops over long distances.
Victor, 42 years old, summer resident
Great difficulties were experienced when clearing snow in winter. For this purpose, we used a walk-behind tractor and a snow blower that is mounted on it. My neighbor helped me make drawings and assemble the design of the adapter for the walk-behind tractor. After the device was manufactured, snow removal work became much easier. The trailer turned out to be durable and reliable.
How to make an adapter for a walk-behind tractor with your own hands
To design a trailer for a walk-behind tractor yourself, you do not need special knowledge or skills - just drawings and welding. The materials are low cost and are available for purchase at any hardware store.
Scheme and design elements
As already mentioned, the adapter above is a trailer, which is located either behind the walk-behind tractor or in front. Schematically it looks like this:
Drawing of the MTZ-0.5 walk-behind tractor with homemade attachments
The adapter for the walk-behind tractor provides the following basic design elements:
- Frame - can be spinal or ladder. Sometimes you can find an option where the frames of the unit itself and the trailer are combined into a single element. However, in this case it is necessary to create a new pedestal for the transmission and engine.
- Suspension – axial, bridge, rotary, portal. Usually made without elastic elements.
- Portal – used only in rear view. In the case of the front one, it becomes the portal of the unit itself.
- The hitch is the most important element of the adapter, as it makes the walk-behind tractor stable and ensures a reliable connection. If the trailer has steering control, then the hitch will be rigid; in the case of a movable joint, fasteners are created on a horizontal hinge. There is an option to create it taking into account two degrees of freedom: twisting and rotation.
- The seat is created depending on the preferences of the owner.
- Steering - used only with a rigid coupling. You can create it yourself, or purchase it at a specialized store.
Required materials and tools
To make a trailer yourself, you need the following materials and tools:
- metal corners;
- metal sheets to support the legs;
- square metal profile;
- wheels (2 pcs.);
- welding machine;
- other tools (saw, screwdriver, etc.).
Drawings and dimensions
Example of a simple circuit
The base of the adapter will be a square metal profile. Usually it is taken with a length of 160 to 180 cm. A smaller profile is attached to it directly perpendicularly - 50-60 cm (depending on the size of the desired track).
Wheel stands are attached to the resulting structure. As for the racks, their size is 25-40 cm. It is determined depending on the walk-behind tractor itself. Then the braces are welded, the length of which is determined by the desired size of the entire structure and other parameters.
Next, a frame is created, the side guides of which are attached to the wheel stands using bolts. The attachments are then attached to the frame, then the control lever. It has 3 elbows measuring 20, 35 and 55 cm.
To increase mass and force, another larger lever is created - 80 cm.
Assembling an adapter for a walk-behind tractor
Stage 1. Creation of a kinematic diagram.
From the very beginning, at the design stage, it is necessary to create a kinematic diagram, which should provide for ensuring the balance of the entire system and preventing additional overload. In this case, it is appropriate to use ready-made options (like the example below) or create it yourself.
Simple adapter circuit
Stage 2. Creation of basic elements.
When manufacturing the frame structure, it is necessary to provide a fork with a bushing. It will ensure that the trailer turns freely. The frame itself is created from metal corners and pipes, the body is made from steel sheet. To create wheel stands, a diagram is drawn or a ready-made one is taken.
Often a 15-centimeter pin is used to create a coupling unit. It is inserted into the hole in the drawbar of the U-shaped tow bar of the walk-behind tractor.
This option fails quickly because it wears out too quickly due to the free-rotating trailer, which breaks up the mating holes. It is recommended to increase the length of the U-shaped hitch for long-term use.
Stage 3. Seat installation.
We build a walk-behind tractor according to instructions from Arkhipov
Step-by-step device assembly technology
The assembly of the structure begins with the arrangement of the drive shaft. To do this, a housing with bearings is attached to it, a sprocket is welded and overrunning clutches are mounted, which will perform the function of a differential during operation. After this, the structure is equipped with wheels and a frame. A telescopic rod, a plow and a steering wheel .
The main elements of the running shaft: 1 – shaft, 2 – sprocket, 3 – cover, 4 – bearing housing, 5 – support platform, 6 – bearing No. 308, 7 – freewheel housing, 8 – pawl axis, 9 – pawl, 10 – ratchet, 11 – bearing No. 307, 12 – washers, 13 – wheel, 14 – pawl spring
The agricultural walk-behind tractor is equipped with special wheels, which, unlike rubber counterparts, are able to provide better traction with the ground.
Such metal wheels do not become clogged with soil. When they come into contact with the soil, they do not compact it, but rather loosen it.
READ How to make a stand for a drill
To connect the frame of the unit with the engine mount and the frame of the scooter itself, two arc-shaped pipes are used. Between them there is space for placing a fuel tank.
To equip the engine, a bracket is used, ending with a steel axle 150 mm long. The bracket is welded cantilever to the U-shaped frame of the structure. The motor with suspension is suspended on the axle itself. The assembled structure is connected to the arc-shaped arcs of the frame. Only after this the secondary shaft is mounted, the control cables are pulled and the chains are tensioned.
Main elements of the control unit: 1 – connecting axis, 2 – bar, 3 – pipe, 4 – handles
Connecting elements of the structure: 1 – main rod, 2 – control rod
What is good about this particular design?
There are dozens of analogues of this model, but in comparison with them, the original model of the walk-behind tractor has a number of undeniable advantages.
- Swivel joint. The processing tools and tractors of most of these models have a rigid connection, which complicates the maneuvering of the unit and thereby makes it difficult to work with it. The parts of this agricultural unit are connected by means of hinges. This makes it possible to change the direction of movement during work, if necessary, without removing the plow from the furrow.
- Shift of the axis to the direction of movement. Many owners, when cultivating soil using a walk-behind tractor, have encountered such a difficulty that in the process of moving forward under the influence of soil resistance, the unit moves to the side. To level the furrow, a lot of effort must be made. To compensate for such a skid, the master positioned the plow axis at a slight angle in the direction of movement. When plowing, the structure is slightly turned to the left. The desired position can always be adjusted using three rod joints.
- The level of the specified plowing depth. If in other models the plowing depth is maintained by lowering or raising the plow, then when working with this walk-behind tractor it is performed automatically. Regulation is carried out by changing the angle of the plow in relation to the furrow. The structure is equipped with a field board, which acts as a lifting force when burying the plow. If, on the contrary, the ploughshare appears above the surface of the earth, then its angle of attack instantly increases, under the influence of which it again plunges into the ground to a given depth.
Design features of the unit
The walk-behind tractor is a self-propelled machine on two wheels, equipped with an engine removed from a VP-150M motor scooter. The reason for choosing this particular engine was that it has a design solution that allows forced air cooling of the cylinder head.
Such a motor from a scooter is capable of operating at the lowest speeds and at fairly heavy loads.
To build the walk-behind tractor, the master used control cables, engine mounts taken from a motor scooter, as well as a double arc of the frame, handles and chains. The rest of the design details were industrial production
Separately, the designer produced a U-shaped frame welded from pipes and a wheel axle turned on a lathe. He also made 3 homemade hinges for the main and control rods. They will be used as connecting elements between the walk-behind tractor itself, its steering wheel and the plow.
A steel pipe is attached to the frame of the unit by welding, ending with an axis, which is necessary for tensioning the cables going to the engine gearbox. The tension itself is carried out by means of a swinging rocker arm, the gear shift knob of which is a welded section of steel pipe.
The pitch of the chains used to create the device is 12.7 mm and 15.9 mm. Number of teeth on sprockets: output shaft – 11, secondary shaft – 20 and 60, drive axle – 40.
DIY front adapter for walk-behind tractor
Homemade front adapter with steering for a walk-behind tractor: photo report on making a homemade product.
Dear site visitors, You are Your Own Builder! We present to your attention another homemade product from the craftsman Mikhail, who is engaged in the construction of various homemade mini tractors and other agricultural equipment. technology.
This time we will look at a rather useful homemade product that will undoubtedly be useful to owners of walk-behind tractors - a homemade front adapter with steering control for a walk-behind tractor.
This device greatly facilitates the work of cultivating a vegetable garden, because essentially by installing the adapter on a walk-behind tractor, it will already be a mini tractor with steering control, and working on a mini tractor is much easier than with a walk-behind tractor.
The process of building an adapter for a walk-behind tractor is presented in these detailed photos:
Front axle with homemade steering knuckles.
The homemade frame is welded from a profile pipe.
The base for the seat is welded to the frame.
Steering rack from a VAZ car.
Steering rods are also from a VAZ car.
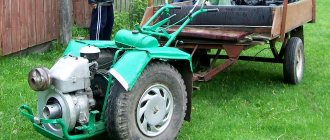
As a result, the author made a mini tractor from a walk-behind tractor with his own hands.
Design features of front and rear adapters for walk-behind tractors
Many farmers use walk-behind tractors to work in their fields. The adapter for the walk-behind tractor makes it possible to speed up its execution. This unit is used as a trailer that moves on wheels and is attached to a motor cultivator. You can add attachments to the device and mount a chair. Often gardeners make such a unit themselves.
Purpose
An adapter for a walk-behind tractor was created for the convenience of gardening. If you attach a hinge to it, you can expand the scope of application of the device:
- remove hay;
- level the soil surface;
- transport goods;
- harrow the ground;
- clear the area of snow.
An adapter is a device that is designed for movement on a motor cultivator. With it, you can control the unit while sitting in a chair, and at the same time cultivate the soil. The trailer for the Neva motor-cultivator is equipped with a steering control. It makes it easier to use the walk-behind tractor.
You can install different attachments for harvesting, a plow, a mower, etc.
This trailer speeds up work in the field. Using this design, you can increase the speed of the cultivator from 5 to 10 km/h. Let's look at the adapter device. The adapter for the motor cultivator consists of:
- frames;
- operator seats;
- two wheels;
- axles;
- coupling mechanism.
After attaching the adapter, the cultivator looks and is used like a mini-tractor. To create an adapter for a cultivator with front steering, you need a frame. The operator's seat is installed on it. The frame is fixed to the chassis.
The seat is fixed to the frame. This will make it easier for the operator to control the cultivator. The wheel system will help move the unit around the site. There are 2 types of wheels: metal (used in the field) and rubber (used for driving on the road).
The hitch for a walk-behind tractor is made of steel or cast iron by welding. She attaches the cart to the cultivator. The U-shaped fastening system is considered the best. With this design the device will be stable.
- The highest travel speed on a walk-behind tractor with a trailer is 12 km/h.
- Maximum load capacity - 100 kg.
- The track diameter is 67 cm.
- Dimensions are 130x70x71 cm.
- The weight of the device is 22 kg.
- The warranty period is 5 years.
Design Features
The design of this device is very simple. At its core, the adapter is a trolley that is attached to a walk-behind tractor. It consists of a frame on which the driver's seat or body is mounted. The frame is mounted on a two-wheel chassis. Another indispensable element of this equipment is the drawbar, with which the trolley is attached to the main unit. It pulls the trailer, and this force is transmitted to the wheels of the adapter. You can attach many different devices to this device: a milling cutter, a flat cutter, a harrow, a potato digger and much more.
This ensures the reliability of the device
When making homemade equipment of this kind, it is necessary to pay great attention to the strength of the coupling between the adapter and the walk-behind tractor, since this is the weakest point of the entire unit. The hitch must be made of steel or cast iron. As a rule, it is performed by welding, and special attention should be paid to the weld seams
As a rule, it is performed by welding, and special attention should be paid to the welds. Modern models of this technology also include a control panel conveniently located near the driver’s seat
From this panel you can control the vertical movement of various equipment that is attached to the adapter. You can also change the angular movement of attached devices
Modern models of this technology also include a control panel conveniently located near the driver’s seat. From this panel you can control the vertical movement of various equipment that is attached to the adapter. You can also change the angular movement of attached devices.
For this purpose, the device is equipped with a system of levers or hydraulic units.
In addition to the equipment set that is sold with the adapter, various additional devices can be used to make gardening work easier. Some of them are purchased in the store, others can be made independently if you have the appropriate tools, materials and skills.
Buying a new adapter for a walk-behind tractor is not difficult. There are many different types of this equipment on sale. The more functions this equipment performs and the more convenient it is to use, the higher its price. Even the cheapest adapters have a considerable cost, so many owners of walk-behind tractors decide to make this trailer with their own hands.
In this case, it is necessary to perform a preliminary calculation of the strength and mechanical characteristics of the device.
Types of adapters for walk-behind tractors
The adapter for the walk-behind tractor comes in several types. The design is distinguished by the coupling method:
- Strong connection to the motor cultivator. The device has a separate steering wheel. Steering wheels are located at the front or rear (both options are possible).
- Movable connection. At the same time, the angle between the cultivator and the cart changes all the time. Turning requires a lot of effort due to the fact that the connection point is movable.
The devices are also divided according to the presence of drive wheels into:
- Front. The hitch assembly is located at the rear.
- Rear. The hitch assembly is located at the front.
Trailers are divided into:
In addition to garden work, universal ones are useful for transporting crops.
Trailers are divided according to the size of the drawbar:
Structures with a short drawbar are attached to low-power walk-behind tractors. Trailers with a long drawbar are attached to powerful cultivators.
There are 2 types of trailers: on 1 axle or on 2 axles. These couplings are created by the manufacturer. The factory calculated such a design and mounted a tow bar on it. A spring was installed under the seat, designed to allow the vehicle to move smoothly on rocky surfaces.
The APM has special footrests and a brake that is pressed with the foot to stop the cultivator. Pneumatic tires were mounted on the adapter, which ensure smooth running at high speed.
You can buy the device in a specialty store unassembled in packaging. It's easy to assemble. There are instructions for this. To assemble the device, no additional knowledge or skills are required. Afterwards you need to check how the design works.
If all components work well, you can start operating the device. When purchasing a design, you also need to choose a soft lining for the seat. Then the driver's work will become more convenient. The HorseAM IS 1 adapter for the Magnum walk-behind tractor, and adapters for the PNO-1, AM-3 K, BUM-3, KTZ-03 cultivators are very popular among farmers.
With steering
A high-quality adapter with a steering wheel for a walk-behind tractor makes it easier to control the cultivator. In terms of its functions, such a walk-behind tractor is comparable to a mini-tractor, only it is more economical in fuel consumption. The standard APM unit does not have a steering wheel.
Control is carried out using the cultivator steering wheel. But other manufacturers produce units with steering. The trolley is designed for more convenient work on the cultivator, so the presence of a steering wheel will make control easier.
With movable joint
When a trailer is movably coupled to a motor-cultivator, the angle of the vertical axis between the cart and the cultivator changes. It is easier to make such a device, but when turning it will be necessary to apply more force. This type of trailer is inferior in geometric characteristics: the turning radius becomes larger.
How can you upgrade a homemade walk-behind tractor?
The Arkhipov walk-behind tractor is multifunctional. It can be used as a plow or a cultivator. To do this, it is enough to replace the removable parts for the plow with parts with removed moldboards for the cultivator. As it moves, the walk-behind tractor will deepen furrows into the ground and place potato tubers in them. To plow the tubers, you just need to put the moldboards in place and walk the unit between the planted rows.
The same principle can be used to hill up sprouted plants. You can learn more about how to independently design a hiller for a walk-behind tractor from the material: https://diz-cafe.com/tech/okuchnik-svoimi-rukami.html
The agricultural unit is also convenient for harvesting. Using different blades you can change the working width. The unit is also good because it is capable of collecting missed potatoes and plant tops remaining after harvesting. For these purposes, it is equipped with a rake or harrow.
The universal design can be used not only for agricultural work. In winter, it is successfully used for snow removal. A faithful assistant will also come in handy for cleaning the paths of the local area. By installing a roller with a round brush and an additional sprocket on the walk-behind tractor, the owner will make it easier for himself to clear the sidewalks.
Sources:
https://piramida-stroi.ru/rukami/adapter-dlya-motobloka-svoimi-rukami-chertezhi-i-razmery-s-rulevym-upravleniem-adapter-dlya-motobloka-svoimi-rukami-perednij-s-rulevym- upravleniem-samodelnyj-s-rulem-chertezhi-kak-sdela.html https://diz-cafe.com/tech/motoblok-svoimi-rukami.html
How to make an adapter for a walk-behind tractor with your own hands
A gardener or farmer who wants to increase the volume of work can make an adapter for a walk-behind tractor with his own hands. Let's look at how to make a front adapter with a steering wheel yourself. To do this, a frame is made, a lever is welded to it, then a coupling unit is created, after that the trailer rotation mechanism is made, then the braces need to be welded.
In this way, you can make a homemade all-wheel drive trailer for both small and heavy walk-behind tractors. Let's look at step-by-step instructions for making a trailer yourself below.
Scheme and design elements
To make an adapter with your own hands, you must first complete the drawings and diagrams of this device. And using a ready-made diagram indicating all the parts, assemblies, structural elements and their dimensions, it will be easier to start making the unit yourself.
Required materials and tools
Let's consider what is needed to create the device.
Materials and tools:
- Two wheels with an axle. The radius of the wheels should be 15-18 inches. You can take wheels from a car.
- Bearings for wheel and steering systems. Metal profile corner or channel, metal pipe.
- Nuts, screws, washers.
- Lubricant: grease.
- Welding machine, drill with drill bit, wires, disks.
- Bulgarian.
- Screwdriver, wrench, screwdriver.
- Frame for turning the cultivator using the steering wheel.
Drawings and dimensions
First you need to complete the drawing. First of all, the kinetic scheme is calculated. Then they carry out the basic diagram, which shows the dimensions of all parts. All parts, components and fasteners of the structure will be manufactured according to this scheme. Before you start creating the unit, you need to clarify all the data available on the diagram and check their compliance with the indicators of all workpieces.
Assembling an adapter for a walk-behind tractor
First they make the frame. It is made from pieces of metal of the required length. The metal is cut with a grinder and the parts are connected by welding or screws.
Then they do the chassis. When the cultivator motor is located at the front, then the track width is determined by the base wheels. The rear ones are attached to the frame using an axle. It must be made from a pipe of the required diameter. Bushings with bearings are attached to its ends.
Then wheels are mounted on them. When the cultivator motor is at the rear, the track width must be wider. Otherwise, the structure will not be able to maintain balance during operation. Then the base wheels of the cultivator need to be removed and fixed to a wide axle.
To make your own steering wheel, you do not need to remove the car handle. If you use a handle from a cultivator, you can control the entire structure using a motorcycle handlebar. But it will be difficult to go back. Therefore, it is best to mount a durable steering column.
Let's consider making a frame for a motor-cultivator trailer. If you take a frame made of solid metal, control will be directed to the front axle of the unit. You can make a frame on hinges, in which case the steering column will rotate completely onto the front frame. To achieve this, a gear should be mounted to the front frame.
The second gear is mounted on the steering column. Then a seat for the tractor driver is made. It can be taken from the car. The seat is placed on the frame by welding. It can be adjusted. This is especially necessary for the front type of device. The driver's seat is now attached.
To attach the trailer to a walk-behind tractor with a plow, you must install a bracket. To operate the mower, you need to make a hydraulic system. To work on the device, you need to weld the tow bar from the car to the rear part, where the metal frame is located. The pump can be borrowed from any unit for agricultural work.
The hitch for the cultivator is U-shaped. For this you need a channel profile. The hitch is installed under the steering column. In this case, you need to drill the holes that are marked on the drawing. The bracket and pin are mounted through them. The components are made of high quality steel. You can also make a caterpillar mechanism.
Thus, all the necessary parts and components of the adapter for the cultivator have been manufactured. Now you need to assemble the entire structure. After this, it needs to be checked and tested in operation. If all components operate normally, then you can begin operating the unit.
Manufacturing a device with a movable joint
This is the simplest device. The adapter itself will be located behind the walk-behind tractor. It is not difficult to make, but the process requires attention and concentration. The service life of the mechanism depends on the quality of work. This adapter is suitable for heavy walk-behind tractors, for example, “Neva”. It has an engine power of over 7 hp. With. and weight from 105 kg. This allows you to pull not only the adapter, but also agricultural implements without slipping.
For manufacturing you will need the following materials and tools:
- electric drill with the necessary set of drills;
- DC welding machine and electrodes;
- grinder with a set of cutting and grinding discs;
- hammer, file, square, various hardware;
- sheet metal with a thickness of at least 5 mm;
- several profile pipes measuring 40 x 50 and 50 x 50 mm;
- round water pipe with thick walls with a diameter of 30−45 mm;
- steel rods with a diameter suitable for a round pipe;
- channel 40 x 50 mm;
- two wheels from a Zhiguli or Oka with bearings and hubs;
- driver's seat.
You can choose any adapter size, but based on the needs of the mini-equipment. The frame itself can be made slightly higher or lower than the axis of the walk-behind tractor. For wheels, the optimal suspension is portal, providing decent ground clearance. It is not necessary to install shock absorbers on the adapter - this complicates the design. The easiest way is to take a seat with built-in elastic elements.
Next, they proceed directly to the manufacture of individual components.
- Hitch. This is a welded mechanism, which is a hinge that operates in two planes. It is then installed into the base of the adapter frame and bolted to it. It consists of two pieces of 40 x 50 pipes welded to each other and a piece of round water pipe. A welded tee is inserted into it. The tee itself consists of a rod and part of the same pipe. This is the most critical unit, so the welds must be perfect.
- Adapter frame. Here you will need a profile pipe and channel. They are welded together, strengthened, and then made into racks for the wheels. Next, the racks are fixed with braces welded to the frame and wheel hubs. Install and secure the wheels.
- Several pieces of pipe are welded to the main frame to install the seat.
- Fix and adjust the seat. It is placed so that when the steering wheel is turned, the operator’s back does not leave the backrest. There is no need to remove the walk-behind tractor controls - this is done when the power plant is located behind the driver.
- Install the finished coupling device.
- Attached to the walk-behind tractor.
Next, the wheel locking mechanism is made. To do this, use a ready-made brake system from any passenger car and fit it to the installed wheel hubs.