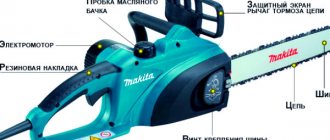
For objective reasons, most people will prefer to use a snow blower instead of a shovel to clear the area of snow that has accumulated in winter. But the purchase of such equipment automatically means the need for its maintenance and possible repairs.
It cannot be said that a snow blower is a very complex unit, although certain features are present here. This provides an excellent opportunity to maintain and restore the snow blower on your own. To do this, you need to know its structure, understand the principle of operation, and so on.
There are several basic elements that need maintenance. In addition to the engine, the gearbox of a snow blower plays an important role. This will be discussed in the article.
Gearbox design - studying the mechanism from the inside
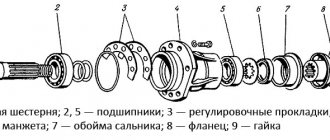
The main element of the mechanism is the gear of the snow blower gearbox, made mainly of soft metals.
Basically, bronze is used for this. The use of soft metals is explained by the fact that if the auger jams, the engine will not be damaged. The screws are fixed to the shaft using shear bolts, which act as the initial protection of the mechanism. If emergency repairs are necessary, the bolts must be cut off to protect the snow blower motor. If this does not help, the gearbox of the unit will take the brunt of the blow.
All elements of the gearbox are placed in its housing. If the snow removal unit is used for domestic purposes, the unit body is made of an alloy of aluminum and silicon. In this design, the gearbox housing consists of two parts connected by bolts. In professional equipment, the gearbox housing is made primarily of cast iron.
Depending on the scope of application, the snow blower gearbox can be large or small in size. In large units, the gearbox gear for a snow blower will also have quite large dimensions.
What are the features of gears?
The gear is the most important element of the gearbox. Different types of materials are used for its manufacture. In household models, the most common solution is a bronze gear, which has a diameter of 19 mm and 20 teeth. In professional and larger snow blowers, gears with 41 teeth and a diameter of 25 mm are used.
When the auger on a snow blower suddenly becomes blocked, such a small gear takes on the resulting load, thereby protecting the power unit.
Bronze gears on snow blowers are a consumable item. Therefore, in the event of a breakdown, which does not occur so rarely, you need to buy a new similar gear. And with the same number of teeth.
So choosing a good quality gear is of great importance.
Types of gearboxes in snowblowers
The torque of the snow removal unit created by the motor is transmitted to the working parts using a power take-off shaft and a V-belt drive. A gearbox located near the machine engine is attached to the shaft via a screw mechanism. In this case, snow removal equipment can be equipped with two types of gearboxes:
- Serviceable gearboxes - mechanisms of this type require periodic disassembly for partial or complete maintenance. Such elements have a longer service life; their components are made of bronze, due to which the gear of the snow blower gearbox is much less susceptible to wear;
- Maintenance-free gearboxes - such units do not require maintenance, but at the same time they cannot be repaired. In case of any malfunction, the mechanism must be removed and thrown away, and a new part installed in its place.
Gearboxes of the second type are equipped with cheaper models of snowplows - units made in China and Korea. Mechanisms of the first type are used in equipment of European, Japanese and American brands.
Malfunctions and repair of snow blower gearbox
Most experts advise buying snow removal equipment with a serviceable gearbox. The latter requires regular maintenance, but it can last much longer than maintenance-free units. At the same time, serviced gearboxes break down from time to time at the most inopportune moment. The most common breakdowns of these mechanisms include:
- The appearance of sharp knocks inside the gearbox - most often the cause of such a breakdown is damage to the worm mechanism or the bearings located next to it. To repair, you will need to buy a new mechanism or adjust the bearings;
- The gearbox began to heat up quickly - the reason may lie in the lack of lubrication or partial wear of the bearings. The unit will need to be disassembled and checked for lubrication and integrity of the bearings. If necessary, the latter must be replaced immediately;
- The gearbox began to vibrate strongly - this problem appears when the axis of position of the motor and the machine shafts is disrupted. Repair is carried out by eliminating the defect that appears;
- Lubricant leaks from the gearbox - the reason lies in the blockage of the drainage hole inside the vent. To repair, the vent should be washed in kerosene and wiped dry with a dry cloth;
- One or more gears of the gearbox are worn out - if during disassembly it turns out that the edges of the part have been worn out, then it will need to be completely replaced. When purchasing a new element, you need to be extremely careful - the gear for a snow blower must have a certain diameter, otherwise it will not fit inside the gearbox.
In most cases, serviceable gearboxes can be easily repaired with your own hands. If the problem cannot be resolved, then it is better to contact a service center so as not to further damage the elements of the snow blower.
How to extend the life of the gearbox?
Both standard and homemade snow blower gearboxes will last much longer if the operator of the unit adheres to certain rules.
These include:
- constant use of exclusively high-quality gear oil for lubrication - its semi-synthetic analogues will not be able to provide reliable protection of the moving parts of the unit. As a result, sooner or later it will fail;
- breaks during operation - any gearbox heats up and the longer it operates under high temperatures, the more it wears out. This should be eliminated and a 10-minute pause should be taken after each hour of operation of the snow blower;
- regular washing of the unit - even the use of high-quality oil does not guarantee the absence of carbon deposits that accumulate on the walls of the gearbox. After several days of intensive use, a layer of resin is deposited in the mechanism that can interfere with its normal operation. To prevent this, the gearbox will need to be washed every 2 weeks of regular use of the snow blower;
- careful manipulations with the auger drive lever - each time you press the lever, the drive cable starts the gearbox. Over time, the cable stretches and breaks. To prolong its service life, the operator should press the drive lever only in cases where it is really necessary.
When operating a snow blower, it is very important to prevent oil from leaking out of the machine’s gear housing. To do this, you need to regularly check the seals and, if necessary, change them on time.
Self-made mechanism
Often, owners of snow removal equipment equip their units with homemade gearboxes. To make them, you can use improvised and purchased materials. To manufacture the mechanism you will need the following components:
- Housing – in order not to waste time, it is best to buy a ready-made cast iron or aluminum housing from an old gearbox;
- Gear with 20 teeth - it is made of metal using special equipment. You can also purchase a finished part from an old snow blower;
- Oil seals - you can use gaskets made of thick rubber;
- Shear bolts - you can buy fasteners at any store that sells garden equipment;
- Bearings – closed roller bolts can be used to make the gearbox;
- Shaft - to make it you need to take a regular pipe made of grade 45 steel.
Having prepared all the necessary components, you need to carefully study the work plan. The assembly diagram is shown in the figure on the right.
The manufacturing procedure is as follows:
- First, you need to attach the gear and bearings to the shaft;
- Then one of the housing parts is attached to the shaft. In this case, the gear and bearings must be located inside the housing;
- Next, the spare parts are sealed with oil seals, and the second part of the housing is installed on top;
- At the end, both parts of the housing are fixed with shear bolts.
Of course, you will have to spend a little money on making your own gearbox, however, in any case, creating a mechanism will cost much less than buying a new unit.
Instructions
Over time, everything breaks down. Any technique has a limit of strength and does not work forever. As for the Patriot, Champion, Honda, and Foreman snow blowers, some of their components are specially prepared so that breakdowns of special simple parts occur in them.
Shear bolts
Thanks to this, you can keep all important parts intact. This part, the shear bolts, is the second consumable of the snow blower, after gasoline.
The shear bolts are made in such a way that they come off on their own in the event of excessive load on the auger. In this case, the gearbox will remain intact, and the bolts just need to be replaced. But you won’t learn to buy them all the time for reasons of economy.
The cost of the kit, although not very large, becomes very noticeable when the consumption is high. Therefore, you should seriously think about how to make shear bolts for a snow blower with your own hands.
To do this, you need to take bolts of the required diameter, be sure to note that the diameter of the bolt is the same along the entire length, this is important, and simply transfer the dimensions of the original shear bolt to the workpiece. Next you just need to make grooves in those places where they are on the original bolts
In principle, not a difficult operation, but useful for the wallet.
Caterpillars
As for the tracks for snow blowers MTD, Huter, Kraftsman, Stig, much more tools and consumables will be required. But the result will still be beyond praise. One simple option is to make tracks from an old tire.
Its main advantage is that the result is a closed circuit, which means durable and reliable.
It is also quite simple to make - you need to cut off the edge from an old tire of the required size. A knife dipped in soapy water or a jigsaw with a fine-toothed attachment is suitable for this. After the jigsaw, it is best to process the edges to achieve greater smoothness to avoid tears.
If necessary, you can completely solder it. The only drawback of this design is the fixed size of the future caterpillar. But if necessary, you can make a larger cut if you need a narrow track, or tie two together if you need a wider one.
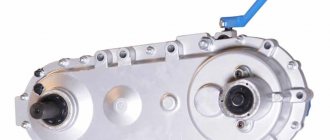
Gearbox
As for the gearbox, everything is simple - its service life is the longest of all moving parts. The gearbox transmits the driving moment from the engine to the auger and is located on the axis of the auger.
In fact, several gears, with regular lubrication, will not cause any special problems, especially since the total time of use of the snow blower does not exceed several tens of hours.
This video shows the assembly of a snow blower gearbox.
Friction disc
Another part that often breaks is the friction ring. Too much force on the wheels leads to the fact that the wheel-friction disc pair slips, which causes the friction ring to wear out and then break.
As a result, the friction wheel, made of steel, leaves deep grooves in the aluminum friction disc. But these are not the only problems. In the process, the belts wear out and the clutches completely fail.
And due to the fact that it is practically impossible to make such a ring at home, it is better to carefully monitor the progress of the snow blower and not try to skid on it.
The video shows how to replace the friction disc.
Snowblower chains, it's just a parade of diversity. Here you can see absolutely all types of them, especially if it is made by yourself. Absolutely everything is suitable for connecting the motor and auger. Homemade installations often use bicycle chains along with bicycle sprockets.
But this option is only suitable for low-power units. As for wheel protection, it can also be replaced with improvised means. It is enough to have a piece of chain at your disposal, and, at best, a welding machine.
But if it is not there, you can get by with simply riveting it with a hammer. The only condition for making the correct chain for a wheel is that it should not be too small and too loose. And the best option is the shape of a ladder.
True, it is possible to make something similar at home, but such a product will be far from having the functionality of a factory part. Here, cheapness is very inferior to quality.
Dismantling and lubrication of snow removal equipment gearbox
Before lubricating the gears and other elements of the gearbox, you need to completely disassemble the mechanism. Today you can hear a lot of advice on how to remove the gearbox on a snow blower. All of them can be described in the following algorithm:
- First of all, it is necessary to dismantle the belt protection casing and the auger drive cable;
- Next you need to unscrew the bolts that are located behind the “snail”;
- After this, you will need to remove the auger belt from the pulley;
- Next, you need to unscrew the bolts holding the auger shaft;
- After this, you will need to turn the “snail” and pull out the auger along with the impeller;
- Next you need to remove the shear bolts and disassemble the shaft;
- Finally, you will need to disassemble the gearbox itself.
Many beginners do not know how to properly disassemble the gearbox itself. To do this, you must proceed in the following order:
- First you need to clamp one of the shaft parts with a vice;
- After this, you will need to unscrew the 6 bolts securing both parts of the gearbox together;
- Next, you need to take a hammer and lightly tap on the gearbox housing.
How to remove the gearbox on a snow blower?
In some cases, the snow blower owner may need to completely remove the gearbox. This is quite easy to do if you have a flat and shaped screwdriver on hand.
The procedure is as follows:
- First of all, you will need to hold one specific part of the factory shaft motionless with a hand vice;
- Next, you need to unscrew the 6 screws that connect both parts of the mechanism together;
- Then you need to lightly tap the assembly body with a hammer and carefully remove the gearbox.
The dismantled mechanism will need to be disassembled and the parts laid out on a flat surface. This will help identify the worn part. After replacing faulty spare parts, you can assemble the unit and install it in the regular place provided in the snow blower.
Design options for homemade snow blowers
The main task of a snow blower is to capture and throw away snow masses from the place where they accumulate, for example, from the sidewalk. Snow blowers made by folk craftsmen have different designs. But according to the type of snow capture, models differ into auger and rotary.
Auger unit
The main part of the snow removal unit is an auger, reminiscent of a screw from a meat grinder.
There are two types of screw units.
- Single stage. They are equipped with one screw in the form of spirally arranged knives. The spiral knives consist of two parts and converge in the center where the tossing vanes are located. When the mechanism moves with a bucket, a layer of snow is cut, which immediately falls under the rotating knives. The latter crush the snow and move it to the central part of the body. Since the blades are located in the center of the auger, they capture crushed snow and throw it into a nozzle installed at the rear of the bucket. The higher the rotation speed of the shaft with blades, the further the snow is thrown. Auger knives can be either with a smooth edge or with a serrated one. Smooth edged knives are used for clearing freshly fallen snow and are often made from conveyor belt. A toothed auger is used if it is necessary to remove icy and compacted snow.
- Two-stage. This is a modernization of an auger-type snow blower. Its design also includes a screw. But for better snow ejection, a rotor with 2 or more blades is installed at the rear of the bucket. A rotary auger snow blower works on the same principle as a single-stage unit, but thanks to the rotor blades, the snow is better crushed and thrown over a long distance (up to 15 meters). The following figure shows the structure of a two-stage type snow blower.
Rotary unit
A rotary snow blower has the simplest design and consists of a round “snail” body and guide blades . In the upper part of the body there is a sleeve through which snow is thrown out.
A rotor with blades is installed in the central part of the cochlea. This impeller is driven by a motor (gasoline or electric). The rotor, rotating at high speeds, captures snow, crushes it in the snail body and throws it out through the sleeve.
Snow throwers made by craftsmen for the home can be of two types.
- With stationary drive. The motor is installed in the unit, after which it becomes a full-fledged snow blower.
- As a supplement for other units (mini-tractor or walk-behind tractor). Therefore, a motor is not installed on these mechanisms. The transmission of rotational motion from the engine to the rotor occurs through a chain or belt drive.
Selecting the engine type
Before you make a manual snow blower, you need to understand which type of engine is better to choose - electric or gasoline.
Electric motor
Electric units are characterized by silent operation and are very easy to maintain. They also do not require any consumables. The only inconvenience of electrical devices is the electrical cable that constantly interferes with movement. Of course, you can use a battery-powered engine, but the operating time of such a cleaner will be limited by the battery charge level. Therefore, if you are going to make an electric snow blower, know that it can only work within the yard, that is, the range of movement of the unit will be limited by the length of the power cable.
Gasoline internal combustion engine
Gasoline snow blowers are powerful and quite noisy units. They cope with thick snow covers, including icy ones. Gasoline devices have an advantage over electric ones, not only in power, but also in mobility, since they do not depend on the electrical network. Thanks to this, the units can be used to clear snow drifts over large areas, for example, near private courtyards, in the courtyards of high-rise buildings, on sidewalks, on certain sections of the road, etc. But despite the listed advantages of gasoline devices, they also have disadvantages:
- engine maintenance required;
- Regular refueling is required;
- presence of exhaust gases;
- high noise level when the engine is running.
Based on the above, you can understand that if you need to clear the yard of a summer house or small private property from drifts, then it is better to focus on making an electric snow blower. If you plan to regularly clear large areas of snow, then a gasoline drive will cope with this task better than an electric one.
Engine options from other units
To make a snow blower with your own hands, you will need to select a motor that will rotate either the auger or the rotor of the unit. If you are going to make a device with an electric motor, then any asynchronous electric motor with a power of at least 2 kW and a rotation speed of 1500 to 3000 rpm will be suitable as a drive component. If you take an engine with less power, it will not cope with thick layers of snow and will stop all the time. In this case, clearing drifts with a shovel will be much more effective.
As a drive component, some craftsmen use motors from electric trimmers and chain saws. It is not uncommon to see homemade snow blowers made from a lawnmower. But the power of these units is only enough to clear freshly fallen and loose snow.
A more powerful version of the driving part of the drive for a snowthrower is an internal combustion engine (ICE). It can be taken from a chainsaw or gasoline trimmer. Also, a snow removal unit can be made from a motor-cultivator or walk-behind tractor.
What to do if your snow blower won't start
First of all, check the fuel, or better yet, replace it. Usually this is enough. But there are other reasons not related to gasoline:
- The oil sensor for a snow blower blocks the start of the internal combustion engine. First, the oil level and quality are checked, then the serviceability of the sensor.
- The starter does not start. You should check the battery charge. If the starter is not broken, the snow blower should start after charging.
- The starter has difficulty turning the engine crankshaft. The reason may be that the oil thickens greatly in the cold. You need to tow the vehicle to a warm area and leave it there until the snow blower oil reaches the desired fluidity.
If the problem is in the spark plugs, then they should be cleaned of carbon deposits, dried and installed well. Then check the serviceability of the spark plugs. If they are working properly, but the device does not work, then the problem is in the ignition system. The snow removal equipment in relation to this system needs to be repaired.
The snow blower won't start, what should I do?
The device does not start easily if the air filters are clogged. They should be washed and dried. Also, the cause of unstable speed can be unregulated internal combustion engine valves.
When the vehicle does not start, the reason may lie in a malfunction of the carburetor. This can be caused by debris getting into the fuel channels, which prevents fuel from flowing into the mixing chamber for the snow blower. The carburetor will need to be cleaned.
Making your own screw
The auger for a snow blower is the main moving part of the unit, the manufacture of which does not cause difficulties. It is best to use a rubber belt from a conveyor with a thickness of 10 mm and a length of 1.5 m to make the auger . It is necessary to cut 4 rings from the rubber strip with a diameter of 28 cm. The parts are easily cut out using an electric jigsaw.
Below are drawings of all screw parts.
A metal pipe with a diameter of 27 mm is used as a shaft. Adapters are attached to its ends, onto which bearings are installed. A 120 mm long cut is made in the central part of the pipe, into which a central plate will be installed, designed to throw away snow. Also, 4 plates are put on and welded onto the pipe. Rubber rings will be attached to them and to the central plate. How this is done can be clearly seen in the next photo.
A metal strip can also be used to make a screw. But it is preferable to use rubber because it does not scratch paving slabs and is not damaged when it comes into contact with a hard obstacle, such as a curb or fence.
Assembling an auger snow blower
Snow blowers that use an auger are the most powerful and can handle even icy snow. In addition, the auger is most often used in self-propelled snow removal machines.
Based on a chainsaw
Making this snowblower with your own hands is quite simple. Since it will be powered by a chainsaw engine, several additional parts will be required for the chain drive. For these purposes, you can use the front and rear sprockets from a motorcycle, as well as a chain from it.
How the frame and auger are made was described above. A long handle is attached to the frame. A large sprocket from a motorcycle is installed on the auger shaft on the right side, and a small one is installed on the chainsaw engine shaft. Next, the chainsaw is installed on the frame, after which the chain is put on the sprockets and tensioned. To control the engine, the throttle cable is routed to a handle attached to the frame.
Below are drawings of a homemade chassis, where a chainsaw is used as the main part of the drive.
Trimmer based
To make an auger snow blower from an electric trimmer or from a lawn mower, you will need to install a gearbox: it will serve to transmit rotational motion from the trimmer shaft to the auger shaft.
But there is one nuance here. The gearbox for this type of unit is quite expensive, and it is not practical to buy it to make an attachment for a trimmer. Therefore, based on the latter, rotary-type snow blowers are manufactured, which will be discussed below.
Based on a motor cultivator (motor block)
The simplest addition to a walk-behind tractor is a snow blade.
A homemade snow removal attachment (shovel) on a walk-behind tractor is screwed to the frame of the unit, after which it turns into a small bulldozer.
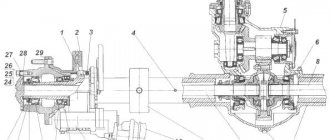
Below is a diagram that clearly shows the design of a snow blower based on a cultivator.
The scheme is deciphered as follows.
- A snow blower drive that connects the engine to the auger.
- Caterpillar drive.
- Drive belt.
- Roller (parasitic) to provide reverse gear.
- Intermediate shaft.
- Belt tension roller. Thanks to it, the unit moves forward.
A self-propelled snow blower greatly facilitates snow removal, especially in large areas where using the machine on skis, pushed by the operator, requires a lot of physical effort from the operator.
Common snow blower malfunctions and their causes
Snow blowers are quite easy to operate, and minor repairs to snow blowers can be done on your own. And spare parts for snow blowers are very affordable.
The machine does not throw out snow, a common fault.
Frequent snow blower malfunctions:
- The car does not start - the spark plug is faulty.
- The snow removal engine is operating unstable - the spark plug electrodes are clogged or the gap between them is not adjusted.
- Dark exhaust gases indicate poor fuel or the carburetor damper is plugged.
- The device does not move forward - the cables and belts are loose.
- Perceptible vibration - the mounting screws have become loose.
- The starter rope is stuck - the flywheel is jammed.
- The machine does not throw out snow - a foreign body has entered the auger, the protective bolt has been cut off, the drive belt tension is poor, the auger has iced up.
Rotor manufacturing
To make a rotary snow blower, you can use the drawings below.
The material for the manufacture of the rotor and its blades is sheet steel 2 mm thick. The rotor housing is made of roofing iron or sheet steel thinner than 2 mm. All dimensions of parts are indicated in the drawing.
The transmission of rotation from the engine to the rotor shaft can be carried out using a belt or chain. You can also connect the gearbox shaft of an electric trimmer or lawn mower to the rotor shaft. Fortunately, these units already have an angular gearbox. The entire structure is installed on a frame with a chassis. The result is a lightweight manual snow blower on wheels.
It should be remembered that an electric snow blower based on a trimmer should not be subjected to heavy loads, as its gearbox may fail. The same recommendation applies to a gas mower if you decide to assemble a snow blower at its base.
A simpler design of the unit, mounted on a frame with runners, can be assembled according to a diagram from an old magazine.
Thanks to the drawings above, assembling a snow blower should not cause any difficulties for any home craftsman.
Situations often arise when you need to remove snow at night: in this case, a headlight for a snow blower will be a useful addition . If installing a headlight on an electric snow blower is quite simple, then with units powered by an internal combustion engine, things are more complicated: they require connection to the electrical circuit of the device using special relays and electronic boards. But still there is a way out of this situation. You can purchase a regular LED flashlight and screw it to the unit.
Domestic snow removal machines are used by many owners of country houses and cottages to clear the territory of fallen snow masses. Hardly anyone wants to do this manually, which is why there is a demand for such devices.
Moreover, there are quite a lot of models of snow blowers on the market for special equipment, both domestic and foreign manufacturers.
However, while working with a snow blower, a number of specific problems may arise with it. We are talking about probable breakdowns from which not a single owner of these units is insured. One of the most vital parts for a snow blower is the gearbox, which is located near the engine.
The most common breakdowns
In general, quite a lot of spare parts and components can break in a snowblower (see here). As experts note, the breakdown itself occurs as a result of improper operation of the unit by the person himself.
Snowblower breakdown
It’s not for nothing that many user manuals explicitly state that before starting work, carefully read the instructions for the unit. But the buyer very rarely adheres to this rule. First they use the equipment, then it breaks, and then the person looks at the instructions.
By the way, there is quite useful information there, in particular, how to fill the oil, how to start it, which levers to press, etc.
There are several main breakdowns in a snow blower:
- One of the most common problems is the breakage of keys, i.e. shear bolts. They consist of soft metal, with the help of which the screw elements are attached. If the unit runs into any obstacle, these bolts are cut off and the shaft itself stops.
- The keys themselves are simply a necessary consumable that every snow blower owner should have, as they say, “in reserve.” Some seek to replace them with regular bolts, thus wanting to save on purchasing shear bolts.
- Instead, the result of such actions is the complete failure of the snow blower, resulting in replacement with a new unit. In general, shear bolts perform a safety role, i.e. protect more important components - the engine and rotor mechanism.
- In second place is belt failure. Experts advise purchasing a spare drive belt directly along with the purchase of the snow blower itself. The fact is that during operation it wears out significantly, which inevitably leads to its breakage.
- At the same time, we are talking not only about the belt going to the wheelbase, but also about the drive belt of the auger mechanism, because they are both very vulnerable.
- The next most popular problem is the problem with the friction disc. This is the component that drives the wheelbase. The friction wheel, which is pressed against the disk, when rotating, transmits movement to the wheels of the snow blower through gears.
- Increased load on the wheelbase can lead to failure of the friction ring, as a result of which the steel friction wheel will damage the soft structure of the friction disk made of aluminum.
Device and application
The torque from the snowblower engine is transmitted to the working system through a V-belt transmission and a power take-off shaft, to which a screw mechanism is connected through a gearbox, as well as a rotor. The gearbox itself is divided into two types:
- Serviced. This type of gearbox must be periodically disassembled to replace the lubricant. Such gearboxes have a longer service life because the lubricant contains bronze components, which partially restore the gearbox gear.
- Maintenance free. Such gearboxes do not require any maintenance, but they are not subject to repair. In the event of a breakdown, the gearbox is removed and a new part is purchased in its place.
As for the gear located inside the gearbox, it is made of soft metals. The main material used is bronze.
This is understandable, because if the auger mechanism jams, it is necessary to prevent damage to the engine, which is the main working unit of the snow blower. The augers themselves are attached to the shaft using shear bolts, which provide initial protection.
In case of any emergency, these bolts are cut off, which avoids damage to the engine. If this does not help, then the gearbox will take the brunt of the blow, protecting the snow blower motor.
Obviously, repairing or purchasing a new gearbox will be much cheaper than purchasing a new engine. Read about how to repair a snow blower yourself here.
Depending on the classification of snow blowers, or more precisely, the scope of their application, the type of gearbox housing also depends. For professional models of snow blowers, which are used to remove snow masses from large areas, the gearbox housing will consist of cast iron.
Types of gearboxes
If we talk about snowplows, then they have the possibility of using 2 types of gearboxes.
- Serviced. They can be disassembled and assembled with your own hands. They do this in order to replace worn components or change the lubricant inside. The elements of serviced gearboxes are usually made of bronze, which is why their wear process is quite long. A serviced gearbox is considered more reliable, since if the basic rules of operation and maintenance are followed, it can last a long period of time. Therefore, manufacturers from countries such as the USA, Japan and a number of European countries give preference to serviced gearboxes when assembling their snow blowers.
- Maintenance-free. No maintenance required here. But the structure cannot be disassembled for repair or maintenance. A maintenance-free gearbox has a limited service life. If it breaks, there is nothing left to do but remove it and replace it. No other options are provided. Most often, maintenance-free elements are found on budget Korean snow blowers, as well as on Chinese equipment.
In fact, the choice is obvious. If you want to get a more resourceful and durable snow blower, give preference to models that use a serviceable type of gearbox.
Causes of malfunctions and repairs
Many experts advise choosing snow blowers that use a serviceable gearbox. Of course, it requires some handling, but it will last much longer than a maintenance-free gearbox.
However, this issue also has a second side - such gearboxes tend to break at the most inopportune moment. Using the example of Patriot, Tselina, Champion and Profi snow blowers, let's look at what gearbox failures can happen, as well as methods for eliminating them.
- There are sharp knocking noises in the gearbox of a Champion snow blower - the most likely cause of this problem is damage to the worm turns or bearings. The way out of the situation would be to adjust or replace the bearings, as well as purchase a new worm pair.
- If you observe that the Patriot snow blower gearbox is overheating, then several factors may be causing this phenomenon. In particular, the issue may be due to insufficient lubrication or wear of the bearings.
- In the first case, you simply need to add the required amount of lubricant, and in the second, adjust the bearings or replace them with new ones.
- If the gearbox of a Profi snow blower vibrates very strongly, then the likely cause may be misalignment of the shafts and the engine of the unit. Thus, do-it-yourself repair of the Profi snow blower gearbox is carried out by eliminating this misalignment.
- If grease leaks from the Tselina snow blower gearbox, the likely cause may be a clogged drain hole in the vent. To correct this situation, you need to rinse the vent plug in kerosene and then wipe it dry.
- Another common cause is wear of the gear included in the gearbox design. This is understandable, because it is made mainly of bronze, so during long-term use, its edges can simply wear off.
- The only way out of this situation is to completely replace the gear with a new one.
In most cases, snowplow gearboxes can be repaired without requiring replacement. Of course, you may need to purchase individual gearbox components - oil seal, gear, etc. However, this is not such a big expense as in the case of purchasing the entire gearbox.
By the way, the cost of components may vary. For example, a 24 tooth snow blower auger gear will cost about 3 thousand rubles. By the way, gears of different types of gearboxes may have a different number of edges - basically, these are 20 teeth and 24 teeth, depending on the model of the snowblower.
For more information about gearbox repair, watch the video:
Pros and cons of going to a workshop
The main advantage of contacting a workshop for repair or maintenance of a snow blower is that you only need to do the following:
- bring the unit;
- hand it over to the workshop workers;
- after their call, pick up the repaired device.
Workshop workers independently:
- carry out diagnostics;
- determine the malfunction;
- purchase the necessary spare parts;
- the unit will be repaired.
There are many more disadvantages of using a workshop:
- the need to deliver the unit to the workshop and take it back;
- high probability of poor-quality repairs;
- you don’t know what parts the workers bought and what they put into your snow thrower;
- you do not control the process, so you do not know whether the workshop workers actually completed the work for which you have to pay.
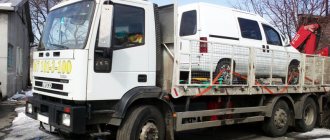
The main disadvantage of going to a workshop is the need to deliver the broken unit there yourself.
If the snow blower weighs little, it is not difficult to load and unload it yourself.
It is very difficult to load units weighing over 50 kilograms into a car.
But there are snowplows weighing over 100 kilograms, which are difficult to load even with three people.
Moreover, you will need to load and unload upon delivery to the workshop, then repeat the difficult procedure after the repair. If the repair was performed poorly, you will have to perform all these steps again.
Many workshops offer paid delivery. But prices for such services are usually high, especially since there are two deliveries - to the workshop and back.
Because of this, the owner of the snow blower is forced to travel to them several times. First to carry out repairs, and then to re-repair or receive compensation.
In some cases, it is possible to obtain payment of compensation or at least the money paid for the repair of the unit only through a trial, which lasts several months. After all, the judge can order various examinations to establish who is to blame for the breakdown of the snow blower.
Naturally, this does not always happen, but on many forums there are user complaints about the incompetence of employees:
Therefore, you have to look for workshops with a good reputation where your relatives or friends have repaired snow blowers.
And even in such workshops, there is a high probability that you will have to pay for work that was performed only on paper.
In addition, workshop workers purchase cheap non-original spare parts, and demand payment as for original components.
After all, it is impossible to check exactly what parts the workshop workers purchased. It is equally impossible for an inexperienced snow blower owner to distinguish quality parts from defective or fake parts.
How to do it yourself
Making your own gearbox involves using various components from other equipment. The fact is that the gearbox itself is a rather complex part, so making it yourself is quite problematic.
In general, a DIY snow blower gearbox will consist of several important components:
Gearbox housing, consisting of two halves
It is impossible to make it yourself, so you need to purchase them separately. Fortunately, the cost of one half of the case is about 700 rubles, which is quite cheap.
Gear
To manufacture them, you will need special metal-cutting equipment, but the optimal solution would also be to purchase ready-made spare parts (see here). For example, the gearbox of a Patriot snow blower, the price of which is about 3 thousand rubles, will be the optimal solution.
Oil seals
They are used as a seal to prevent lubricant from leaking out. They cost about 100 rubles apiece, so purchasing them won’t break your budget.
Bolts
Shear bolts located on the gearbox shaft. They can be made from ordinary bolts by turning grooves using a grinder.
Bearings
Enclosed roller bearings can be used.
For these purposes, a pipe made of grade 45 steel, which is quite resistant to stress, is perfect.
As we can see, most of the components of a homemade gearbox are purchased separately, because There is no technical ability to make them yourself. In any case, self-assembly will cost much less than buying a ready-made gearbox.
Snow blower auger malfunction
If the auger does not spin or the rotation speed drops, then there may be the following reasons:
- grinding down protective bolts;
- weak tension or rupture of the auger drive cable;
- Snow blower gearbox malfunction.
Replacing shear bolts
Shear bolts for a snow blower are needed in order to prevent malfunction of the gearbox, and therefore the auger. They are machined from a soft metal and are used to attach the auger. When they come into contact with a hard obstacle, the bolts are cut off and the auger stops working. That is, the engine runs, but snow is not thrown out.
Important! There is no point in repairing these bolts; they are simply replaced with new ones (the holes of the screw and shaft are aligned, the bolt is inserted and tightened)
Replacing the auger drive cable
Looseness and breakage of the auger drive cable can result in poor operation or stalling of the auger screw. To eliminate slackening of the cable, the pressure on the pressure roller drive belt is adjusted. If the cable breaks, it is replaced with a new one. To do this, it is removed from the handle and then separated from the pressure roller.
Malfunction of the auger gearbox and its repair
When the auger shaft stops spinning (or rotates jerkily), it needs to be disassembled to determine the causes of the breakdown. The gearbox most likely failed due to wear on the gear teeth.
For repairs, it is necessary to separate the snow blower mechanism from the engine. Then you need to disassemble the auger down to the gearbox on the shaft.
Malfunction of the auger gearbox; its repair
The gearbox is fastened with bolts of two halves, which, when unscrewed, reveal gears. The damaged gear is replaced with a new one, and the unit is assembled. In this case, it is better to carry out servicing of snow blowers in a specialized center.
Important! During assembly, the gearbox halves must be thickly treated with graphite lubricant.
How to properly change the lubricant - how to lubricate
Many people ask the question: how to remove the gearbox from a snow blower in order to carry out a scheduled lubricant change? This is not as simple as it seems at first glance, so we will describe this process step by step:
- We unhook the plastic belt protection cover, as well as the auger drive cable.
- We unscrew the bolts that are located behind the snow ejection snail.
- Next, you need to remove the auger drive belt from the pulley.
- Next you need to unscrew the bolts securing the auger shaft.
- Then you need to turn the snail to its natural position, after which we take the gearbox and pull out the screw mechanism with the impeller.
- We remove the shear bolts securing the auger to the shaft, and then disassemble it.
- The gearbox itself needs to be disassembled into two components.
How to disassemble a snow blower gearbox with your own hands - diagram
A reasonable question arises: how to disassemble a snow blower gearbox? The sequence of actions will be as follows:
- We clamp in a vice one of the parts of the shaft on which the gearbox is located.
- There are six bolts on the gearbox that connect the two halves of the housing. They need to be unscrewed.
- We take a hammer and tap the gearbox housing a little to make it easier to divide it into two halves.
The disassembled parts of the gearbox are cleaned in gasoline to wash away any remaining old lubricant.
If you have a snow blower purchased at a specialized store, then the question of how to lubricate the gearbox should not arise. All information is specified in the operating instructions for a specific model, and it is also written there what type of lubricant is recommended to be used for a specific gearbox.
However, it happens that it is quite difficult to find it. In such cases, gear lubricant is used for snow blower gearboxes from several manufacturers - Multifak, Litol, Tsiatim, etc.
To add a certain amount of lubricant to the gearbox, you need to do the following:
- Clean the gearbox and fitting from any existing dirt.
- Unscrew the fitting and then pump in the required amount of lubricant using a syringe.
- Screw the fitting back.
- It is important to understand that the presence of lubricant in the gearbox is a prerequisite for the quality operation of the entire snow blower. Therefore, it needs to be replaced before each new season.
By the way, some companies warn the owner of the snow blower in advance that the gearbox is not completely filled with lubricant, so it must be refilled after the first ten hours of operation of the unit. DIY gearbox, watch the video:
How to choose the right lubricant
Now let’s talk about how to lubricate the auger gearbox on snow blowers and what requirements apply to the lubricant.
The gearbox has moving elements. And for their coordinated and efficient operation, high-quality lubricating fluid is required.
If you look at the instruction manual and also read the comments of snow removal equipment manufacturers, many of them agree that the optimal solution for lubricating the gearbox is gear oil. But it is better to refuse Litol and other similar compounds that attract buyers mainly with an affordable price. Yes, in other mechanisms they can cope with their assigned responsibilities. But in the case of a snow blower gearbox, cheap lubricant does not provide the required level of protection. And at low temperatures it freezes completely. Special lubricants are provided for gearboxes. These are the ones you should rely on.
Regarding oils for snow blower gearboxes, there are several requirements that the formulations used must meet.
- Frost resistance . One of the main requirements. And it's easy to explain. Snow blowers are designed to handle snow. That’s why they are used in winter, often at subzero low temperatures. In order for the lubricant to cope with its tasks, it must be resistant to even severe frost. The structure of the composition should not be violated.
- Fluidity . Sufficient fluidity ensures that the working fluid can penetrate into all cracks and gaps, grooves and holes. This way the rubbing elements will be constantly lubricated. This means reduced friction and increased service life.
- Viscosity _ A balance is needed between fluidity and viscosity. If, due to fluidity, the lubricant penetrates to all elements, then due to viscosity, a strong protective film is formed on the surfaces.
If you don’t know what is the best way to lubricate the auger gearbox on your snow blower, the first thing to do is look at the snow blower’s instruction manual. The manufacturer must indicate what oil to pour into the engine, what to use for servicing the gearbox, its frequency, etc.
The choice of lubricant largely depends on what type of gearbox is used on a particular snow blower.
To ensure that the unit lasts as long and efficiently as possible, give preference to special lubricants. The priority is geared or graphite. But it is better not to use solid oil and similar compounds. Yes, the price will be impressive, but it will fully justify itself.