Knowing how to bleed the brakes on a UAZ Bukhanka is the basis for safety during its operation. The car received national recognition due to the simplicity of its design and the availability of repairs in the field. The all-terrain qualities and capacity of the vehicle, which was originally created for military doctors, made it possible for the transport to be used by power engineers, hunters, and farmers.
How to bleed the brakes on a loaf in 5 minutes
To bleed the brake hydraulic system in order to remove air, each brake cylinder has a special fitting, which can be left alone when repairing leaking brakes in the field.
When replacing brake pads, an experienced mechanic-driver puts new pistons in the brake cylinders - so, as they say, for the rest of their lives. After the pistons with new cuffs are inserted, we pump the brakes through these pistons, and not through the soured fitting, which we no longer need. Only after bleeding the cylinder do we move on to installing the brake pads and all subsequent assembly.
So, new pistons are inserted into the cylinder. Now we take a chisel or a beard and a hammer in our hands, and the assistant (or assistant) in the cabin, at our command, presses the brake pedal. The pistons extend from the depths of the cylinders, but do not fall out of them, since the brake pedal sinks all the way, and an assistant holds it in this position. At the same time, we see a small amount of brake fluid protruding from under the outer cuff. This means that there is no longer any air in the cylinder. Well, or almost not.
The assistant holds the pedal in the pressed “to the floor” position, and at this time we use a hammer and chisel to drive the pistons back into the cylinder. To be sure that there is no air in the system, we repeat this operation several times. For example, my god loves four.
It is convenient to do a similar operation with installed pads. Only the boot on one side should be temporarily moved from its seat towards the block. It is on this side that we use a mounting tool and press the block so that when you press the pedal, the piston can extend to the limit on this side. All clear?
With this method of bleeding the brakes, virtually no fluid is lost from the system. But the point is not about savings, but about the simplicity and reliability of the proposed method. I repeat: this method is applicable in field conditions for urgent repairs of “missing” brakes.
It’s better to spend an hour or two on urgent brake repairs while standing on the side of the road than to drive into someone’s car in an hour or two.
Source
Tool
To carry out the work you must have:
- brake fluid, usually DOT4 or the one that is poured into the system;
- a clean container for collecting fuel fluid;
- hose for draining fluid from brake cylinders;
- key 10, unscrew the bypass valve.
The hose or tube must be such that it fits tightly onto the bypass valve and has a length of 40 centimeters.
Bleeding the brakes of the rear right wheel of the UAZ
correct bleeding of brakes
Filling the UAZ-469 brake system with working fluid is carried out in the following sequence:
- check the tightness of all connections of the hydraulic brake drive and the condition of the flexible rubber hoses, unscrew the filler plug and fill the main cylinder with working fluid, remove the rubber cap from the bypass valve of the brake cylinder of the right rear wheel and put a special rubber hose about 400 mm long on the valve, the other end of this lower the hose into a glass container with a capacity of at least 0.5 liters, half filled with brake fluid;
— unscrew the bypass valve, then press the brake pedal several times. Press quickly and release slowly. Pump fluid through the main cylinder of the UAZ-469 until the release of air bubbles from the hose lowered into the vessel with the brake fluid stops; Bleed the brake cylinders of the remaining wheels of the UAZ-469 in the following sequence:
— lower (front) cylinder of the front right brake, upper (rear) cylinder of the front right brake, lower (front) cylinder of the front left brake, upper (rear) cylinder of the front left brake, cylinder of the rear left brake.
After bleeding all the brakes, add brake fluid to the master cylinder to a level 15-20 mm below the top edge of the filler hole, clean the vent hole near the filler plug and screw it tightly. After this, check the operation of the brakes while driving.
Source
Malfunctions and repair of transmission elements
Transmissions are the mechanisms that connect the engine and chassis. This includes the transfer case, gearbox, clutch and driveshafts.
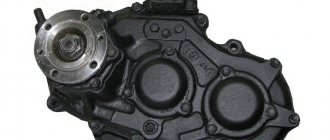
Transfer case repair
Reasons for repairs may be:
- grease drips;
- the appearance of noise and vibrations;
- problems with switching to different positions;
- unplanned exit from the enabled mode.
Stages of repair work:
- Dismantling and disassembling the transfer case.
- Fault detection.
- Elimination of the causes of problems (replacement or rehabilitation of elements).
- Assembly, installation in a regular place, configuration.
Almost all parts of the box are connected to the lid, are clearly visible and accessible for removal. The gears are engaged only when the front drive axle is connected.
How to bleed the clutch
The UAZ clutch serves to disconnect the engine shaft and gearbox when shifting.
It may be necessary to adjust the clutch on a UAZ in case of deviations in operation, after replacing parts or the entire mechanism. The unit is bolted to the flywheel of the ZMZ engine; the position after balancing is indicated as “O”.
The UAZ clutch is adjusted in a stationary state on the vehicle by controlling the length of the pusher and horizontal rod (free play - 150 mm) and in the removed state using a driven disk template.
To bleed the hydraulic drive, you need to add fluid to the tank on the main fluid pump, put a hose on the valve and insert the other end into the container. The further sequence is similar to pumping the GTZ.
Replacing the clutch master cylinder
Replacing the brake master cylinder (MBC) and replacing the clutch master cylinder if it is impossible to repair are similar, only access to the MBC is worse: you need to disconnect the MBC from the lever, unscrew the end connection and two mounting bolts. Before doing this, drain the fluid, as it may spill in the cabin.
Craftsmen install a unit from a VAZ classic on old car models with minor modifications.
Changing the oil in the box
Unscrew the magnetic plugs in both boxes and drain the waste. It is better to drive 20-30 km before the procedure to warm up the oil if the replacement is performed in the cold season.
To change the oil in the box, you will need a device consisting of a 0.5 liter plastic bottle and a hose that must be tightly inserted into the lid. After the waste has drained, tighten the plugs cleared of steel shavings and add fresh oil.
Transmission repair
Repairing a UAZ gearbox is difficult to do on your own: to do this you need to unscrew the cardans and cushions from the frame.
The UAZ gearbox is removed together with the transfer case. To repair a manual transmission, you need knowledge of basic mechanics, the ability to see play on the shaft, and distinguish a working bearing and synchronizer from a faulty one.
The Ulyanovsk Automobile Plant did not provide for repairing the gearbox alone, therefore, when you put the gaskets and gearbox covers in their original places, the assembly is not completed. Reinstallation is a procedure that requires effort and patience.
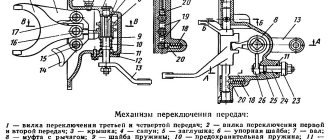
Adjusting gearbox rods
The rods on the box are adjusted in this order:
- move the PP lever to the neutral position;
- loosen the nuts on the rods on the gearbox and the rocker;
- place the flags down, perpendicular to the ground;
- Set the shift lever to the middle of neutral and tighten the nuts.
Several adjustment cycles may be required.
Clutch replacement
Before the operation, it is necessary to drain the oil from the gearbox and gearbox. Mark the positions and unscrew the cardan shafts. Disconnect the muffler.
Then it goes like this:
- We remove the protection, lever rods and brake cable.
- Disconnect the wires and remove the slave cylinder.
- Unscrew the 4 gearbox fastening nuts.
- Unscrew and pull off the box.
- Mark the location of the flywheel and basket and disconnect it.
- We replace the clutch disc or install a new basket according to the marks, tighten it with a cross, and assemble it.
How to remove the clutch pedal
Shoot as follows:
- remove the stopper from the pedal axle;
- pull out the axle and spring;
- Using a screwdriver, remove the pedal and remove the bushings.
Shank Bearing Replacement
Turn the cardan all the way to the right and put a mark on the bridge itself. Move it to the extreme left and mark it. The further sequence is as follows:
- Unscrew the cardan flange.
- Open the lid.
- Remove the oil washer.
- Remove the shank bearing.
- If necessary, remove the play using spacers.
- Install the new bearing and reassemble in reverse order.
Replacing the driveshaft cross
When the crosspiece fails, it most often rings when starting off - these are the first signs of a malfunction. Change it like this:
- We remove the cardan and clamp it in a vice. When working with rotating machinery, you should, if possible, mark all positions before separating the parts.
- We take out the locking rings.
- First, we pump out the old cross from the cardan, then from the cup.
- We inspect the seat for defects. We straighten them if necessary and install the new part with gentle blows.
Replacing the front axle oil seal
If lubricant leaks, the shank oil seal needs to be replaced. We make marks and unscrew the cardan.
We take out the cotter pin, mark it again and unscrew the axle nut. We remove the part and use a flat-head screwdriver to remove the oil seal.
We wash everything, wipe it, and, putting the old oil seal in place, fill in a new one. We assemble in reverse order according to the marks.
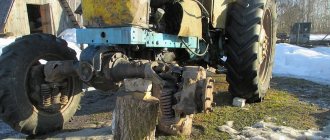
Dismantling the front and rear axles
To repair the front axle of a UAZ, you will need a jack and wheel chocks. We work according to the following scheme:
- We place stops under the rear wheels of the car.
- Disconnect the hoses and pipes from the drums.
- Disconnect the shock absorbers at the bottom.
- We unscrew the cardan and the rod from the bipod.
- We remove the spring ladders.
- Using the frame, we lift the front of the car.
- We roll out the bridge, dismantle it and repair it.
Dismantling the UAZ rear axle is done in the same way.
Bleeding the brakes of a UAZ Bukhanka: How to bleed the brakes consistently
The relationship between safety and the ability to stop in time is obvious; for this reason, bleeding the brakes of a UAZ loaf is a procedure that does not require delay. Do not forget that the correct execution and approach are directly related to the life of the driver and passengers operating the transport. Such concepts are not neglected, so studying the instructions before performing manipulations is a must.
As for UAZ cars (452, 469), the models received popular love and recognition for their unpretentiousness and endurance. The first is known as transport for emergency services, gas utilities, etc. The second is widely used in areas requiring increased cross-country ability.
Features of UAZ brakes
If you are allowed to delay replacing some components of the car, then repairing the brakes cannot be postponed. A possible emergency will be costly and the cost of the issue will be many times higher than the cost of preventive measures, not to mention the possible loss of life.
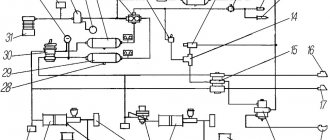
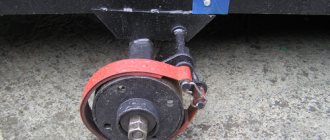
Structurally, the main element of equipment brakes is the working brake mechanism. The unit includes two identical blocks. The edges of both parts are in contact with the cylinder pistons; the structure itself is supported by a special support rod. There are two holes in the cylinders, the first one performs the function of removing air during the pumping procedure, the second one removes the working fluid. The tightness of the structure is ensured by a specially designed regulator. The connection of the system elements into one mechanism is ensured by tubes; the parts connect the cylinders, the main brake cylinder and the foot brake lever.
Visually, the brake design and connection are the same front and rear. The difference is that there are two cylinders at the front, while at the rear the brake operates from a single device. This feature is explained by the need to apply more force when braking to the front wheels compared to the rear elements.
Both UAZ vehicles (469, 452) are equipped with drum brakes. The disk elements are made of steel; they are manufactured using the stamping method, a cast iron rim and an amplifier connected to the disk. It’s easy to get to the UAZ 452 drums; if you need to replace the product with a new one, removing the part is not difficult. The dismantling process does not require removing the hubs, so there is no need to worry about bearings. The drums are fixed to the hub with five screws. Thanks to the clamps, the new drum will be in the right place.
Dismantling the brake element of the UAZ-452 “Loaf”:
Blog about UAZ
The braking system of utility vehicles of the UAZ-452 family consists of front and rear service brakes on all wheels, hydraulically driven by a pedal, and a parking hand brake, actuated by a lever using a rod and a flexible cable.
The design of service brakes for vehicles of the UAZ-452 family.
The distribution of vehicle weight along the axles and its redistribution during braking requires higher efficiency of the front brakes compared to the rear ones. Therefore, the brakes of the front and rear wheels are different in design. In front brakes, each brake pad is actuated by a separate wheel cylinder. When braking the car while moving forward, both front brake pads will be captured by the drum.
For rear service brakes, both pads are actuated by one wheel cylinder. When braking, only one shoe will be captured by the drum, resulting in lower efficiency of the rear service brakes.
The main characteristics of the front and rear service brakes of cars of the UAZ-452 family.
— Brake drum diameter in mm: 280+0.15 — Friction lining width in mm: 50+-1 — Diameter in mm: master cylinder: 32+0.027 master cylinder pistons: 32–0.025 wheel cylinders: 32+0.027 wheel cylinder pistons : 32-0.025 — Length of the return spring of the main cylinder in mm: in a free state: 100 under a load of 7.2+-0.4 kgf: 60 — Length of the spring of the wheel cylinders in mm: in a free state: 20+-2 under a load 4 .7+-0.5 kgf: 3.5
The design of the front service brakes of cars of the UAZ-452 family.
The brake shield of the front brakes is attached to the steering knuckle axle with six bolts. Two wheel cylinders are mounted on the brake shield, on the support pins of the pads. On the support pins, between the washers under their heads and the support lugs of the wheel cylinders, bronze eccentrics are fixedly mounted on which the brake pads are pivotally mounted.
By turning the support pins with the eccentrics mounted on them, you can move the support ends of the pads relative to the brake shield. Brakes are adjusted using support pins when they are assembled at the factory or during repairs with the replacement of pads or linings to achieve uniform fit of the latter to the brake drum.
The support fingers on the outer ends have marks (cores). The position of the support pins with eccentrics after adjustment is fixed with nuts. The rim and pad rib are stamped and relief welded. The friction linings are attached to the rim with aluminum rivets recessed into the body of the lining. The moving ends of the brake pads rest against the piston tips of the wheel cylinders.
The pads, with the inner surface of their rims, rest on adjusting eccentrics, movably mounted on the brake shield. In a given position, the eccentrics are held by springs in a compressed state. The pads are pressed against the eccentrics by tension springs. With the help of eccentrics, the hexagonal heads of the axes of which are brought outwards, the required gap between the pads and the drum is established.
The pads are kept from lateral displacement by pad supports riveted to the shield and release springs. Inside each wheel cylinder there is a piston with a rubber sealing collar and a spring that presses the piston to the thrust end of the pad rib. The wheel cylinder has two holes: one is used to supply brake fluid from the drive system, and the other is to remove air from the system during bleeding.
A bypass valve is screwed into the second hole, which with a conical chamfer tightly closes the hole into the cylinder cavity, ensuring its tightness. To protect the axial hole of the valve from clogging, a protective rubber cap is placed on it. The cylinders are connected to each other by a tube. The internal cavities of the wheel cylinders are protected from contamination by rubber caps.
Rear service brakes for UAZ-452 family vehicles.
The brake cylinder of the rear service brakes is secured to the brake shield with two bolts. The pistons, cuffs and other cylinder parts are the same as the front brakes. At the bottom of the brake shield there are support pins, which are fitted with adjusting eccentrics similar to those of the front brakes, against which the pads move. To increase the rigidity of the pad supports, the ends of the fingers are connected to one another using a plate.
The rear brake pad lining is shorter than the front brake pad lining, ensuring equal wear on the rear and front pads.
Brake drums for front and rear service brakes.
The brake drums are the same for all wheels and vehicles of the UAZ-452 family. The drum has a cast iron rim and a disk stamped from sheet steel with an amplifier welded to it, connected into an integral structure when the rim is cast.
For easy access to the brakes, the drums are made removable, which allows you to clean and check the brakes without removing the hubs or disturbing the adjustment of the wheel hub bearings. The brake drums are attached to the hub with three screws, which are unevenly spaced around the circumference.
This ensures that the drum is installed on the hub in one specific position, in which the drum was processed with the hub assembly. It is not recommended to move brake drums from one hub to another, as this may lead to increased runout of the working surfaces of the drum relative to the brake linings.
Source: auto.kombat.com.ua
Bleeding brakes UAZ 469
The purpose of carrying out pumping manipulations is to remove the air contained in the internal parts of the braking mechanism. Periodically, once a week, inspect the machine for damage and leaks, paying attention to:
Braking mechanism UAZ (469, 452):
A sign that it is time to perform pumping manipulations is an increased working stroke of the foot brake lever, as well as detection of dips when pressing the foot brake. In addition, the lubricant is changed after repairs or replacement of components or parts of mechanisms. Regardless of the circumstances, you need to refill DOT-4 brake concentrate and bleed the brakes on UAZ 469 and 452 once every two years.
Body repair
When repairing the body of a UAZ, it should be taken into account that the most vulnerable metal is located at the bottom of the car. Corrugated floors, wings, beams and partitions are susceptible to corrosion. The weakening of rigid structural elements causes a body lift.
When dismantling the seats and interior trim, it is easy to gain access to any parts. In case of major repairs, the body can be strengthened by replacing standard load-bearing units and installing additional stiffening elements. It is better to coat unwelded seams with sealant - this will eliminate unnecessary noise.
Cars of the UAZ family lend themselves well to tuning and modifications. All-terrain tires, electric winches are installed on them, spring spacers are made, and the transmission is strengthened to compensate for the wide tires.
Bleeding the brakes, sequence
Before pumping the brakes on your UAZ, look for a dry, flat surface. In addition, you will need an assistant, since it is difficult to perform the operation alone, but in case of urgent need it is possible.
The sequence of the process is as follows:
The cylinders on the front wheels are pumped in the same way, the sequence of manipulations is: bottom right, top right, bottom left, top left. It is necessary to observe the pumping order. Otherwise, a situation is possible when the brakes on the UAZ loaf are not pumped. If technically there is no wear and tear, then the problem lies in a violation of the procedure.
When the actions taken do not produce results and air is also present in the mechanism, then when force is applied, the stop lever will be elastic to the touch. In this situation, the process is repeated again until a feeling of hard leverage appears.
Air control in brakes:
When the process is completed and the liquid continues to bubble, check the seals of the joints, pipes, and cylinders (main and working). Check threaded connections, change seals, gaskets, rings, and cylinder cuffs. As for replacing working cylinders, the replacement process occurs as a complex.
At the end of the steps, fill the brake fluid to about 0, fix the cap of the container with a meter that monitors the decrease in level. The liquid is changed until the new, light consistency replaces the old, dark matter.
Source
Replacing brake fluid
Not all car owners know that brake fluid needs to be replaced every two years when the car is used in moderate conditions. The main mistake is often that many people simply add lubricant to the required level, rather than change it completely.
UAZ loaf How to bleed the brakes alone
How to bleed your brakes alone
Before this, you need to unscrew the cylinder or caliper fitting a little so that the liquid flows out a little by gravity...
Every 60 thousand kilometers, the brake fluid needs to be replaced. Car brake fluid can withstand very serious loads. During intensive driving and sudden stops, the temperature range can vary from 170 to 2000°C. It needs to be completely changed because as it moves, water gets into the liquid and dilutes it. A lower concentration negatively affects the quality of the substance. If the liquid is too diluted and boils, it can block the brakes with steam and subsequently lead to an emergency.
Nowadays, car companies have developed a special device that determines the boiling point of brake fluid. The device diagnoses the substance and displays appropriate recommendations. It can show the condition of the fluid at the moment and how necessary it is to replace it as soon as possible. The entire procedure takes no more than a minute, but this frees car owners from unnecessary hassle.
How to bleed brakes on UAZ-469 and UAZ “Loaf”
So, stopping on time is a useful skill in all areas of life, helping to avoid many troubles, and even when driving a car you cannot do without it. Today we are talking about the brake system of the UAZ “Loaf”, which is a guarantor of relatively safe operation of the vehicle.
UAZ “Bukhanka” and model 469 need no introduction; almost all residents of the post-Soviet space know what these two cars look like. Both all-terrain vehicles were initially created for the needs of the military, and then migrated to the use of civilians, who appreciated the products of the Ulyanovsk plant for their versatility.
Features and problems of the brake system of the UAZ “Bukhanka” and UAZ-469
Both UAZ models are equipped with drum brakes. At the same time, the front ones are structurally different from the rear ones:
The rear brake pads are different, but they are driven by one cylinder. On the “Loaf” and on the UAZ-469, the rear brakes have different shields, but the rear and front brakes have the same wheel cylinder cuffs and pistons. The brake drums are removed from the hubs and are no different from each other on all wheels. The front pads on the rear brakes and all on the front ones are interchangeable without any problems.
UAZ “Loaf”: brake system diagram
The service brake of the models under discussion is hydraulically driven; the UAZ-469 and UAZ-469 B vehicles differ exclusively in their pipelines. But the parking brake of these cars is the same (drum type) and is equipped with a mechanical drive.
Bleeding the brakes of the UAZ “Bukhanka” may be required in several cases:
Even if none of the above faults are detected, the UAZ brake system requires maintenance at least once every two years.
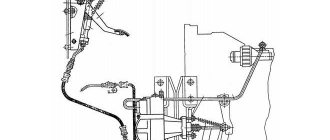
Removing and disassembling the master cylinder
Removal and disassembly of the main brake cylinder is carried out in the following order:
- Disconnect the lines leading from the master cylinder to the warning device.
- Disconnect the warning device from the brake master cylinder.
- Disconnect the brake master cylinder from the vacuum booster.
- Unscrew the thrust bolt 14 (see Fig. 231).
- Remove the lock ring 22 and take out the thrust washer 21.
- Remove the primary chamber piston assembly 19.
- Unscrew plug 7, remove plug insert 9, return spring 10 and secondary chamber piston assembly 13.
It is not recommended to remove tanks 4 unless necessary. If it is necessary to remove them, unscrew the plugs of the tanks 1, remove the screens 3 and unscrew the fittings 5 securing the tank bodies.
Remove piston assembly 19 only towards the flange, and piston assembly 13 towards the opposite end. Remove the pistons carefully so as not to damage the sealing collars 18 and rings 20. If the pistons cannot be removed freely from the cylinder, first lightly push the piston 13 with the piston 19, and then carefully push the piston 19 by pressing (through the vacated cavity) with a screwdriver or other object onto the spring holder 16 or spring holder screw 17.
Reassemble and install the master cylinder in the reverse order. In this case, install the assembled pistons into the cylinder carefully and only from the side of the corresponding ends of the cylinder. To avoid damaging the seals and rings, do not push the pistons through the entire cylinder cavity.
When assembling piston 19, screw screw 17 until it stops in the piston. Screw the thrust bolt 14 into the crankcase only after installing the assembled piston 19, washer 21 and retaining ring 22.
- thrust bolt 14: 8-10 N*m (0.8-1.0 kgf*m);
- fitting 5: 16-22 N*m (1.6-2.2 kgf*m);
- plugs 7: 167-186 N*m (17-19 kgf*m).
Source
UAZ “Bukhanka” and UAZ-469: sequence of operation when bleeding the brakes
Park the car on a flat and dry surface. It would be nice to invite an assistant, but it’s quite possible to cope with the task alone, if you don’t rush and follow the sequence of actions:
The front wheel cylinders of the brake system on the UAZ “Bukhanka” and UAZ-469 are pumped in the following order: right - bottom / top, left - bottom / top. Monitoring the correctness of the procedure is the natural movement of the brake lever under your foot, as it is felt in a properly working car. After completing the work, add brake fluid to the “MAX” mark; if the brake fluid is very dark, replace it with a new one.
Watch how to properly bleed the brakes on a UAZ “Bukhanka” in the video below.
We will be very grateful if you share your own life hacks on how to bleed the brakes on a UAZ “Bukhanka” alone.
Source
Power unit
Since 2016, UAZ has been equipped with UMZ 421 engines in injection or carburetor versions. The most common engine breakdowns:
- Thermal clearances of the timing valves go away;
- the connecting rod bearings are rotated;
- the ignition system fails;
- The thermostat breaks;
- the pump does not pump;
- The engine is heating up.
Coolant replacement
After 2 years of operation or 60,000 km, the coolant in the car needs to be replaced. Replacement is carried out on a cold engine and on a level surface.
If there is crankcase protection, you will have to remove it. Open the heater tap, place the container and unscrew the cap on the radiator. We unscrew the cap of the expansion tank and the plug in the cylinder block.
You can use water to flush the system several times. Fill the antifreeze through the expansion tank, start and warm up the engine. If necessary, add fluid to the maximum mark.
Where is the charging relay located?
The charging relay protects the generator from overload and is located with it under the hood on the right side of the engine.
How to remove a radiator
The radiator on the car is initially mounted poorly - the top is on the body, and the bottom is on the frame. Mechanical stresses are created, which lead to microcracks and product leakage.
The order in which to remove the cooling system radiator is intuitive. Through the cabin and from the bottom of the machine, we unscrew the pipes and fasteners, and remove the assembly.
Copper radiators are well soldered. In aluminum devices, you can try to seal the tubes with sealants, for example, “dry welding”.
Changing the engine oil
Engine oils are used recommended by the manufacturer. Change every 10 thousand km.
If the crankcase guard is installed, it may need to be removed. Depending on the engine brand, the location of the drain plug differs.
Replacement is carried out with the car warmed up.
To avoid strong pressure from below, it is recommended to first place the container and unscrew the magnetic plug and only then open the oil filler hole.
The system should be flushed periodically before adding new oil. A cleaning agent is used for this purpose.
When the waste or flushing has drained, tighten the plug and fill in fresh oil to the upper mark of the dipstick. The car is started and the pressure is checked.
To reduce oil consumption on ZMZ engines, the valve cover of the cylinder block, the crankcase ventilation system, and the labyrinth connection of the oil deflector are modified.
How to remove the engine
The engine from the car can be lowered into the pit or removed through the passenger compartment. There is no need to remove the boxes from the car.
Before starting the procedure, it is necessary to remove the attachments, generator, fuel pump, wires, hoses and pipes, and unscrew the fastenings of the product to the body.
For safe work, it is better to use devices with a crane beam. The engine is lifted into the cabin and removed through the doors or lowered into the pit on a stand.
How to remove the starter
In order not to remove anything unnecessary, the UAZ starter is replaced from two positions - from under the car and from the cab.
Use a spanner wrench to unscrew the fasteners using short movements. We move aside the electric starter connection wires. We turn the device with the retractor relay down and remove it. The starter retractor relay is located on the side of the device body, the control relay is in the engine compartment on the left in the direction of travel. There is also a locking relay installed in the cabin.
How to connect a generator
Connection diagrams for a car generator differ depending on its modifications and engine type. Timing belts can also be different.
To replace the product, you will need an electrical circuit that matches your brand of car, or a service center specialist.
Before working with electrical wiring, turn off the onboard power. In all cars, you need to connect the battery (plus) to the generator, connect the ignition switch and a light bulb with a voltmeter on the instrument panel.
To optimize the on-board network, car owners install an additional battery through an isolation device.
Replacing the alternator belt
For the ZMZ engine, tension is performed by the power steering pump, and the procedure for replacing the belt is as follows:
- Loosen the pump fastenings to the bracket, tighten the adjustment bolt and move the assembly to the right.
- Remove the belt from all rollers.
Some models have a tension roller. The belt is removed by adjusting its position.
How to install the ignition
The ignition is adjusted by aligning the marks using the starting handle on the crankshaft and cylinder block (with an advance angle of 5º). It is necessary that the marks coincide at the end of the compression stroke of the first cylinder. This is determined by the distributor slider - it should be directed to the contact of the desired cylinder.
To set the ignition, there is a red mark on the sensor rotor, and an arrow on the stator. We relax the octane corrector and move it to the zero position. After this, by turning the distributor body, we align the marks and tighten to fix the setting.
Check the correct installation of the ignition on the UAZ by sharply pressing the accelerator while driving at a speed of 50 km/h. Detonation knocks should be no more than 3 seconds. Their absence or long duration is a sign that additional adjustment is required.
Features of UAZ brakes
If you are allowed to delay replacing some components of the car, then repairing the brakes cannot be postponed. A possible emergency will be costly and the cost of the issue will be many times higher than the cost of preventive measures, not to mention the possible loss of life.
Structurally, the main element of equipment brakes is the working brake mechanism. The unit includes two identical blocks. The edges of both parts are in contact with the cylinder pistons; the structure itself is supported by a special support rod. There are two holes in the cylinders, the first one performs the function of removing air during the pumping procedure, the second one removes the working fluid.
Visually, the brake design and connection are the same front and rear. The difference is that there are two cylinders at the front, while at the rear the brake operates from a single device. This feature is explained by the need to apply more force when braking to the front wheels compared to the rear elements.
Both UAZ vehicles (469, 452) are equipped with drum brakes. The disk elements are made of steel; they are manufactured using the stamping method, a cast iron rim and an amplifier connected to the disk. It’s easy to get to the UAZ 452 drums; if you need to replace the product with a new one, removing the part is not difficult.
Symptoms of problems
The fluid brake system consists of many parts that can become unusable: pipes, wheel cylinders, calipers, drums and pads. Typical signs of a faulty master cylinder:
- After pressing the pedal, the car stops slowly. The reason is that the cuffs of one or two pistons have lost their tightness - they have cracked or “floated”.
- To slow down, you need to press the brake pedal hard. The phenomenon occurs due to swelling of the rubber of the piston seals.
- The brake pedal travel is too short. The fluid inside the cylinder has nowhere to go because the compensation hole is clogged. Another option is that the passage is blocked by a swollen rubber seal.
- A common symptom is pedal failure, the brakes coming on at the end of the stroke. This indicates complete wear of the cuffs; as a result, liquid penetrates behind the piston and rushes into the expansion tank - the cylinder “bypasses.”
- The pads do not release the brake discs and drums and get very hot when driving. Options: one of the pistons is jammed or the bypass hole is clogged.
Bleeding the brakes, sequence
The purpose of carrying out pumping manipulations is to remove the air contained in the internal parts of the braking mechanism. Periodically, once a week, inspect the machine for damage and leaks, paying attention to:
A sign that it is time to perform pumping manipulations is an increased working stroke of the foot brake lever, as well as detection of dips when pressing the foot brake. In addition, the lubricant is changed after repairs or replacement of components or parts of mechanisms. Regardless of the circumstances, you need to refill DOT-4 brake concentrate and bleed the brakes on UAZ 469 and 452 once every two years.
Before pumping the brakes on your UAZ, look for a dry, flat surface. In addition, you will need an assistant, since it is difficult to perform the operation alone, but in case of urgent need it is possible.
The sequence of the process is as follows:
The cylinders on the front wheels are pumped in the same way, the sequence of manipulations is: bottom right, top right, bottom left, top left. It is necessary to observe the pumping order. Otherwise, a situation is possible when the brakes on the UAZ loaf are not pumped. If technically there is no wear and tear, then the problem lies in a violation of the procedure.
When the actions taken do not produce results and air is also present in the mechanism, then when force is applied, the stop lever will be elastic to the touch. In this situation, the process is repeated again until a feeling of hard leverage appears.
When the process is completed and the liquid continues to bubble, check the seals of the joints, pipes, and cylinders (main and working). Check threaded connections, change seals, gaskets, rings, and cylinder cuffs. As for replacing working cylinders, the replacement process occurs as a complex.
At the end of the steps, fill the brake fluid to about 0, fix the cap of the container with a meter that monitors the decrease in level. The liquid is changed until the new, light consistency replaces the old, dark matter.
Car suspension
The suspension periodically requires maintenance or repair. It consists of semi-elliptical springs with a trapezoidal profile and telescopic shock absorbers to dampen vibrations. Front and rear springs are interchangeable. Rubber cushions on modern cars are being replaced by polyurethane ones. When installing springs, you do not need to distinguish between the beginning and the end.
On 452 models, shock absorbers require maintenance. After 6000 km, you should add fluid (“spindle”) to them using an oil can and tighten the fasteners.
Replacing the front wheel bearing
The hub connects the shaft and the wheel rim. If the bearing “howls” or gets hot, replacing the UAZ front wheel bearing is performed in the following sequence:
- We set up the jack and remove the wheel.
- Unscrew the cover, remove the cotter pin, and loosen the nut.
- We tie up and remove the caliper.
- We remove the stopper and press out the bearing. You will need a puller.
- We clean the axle shaft from old grease, install a new element, and assemble it.
- Tighten the nut so that the wheel rotates freely.
Wheel alignment
The camber of the car is set by the factory using the steering knuckle and is not adjusted later. Wheel toe is the difference in distances (1.5-3 mm) between them front and rear, adjusted as follows:
- prepare the rail of the required size;
- check the tire pressure;
- install the machine on a flat surface;
- measure the distance in the middle of the wheels in front, mark the points;
- roll the car half a turn of the wheel and take a new measurement;
- By changing the length of the rod we make adjustments.
Replacing spring cushions
The work can be simplified if you use clamps. You need to unscrew one cup of the pillow, place a corner on the other and tighten the spring with a clamp. This preparation will allow you to release the cushion when lifting the car with a jack. Lowering the lift, screw the cup back. We repeat the operation on the remaining assemblies.
Installing springs
The main problem when replacing springs, especially reinforced ones, is the need to straighten them for installation. This cannot be done without special devices. At service stations there are factory-made devices. The springs are inserted and compressed with a screw jack.
Craftsmen assemble structures to change springs from stepladders or weld additional elements to an oil jack.
Replacing king pins
You can replace the kingpins on a UAZ Bukhanka with your own hands without removing the oiler. To do this, we free access to the kingpin and remove the cover by unscrewing the four bolts. We remove the cover and screw the bolts back 3-5 mm. We place a metal plate with a hole in the center on them. We insert a bolt with a screwed nut into it and screw it into the kingpin. Using a nut, press out the part.
You can remove the bronze bushing with a bent and sharpened nail. We wash and lubricate the seat. We hammer a new kingpin through a wooden block and assemble the structure.