UMZ 4216 version with separate coils from the 406 motor. The main thing is not to mix up the low-voltage coil control wires. The main thing to know is that the cylinder count starts from the front bumper of the car.
The slider should stand against the internal contact of the cover, connected by a wire to the spark plug of the first cylinder. Closing the hole with a paper stopper, rotate the crankshaft. The moment the plug comes out corresponds to the beginning of the compression stroke. Prolonged detonation indicates excessive ignition timing. The absence of detonation requires an increase in the ignition timing, after which the test must be repeated.
Starting the engine of any car is possible due to the ignition of the combustible mixture in the cylinders of the power unit. As already said, the ignition on an UAZ performs one of the main functions when starting the power unit. The main components of a contact type system are a battery, a short circuit, a drive, spark plugs, a capacitor, and a breaker with a distributor. A non-contact ignition system called transistor. After connection, how is the ignition installed for proper engine operation? The next step will be to install the controller cover in place and diagnose the high-voltage wires.
Turn off the ignition and remove the distributor cover; the tips and high-voltage cables are connected to it. Then you need to disconnect the wire connected to the switch from the distribution mechanism. Taking a 13mm wrench, unscrew the two nuts securing the device and remove the mechanism along with the oil pump drive from the power unit.
A12BS non-demountable design.
Re: Cylinder numbering for UMZ 417
The voltage sensor consists of a rotor and a stator. The second terminal of the winding is electrically connected to the housing in the assembled sensor-distributor. 6. Install the distributor sensor cover, check the correct installation of the ignition wires to the spark plugs in accordance with the operating order of the engine cylinders 1–2–4–3, counting counterclockwise. After each ignition installation, check the accuracy of the ignition timing by listening to the engine while the vehicle is moving.
Numbering from the radiator. Remove the spark plug from the first one, tighten it to compression (check with your finger to see how it hisses), turn it until the moment of ignition (according to the marks on the pulley), and look at the slider. Insert the first wire where the slider is, and the rest are in order according to the direction of the slider.
I apologize for the lame question, but the previous owner of the automobile claims that the numbering of the cylinders in the UMZ 417 does not come from the radiator, but from the passenger compartment. I have encountered this in the French.
And both valves of the first cylinder are closed? Timing gears by marks?
Set the TDC in cylinder 1, remove the distributor from the drive (a boot in common parlance) and look inside. Sometimes the distributor drive is installed incorrectly. Try setting the ignition very early, if it gets better, move the distributor drive gear by 1 tooth. Just carefully reinstall the oil pump drive.
How to set it correctly?
After connection, how is the ignition installed for proper engine operation?
What is the procedure and how to correctly set the node settings, read below:
- To begin, the vehicle must be secured in place, and turn on the handbrake. The piston of the first cylinder must be installed at top dead center; note that the hole on the crankshaft pulley must coincide with the mark located on the timing gear cover.
- The cover must be removed from the switchgear. Having done this, you will see a slider located opposite input 1, inside the cover. If it is not there, then the crankshaft must be turned 180 degrees and the octane corrector set to 0. Using a wrench, screw the pointer to the distributor controller body so that it is aligned with the middle mark on the octane corrector. Loosen the screw securing the plastic to the distribution controller housing a little.
- Carefully turn the housing, holding the slider with your finger so that it does not rotate. This way you can eliminate gaps in the drive. The housing is rotated until the sharp part of the petal on the stator is aligned with the red mark on the rotor. Secure the plate with a screw to the controller body.
- The next step will be to install the controller cover in place and diagnose the high-voltage wires. They must be installed in accordance with the order of operation of the cylinders, that is, first, second, fourth, third. When the ignition timing is set, it is necessary to diagnose the correctness while driving.
- Start the power unit and warm it up for about ten minutes until the temperature is about 80 degrees. Moving on a flat and straight road at a speed of approximately 40 km/h, sharply press the gas pedal. If, when accelerating to 60 km/h, you feel or hear detonation, it should be short-lived, then everything has been done correctly. If the detonation is very strong, then the distribution controller must be turned half or one division counterclockwise. In the complete absence of detonation, the set advance angle should be increased, that is, the controller should be turned clockwise.
Driving without interference: set the ignition on the UAZ
The operation of a car engine is impossible without correctly set ignition timing. Remove the cover from the ignition distributor. For example, for a VAZ-2106 car, the switch can be installed in the free space between the washer reservoir and the left headlight. Drill 2 holes and screw the switch with self-tapping screws. Correctly setting the ignition timing in a contactless ignition system makes it possible to operate the car in comfortable conditions. Set the crankshaft to a position that corresponds to the ignition timing of 5 degrees. Check the order of connecting the high-voltage wires of the engine cylinders.
The ignition system is fundamental to the normal operation of a car engine. If any actions were incorrect, this will be reflected when the engine is started by the starter and the car is moving. All you need to do is adjust the spark supply - set the ignition correctly on the contactless system. Tighten the bolt at the pointer on the sensor-distributor housing. Be sure to check how the ignition wires are installed to the spark plugs, taking into account the order of operation of the cylinders 1-2-4-3. If there is no detonation, we increase the ignition timing.
Serves to turn on and off the current in the primary circuit of the ignition system and to turn on the starter.
Read also: Peugeot 308 engine cooling diagram
The UAZ distributor is considered one of the important components of the ignition system in a vehicle. What is the connection diagram for electronic or contactless ignition on a UAZ 417, how to convert contact ignition to contactless? Why does the coil heat up and how to adjust and adjust the advance angle? The ignition system can also be electronic. First of all, you must lock your car in one place by pulling the parking brake lever.
The ignition must be installed if the ignition distributor is removed from the engine or if the ignition timing is incorrect. TDC according to the mark on the engine crankshaft pulley (Figure 15.13). The following characteristic malfunctions are possible in the ignition system: the ignition system does not work, the ignition system works intermittently, the ignition timing is incorrect.
This will be the beginning of the compression stroke in the 1st cylinder. 5. Tighten the locking screw and check the gap between the contacts again. 6. Install the rotor and secure the distributor cap.
With the help of an emergency vibrator, the contactless battery ignition system of the UAZ can operate in the event of a failure or breakdown of the transistor switch or stator coil of the sensor-distributor. To switch to working with an emergency vibrator, you must disconnect the wire from the short-circuit terminal of the switch and connect it to the output of the emergency vibrator.
This is visible not only when starting the engine with the starter, but also when the car itself is moving. Afterwards, you need to check the installation of the ignition wires according to the basic order of operation of the cylinders one-two-four-three, counting counter (hours). After you have installed the ignition, you need to check that it is installed correctly while driving.
Additional resistance.
There is a drop in engine power, fuel consumption increases noticeably and, most importantly, the car begins to shake and it may simply stall unexpectedly. If this is not the case, then rotate the crankshaft 180 degrees.
Video watched by: 2545341
Description: Good afternoon reader, do-it-yourself car repair is a collection of all kinds of instructions (articles, videos, photo reports, questions/answers) that clearly show how to do the repair yourself. For ease of use of the etlib.ru website, all materials are divided by car brands and models, as well as into categories and types of materials. When buying a car, car enthusiasts are increasingly interested in doing their own car repairs. And so everything is in order, the length of the body of your car is 3789, width - 1101, height - 1733 mm. The wheelbase is 2065 mm. Ground clearance 136 mm. The car is equipped with a hybrid power unit. The four-cylinder engine is equipped with a system that provides engine power output. There are sixteen valves per engine. The diameter of one cylinder is 64 mm, the piston stroke is 47 mm. The engine crankshaft accelerates to 7000 rpm. Maximum torque is maintained up to 9000 rpm.
Original video title:
Release date: April 23, 2022
Posted by admin: at the request of Eberhard
Answer from a car owner named Sext: Everything is OK!
Laughter in the topic: A fast train is traveling at full speed. Suddenly he drives off the rails, passes through a forest belt, a corn field and returns to the rails again. Stunned passengers ask the driver: “What was that?” “We’re driving, I see a man shitting on the rails.” “We had to push so hard!” “So we just caught up in the corn!”
Necessary tools for work: 1. sledgehammer; 2. Open-end wrench 24; 3. Socket wrench 30; 4. scissor; 5. Phillips screwdriver; 6. chisel;
The UAZ distributor is considered one of the important components of the ignition system in a vehicle. Correct adjustment of this mechanism ensures optimal operation of the power unit as a whole. You can learn more about the principle of operation of the ignition system and how to set it up correctly with your own hands from this material.
Review of SZ on famous UAZs
What is the connection diagram for electronic or contactless ignition on a UAZ 417, how to convert contact ignition to contactless? Why does the coil heat up and how to adjust and adjust the advance angle? First, let’s look at the main points regarding the action and types of SZ.
Read also: Remove silk-screen printing from windshield
Operating principle of SZ
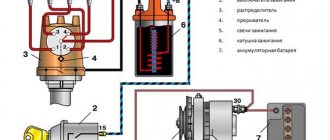
Contact system diagram
The ignition system, or rather its correct setting, plays a big role in the operation and starting of a car engine. With correct adjustment, the combustible mixture will burn correctly in the power unit as a result of the supply of charge through the spark plugs. A spark plug is placed on each cylinder of the UAZ engine, each of which is turned on in a certain order, in turn, delivering a discharge to the cylinder after a certain time. It must be taken into account that any SZ makes it possible not only to deliver the required discharge, but also determines its strength.
Due to its technical characteristics, the car’s battery cannot produce the voltage and current required to ignite the mixture. This is due to the fact that the battery can only produce a current of a certain strength. And thanks to the correct operation of the system, the current value increases significantly, which allows you to successfully ignite the air-fuel mixture.
The operating principle of the system consists of several stages:
- First, the driver inserts the key into the ignition and turns it, electrical energy is stored in a coil.
- Then the coil converts the low-voltage voltage in the on-board network of 12 volts into high-voltage. As a result, the voltage value increases to 30 thousand V.
- After this, the discharge is distributed and supplied to one or another spark plug.
- The candle itself produces a spark that ignites the mixture.
Diagram of the UAZ contactless system
What types of SZ are there?
Domestic UAZ vehicles can use one of three ignition systems; let’s look at each of them in detail:
- Contact view. This type of SZ is outdated, however, it is used on most machines. In such a system, the principle of operation is to issue a certain impulse that is formed in a distributor - a distribution device. The contact system is considered one of the simplest in terms of design, which is an advantage, since if a malfunction occurs, the car owner will be able to independently check and repair the system. In addition, prices for structural parts of the contact system are usually affordable, which is good news. The contact SZ includes a coil, a switchgear, a breaker, a capacitor and spark plugs.
- Non-contact type, also called transistor type. Compared to the contact system, the contactless system has more advantages. The resulting spark has a higher power, which is achieved due to the formation of high voltage in the secondary winding of the coil. Also, contactless systems are equipped with an electromagnetic device, which makes it possible to achieve more stable operation of the engine. Ultimately, if the UAZ power unit is configured correctly, then by using a contactless system you can not only increase its power, but also achieve fuel savings, albeit insignificant. Also, such systems are easier to maintain. One of the main nuances in terms of maintenance is the need to periodically lubricate the distributor drive - at least every 10 thousand kilometers. One of the main disadvantages is the difficulty of repair. In practice, repairing a contactless SZ will be problematic, since diagnosing the system will require equipment that is usually available at a service station.
- The ignition system can also be electronic. This option is currently considered one of the most progressive and expensive; it is installed mainly on new cars. Compared with contact and non-contact systems, the electronic system has a more complex structure. The main advantage of this system is that, if necessary, the process of adjusting the ignition angle will be much easier. In addition, there are no contacts in the electronic system that are susceptible to oxidation. It should also be noted that in practice, the combustible mixture in the cylinders of a power unit with an electronic system almost always burns completely. But despite all the advantages, electronic repair systems also have their disadvantages, which relate to device repair. It is almost impossible to repair such an SZ with your own hands, since to perform this task, again, you will need equipment (video published by Nail Poroshin).
Description of SZ on UAZ
How is the ignition circuit installed, configured and adjusted on the AUZ 417 or any other? We will talk about this below. But first, let's understand the principle of operation of the node, as well as the types of SZ.
Operating principle of SZ
As already said, the ignition on an UAZ performs one of the main functions when starting the power unit. Thanks to this system, the procedure for igniting the air-fuel mixture in the cylinders of the power unit is carried out by supplying a spark. The spark is directly supplied to the spark plugs; one spark plug is installed on each cylinder. All of these safety devices operate in sequence mode, igniting the combustible mixture in the required period of time. It is also necessary to take into account that the ignition system on cars not only provides a spark, but also determines its strength.
The vehicle battery is not able to produce the voltage and current required to ignite the mixture, since this device only produces a certain amount of current. The help comes from the ignition system, the purpose of which is to increase the power of the car’s battery. As a result of using the SZ battery, it is possible to transmit sufficient voltage to the spark plugs to ignite the mixture.
Types of ignition systems
Today there are three main types of ignition systems that can be installed on cars:
- Contact SZ. It is considered obsolete, but continues to be successfully used on domestically produced vehicles. The principle of operation is that the system produces the necessary impulse, which appears due to the operation of the distribution component. The contact-type device itself is simple, and this is a plus, because in the event of a breakdown, the driver can always diagnose and repair it himself. The cost of replacement components is not high. The main components of a contact type system are a battery, a short circuit, a drive, spark plugs, a capacitor, and a breaker with a distributor.
- A non-contact ignition system called transistor. Many vehicles are equipped with this type. When compared with the type described above, the system is characterized by a number of advantages. Firstly, the generated spark has greater power, which is due to the increased voltage level in the secondary winding of the ignition coil. Secondly, the contactless system is equipped with an electromagnetic device that allows for stable operation, as well as energy transfer to all nodes. As a result, with proper tuning of the internal combustion engine, this allows not only to increase operating power, but also to save fuel. Thirdly, it is convenient in terms of node maintenance. To ensure long-term performance, after setting up and installing the distributor drive, this element must be lubricated from time to time. To ensure normal operation, the element is lubricated every ten thousand kilometers. As for the disadvantages, it is the difficulty of repair. It is impossible to repair the device yourself; this requires special diagnostic equipment, which is only available at service stations.
- Another option for SZ is electronic, which is the most technologically advanced and expensive today, which is why new vehicles are equipped with it. Unlike the two systems described above, the electronic ignition system is characterized by a complex device that ensures the functionality of not only the torque, but also other parameters. Currently, all modern cars are equipped with electronic systems. The key advantage is a more simplified procedure for setting the advance angle, as well as the absence of the need to periodically check the contacts for oxidation. In practice, the air-fuel mixture in engines with electronic combustion almost always burns completely. This type also has its disadvantages, in particular in the matter of repairs. It is impossible to produce it with your own hands, since this requires equipment. Detailed instructions for adjusting the ignition using a light bulb are presented in the video below.
Expert recommendations on how to configure correctly
So, how to set the advance angle yourself in order to achieve proper operation of the UAZ engine:
- First of all, you must lock your car in one place by pulling the parking brake lever. Rotate the crankshaft so that the piston of cylinder 1 reaches TDC (top point). In this case, you need to ensure that the hole on the crankshaft pulley coincides with the mark marked on the timing gear cover.
- After this, remove the cover from the distribution mechanism. After dismantling, you will be able to see the slider, which is located inside the cover itself, opposite the contact. If there is no slider, you should turn the crankshaft 180 degrees again, and then set the octane corrector to 0. Using a wrench, you will need to screw the pointer to the distribution mechanism housing so that it aligns with the middle mark. When these steps are completed, the fastening bolt with which the plates are attached to the distributor body must be loosened slightly.
- Then, holding the slider in one place with a finger to prevent it from rotating, you need to carefully rotate the housing itself, this will allow you to remove possible backlash in the drive. The housing must be rotated until you achieve alignment of the sharp end of the stator mechanism petal with the red mark located on the rotor device. After this, the plate itself must be secured to the body using the appropriate bolt.
- Once you have completed these steps, you need to replace the controller cover and check the high voltage cables. You need to make sure that these wires are installed in the correct sequence, taking into account the firing order of the cylinders. When you manage to correctly adjust the lead angle, you need to make sure that the entire procedure was performed correctly.
- To diagnose the correctness of the actions performed, you need to start the engine of your UAZ and wait about 5-10 minutes until the power unit warms up. The operating temperature of the engine is about 90 degrees; you can wait until the internal combustion engine warms up to 80 degrees. Then you need to drive onto a flat road and accelerate the car to 40 km/h, after which you should sharply press the gas. At this moment, the car will accelerate and if, when the speed increases to 60 km/h, a short-term detonation (metallic knock) is heard from under the hood, then this indicates that all actions were performed correctly. If the detonation is too long, the system will need to be adjusted. To do this, the housing of the distribution mechanism will need to be turned one notch or half, and it must be turned counterclockwise. If the diagnostics showed that there is no knocking of the “fingers” at all, then the advance angle should be increased. To do this, the mechanism should be turned in the opposite direction.
Read also: Car theft by brand
Photo gallery “How to adjust correctly”
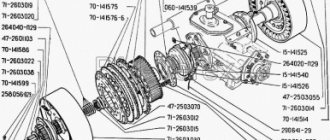
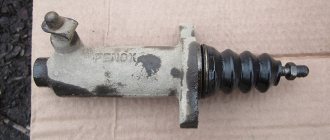
Installation of the UAZ distributor drive
Installing a distributor drive on a UAZ vehicle involves combining a camshaft and an oil pump. It's not very simple.
The distributor drive is driven into rotation by the camshaft gear, at the same time, the oil pump is driven into rotation by the distributor drive through the plate. Removing the drive is not difficult; unscrew the two fastening nuts and remove it from the engine block. The drive may burn in the motor block housing. In this case, you have to use ingenuity. Or try to rock it. Or unscrew the mounting pins and try to turn it. Why does the drive fail? As a rule, this happens when starting the car in cold weather. The oil becomes very thick, and it is very difficult to turn the oil pump. Therefore, the pump will stall, causing the plate to bend. And it gets out of engagement with the oil pump.
Installation of the UAZ distributor drive
After removing the drive, the distributor drive is reinstalled. To do this, set the piston of the first cylinder to TDC at the moment of fuel compression. The easiest way to set this position is to unscrew the spark plug of the first cylinder and block the hole with a paper stopper. When bringing the piston in at the moment of compression, the plug will be knocked out, and then install the generator drive pulley at the first mark.
Correct camshaft position
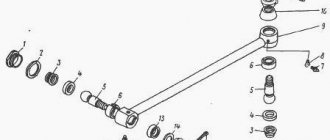
I would like to note that the piston approaches the TDC position twice during the cylinder operating cycle. For the first time at the moment of compression. The second is at the moment of exhaust gas emission. It is very important not to confuse these provisions. Therefore, we check ourselves by determining the compression occurring in the cylinder. Since at the moment the valves are closed and fuel compression occurs. So, we have installed the piston at TDC. Now our task is to install the drive correctly. Pay attention to the groove into which the distributor drive coupling is inserted; it is offset from the center. This groove must have a direction parallel to the cylinder block. And relative to the center it is offset from the engine block.
The distributor at the junction with the pipe has a similar offset
The drive gear is helical, so if we start inserting the drive in this position. It will not install correctly, but will turn one tooth. Therefore, before inserting the drive, it must be turned one tooth counterclockwise. So that the drive is installed in its place and takes the correct position. Try to engage the edge of the drive gear with the gear on the camshaft. The drive cannot be installed immediately. It is necessary to rotate the crankshaft until the plate fits into the groove of the oil pump. When turning the crankshaft, it is necessary to press the drive. To prevent the edge of the gear from becoming disengaged.
Once the oil pump groove is aligned with the drive plate. The drive will sit in place. After this, it is necessary to again set the piston to the TDC position at the moment of compression, and check the position of the drive groove. If it is parallel to the block and offset from the block, then the distributor drive is installed correctly. If not, this procedure must be repeated.
Drive plate alignment
There is one very big problem during installation. The oil pump drive plate is not firmly fixed along the drive axis. Therefore, when we install the drive, it deviates relative to the axis and does not fall into the groove of the oil pump. It needs to be fixed somehow. I simply inserted matches on both sides, and this fixation was enough for me to install the drive. After the drive is correctly seated in its place, fasten it with nuts.
A guide to replacing a distributor with an oil pump drive
Before installing a new distributor with a drive, you need to weigh your strengths, since it is not recommended to make mistakes when performing work.
So, how to replace and install the distributor:
- Turn off the ignition and remove the distributor cover; the tips and high-voltage cables are connected to it.
- Then you need to disconnect the wire connected to the switch from the distribution mechanism. You also need to disconnect the pipe connected to the vacuum regulator.
- Taking a 13mm wrench, unscrew the two nuts securing the device and remove the mechanism along with the oil pump drive from the power unit.
- After completing these steps, you will be able to see the gasket located under the drive. If as a result of these actions the position of the crankshaft has not changed, then simply install a new mechanism, making sure that the slider is located opposite the mark. All actions are performed in reverse order. When the installation is completed, the advance angle is adjusted.
- If, as a result, the location of the shaft has changed, then before installation it is necessary to move the piston of cylinder 1 to top dead center. You need to ensure that the marks on the pulley align with the pointer on the motor itself.