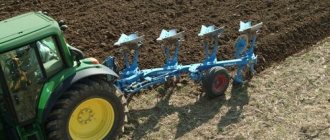
How to make a disc harrow for a mini tractor with your own hands
A disc harrow for a mini tractor is a type of attachment and is designed for soil cultivation. This device loosens the soil, allows you to level the soil surface, destroys the crust, eliminates weeds, and protects the soil from drying out. Soil humidity must be at least 50%, otherwise dust will form, which is unacceptable for agricultural crops.
Advantages of a disc harrow
A disc harrow is an excellent unit that can be successfully used instead of a plow, cultivator or hoe. It is perfect even for soils with extremely low moisture content.
Harrowing is carried out in the following cases:
- When it is necessary to destroy the upper crust-like layer of the earth, which was formed under the influence of moisture, sun and wind over a long period of time.
- To mix the soil with applied fertilizers.
- If you want to level the surface of the area.
- If it is necessary to thin out densely growing cultivated plants.
- To destroy weeds in the garden or field, as well as chop dead wood. Any disc harrow crushes sunflower and corn.
Only a high-quality disc harrow manufactured taking into account all technical nuances can cope with such tasks. Using our free 3D models of disc harrows, you can make them yourself to sell. By adhering to all the details of the samples, your harrows will be in no way inferior to their factory counterparts!
Important! The harrow must be used at speeds exceeding 7 kilometers per hour. This way the harrowing process will be as efficient as possible.
Disc harrow for mini tractor
A disc harrow is used when the tractor speed is no more than 7 km/h. In this case, the draft force of the tractor itself is used. When loosening the soil, the structure is used together with a plow to improve the harrowing process.
Disc harrows for tractors are used in regions where the soil moisture level is no more than 25%. This design consists of several disks located vertically at a slight angle to the main axis of the mechanism. At the same time, it becomes possible to adjust the depth and angle of tillage.
When the equipment is operating, the discs perform the function of a blade and a plowshare, which reduces the load on the tractor and effectively loosens the soil.
Such equipment is used in fields with a large amount of plant residues, while the grass is wound onto the disks and does not clog the space between them. Currently, these devices are sold for tractors with a width of 1100 mm or 1500 mm. Depending on the power of the minitractor, attachments with a certain number of disks are used.
Such equipment can be made at home from scrap materials.
Self-made structures have the following advantages:
- productivity increases to 2 ha/h;
- the design can perform many tasks;
- the mechanism has a large working width;
- Such attachments have a low cost.
Disc harrow
Disc harrows are used on dry soils and are practically no different in functionality from rotary active harrows, except that here the working body is discs mounted on independent axes, and they are attached to the walk-behind tractor using a hitch.
Homemade disc harrow
The drawing shows the dimensions for a mini-tractor, so when making attachments for a walk-behind tractor, we adjust all the values to the dimensions of the power unit. One section was borrowed from a large tractor diskator, consisting of 8 lens-shaped disks with a diameter of 450 mm with an interdisk distance of 150 mm. The video clearly shows the operation of equipment made by hand and installed on a walk-behind tractor with an adapter.
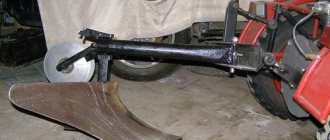
Disc harrow drawing
The disk section is movably mounted on a metal frame 1400x650 mm and welded from a 50x50 mm angle. The grip of such homemade equipment is 1200 mm with a depth of up to 100 mm, and the angle of attack is adjustable up to 17˚. As already mentioned, in order to use the harrowing device together with the Neva walk-behind tractor, the length of the frame can be halved and, accordingly, only 4 discs can be used.
How to make a disc harrow for a mini tractor with your own hands
Let's look at how a homemade disc harrow for a mini tractor is made.
First of all, you need to prepare the following materials:
- channel;
- corner;
- used car wheels;
- durable metal pipe;
- strong belt;
- disks;
- wheels of small diameter.
A do-it-yourself harrow for a mini tractor is made from these materials.
The structure will consist of the following components:
- frame made of metal corners;
- disks;
- bracket;
- rotation mechanism;
- beams;
- wheels.
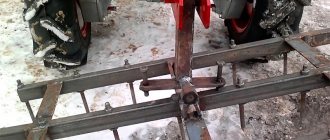
Let's consider the process of assembling attachments. First you need to take 8 disks with a diameter of 56 cm. Attach them to a metal pipe having a length of 2.6 m. The distance between them should be 15 cm.
After this, you need to assemble the frame from metal corners. Using welding, the corners are connected in the form of a square structure. A three-point fixation method is used: at the top of the frame, with the right and left pins.
You can also connect using a belt. Then the finished product is supplemented with wheels, then it will be much more maneuverable when cornering.
Traditional harrow
The classic, or as it is also called, horse harrow, is used to create a smooth and loose surface. Also, this type of attachment allows you to effectively cover moisture in the soil and thereby prevent it from drying out. The harrow crushes large lumps of earth to the required fraction, destroys weeds and removes remnants of vegetation from the soil. The equipment is quite lightweight and is therefore used for surface tillage, crushing clods of earth and shallow loosening before sowing.
The tooth harrow for factory-produced walk-behind tractors is made of special structural steel that can withstand significant loads. Also, this equipment does a good job of leveling the soil after milling.
This type of harrowing equipment is a straight or zigzag frame that you can make yourself from a steel strip, a square pipe or angle, a stand for coupling with a walk-behind tractor and teeth. The teeth can be secured to the frame by welding, or by cutting threads on them and securing them with nuts. The working bodies on the frame are located at an even distance from each other, and their length can be 25-45 mm. Regarding the width of the equipment, for example, for the Neva walk-behind tractor, 500-600 mm is quite enough. The video below shows a tooth harrow in action.
How to make a harrow for a mini tractor with your own hands?
A harrow for a mini tractor is a very useful and multifunctional mechanism in agriculture. A disc harrow for a mini tractor can be called a universal assistant for cultivating soil, because it simultaneously performs the functions of a plow, a conventional harrow, and a cultivator. With its help, the soil is leveled and loosened, moisture is revealed before sowing, and the remains of plant roots and stems are crushed.
The structure consists of a number of disks attached at an angle to the bearing axis. The depth of immersion of discs into the soil is adjustable. The diameters of the discs also differ - from 11 to 25 cm, depending on the purpose.
Another type of harrow is a toothed (mesh) harrow. This is an older and time-tested option. The design is a network of thin metal plates with teeth of various shapes (straight, curved, spring harrows for a mini tractor). The functionality and efficiency of such a harrow is significantly limited compared to a disc harrow.
You should make your own disc harrow for a mini tractor using the following algorithm:
- A harrow frame is made from pipes and a square metal profile. The width of the frame should be about 1 m so that the structure does not turn out to be too massive and heavy.
- A shaft of the appropriate diameter is attached in the central part, which is additionally reinforced with racks. The shaft can be used from an old cultivator.
- Discs of the appropriate diameter (about 25 cm) are installed on the shaft.
- The number of disks should be in pairs on the left and right sides of the structure. The discs are installed at a slight angle to the shaft at a distance of about 5 cm from each other.
- To increase the productivity of the harrow, cuts are made on the disks in a semicircle using a grinder.
This design is ideal even for a light mini tractor with a VAZ engine.
Step-by-step instructions: how to assemble a mini tractor from a walk-behind tractor and a trailer
The main part of the structure (besides the walk-behind tractor itself) is a welded metal frame consisting of two side members of two cross beams - front and rear. They are made from a metal angle, rolled channel or profiled pipe. The frame shape can be rectangular or trapezoidal.
- Stands can be attached to the corners of the frame.
- Then the rear axle should be mounted on the frame, and in the case of all-wheel drive, the front axle as well.
- At the next stage of assembling the mini-tractor, the walk-behind tractor engine and gearbox are placed on the frame. The latter should be turned towards the driver to make it convenient and easy to switch.
A common design option is the so-called broken frame. It consists of two parts connected by a hinged coupling. This design allows you to reduce the cost of parts for mounting control mechanisms.
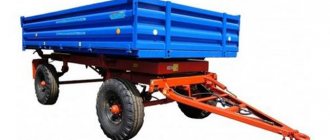
DIY trailer drawing for walk-behind tractor
If the design is based on the Centaur walk-behind tractor, then it is necessary to calculate the kinematic diagram of the transmission of torque from the motor shaft to the bridge
At the same time, it is important to correctly distribute the load on the axle, especially if the machine is planned to be used for transporting goods.
Watch the video: Homemade trailer for a walk-behind tractor
A homemade mini-tractor from a walk-behind tractor and a trailer is usually equipped with mechanisms from ordinary cars or loaders. For example, the brake mechanism and steering rack are taken from old Zhiguli cars. In the same way, you can provide a car under construction with a steering column assembled with rods, a front beam with hubs, wheels, and rear fenders.
When assembling a mini-tractor yourself according to drawings and videos, it is important to think through the location of components and mechanisms so that their maintenance is convenient. For example, the most common option for placing the brake system is the output shaft of a walk-behind tractor.
Interesting video: Trailer for the Neva walk-behind tractor, dimensions, hitch
It is important to take care of a comfortable place for the driver, because shock absorbers are usually not installed on a mini-tractor. In addition, you need to take care of the design of the tow bar
It will be needed not only for towing a trailer, but also for additional agricultural attachments. It is convenient to use the attachment device from the Belorus tractor.
Photo of the trailer for the walk-behind tractor with your own
Important: Which crawler excavator is better in terms of technical characteristics?
Homemade mini-tractors based on a walk-behind tractor are very common due to the combination of good functionality and inexpensive price compared to factory-made counterparts. Creating your own model of such equipment may not be as easy and simple as buying a ready-made one. But what a pleasure it is to work on your own land on your own mini-tractor!
Now you know how to make a trailer for a walk-behind tractor with your own hands using videos and drawings, so you can try to prepare the equipment for spring agricultural work at the dacha or on your own farm.
Harrows and rakes for mini tractors: varieties, self-production
Mini tractors are reliable and hardy assistants for any owner of a personal plot.
Farmers with small and medium-sized farms use them to successfully cope with a variety of operations - from transporting goods to cultivating the land. One of the most common operations in the spring and summer is cultivating land and making hay. These operations cannot be performed without such attachments as harrows and rakes for mini tractors. Homemade harrows for mini tractors, like rakes, can be easily constructed at home. Such a hitch will be distinguished by its reliable design, taking into account all the user’s preferences, and will be suitable for any type of equipment, even a homemade mini-truck with a VAZ engine.
What to look for when choosing
There are a number of factors that need to be taken into account when purchasing, this will help you get a model that will fit, but will not cost too much. A good option is to talk to those who use the equipment and learn about the nuances that appear during operation. Main nuances:
Dimensions of equipment. For a small area, it is better to take the most compact modifications in order to move freely and save space. Think about what maximum dimensions a mini-tractor should have for normal operation. Power of the power unit. Typically engines produce from 10 hp. and more. The larger the equipment, the higher the performance should be. But an overly powerful engine is undesirable, as it will consume much more fuel. Drive unit. In the cheapest models, power is transmitted only to the rear drive. There are four-wheel drive tractors, as well as those where you can engage or disengage the front axle with a transfer case. The latter option is the most preferable, as it saves fuel compared to solutions with permanent all-wheel drive. Transmission. The most important thing here is the gearbox; it must have enough speeds for different operating modes
It is necessary to clarify the minimum and maximum speed, this is important when transporting goods and driving between areas located at a distance. Fuel type
Gasoline engines are cheaper and easier to maintain. But diesel engines consume less fuel and provide more effort at low speeds. You should choose according to the situation. But if you have to use the equipment in winter, it is better to take the gasoline version, as it is much easier to start in the cold season.
Controls and possible adjustments. The easiest way is to sit down and check whether it will be convenient to work behind the wheel of a mini-tractor or not.
It is important that the seat has adjustments and shock-absorbing mounts. Rear linkage and power take-off shaft design
The configuration must be suitable for the equipment that will be installed during operation. Take into account the weight of the units, buy a tractor with hydraulics that will be able to raise and lower them. Workmanship. It is necessary to carefully inspect the equipment; usually cheap and unreliable equipment can be seen immediately by poor surface treatment, problems with the paintwork and other signs. Choose one of the models, and then read the reviews, so you can’t go wrong with buying a mini tractor for your site. Equipment. An important point that should not be overlooked. The same option is sold with different quantities of attachments, the price depends on this. The kit should include a set of maintenance tools and detailed instructions in Russian.
Important Characteristics of the TOP 3 German Liebherr forklifts
Advice! Check the ease of mounting the equipment on the hitch and the operation of the power take-off shaft.
After purchase, study the instructions, run the engine properly, its service life depends on this. Some companies conduct a test run before sale, so the equipment can be used immediately after delivery to the site. It is worthwhile to carefully inspect the engine for leaks and ask that it be started during inspection.
Features of a rake for a mini tractor
According to their design, rakes for mini tractors are usually classified into 2 types:
- rake-tedder for a mini-tractor of the “Solnyshko” type;
- rotary rake.
Each of the presented designs has its own characteristics and advantages. The choice of this trailed equipment also depends on the nature of the upcoming work and the topography of the hayfield. For example, the “Solnyshko” rake for a mini tractor is suitable for areas with uneven surfaces, since their height is easy to control during operation. Also among the advantages of these rakes it is worth noting high productivity (wide area coverage and high speed), ease of repair and operation. To make a rake-tedder for a mini tractor of this particular design, we recommend that you watch the video:
Types of harrows for mini tractors
There are several classifications of harrows. Let's focus on the most important ones.
According to the depth of processing, they are distinguished:
- heavy harrows – cultivate the soil quite efficiently. Penetrate to a depth of 10 cm, break up large clods of earth;
- medium - cultivate the soil to a depth of 8 cm;
- light – used for planting seeds and leveling the surface layer of soil. Capable of penetrating the soil to a depth of 6 cm.
Based on the design of the working elements, harrows are divided into:
- tooth harrows are the oldest and most common type of harrow. It is made in the form of a grid of thin metal plates, to which various teeth (straight, curved) are welded. A special modernized version of this type of harrow are spring harrows for mini tractors;
- disc harrows for mini tractors are universal, can be used on any type of soil, including the presence of foreign particles, coarse plant stems and stones. They consist of a certain number of curved discs with notches, located at an angle;
- combined (chain defenses) - consist of knives, teeth and levelers (chains or metal rods). Well suited for soil treatment before sowing.
Depending on the type of coupling there are:
- active – harrows that are attached to the PTO and operate independently, without additional attachments;
- combined - which work together with other attachments (for example, seeders).
Attachment for harrowing technology
Harrowing is the cultivation of the top layer of soil to loosen the soil before planting. Sometimes this method can be used to thin out crops if they are too dense; harrowing will also help mix the soil with other fertilizer. Therefore, in the process of cultivating the soil, you will definitely need a mini-tractor with a harrow.
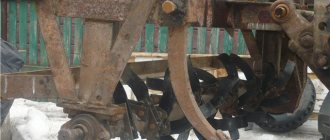
Disc harrow at work
The interaction of the harrow with the ground makes the surface correct and allows it to be leveled. During the processing process, the harrow not only destroys the crust on the surface of the earth, but also removes weeds and protects the soil from completely drying out. The soil moisture level should not be below 50%, otherwise the dry soil will simply dissolve into dust, which is not correct for planting plants.
What is a disc harrow and its types
A disc harrow can replace a harrow, plow, cultivator and hoe. This special attachment is widely used in areas where soil moisture does not exceed 25% and crop residues exceed 60%.
Important Compact motor-cultivator Sibiryak MK-3-02 of domestic production
The hinged structure in the photo consists of a certain number of disks, which are positioned vertically to the main axis of the structure at a certain angle. Thanks to this, it is possible to regulate the depth in the soil and determine the angle of cultivation.
In harrow operation, such discs will play the role of a blade and a ploughshare, this will reduce the load on the mini-tractor itself and crumble the earth. The ideal use of such a hanging structure would be in fields with a huge amount of plant residues; in such a successful design, the grass is simply wound onto the discs and the space between the discs is not clogged. The train roller always acts as a grinder, leveling the surface of the earth.
Today you can buy a mini-tractor harrow on sale in two versions: with a width of 1100 or 1500 millimeters. Depending on the power of your tractor, an option with a different number of discs will be used.
According to the design of the working part, the harrow is divided into mounted and mesh.
In the event that you need to cultivate the ground where there are a lot of plant roots left, it will be advantageous to purchase a harrow with discs, but naturally it will not be suitable for stone soil - the discs will simply become dull and repairs will be required.
The mesh harrow is an old, but time-tested design: on a base in the form of a metal mesh, the teeth are strengthened in different ways. The setting of the teeth will vary depending on the task at hand. The teeth can be made in different versions: curved, straight and spring design.
In order to properly distribute fertilizers and loosen the soil along with the remaining grass, you will definitely need a harrow, which can increase the resistance of the earth's surface to various erosion processes and increase its absorption function.
one per post “Disk harrow for mini tractor: types, features”
We need a disc harrow, which at its widest part will be no more than 1300 cm. We work on narrow row spacing.
How to make a harrow for a mini tractor with your own hands?
Based on the above, a universal option is a disc harrow for a mini tractor.
You can make a homemade harrow quickly and easily using the following algorithm:
- Make a frame. Pipes and metal profiles are suitable as blanks. You should not make the frame too large and massive, so as not to overload the mini tractor.
- A shaft is fixed in the center of the frame, which is reinforced with racks. The diameter is selected based on the size of the disks.
- The discs are attached to the shaft at a slight angle, at a distance of 5-7 cm from each other. The disks should be placed symmetrically. Diameter – at least 25 cm.
- It is also worth making small cuts on the edges of the disks with a grinder to increase work efficiency.
How to make a rotary cutter with your own hands
Attachments for a mini tractor, including a rototiller for MTZ, cost a lot of money, which can significantly hit the pocket of an ordinary farmer. Homemade products come to the aid of craftsmen - a homemade milling cutter for a tractor, with the proper skill, can be made in the shortest possible time and is in no way inferior in quality to factory models. A homemade milling cutter for a minitractor will save a significant part of the tractor driver’s budget, however, before you start constructing the unit, you should think about whether you have the required amount of free time and minimal skills in this path. First of all, you need to familiarize yourself with the design of the cutter.
A homemade rotary cutter at MTZ should be made of five main elements:
- Main shaft.
- Gearbox.
- Cutting elements attached to the shaft.
- Protective cover.
- Support frame with wheels.
The specifics of the functioning of a rototiller are quite simple. The main wheels of the equipment transmit the rotation impulse to the main shaft when the mini tractor moves. The knives with which the unit's shaft is equipped begin to rotate, thereby lifting the top layer of soil and turning it over. In principle, the whole technique is similar to digging up an area with a shovel, with the only exception that with the help of a hand-made cutter at MTZ, this can be done much more efficiently and quickly.
To make a cutter for a mini tractor with your own hands, you must first acquire the necessary equipment, such as:
- wrenches of different sizes;
- drill;
- Bulgarian;
- welding machine.
You will also need fastening tools - bolts and nuts. Before assembly, you need to carefully study the drawings, which can be found in large quantities on the Internet. After all the equipment has been prepared and the drawings have been studied, you can proceed to assembling the apparatus.
The attachment assembly process begins with the manufacture of the support frame. For it you will need channels, you can also use a pipe with a diameter of 4 cm. The element is cut into 4 equal parts, which will subsequently be welded together. The width must be selected in accordance with the power of the mini tractor’s power plant.
The shaft is fixed to the frame. The role of the shaft can be played by a pipe with a diameter of at least 5 cm. Fastening is carried out using bushings and bearings.
One of the key points is making knives from metal plates. The number of cutting elements must correspond to the width of the shaft. The knives are secured to the shaft using bolts and other fasteners.
Now we can assume that the homemade milling cutter for the tractor is ready. You just need to treat all the working elements of the system with grease and run it in to understand whether you have assembled everything correctly.
And if you decide to buy a ready-made rototiller, be sure to read the instructions for use before you go out to work. Proper operation and care of the equipment will allow you to not think about repairing such expensive equipment for a long time.
Harrows for mini tractors: types of features and do-it-yourself assembly
Mini tractors have proven themselves to be productive, reliable machines that can handle any agricultural task.
Their implementation is partly a matter not only of the power drive, but also of various attachments that turn small-sized agricultural machinery into real production giants. Among them are harrows and rakes, which make it possible not only to perform basic tasks, but also to tillage and rake cut hay. Today it is difficult to find a farmer who would not appreciate their merits. Therefore, the number of people wishing to acquire such assistants is growing with each field season. It is about them that we will talk in this article and will dwell in detail on how you can make them yourself.
Classifications of harrows for mini tractors
Depending on the depth of immersion in the soil, harrows are:
- heavy - crush large clods and reach a depth of 10 cm with their working organs;
- medium - perform harrowing at a depth of up to 8 cm;
- lightweight - contribute not only to leveling the surface layer, but also to embedding seeds and organic matter. Processing is possible up to 6 cm in depth.
Based on the nature of their shape, harrowing units for mini tractors are distinguished:
- toothed - represented by a frame of transverse and longitudinal metal slats carrying teeth. The shape of the latter can be either oval or pointed;
- disc - viable not only for fall or post-plow tillage. They are used on all types of agricultural landscapes, regardless of soil type, type of previous crop and labor intensity of the task. Externally, they are a series of spherical or cut-out disks installed in one or two rows at a certain angle;
- Grinding harrows are relevant for pre-sowing soil treatment. They are composed of alternating knives, teeth and leveling elements, which create a complex effect on the surface layers;
- mesh harrows - consist of separate sections of wedge-shaped teeth located on movable hinges. Popular in sugar beet growing regions.
Do-it-yourself disc harrow for a mini tractor: assembly from “A” to “Z”
- thick-walled metal pipe;
- whole car wheels;
- corner and channel;
- belt with good springing properties;
- harrowing discs (ready-made or homemade, the size of which will be given below);
- spare wheels of smaller diameter.
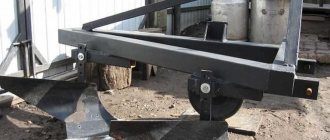
The classic design of a disc harrow on a mini tractor looks like this, where:
1 – frame, 2 – front knives, 3 – rear knives, 4.5 – pivot pins, 6 – bracket, 7 – cleaner, 8, 9 – beams, 10 – element for adjusting the working angle, 11 – roller.
We use this model as a base one.
Progress:
- take 8 ready-made or homemade disks with a diameter of 56 cm;
- we aggregate them to a metal pipe 2.6 m long, so that the distance between the mounted disks is at least 15 cm;
- we assemble a frame from corners, which we transform into a square blank by electric welding;
- We use a three-point fastening method - on top of the frame, and with the left and right axle. Instead, a belt connection can be used;
- If necessary, we add wheels to the assembled harrow - this will make it more maneuverable and rotatable.
Advantages of homemade disc harrows:
- high productivity – up to 2 hectares per hour;
- multitasking;
- large working width;
- low cost.
DIY disc harrow for walk-behind tractor
At home, you can only do it for a cultivator-type walk-behind tractor. Two pipes are made; they must be securely fixed to the walk-behind tractor shaft. Most likely, you will have to take this work to a turner at the factory or use shafts from a broken cultivator. The total length of the pipe should not be more than 1 meter - the walk-behind tractor will not pull a harrow that is too heavy.
Disks with a diameter of about 25 cm are placed on the shafts. To reduce resistance, cuts are made along the edges with a grinder every 10 cm of the circumference.
The mounting holes of the disks should be slightly larger than the diameter of the shafts. The disks are installed with a slight inclination to the shaft axis. On the left side of the shaft the slope is in one direction, on the right - in the other. The number of disks is taken such that they mutually overlap each other in slope - usually they are placed every 5 cm.
In general, making a disc harrow yourself is a difficult task. It’s easier to buy a cheap Chinese one and modify it by thoroughly welding all the seams, which is usually not done in production.
This is interesting: The most popular models of Chinese mini tractors Dong Feng: what you need to know
Mini tractor rake: features and variety
Another attachment that no agricultural farm can do without is a rake-tedder - adapters equipped with wheels, the leading working part of which is steel teeth.
The main functional purpose of a rake is to rake hay when the scale of the work does not allow doing this manually.
The efficiency of the rake is influenced by the following operating parameters:
- captured area;
- rotation speed of working parts;
- diameter of rotating elements;
- roll size produced.
Classification
According to the swathing scheme, rakes can be:
Depending on the type of working elements, rakes are distinguished:
- rotary or tape - the most productive, but also expensive adapters;
- wheel-finger - allow you to turn over and collect dry hay;
- wheeled.
The most primitive designs of the above are the transverse rakes on a mini tractor. They are designed only to rake hay in the direction opposite to the movement of the tractor. This is achieved by rows of lowered sharp teeth.
Homemade belt rake for a mini tractor
You will need the following tools and consumables:
- electric welding;
- grinder or other device for cutting metal;
- metal rods;
- profile and round pipes;
- corner made of thick-walled metal.
As a basic basis for the rake, you can use the basic model shown in the figure below.
Progress
Stage 1 – production of teeth for impellers
Depending on the dimensions of the future structure and the height of the minitractor itself, for this we will need up to 600 mm of wire with a thickness of 0.5-0.7 cm (for each element).
The number of steel rods is calculated based on the circumference of the impeller. They should be located every 10 cm and carry one more additional tooth.
Stage 2 – attachment to the base disk elements
The easiest way to do this is with bolts. The discs themselves can be made from 4 mm steel in diameter, which is suitable specifically for you;
Stage 3 – aggregation of wheels onto a rake
We take bearings and hubs (can be from an old VAZ). It is advisable to use tapered bearings, which will provide greater tightness to this working unit.
Stage 4 - creating an axis
Wheels and teeth will be attached to it. It can be made from a rod that is reliable in thickness.
5th step
Attaching metal stops – hitch clamps to the tractor. They are made of steel in size 30x100 mm;
6th – installation of support posts
For them we choose a length of 120 mm. We attach them to the axle using welding.