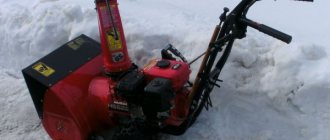
The design of snow removal machines itself is not particularly complicated. Therefore, working units here do not fail so often. There are several elements that are subject to the greatest wear and tear. These are drive belts, shear bolts and friction rings.
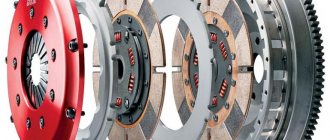
If we talk about the friction ring, then we are talking about a simple part, but if it breaks, the snow blower will not be able to move. In theory, you can make a new friction ring yourself, but objectively it’s easier, more reliable and safer to buy a new part. The snowblower owner's task is to monitor the condition of the friction ring, as well as other consumable parts, and promptly change them when signs of wear appear.
The main causes of friction ring wear
In the design of most snowplows, changing the speed of their movement around the site is carried out without the need to stop. Because of this, the rubber sealing disc located on the ring quickly loses its elasticity and wears out. After it, the main blow is taken directly by the friction ring for the snow blower.
Another reason for part failure is frequent slipping of the snow blower. During this process, the wheels are subject to increased loads, resulting in grooves forming on the surface of the ring. Over time they become wider and deeper. This happens until the element breaks into pieces.
The third reason for friction ring failures is corrosion, which occurs due to high or variable humidity. Over time, rust spreads over the entire surface of the part, quickly destroying its structure and reducing its resistance to high loads. You can determine that the friction disc for a snow blower has begun to rust by the characteristic creaking noise that is heard when changing gears.
Instructions
Over time, everything breaks down. Any technique has a limit of strength and does not work forever. As for the Patriot, Champion, Honda, and Foreman snow blowers, some of their components are specially prepared so that breakdowns of special simple parts occur in them.
Shear bolts
Thanks to this, you can keep all important parts intact. This part, the shear bolts, is the second consumable of the snow blower, after gasoline.
The shear bolts are made in such a way that they come off on their own in the event of excessive load on the auger. In this case, the gearbox will remain intact, and the bolts just need to be replaced. But you won’t learn to buy them all the time for reasons of economy.
Shear bolts
The cost of the kit, although not very large, becomes very noticeable when the consumption is high. Therefore, you should seriously think about how to make shear bolts for a snow blower with your own hands.
To do this, you need to take bolts of the required diameter, be sure to note that the diameter of the bolt is the same along the entire length, this is important, and simply transfer the dimensions of the original shear bolt to the workpiece. Next you just need to make grooves in those places where they are on the original bolts
In principle, not a difficult operation, but useful for the wallet.
Caterpillars
As for the tracks for snow blowers MTD, Huter, Kraftsman, Stig, much more tools and consumables will be required. But the result will still be beyond praise. One simple option is to make tracks from an old tire.
Its main advantage is that the result is a closed circuit, which means durable and reliable.
It is also quite simple to make - you need to cut off the edge from an old tire of the required size. A knife dipped in soapy water or a jigsaw with a fine-toothed attachment is suitable for this. After the jigsaw, it is best to process the edges to achieve greater smoothness to avoid tears.
If necessary, you can completely solder it. The only drawback of this design is the fixed size of the future caterpillar. But if necessary, you can make a larger cut if you need a narrow track, or tie two together if you need a wider one.
Gearbox
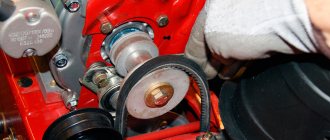
As for the gearbox, everything is simple - its service life is the longest of all moving parts. The gearbox transmits the driving moment from the engine to the auger and is located on the axis of the auger.
In fact, several gears, with regular lubrication, will not cause any special problems, especially since the total time of use of the snow blower does not exceed several tens of hours.
This video shows the assembly of a snow blower gearbox.
Friction disc
Another part that often breaks is the friction ring. Too much force on the wheels leads to the fact that the wheel-friction disc pair slips, which causes the friction ring to wear out and then break.
As a result, the friction wheel, made of steel, leaves deep grooves in the aluminum friction disc. But these are not the only problems. In the process, the belts wear out and the clutches completely fail.
And due to the fact that it is practically impossible to make such a ring at home, it is better to carefully monitor the progress of the snow blower and not try to skid on it.
The video shows how to replace the friction disc.
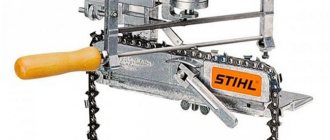
Chains
Snowblower chains, it's just a parade of diversity. Here you can see absolutely all types of them, especially if it is made by yourself. Absolutely everything is suitable for connecting the motor and auger. Homemade installations often use bicycle chains along with bicycle sprockets.
But this option is only suitable for low-power units. As for wheel protection, it can also be replaced with improvised means. It is enough to have a piece of chain at your disposal, and, at best, a welding machine.
But if it is not there, you can get by with simply riveting it with a hammer. The only condition for making the correct chain for a wheel is that it should not be too small and too loose. And the best option is the shape of a ladder.
True, it is possible to make something similar at home, but such a product will be far from having the functionality of a factory part. Here, cheapness is very inferior to quality.
How to make a friction ring for a snow blower with your own hands?
Making a new friction disc yourself requires attention and the ability to work with hand-held electrical equipment.
To make a friction element, the manufacturer will need:
- grinder with a set of cutting discs;
- disc-shaped steel part;
- a thick rubber ring, the diameter of which must correspond to the diameter of the steel part;
- pliers;
- glue “liquid nails”;
- file.
The further procedure for the manufacturer should be as follows:
- First, you will need to carefully sand the metal workpiece to make it completely smooth. It is best to do this with a grinder. The burrs remaining after grinding can be removed with a file;
- Then you need to make a hole inside the workpiece. The fastest way to do this is with a drill. To do this, you need to drill 3 holes located next to each other inside the part. After this, the partitions between them will need to be knocked out with a hammer. The internal contour of a homemade disk must be cleaned using a thin file or sandpaper;
- At the next stage, a homemade friction ring for a snow blower will need to be equipped with a rubber seal. To permanently fix both elements, the upper part of the metal disk must be lubricated with “liquid nails” glue. To install the rubber part, the manufacturer will need a flathead screwdriver and pliers;
- Once the glue has dried, the homemade spare part will need to be installed in its regular place in the snow blower.
To prevent the homemade friction disc from breaking in the first hour of operation of the snow blower, the machine does not need to be subjected to high loads immediately. It is better to use the unit for removing dry snow for about an hour. If during this time the snow blower gears are switched without any extraneous sounds or jerks, then the unit is ready for intensive use.
Design #1 – auger snow blower model
We suggest first considering the option of how to make a snow blower with your own hands based on an old engine from a walk-behind tractor. To do this you need to prepare:
- Sheet (roofing) iron for assembling the auger body;
- Steel corner 50x50 mm for the structure frame;
- Plywood 10 mm thick for side parts;
- Half-inch pipe for arranging the handle of the machine.
When planning to equip a homemade snow blower with an air-cooled engine, it is necessary to provide additional protection for the air intake opening from small snow particles emitted during operation.
The engine power of this device is 6.5 hp. It is quite enough for clearing fresh snow from the garden area.
Thanks to the machine’s working width of 50 cm, it will be convenient to move the structure and clear winding paths on the site. The machine has compact dimensions, its width does not exceed 65 cm. This allows you to hide the snow blower in the barn at any time as unnecessary; it easily passes through a regular doorway.
To make the auger shaft, you can use a ¾ inch pipe. A through cut is made in the pipe, which is necessary to fix a metal blade measuring 120x270 mm. During operation, the captured snow mass from the transport belt will be moved by the auger to the blade. This blade, in turn, under the influence of the rotation of the shaft, will throw the snow to the sides.
The frame of the snow blower can be welded from steel corners 50x50 mm, and closer to the edges of the structure in the pipe to the transverse corners, all that remains is to weld two corners on each side, the dimensions of which are 25x25 mm
The engine platform will be attached to these corners in the future. You can fasten the transverse corners with the longitudinal ones and fix the control handles on them using bolts (M8).
The auger pipe is equipped with a metal blade and four rubber rings d=28 cm, the material for the manufacture of which can be the sidewall of a tire or a 1.5-meter transport belt with a thickness of 1.5 mm.
You can cut rings from a rubber base using a simple device: drive two screws into a board, and then secure this structure tightly to the tape and turn it in a circle. You can significantly simplify the cutting procedure by using a jigsaw.
Since the snow blower auger will rotate in self-aligning bearings 205, they must be placed on the pipe. In order to make a snow blower yourself, you can use any bearings, the main thing is that they must be closed. The support from the cardan of old Zhiguli models can act as a protective casing for bearings.
To insure a homemade auger against ice, it is advisable to provide a safety pin. In addition to its direct purpose - cutting when the auger jams, it will serve as a belt fuse (if a belt drive system is installed). The auger can also be driven by a chain. Its idle speed is about 800 rpm. All the necessary components for a snow blower can be purchased at any specialized store.
A piece of plastic sewer pipe d=160 mm is well suited for discarding snow. It is fixed on a pipe of the same diameter located on the auger body itself
An extension of this section of pipe will be a chute for throwing out snow, the diameter of which should be larger than the width of the metal auger blade.
Recent posts 5 working ways to use tar in the garden 7 indoor plants that help you get married even in adulthood Indoor plants that can bloom in trouble
Before assembling the structure, you need to pay attention to the fact that the dimensions of the machine body should be a couple of centimeters larger than the dimensions of the auger itself. This will prevent the mechanism from touching the walls of the housing during operation.
Since the snow blower engine can be used for other purposes during snow-free periods, it is desirable to provide a quick-release convenient platform in the design of the unit, thanks to which the engine can be removed at any time without using any tools.
A significant advantage of this design solution is the ease of cleaning the body and moving parts of the machine from compacted snow. And storing such a snow blower is much easier: just remove the engine and the machine will become twice as light.
The basis for the skis are wooden beams, which are additionally equipped with plastic linings. You can make such overlays from an electrical wiring box.
The snow blower is ready for use. All that remains is to paint the homemade device and start working on clearing the snow.
Correct installation of the friction disc
Machine operators have to change friction rings on snow blowers used on the farm quite often, since worn or broken parts cannot be repaired.
The replacement process itself will not cause difficulties if the operator proceeds in this order:
- First you need to remove the key from the ignition switch of the unit and drain all the gasoline from the fuel tank;
- Then you will need to wait until the engine cools down completely. Next, you need to unscrew the spark plug using a special removable key;
- The operator must then remove the machine wheels and remove the locking pins;
- The next step is to carefully remove the upper cover of the gearbox housing, as well as the pin installed in the spring clip;
- Then you will need to carefully remove the support flange and the standard friction mechanism;
- At the last stage, the operator must dismantle the old spare part and replace it with a new one.
Next, the operator will need to check the operation of the snow blower gearbox. To do this, you need to thoroughly warm up the engine of the car and alternately move the gear shift lever to different positions. In this case, the lever must be left in each position for 5 seconds. If, during the check, the snow blower does not jerk when shifting gears, and the lever itself does not emit knocking vibrations, then the ring is installed correctly.
Common snow blower malfunctions and their causes
Snow blowers, despite their simple design, are also prone to malfunctions. Failures can be simple, which the user can fix independently, or more complex. In such cases, repairing the snow blower will be impossible without the help of a specialist. The most common snow blower malfunctions are as follows.
- Snow blower won't start. The cause may be a faulty spark plug or poor contact of the high-voltage cable in the coil or in the spark plug cap.
- The engine is running erratically. Often this engine behavior is caused by clogged spark plug electrodes or an incorrectly set gap between them.
- Black exhaust gases. Black smoke may appear due to poor quality gasoline or due to a closed carburetor choke.
- The unit stopped moving forward. This problem may occur due to weakening of the drive cable, due to misadjustment of the friction drive or traction belt.
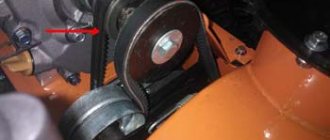
- Strong vibration. The unit begins to vibrate excessively if the screws that secure the engine to the frame are loose.
- The starter rope does not extend. This means that the flywheel is blocked by something. You will need to open the cover hiding the flywheel mechanism and find the cause of the jamming.
- The unit stopped throwing snow. There may be several reasons for the malfunction: a foreign object has entered the auger (rotor); the protective bolt has been cut off; the engine runs at low speed; the drive belt slips due to poor tension or even breaks; the augers are covered with ice and cannot rotate.
How to extend the service life of a friction ring?
There are a number of recommendations, the implementation of which will help increase the working life of the friction disc and other elements of the snow blower transmission. These include:
- Observance by the operator of the sequence when switching speeds of the snow blower - it is prohibited to change gears by “slipping” the lever 1-2 positions forward or backward. This leads to increased wear of the rubber seal and the metal part itself;
- working with the clutch every time you change gears - this reduces the load on the friction ring and makes it less vulnerable to elevated temperatures;
- shift gears only when the snow blower wheels come to a complete stop - otherwise the part will quickly deform;
- timely cleaning and changing the oil in the snow blower transmission - this will help prevent not only wear on the disc, but also other important parts of the mechanism.
The service life of a transmission element is largely influenced by the quality of the oil. It is best to use compounds from well-known manufacturers to lubricate the mechanism. These oils meet all quality standards and have a balanced composition, which is very important for protecting transmission parts from overheating and wear.
Peculiarities
The friction ring for a snow blower is subject to very high wear. That's why it often breaks down in a short time. Meanwhile, the efficiency of work largely depends on this ring. Without it, it is impossible to synchronize the rotation of the wheels with each other. The breakdown most often manifests itself in the fact that the gearbox sets one speed, but the device operates at a different pace or changes it chaotically.
By default, most manufacturers equip their snowblowers with aluminum clutches. Products with steel parts are found much less frequently. Regardless of this, the ring is shaped like a disk. A rubber seal is placed over the disk element. Of course, the reliability of the rubber used is critical.
Why does the structure wear out?
All manufacturers indicate in their advertising and even in accompanying documentation that friction rings have a long service life. But this only applies to a normal situation. If the rules for using equipment are violated, the disk will quickly degrade. The same applies to machines that are operated, albeit correctly, but under a very high load.
Hazardous effects occur when:
- changing gears on a moving snowplow;
- attempts to remove an excessively large layer of snow, especially snowdrifts;
- moisture getting inside the mechanism.
If the owner of the device changes gear without stopping the device, he will not notice anything wrong at first. But the seal, which is designed to protect the disk, will immediately be subjected to a strong blow. Even the most durable and stable rubber cannot be designed to absorb such impacts all the time. It will wear out quickly due to friction. As soon as the protective material breaks off or cracks, friction begins to act on the friction disc itself.
It will also collapse, albeit not so quickly. However, the result will be the same - complete degradation of the part. This will cause the snow blower to stop. Characteristic signs of wear are grooves covering the outside of the ring. If you notice this sign, it is better to immediately throw away the part and select a new one to replace it.
As for dampness, everything is clear here - there is no chance to resist it. A snow removal apparatus, by definition, will come into contact with water, albeit in a different state of aggregation. Liquid ingress causes corrosion.
Rubber mechanical protection is not affected by water, but it will not help prevent its impact on metal parts. You can only strictly observe the equipment storage regime, and also use anti-corrosion compounds.
Construction of snow removal machines
To learn how a snow blower works, you must first understand what it consists of. The main elements are several parts.
An engine that has a 4-stroke motor. These engines are pre-adapted to winter frosts with a temperature of -31 degrees. In most cases, motors from famous companies such as Briggs & Stratton, Tecumseh are in demand.
If there is no air filter in the snow blower, then this is a characteristic sign of a winter engine, since the filter can become clogged with snow, freeze and turn into a plug. The snow blower must not be used all year round, as the device can be damaged not only by winter dust, but also by regular dust. A sleeved motor is considered repairable; it is installed on professional snowplows.
The gasoline model has a manual starter with a cord. Low-power machines have a manual start, while more powerful ones have an electric starter. The electric starter itself has two types - powered from a household electrical network and from an on-board battery. The first option can be started by connecting the motor to a power outlet and pressing the button. To start a cold engine, you will need an electric starter.
Snowplows can be self-propelled or non-self-propelled. Snowplows are often equipped with a manual transmission. Some models have CVT and hydrostatic transmissions with different numbers of speeds. Snow blowers have 5 gears in the front and one gear in the rear.
The edge of the screws can be of two shapes: serrated and smooth.
The 2-stage snow blower has a strong, powerful auger. Its function is to crush stuck together lumps of snow; and it can also push snow to the center of the bucket, where the snow discharge to the impeller is located. The impeller itself will not be able to crush the snow. Its task is to set the speed for incoming snow. The snow is thrown aside.
In single-stage types, the augers may touch the ground during rotation, so they are made of metal or rubber plastic. Thanks to the rubber-plastic material, the auger will easily withstand collisions with pebbles; will not be able to break or become deformed. And a screw made of metal may break in this case.
The tires are branded with an X and V tread pattern. These tires have good grip.
The outlet chute can have two options: metal and plastic. Metal has virtually no vibration. It is more durable and accurate for throwing snow. But a plastic gutter prevents snow from sticking to the device, costs much less and will not rust.
The gearbox can transmit torque from the shaft to the augers. Support skis provide good glide. They hold the front of the device. They can be adjusted in height by setting the degree of snow removal. There are double-sided skis that can simply be turned over when worn. The scoring knife, which is located at the bottom of the bucket, should not touch the ground.
Snow blower chassis come with wheels or tracks. Wheels move without turning on the engine. The tracks are more resistant to ice and slopes. The frame may include circular cross-section tubes. There are brands with rectangular tubes, they can ensure the strength of the device.
Snow blowers also have the necessary lights, which are charged using an on-board generator. All snow blowers have a control program with which you can adjust the engine speed, turn on or off the gear and wheel drive, you can adjust the height, direct the snow discharge, and so on.
To set the direction, you need to rotate the outlet chute. Ordinary models have a handle for this purpose. You can often find a worm gear. To make a turn, you need to twist a special handle.
It is very rare to find snow blowers that have an electrically driven directional control design. Professional machines have levers that are located on the panel. Using such a lever, you can change the height without interrupting the movement.
Manufacturing and replacement of fixtures
It is almost impossible to “reanimate” the friction ring. But there is no need to be afraid - replacing a wheel is quite simple. The first thing you should do is turn off the engine and wait until it cools down. Having pulled out the spark plug, pour out all the fuel from the gasoline tank. Further:
- remove the wheels one by one;
- remove the stopper pins;
- unscrew the screws;
- dismantle the top of the gearbox;
- remove the pins from the spring clips holding them.
The next step is to remove the support flange. It blocks access to the friction device itself. The remains (fragments) of the worn disk are removed. A new ring is installed in its place, and the snow blower is assembled (repeating the manipulations in reverse order). The newly installed disc must be carefully checked by warming up the engine and driving the snow blower around the area in idle mode.
Purchasing friction discs is not always profitable. It is often more economical to make them yourself. But you need to understand that homemade elements can be made completely even only after many hours of persistent work with a file. The blanks will have to be made from aluminum or other relatively soft alloys. The outer contour of the old ring will allow you to prepare the circle.
In this circle you will have to prepare the most even hole possible. The easiest way is to use a drill. Relatively thin drills are fixed in it. When several channels have been made, the jumpers separating them are removed with a chisel. The remaining burrs are removed with a file.
Additional details and nuances
If the disc is made according to all technical rules, during a test run, each gear change is made without the slightest extraneous sounds. But even minor knocks give reason to redo everything from scratch. Usually it takes about 2 minutes to check. As for polyurethane protective elements, harder versions are most often painted blue. The 124x98x15 clutch wheels mentioned above are the most common format.
In terms of elasticity, polyurethane is far superior to any metals. However, it is not resistant enough to high heat. Therefore, operation of a snow blower is permissible only with a strictly limited load on the friction clutch. What is important is that the ring of any model is adapted only for strictly defined modifications of harvesting equipment. You need to inquire about compatibility in advance.
Manufacturers recommend checking the serviceability of friction wheels every 25 hours of operation. Compliance with this rule will allow you to notice emerging problems quickly. As a result, there will be no worsening of breakdowns or the appearance of new defects.
Important parameters when choosing a factory product are both the diameter of the internal hole and the external cross-section. Of course, it is advisable to choose products from the same company - it’s more reliable and calmer.
To learn how to replace the friction ring on a snow blower yourself, watch the video below.
Common friction ring failures
Gear shifting when the snow blower is operating is carried out without stopping the unit. In this regard, the rubber seal of the friction ring wears out quite quickly, and after it the metal part of the part is susceptible to damage.
The element wears out even faster due to frequent slipping of the snowplow wheels. In this case, quite strong pressure is applied to the wheels, which leads to the formation of grooves on the surface of the rings.
Another problem that arises when using rings is rust, which forms due to high humidity. Corrosion destroys the structure of metal parts, causing them to begin to crumble. It is for this reason that snow blower owners may hear a loud squeaking sound when changing gears on the unit.
Snow blowers Caliber
Heavy winter snowfalls and blizzards can cause a lot of trouble for owners of private houses, summer cottages and just garages. Clearing the yard of snow with a shovel every morning is, of course, good for health, but not many Russians have enough time for this. Therefore, Caliber snow blowers, powerful and lightweight, have become a good purchase for many Russians. Unfortunately, improper operation or insufficient preservation of the snow blower for the warm season, wear of spare parts and high loads lead to the fact that you may need urgent repairs of the Caliber snow blower. As a rule, the most common breakdowns are the following:
- Ignition problems causing your snow blower to simply not start
- Insufficient or incorrect valve adjustment
- Carburetor or rotor malfunctions
- Broken drive belts
- Problems with the auger
- Friction ring failure
- Other
In any case, only diagnostics of the Caliber snow blower on a special stand will help determine the exact cause of the malfunction. And such stands are unlikely to be in your home. This requires special services and specialists with relevant knowledge. Therefore, if your snow blower breaks down, you should immediately seek professional help.
Self-replacement of parts
A damaged friction ring on a snow blower is almost impossible to repair. Therefore, in order to continue working, you will need to completely replace the part. To do this you need to follow a certain order:
- First you need to drain all the gasoline from the unit’s tank and remove the ignition key;
- After this, you need to let the engine cool and unscrew the spark plug;
- Then you will need to remove all the wheels and stopper pins one by one;
- Next you need to remove the transmission top and the spring clip pin;
- Next, you will need to dismantle the support flange and the clutch mechanism;
- Finally, you need to remove the old ring and install a new one in its place.
After reassembly, you will need to check the operation of the gearbox. To do this, you need to start and warm up the engine, and then walk around the yard with the unit, without removing the snow. In other words, while testing the gearbox, the snow blower must operate without load. If you don’t hear any strange creaks or other third-party sounds when changing gears, it means the replacement was done correctly.
Repair of snow removal equipment - methods of repairing units
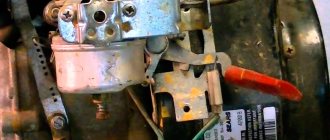
In various models of snow blowers, other breakdowns may occur that are associated with the design features of these snow blowers. For example, Craftsman snow blower repairs often focus on repairing chute problems. In this case, the first thing to do is to make sure that the safety bolts and the worm gear are intact. To do this, you will need to dismantle and disassemble the unit gearbox. This is done in the following order:
- To begin, disconnect the bucket from the unit frame;
- Next, carefully pull out the gearbox;
- Then remove and check the “worm” that is located on the shaft. Most often it is cut off from the mechanism;
- To fix the problem, buy a new “worm” and install it in place of the old part.
One of the most common problems with Patriot snowblowers is the engine not starting. In such cases, experts advise immediately checking the engine compression. If this indicator is within 6–8 atmospheres, then the problem can be eliminated by replacing the old starter cord. To do this you need to act in this order:
- Remove the protective panels and unscrew the return mechanism;
- Cut the old cord and untie its knot inside the starter box;
- Turn the mechanism 7 full turns counterclockwise and secure it with a screwdriver;
- Insert the new cord and tie it into a tight knot in the place where the old cord was secured;
- Release the return mechanism and it will rewind the cord itself.
If this does not help, then you will have to buy a new engine for the snow blower.
Owners of Profi brand snowplows often have to figure out why their unit does not move forward. The reason for this may be hidden in the machine's gearbox. To quickly resolve the malfunction, it is necessary to disassemble the assembly and replace the damaged gear inside it.
Owners of Energoprom brand snow blowers often do not know what to do with excessive vibration of equipment motors. First of all, you will need to check the reliability of the support frames and engine mounts of the unit. Often it is quite enough to simply tighten the mounting bolts further, and the problem will immediately disappear.
Friction ring for a snow blower - how to make a part?
Despite the widespread belief that it is impossible to make a friction disc for a snow blower with your own hands, there are still craftsmen who successfully cope with this task. To do this you will need:
- Bulgarian;
- Metal disk of suitable diameter;
- Rubber ring of the appropriate diameter;
- Pliers;
- Liquid Nails;
- File.
First you need to make the existing metal ring perfectly smooth. To do this, the surface of the part is processed with a grinder, after which the burrs that appear are removed with a file.
Next you will need to cut out the inner hole of the product. For this, a grinder and a file are again used. After the ring has received the appropriate dimensions, you need to put a rubber seal on it. Immediately before this, the outer surface of the part must be lubricated with liquid nails. You may need pliers or a flathead screwdriver to install the seal.
After the liquid nails have dried, you need to install the friction ring on the snow blower. The part will then need to be tested without putting any stress on the snowblower.
Assembling an auger snow blower
Snow blowers that use an auger are the most powerful and can handle even icy snow. In addition, the auger is most often used in self-propelled snow removal machines.
Based on a chainsaw
Making this snowblower with your own hands is quite simple. Since it will be powered by a chainsaw engine, several additional parts will be required for the chain drive. For these purposes, you can use the front and rear sprockets from a motorcycle, as well as a chain from it.
How the frame and auger are made was described above. A long handle is attached to the frame. A large sprocket from a motorcycle is installed on the auger shaft on the right side, and a small one is installed on the chainsaw engine shaft. Next, the chainsaw is installed on the frame, after which the chain is put on the sprockets and tensioned. To control the engine, the throttle cable is routed to a handle attached to the frame.
Below are drawings of a homemade chassis, where a chainsaw is used as the main part of the drive.
Trimmer based
To make an auger snow blower from an electric trimmer or from a lawn mower, you will need to install a gearbox: it will serve to transmit rotational motion from the trimmer shaft to the auger shaft.
But there is one nuance here. The gearbox for this type of unit is quite expensive, and it is not practical to buy it to make an attachment for a trimmer. Therefore, based on the latter, rotary-type snow blowers are manufactured, which will be discussed below.
Based on a motor cultivator (motor block)
The simplest addition to a walk-behind tractor is a snow blade.
A homemade snow removal attachment (shovel) on a walk-behind tractor is screwed to the frame of the unit, after which it turns into a small bulldozer.
Advice! Instead of a blade, you can attach an auger to the front of the frame of a walk-behind tractor or cultivator, resulting in a self-propelled snowplow. When not needed, this attachment for a walk-behind tractor can be easily disconnected from the main unit.
Below is a diagram that clearly shows the design of a snow blower based on a cultivator.
The scheme is deciphered as follows.
- A snow blower drive that connects the engine to the auger.
- Caterpillar drive.
- Drive belt.
- Roller (parasitic) to provide reverse gear.
- Intermediate shaft.
- Belt tension roller. Thanks to it, the unit moves forward.
A self-propelled snow blower greatly facilitates snow removal, especially in large areas where using the machine on skis, pushed by the operator, requires a lot of physical effort from the operator.
Causes of snow blower friction ring wear
There are a number of factors due to which the service life of a snow blower's friction ring is significantly reduced. These include:
- changing gears without stopping the snow blower - in such cases, the first blow is taken by the rubber seal protecting the metal disc. The level of such protection is quite low and short-lived, since rubber does not tolerate friction well and wears out quickly. After the seal breaks, the friction disc comes under the action, which also collapses over time, which leads to the stop of the snow blower;
- improper control of the equipment - in large snowdrifts or holes the snow blower often slips. In this case, the wheels create increased mechanical pressure, which is absorbed by the friction disc. As a result, grooves are formed on the surface of the ring, which leads to accelerated destruction of the part;
- dampness is the only factor that cannot be avoided, since snow and moisture are constant companions of snow removal equipment. As a result of exposure to dampness, corrosion appears on the surface of the disk, which gradually destroys the part. Only the rubber seal is not susceptible to corrosion, but it is not able to protect the ring from destruction.
Of course, the friction ring on a snow blower cannot be protected from the effects of corrosion in winter. However, to extend the life of the part, the equipment should be stored in a dry and warm room, after lubricating the disk with a rust-protective agent.
What is a shear bolt?
Before we move on, let's clarify a common question: What are snow blower shear bolts?
A shear bolt is otherwise called a key. The key is a small piece, about 6mm, of soft metal that holds the snow blower shear screws (augers) together. Most often, dowels break due to the earth cover. Stones and ice get under the snow blower. This causes the bolts to shear and the augers to stop.
Friction ring for a snow blower - how to replace the part?
It is almost impossible to bring a damaged snow blower friction ring back to life. In this case, the only thing left is to change the part. It's quite easy to do this with your own hands. The correct procedure for this is as follows:
- First, turn off the snow blower engine and wait until it cools down completely;
- Remove the snow blower's spark plug from the engine and drain the remaining fuel from the fuel tank;
- Remove all snowblower wheels and locking pins;
- After this, remove the screws and carefully remove the upper part of the gearbox. After this, remove the pin from the spring clip;
Remove the support flange to gain access to the snow blower's friction mechanism. It will also need to be removed;
Remove the remaining parts of the old friction disc from the mechanism, install a new ring and reassemble the snow blower in the opposite direction.
After completing all the steps, you need to check the new friction disc. To do this, fill the snow blower tank with fuel, start the engine and wait 10 minutes for it to warm up. After this, walk the car around the area without removing the snow. The fact that you did everything correctly can be judged by the snow blower switching speeds. If during this you do not hear any extraneous sounds, it means that the friction disc was replaced correctly.
Helpful Tips and Warnings
In order to make work easy and pleasant, and for the equipment to work properly and for a long time, it is worth following some operating rules. With due attention to simple things, they will make life easier in return:
- To ensure that fewer stones and other objects that could damage the snow blower fall into the chute, the area to be cleared must be carefully checked.
- When working with such equipment, always protect your eyes first. It is also not advisable to leave any parts of the body exposed.
- During cleaning work, it is best to wear protective clothing and non-slip shoes. Never start work if any part of your clothing is hanging or dangling.
- Never make adjustments or other manipulations with parts of the snow blower while the engine is running.
To keep your snow blower intact longer, and even more so to avoid unnecessary repairs, you should first pay attention to minor details:
- Snow removal is much more effective if you start immediately after it falls.
- The snow that is thrown out of the chute does not fly against the direction of the wind, since, in this case, it will again end up in the same place from which it was removed. Do not do it this way.
- The gasoline engine must be left idling before and after starting work. First, it must warm up, since it has been standing idle for a long time - in this case, unnecessary deformations of the metal will be avoided.
- At the end of the work, this will make it possible to melt all the stuck snow and ice, which can then simply freeze in places where it was not possible to clear them.
Weekly service
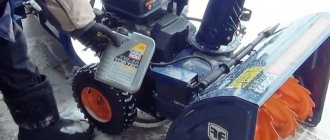
Gasoline snow blowers are reliable and unpretentious devices, so during weekly maintenance it is enough to do the following:
- check the oil level;
- check the fixation of the augers and the condition of the shear bolts;
- check the tightness of all nuts and bolts;
- check the condition of all cables;
- check the runout of the auger;
- measure tire pressure;
- Lubricate all cables with WD-40 or frost-resistant liquid oil.
If the oil level changes even slightly once, then add oil recommended by the manufacturer. If you do not have an instruction manual, visit the manufacturer’s official website or type in a search engine the question “what oil to use for a snow blower engine (model name).”
If oil has to be added at least once a month, the engine needs to be seriously checked.
It can be done:
- on your own if you are well versed in gasoline engines;
- by contacting a certified workshop.
As long as the auger bearings are fully operational, there is absolutely no runout.
If a beat appears, it may be caused by:
- wear of bearings;
- weakening their fastening.
Reducing the pressure by 0.5 atmospheres below the recommended one reduces the tire service life by 1.5–2 times.
Excess pressure by 0.5–1 atmosphere:
- impairs traction with snow and ice;
- increases the likelihood of a wheel explosion.
Monthly service
During monthly maintenance, all of the following are performed:
- weekly work;
- daily work.
And:
- check the condition of the electric starter contacts;
- clean the spark plugs and check the condition of the engine using them.
If the engine is working normally, the color of the spark plug will be light gray.
Black, red and other candle colors indicate:
- problems with the carburetor;
- dirty air filter;
- poorly working spark plug;
- broken ignition.
At home, without special equipment and knowledge, you can only:
- check the condition of the air filter and wash it;
- clean/replace the spark plug.
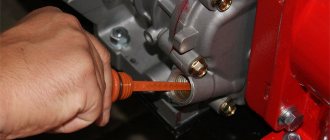
In addition, it is necessary to remove the augers and lubricate the gearbox shafts with engine oil. This operation must be carried out with the engine turned off and the ignition wire removed from the spark plug. For more information about this operation, read the operating instructions for your snow blower.
While performing this operation, also lubricate the remaining parts of the auger drive and the shear bolt holes.
Another important operation is checking the gearbox play. To do this, with the engine turned off, hold the input shaft with one hand and lightly pump the auger with the other.
If the screw play does not exceed 1 millimeter, then everything is fine. If the play is 1–2 millimeters, the bronze gear of the gearbox is worn out, but will still work for some time. If the play is more than 2 mm, the gear must be changed, because its teeth can be cut off at any time.
Maintenance before and at the end of the winter season
Maintenance before the start of the winter season should be performed in the same way as recommended for new equipment.
Thanks to this, you will detect problems at an early stage, so repairing the unit (if necessary) will cost much less.
We know from experience that they rarely work longer than 1.5 seasons, so they can fail at any time.
- engine oil;
- lubricant in the gearbox.
Change the engine oil in the same way as described in the section on the first start of the engine.
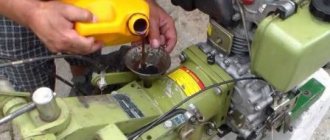
If you have to remove a lot of compacted or wet snow, then the oil must be changed at least once a month (no later than after 25 hours of operation).
To change the lubricant in the gearbox, fill it with synthetic motor or transmission oil until it is full, then:
- start the engine;
- turn on the auger drive;
- let the unit run for 20 minutes;
- turn off the engine and wait until the augers stop completely;
- drain the old grease;
- Fill the gearbox with new lubricant recommended by the manufacturer.
It is also necessary before the start of the season:
- wash or replace the air filter;
- if a fuel filter is installed on the snow blower, check its condition and replace if necessary;
- install new spark plugs.
Mothball your snow blower after the winter season ends.
For this:
- Lubricate all bolts and nuts with a cloth containing engine oil. Fill all cables generously with spindle oil or WD-40.
- Start the engine and leave it running until the fuel runs out.
- Then open the gas tank cap, cover it with a clean cloth and leave it for a day in a ventilated area. Thanks to this, the remaining gasoline will evaporate and storage of the unit will be safe.
- After this, unscrew the spark plug and pour 10 ml of engine oil recommended for this engine into the cylinder.
After completing all these procedures, you can install the snow blower at its storage location.
Friction disc for a snow blower - making the part yourself
Buying a new friction disc for a snow blower will not entail significant financial costs. However, many craftsmen make friction discs from improvised materials. It should be noted right away that the homemade part must be perfectly flat, which can only be achieved after prolonged work with a file. The procedure for making a friction disc is as follows:
- First, find a workpiece made of aluminum or any other soft metal - such a product will be easier to process;
- Cut a circle along the outer contour of the old friction ring from a metal blank. It will not be possible to do this perfectly evenly with the help of a grinder, so all irregularities will have to be processed with a file;
- The most difficult step in making a friction ring for a snow blower is making a straight hole inside the disc. You can use a drill for this. Drill several small holes in the center of the workpiece with a thin drill, which should be located next to each other. Carefully cut off the jumpers that remain between the holes using a chisel. This way, the excess parts of the disk will fall off, and you will be left with a ring with a lot of jagged burrs that will need to be removed with a file.
After making a snow blower disc, you will need to put a rubber seal on its edges. Find a ring that has the appropriate diameter and pull it onto the finished product. To ensure that the seal sits firmly on the disk, use “liquid nails” glue.
Installation and testing of a homemade friction disc is carried out in the same order as in the case of a factory disc. After practicing making disks, you can continue to install homemade parts on your snow blower, saving a good amount of money.
First launch of the propulsion
Three types of propulsion (chassis) are used on snow blowers:
- wheeled without differential;
- wheel with differential;
- crawler.
Working with the first type of propulsion system comes down to connecting and disconnecting the transmission using the appropriate handle. Therefore, to check, connect and disconnect the corresponding handle several times to ensure normal operation of the propulsion unit.
A wheel drive with a differential and a track drive operate on the same principle - blocking a wheel or track on one side leads to a turn in that direction.
The wheel or track locking system operates independently of the transmission.
Therefore, any transmission can be used for testing.
By manipulating the triggers or handles (depending on the snow thrower model), make sure that the snow thrower follows your commands well and turns accurately in the specified places.
When the wheels/tracks do not engage or disengage clearly, adjust the length of the appropriate cables. If the adjustment does not help, contact the store where you purchased the snow blower to have the chassis diagnosed.
Be sure to check the tire pressure.
What pressure should be in the tires of a snow blower is indicated:
- on the side surface of the wheels;
- in the operating instructions.
If you have a tracked unit, check the tension of the tracks and you will need to either tighten them or loosen them if necessary. For a detailed description of this procedure, see your snow blower's instruction manual.