Double-row potato planter – an indispensable unit
Spring, the time when everyone enjoys the first warm rays of sunshine and blooming trees.
But don’t forget that many people associate this time of year with the start of sowing. Planting potatoes is not an easy process that requires a lot of effort, time and energy. You can plant potatoes using a walk-behind tractor. About this in this article. Many farmers purchase a two-row potato planter to help them. But this equipment costs a lot of money, so you can use a walk-behind tractor (see here) or a tractor (see here) for these purposes, and build a potato planter for it yourself.
At the same time, such a unit is assembled very simply. It can work in automatic mode or with operator input (manual potato planter). Double-row homemade potato planters, made with your own hands, will make planting potatoes easier.
In addition, such equipment can evenly distribute potato tubers in the soil, as a result of which the harvest becomes not only of higher quality, but it becomes larger than usual.
A potato planter is simply an irreplaceable unit that every farmer should have.
Device
Potato planters differ in many respects, but basically they are all similar to each other in their design. The unit consists of:
- frames that have dual-drive wheels;
- ladle. Potatoes are loaded into it;
- excavator, which makes a depression in the ground;
- a bracket with a spoon or cup for planting planting material;
- furrow sealer.
Many models of potato planters simultaneously, during planting, add a substance that fertilizes the soil. For these purposes, special models are sold that are equipped with additional containers in addition to sowing units.
All models work on the same principle:
- Potatoes are poured into a ladle. Place bags of potatoes on top so you don't have to stop working every 10 minutes.
- Special brackets move it in the required direction.
- The opener is responsible for creating holes, which are filled with it after potatoes fall into them.
- The tubers are placed in the ground.
The discs move during operation of the unit, so the potatoes are covered with earth. The distance between furrows and rows is regulated by farmers independently. As a rule, a minimum of 20 cm of margin should be left between furrows, and 70 cm between rows.
As a result, you will get even and uniform rows. As soon as you have planted the potatoes at the same distance and buried them thanks to the closing discs, there is one last thing left: traces of the work of the unit remain in the garden, which need to be removed.
This can be done using a cultivator. Read about how to choose a cultivator for your garden here.
A DIY potato planter for a walk-behind tractor will make your life easier and will save not only money, but also the time you spend on planting. If you are going to build one, then you should consider the weight of the potato planter.
Models that do not have a lot of weight can work with mini tractors or walk-behind tractors with low productivity. For example, for MTZ 320 the traction performance should be 0.6. Read more about potato planters for MTZ here.
But, in general, potato planter units have a lot of weight, so when installing it on a walk-behind tractor or attaching it to a tractor, it is necessary to calculate the front and rear counterweight. The latter will prevent the equipment from being lifted, while ensuring its reliable and high-quality operation and durability.
Be sure to install a seat on the potato planter and a stand on which you can place your feet.
The frame for the seat can be made from a couple of welded corners, and for the seat itself you can use boards, which should then be covered with foam rubber or other material of your choice.
Preparation
We make the design
To begin work on constructing a homemade digger, you need to understand the principle of operation of its individual elements: this will make it easier to cope with the task of creating equipment. The frame is the base to which the elements are attached. The grate is the part of the apparatus on which the tubers discard the remaining soil. The ploughshare is a plow, and the transport unit is a piece of equipment that is responsible for the movement of the device. It can include not only wheels, but also a chain, sprockets, discs and bearings.
Materials and tools
All work must be carried out according to drawings and sketches. Before starting work you should prepare:
- metal corners 60 x 40;
- channel No. 8;
- sheet metal (thickness from 7 mm);
- fittings (diameter 10 mm);
- wheels;
- metal pipes (racks);
- conveyor belt (if necessary).
It is also important to prepare a welding machine and bolts for attaching the plowshare. Using a metal saw, gas cutter or grinder, saw off pipes, sheet metal and channel according to the dimensions indicated in the drawing.
Necessary materials
Before you start making a potato planter yourself, it’s worth drawing everything out and drawing up drawings with detailed measurements. For the work itself you will need the following materials:
- Metal corner.
- Drying oil.
- Plywood sheets.
- Shveler.
- Water-based paint
- Fittings..
- Felt pads.
- Rubber gaskets.
- Bolts. Steel sheets.
- Welding machine.
- Angle grinder.
- Mechanism for drill rotation.
- Various keys, screwdrivers, wire cutters.
How to do it yourself
If you cannot purchase a potato planter for a mini tractor or walk-behind tractor, then you should make it yourself. Moreover, having studied specialized literature and talked with people who have experience in such a structure, it will not be difficult to do this even for those who do not have certain skills and technical knowledge. Read our article on this topic.
The basis for any technique is the frame. All parts of the unit must be attached to it. This frame is made from the eighth channel. The basis for the structure is a pair of spars that must be connected by three cross members.
Special arches with mounting forks must be welded to the side members.
Bunker
- Its volume should be 190 liters. It is made from plywood sheets 0.12 cm thick. All parts are attached using steel corners.
- The bunker must be treated with drying oil or waterproof paint.
- A rubber gasket is installed inside so that the potatoes are not damaged during planting.
- Then the ripper holder and the wheel axle are attached to the frame of the future unit using bolts, which has characteristic prefabricated features.
- The axis can be based on a steel or cast iron pipe that has thick walls.
- Spikes or pins, which are sold in a store or turned on a machine, are inserted into the end of the pipe.
- Then a hole is made in the pipe, through which, after installation, a pin is inserted, which holds the spikes.
- When complete assembly has already been done, the pin is welded. The wheels are secured with steel clamps and four M16 bolts.
Description of finished models
Bomet
The two-row type mounted potato planter works with a self-propelled machine for traction thanks to the rear linkage. The unit works with a tractor that is equipped with a rear linkage of category No. 2. The potato planter will perform all tasks in one work cycle that are associated with planting tubers.
- He will dig up the ground and create beds.
Planting material can be planted in row spacing at a distance of 620 mm or 675 mm. It is possible to change the tuber distances in a range of 290 mm, 320 mm or 350 mm. In this case, the planting depth is from 100 mm to 150 mm. The distance of tubers in a row can vary due to the diameter of the running wheels.
The price of the model is 480 dollars.
Bomet potato planters are designed for long-term use, designed and manufactured using modern technologies from high-quality materials.
AGROMECH
Unit for mini tractors with wheel widths from 950 to 100 mm. The two-row Polish potato planter works with a tractor thanks to the rear linkage, and the ZNU category must be no less than No. 2.
The unit performs all the tasks assigned to it: it creates holes, throws planting material there and fills the holes with soil. Can make beds.
Potatoes are planted in row spacing with a distance of 625 mm or 675 mm, the tubers in the row can vary (290 mm, 320 mm or 350 mm), while the seed is planted to a depth of 100 mm to 150 mm. The distance of the tubers can change if you change the diameter of the chassis.
The price of the model is 380 dollars.
User manual
In order for the potato planter to work properly, it is necessary not only to follow the operating instructions, but also to properly store it after use:
- The equipment must be used exclusively for the purposes for which it was designed.
- Be sure to use personal protective equipment while working. Do not wear loose-fitting clothing that could get caught in the moving part of the unit. If dust arises during work, wear a special mask.
- If necessary, use earplugs, headphones or other noise protection devices, as the tractor, together with other agricultural equipment, produces a lot of noise, which negatively affects hearing.
What to look for when choosing?
A potato digger is designed to loosen the lower layers of soil and bring root crops to the surface, however, the operating principle of each of them is different.
When choosing a particular model, you should pay attention to such parameters as:
Mini-tractor power - if the unit is designed to process up to 2-3 hectares of land, there is no point in buying the most powerful potato diggers, which will constantly slow down due to the incompatibility of the equipment with each other.
Volumes of cultivated areas - if you plan to harvest a large amount of crops, it is rational to pay attention to vibrating potato diggers with additional equipment in the form of a trailed one. This way, after removing the soil, the potatoes will go straight into the container. Manual labor is minimized. When it comes to cultivating a garden of 6 acres, then you can use the most primitive models, saving the family budget.
Type of soil being processed - loose chernozem soils are well processed by most types of potato diggers, while loam and sandy soils will require units with a scoring knife.
Prices - in most cases, the price is determined not only by the performance and availability of additional functions of the unit, but also by the manufacturer’s brand
Here it is important to decide whether you need a high-quality unit that will work hard and last for decades, or whether the simplest and most inexpensive model for use in the garden will do.
Presence/absence of weeds on the field - some models are equipped with additional knives, which, together with the stems, remove weeds, while simultaneously performing their main functions. As for conveyor types of potato diggers, they can constantly become clogged with grass and slow down the harvesting process.
Expert opinion Kulikov Vladimir Sergeevich
It should be understood that controlling vibrating potato diggers is quite complex and can cause a number of difficulties for beginners. They are also quite bulky and take up a large amount of space, which is not very convenient when cultivating a personal plot.
Types of potato diggers
Potato diggers are used on loose and moderately compacted soils. Potato digging machines vary:
- sizes;
- design features;
- width of the working strip;
- requirements for clearing the field of weeds;
- ways to clean tubers from soil.
Craftsmen make several types of potato diggers with their own hands. The most popular are fan and screening units. More experienced craftsmen make conveyor and drum diggers for potatoes.
Potato rows in fields cultivated with tractors and walk-behind tractors must be level. Enough space is left between the rows for the wheels of agricultural machines to move.
Varieties based on operating principle
Depending on the equipment and design, potato diggers come in the following types:
Fan - used for harvesting in dachas and vegetable gardens. The design is primitive: fan-shaped rods are welded to the hiller, which loosens the ground. The layer of soil rises to the top, the tubers fall on the rods, where they are shaken off and laid on top of the ground.
Drum - has a complicated design in the form of pruning knives, a grid and a drum, where the tubers are directly cleaned of excess soil. Can be used on all types of soil
Among the disadvantages, it is important to eliminate the high percentage of damaged root crops due to the mechanical action of the lattice drum.
Vibrating (screening) - peeling potatoes from the ground is carried out due to the vibrations of the unit. The disadvantages include the need to use manual labor to collect root crops, since the lattice structure does not provide for transporting potatoes into a prepared container
Used for small agricultural lands. Difficult to manage.
Conveyor - has one of the most complex structural structures. The ploughshare located in front cuts the layer of soil with potatoes and feeds it onto the conveyor lattice base, where the root crops are cleaned. When processing fields with weeds, there is a high probability of the conveyor clogging and stopping its movement.
As for the type of design, potato diggers come in double-row and single-row. In the first case, it is possible to process two rows of potatoes at once in one pass of the mini-tractor. Single-row units are more suitable for processing vegetable gardens with a small area.
Which potato digger for a mini-tractor will you choose?
Single-rowDouble-row
Fan potato digger for walk-behind tractor
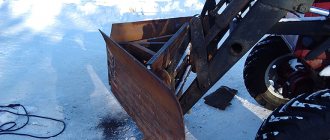
The fan potato digger has several names. It is also called a lancet digger and a paw. Manufacturers of agricultural machinery call this model “Dolphin” because of the characteristic shape of the plow (ploughshare). The unit is simple in design and removes tubers from the ground well.
- The digger is attached to the walk-behind tractor.
- The sharp end of the ploughshare loosens the ground.
- The potatoes are removed from the ground, placed on the inclined surface of the ploughshare, and pushed onto metal rods.
- The soil is separated from the tubers and poured onto the arable land through the twigs.
- The potatoes move up the raised rods and fall to the ground where they can be collected.
Digging with a fan digger allows the presence of rare and low weeds in the field. Potato tops are mown before harvesting.
Making a fan potato digger with your own hands
To work you will need a grinder, a welding machine, a drill and metal drills, and bolts. You will also need materials:
- sheet steel 3-4 mm thick for making a knife (ploughshare);
- bolts with a diameter of 10-12 mm or more;
- steel profile of rectangular section or thick steel sheet for the manufacture of a rack-holder and bracket.
- round steel rod or fittings (not corrugated) with a diameter of 8-10 mm.
In addition, you will need a measuring tape and a pencil for drawing on metal. The procedure for making a fan potato digger:
- Two holes are drilled in the middle part of the ploughshare for fastening to the stand.
- Pieces of steel rods are welded to the expanded part of the knife (to the left and right of the convex part) (so that they fan out upward and to the sides). The length of the rods is 47-50 cm. Sometimes the rods are bent in the form of a marching step.
- The holder stand is bolted to the plowshare. The height of the stand depends on the design of the walk-behind tractor. The support post can be welded directly to the plow without using bolts.
- A bracket with pre-drilled holes is welded to the top of the rack (to connect the potato digger to the walk-behind tractor).
- For structural strength, the lower part of the ploughshare, directed towards the ground, is reinforced with a welded strip of metal.
The advantage of a fan potato digger over other units is its reliability. This unit can be used for more than one year. It has no rotating parts, which become unusable under heavy loads. Potato digging is done quickly and efficiently.
The disadvantages of the unit include the small width of the dug strip (20-25 cm), due to which crop losses reach 20%. The knife of a fan potato digger damages some of the tubers, making them unsuitable for long-term storage and sale.
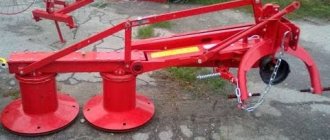
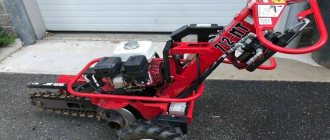
Do-it-yourself double-row potato digger
Do-it-yourself double-row potato digger
Potato digger for MTZ walk-behind tractor
If you don’t have enough money to buy new equipment, but you have a technical mind and skillful hands, a simple homemade 2-row potato digger is the best way out.
The frame of the structure is welded from an iron corner 6 by 4 cm, and corner reinforcements are cut for it from sheet steel 5 mm thick.
The production of elevators is carried out from 0.8-1 cm rods and sheet steel: a grate is made, and a vibrating shaft is attached to it. Everything is bolted to the frame. The ploughshare is made from durable material - a steel pipe 20 cm in diameter, using a grinder saw, after which the finished knives must be sharpened. The wheels are mounted on a shaft with bearings or on hubs on both sides of the digger. They can be steel or rubber; it is advisable to have both pairs of wheels for different soil conditions. The final stage is the manufacture of a mount following the example of a trailer mechanism for a tractor. How long such a homemade product will last depends on the quality of the materials and the strength of the connection.
Growing and harvesting potatoes is a labor-intensive task; special agricultural technology helps to make it easier and faster. A potato digger of various types and capacities eliminates manual labor. Double-row units dig up tubers from two rows, which significantly increases labor productivity. Such devices pay for themselves quite quickly, but you can make them yourself.
0 0 votes
Article rating
Potato Digger
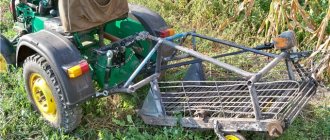
This potato digging unit is also called a vibrating potato digger or shaking digger. A potato peeler consists of three parts: a knife, a moving grid with mechanisms that ensure its vibration, and a metal frame (frame).
A potato digger can be manufactured within a few hours; the work requires experience and skill in working with agricultural machinery. To make the unit you will need:
- Bulgarian;
- welding machine;
- drill, metal drills;
- metal profile with a square side of 2.5 cm;
- steel sheet 3-5 mm thick;
- steel wire with a diameter of 8 mm (or non-corrugated reinforcement of the same diameter);
- wheels;
- bolts, hinges, levers, eccentric, measuring tape, consumables.
You will also need a ruler and a pencil for marking. The procedure for making a potato screening machine:
- measure and cut the metal profile for the frame (frame);
- weld the frame;
- Wheel stands are welded at the bottom of the frame;
- inside the frame, holders for hinges are welded on which the screen will be suspended;
- brackets are welded to the frame for installing the gearbox and mechanisms that will create reciprocating movements (vibration) in the unit;
- a sifter box (screen) is welded from metal rods;
- the screen is hung on hinges inside the frame;
- A gearbox and other equipment for creating vibration are attached to the brackets, and they are connected to the screen. During operation, the rotation of the walk-behind tractor shaft is transmitted through mechanisms (lever and connecting rod) to the screen, vibrations create rotation of the eccentric;
- a potato digger knife is cut out of a steel sheet and bent to the desired shape;
- the plowshare knife is hinged and attached to the bottom of the frame and the screen;
- Wheels are put on the unit and secured.
The ploughshare-knife for a gravity potato digger is made in different shapes. It can be bent and pointed, convex and concave. Digging potatoes proceeds as follows:
- The ploughshare goes deep into the soil and cuts it along with the tubers.
- The knife constantly oscillates in accordance with the vibrations of the screen, cuts off the soil with potatoes and throws the tubers up a little into the screen. The rumbler performs vibrating, reciprocating movements in the frame.
- The peeled tubers roll off the grate and fall onto the arable land behind the potato digger (or on the side of the strip, depending on the design of the unit).
A vibrating potato digger is used for harvesting potatoes over large areas. This unit has a number of advantages:
- The strip coverage is 38-40 cm.
- The depth of penetration of the knife into the soil is 20-25 cm.
- The yield loss is, depending on the potato variety and the flowability of the soil, from 2 to 10%.
- The vibrating potato digger also has a number of disadvantages. They are due to the design features.
- The vibrations of the screen-sifter are transmitted to the control levers of the walk-behind tractor, which makes long-term work tiring.
Purpose
A mini potato digger helps the owner remove potatoes from the ground to the surface.
The operating principle that applies here is as follows:
- The ploughshare is immersed in the ground to a depth greater than that at which the root crops are located.
- When the mini tractor moves, it picks up potatoes mixed with soil.
- This mixture gradually moves back and falls onto the grate.
- There the earth is poured into the soil, and the potatoes then move back and fall to the ground.
- After this, it is enough to walk across the field with a bucket and collect potatoes from the surface of the ground.
Potato digger for mini tractor
Note! Compared to digging up potatoes with a shovel, in this case labor productivity is significantly higher and much less physical effort is spent. Using potato diggers gives the owner the following advantages:
Using potato diggers gives the owner the following advantages:
- Due to the fact that much less effort is spent during cleaning, it is possible to pay more attention to the quality of work. When using such units, potato losses are much less than when harvesting manually.
- Although the mechanism does an important part of the work, it nevertheless ensures economy in relation to the harvest. Root crops are practically not damaged here.
- Cleaning not only requires less effort, but is also done at a much faster rate.
- The mounted potato digger has a simple and understandable operating principle. At the same time, the operation of such a suspended device does not cause difficulties.
- For those who do not have sufficient financial resources to purchase, or those who like to make things with their own hands, there is the opportunity to make a homemade device.
- The potato digger can be used not only as a suspension for a mini tractor, but also used with a walk-behind tractor or a regular tractor.
- There are not only such tractor designs where root crops are removed from the ground, but also others where the potatoes fall into a special tank.
- In such devices, you can easily adjust the depth of immersion of the plowshare, depending on the need.
It is important to note! One of the important advantages of such units is their versatility. Using these devices you can harvest not only potatoes, but also other root vegetables
Conveyor potato digger
Conveyor potato diggers are made both large and very miniature. Potato tubers and soil are loosened with a plow knife. The cut material enters a moving belt and is separated.
The tape is a lattice of metal rods or tubes located parallel to each other. They are fixed in the moving rim of the conveyor (chain). The conveyor belt is also made of steel mesh and rubber on a fabric basis. The soil spills down through the grate or holes, and the potatoes are moved to the arable land or into a receiving hopper.
The movement of the conveyor is carried out by transmitting torque from the shaft of the walk-behind tractor (tractor) through the gearbox, chains, and gears.
A digger with a conveyor belt has a wide blade that cuts the soil by 10-18 cm. Therefore, crop losses when using it are no more than 2-5%. The knife is cut from a thick steel sheet and attached to the frame with rods and bolts.
Independent production of a conveyor potato digger is possible if you have experience in such work. The unit can be made by studying the operating diagrams of factory machines of this type.
There are many designs of conveyor potato diggers; each master introduces new elements and improvements to the product. The process of creating a conveyor digger includes the following steps.
- Welding a frame (frame) made of square steel profile and corners.
- Making a knife-ploughshare from sheet steel.
- Installation of rollers or wheels for the conveyor belt into the frame.
- Assembling a conveyor belt from chain, steel rods, and other material.
- Installation of brackets and fastenings for the gearbox and gear drive.
- Installation of conveyor belt and mechanisms into the frame.
- Installation of a knife (ploughshare) and wheels on the frame.
Specifics of using a mounted potato digger
Regardless of the type of attachment used, the potato digger operates according to the standard principle:
- The device is mounted using a standard canopy at the rear of the mini tractor;
- During operation, the ploughshare is immersed into the ground by 25-30 centimeters, after which the tubers, along with the soil, are moved to the transport mechanism;
- Potatoes are peeled from soil;
- The peeled tubers are thrown back onto the ground. Afterwards, just collect the potatoes.
The advantages of using a potato digger can hardly be overestimated:
- Minimal crop losses during harvesting;
- Lean work - the structure of the tubers is not damaged;
- High harvesting speed;
- The design of the device is very simple, so it is easy to maintain and repair. You can also make a potato digger yourself;
- The attachment can be attached to various agricultural equipment: mini tractors, walk-behind tractors, tractors;
- Some modifications of diggers are equipped with a storage hopper into which potatoes fall after cleaning.
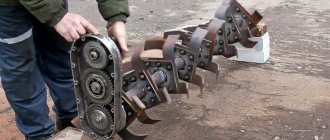
Drum type potato digger
Potato diggers with drums have proven themselves well when harvesting large areas. This unit consists of three parts:
- frames with wheels;
- knife (ploughshare);
- rotating drum made of steel rods.
The knife is attached to the frame on hinges. He cuts the soil, which, together with the tubers, enters the drum. When the drum rotates, the soil lumps are broken and the soil spills down through the grate. The potatoes move to the end of the drum and fall onto the arable land.
The drum is connected to the tractor shaft through gears, chains and a gearbox, from where torque is transmitted to it. The wide knife cuts deep into the soil, which reduces crop losses to a minimum, and the passage of tubers through the drum cavity does not damage them. This unit justifies the cost and time of its production due to its high productivity.
Operating principle
Operating principle of a potato digger
Potato digger
This technique has approximately the same operating principles for different subtypes.
Note! Potato diggers can be used to harvest all tuber crops, not just potatoes: radishes, onions, beets and others.
Double-row diggers cut the soil using three ploughshare knives, grab a layer of soil from two rows with the tubers in it and feed it to the shaking section, where most of the adhering dirt and stones are shaken off. The potatoes themselves are laid out by special mechanisms back onto the field, where they are picked using other machines or manually.
Transport wheels allow you to change the depth of cultivation and control the same rise of the soil layer in both rows, which gives the entire structure increased maneuverability. The first stage of sifting occurs between the bars in a vertical elliptical elevator. The land that is not sifted out, along with tubers and greens, is poured into a cascade elevator, where additional separation takes place. After which the potatoes and tops are laid out on the field along the track where the tractor passed. To make both rows narrower, combs are installed on the sides of the elevators on double-row potato diggers.
Important! If the elevators are clogged with large stones or foreign objects, a signal from the locking mechanisms is heard, the operator must stop the machine and eliminate the cause of the blockage.
Which potato digger is better?
If you don’t want to spend money on buying a factory-made potato digger, you can make this unit yourself. For small areas, it is enough to make a simple fan digger. If potatoes are grown annually over large areas, not only for yourself, but also for sale, it is better to choose a screening or conveyor potato digger.
Mechanical devices for digging potatoes allow you to quickly harvest the crop and clear it from the ground. At the same time, with mechanized harvesting there will always be crop losses, since the steel ploughshare does not remove tubers from potato bushes that have grown to the sides. Potato diggers do not dig up tubers that are deep in the ground. This happens if the soil is too loose and fertile.
Main technical characteristics:
- Grip – 140 cm.
- Row spacing – 70 cm.
- Speed: transport – 12 km/h; working 2-6 km/h.
- Productivity – 0.3-0.6 ha/hour.
- Compatible with Belarus brand tractors (25 hp).
- Dimensions: 435x160x110 cm
- Weight 735 kg
The tasks of small agricultural farms will be performed by the single-row potato digger Bulba-1.
Features of operation of Z-609
A potato digger performs operations of digging and clearing root crops from the soil.
Piling - reduces the scattering of tubers, prevents them from getting into the tractor rut, lays vegetables on the cultivated field in a strip of +- 80 cm. You can complete the harvesting and transportation of the crop at another time.
Operation on dry soil can damage the equipment .
High soil moisture will cause soil to stick to the working parts of the machine, and a certain amount of tubers will be filled in.
Important!
Do you want your equipment to last a long time? You should:
- Turn only when the machine is in transport position.
- When turning to the right, the propeller shaft casing comes into contact with the hitch frame more than when turning to the left; the angle should not exceed 50 degrees.
- Elevators stretch under load. Having processed 10-15 hectares, it is necessary to shorten the front elevator by 8 cm, removing 1 rod and link from each side.
Tips: clear the field of tops and weeds or chop it with a topper. Lubricate rollers and shakers daily.
We sell ridge former cultivators for potatoes. You can order and buy a comb former here.
Review of the best models
Russian-made potato diggers are endowed with excellent technical characteristics and show good performance. Let's look at the most popular models.
"Scout"
This is a conveyor potato digger for high-quality pre-processing of vegetables.
Peculiarities:
- compatible with Scout mini-tractors, equipped with a three-point suspension system and a power take-off shaft;
- connection to models T-12, 15, 18, 24 and 25 is permissible, but using a drive belt of the appropriate class;
- adjustable knife depth up to 28 cm;
- power ratings - from 12 to 25 liters. With.;
- power take-off speed - 540 rpm;
- drive belt type - B2360, B25550 or B2600;
- travel speed - from 2 to 7 km/h.
The cost of attachments starts from 20,000 rubles.
KKM-3
This screening potato digger for connection to the MTZ-132N is designed for digging and laying vegetables on the soil surface.
The model provides adjustment of the depth of immersion of the teeth.
Peculiarities:
- productivity - 0.05-0.2 ha/h;
- speed - 1.1-2.1 km/h;
- soil grip depth - 20 cm;
- required drive - PC-3;
- cost - from 12,500 rubles.
The technique has proven itself well in working with wet and hard soils. At the same time, it is capable of loosening soil littered with stones up to 8-9 t/ha.
4UD-1
A potato digger for extracting vegetables from the soil and partially separating them from the ground, followed by laying them on the surface of the field.
Peculiarities:
- suitable for work in tandem with mini-tractors and tractors of the 0.6 t class with a power of more than 20 hp. With.;
- installation takes place on a rear three-point hitch using a PTO drive;
- pick-up depth - from 15 cm;
- speed - up to 6 km/h;
- productivity - up to 0.225 ha/h;
- type of construction - single-row.
The cost of the model starts from 1,800 rubles.
Bomet Z-655
The vibrating potato digger with rear discharge has a compact size (1.7 x 1.5 x 1.15 m), so it is used on small flat or hilly plots of land with moderately compacted and light soil.
Peculiarities:
- compatibility with any models of mini-tractors with a power of more than 15 hp. With.;
- power take-off speed - 540 rpm;
- soil capture depth - up to 20 cm;
- operating speed - 5 km/h.
Side loading allows you to place the harvested crop 50 cm from the main trench. This ensures that all tubers are lifted without any damage. The cost of the model is from 65,000 rubles.
Wirax
Single-row conveyor potato digger for any mini-tractors of traction class 0.9 with a power of 20-35 hp. With. Cultivates only loose soils without stones.
Peculiarities:
- soil gripping depth - up to 25 cm;
- operating speed - 8 km/h;
- ability to work on surfaces with a slope of up to 6°;
- equipped with two rubber-fabric conveyor belts made in Italy;
- cost - from 60,000 rubles.
KK-1
A single-row conveyor potato digger is suitable for connection to heavy walk-behind tractors and mini-tractors with a power of 18 hp or more. With.
Peculiarities:
- working width - 65 cm;
- digging depth - up to 25 cm;
- operating speed - 4 km/h;
- connects to the Salyut, Ugra, Neva equipment;
- cost - from 55,000 rubles.