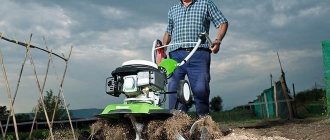
With the help of a walk-behind tractor, you can do a lot of different work if, in addition to the unit, you have the appropriate attachments. The main task of any walk-behind tractor is soil cultivation: plowing, hilling, possibly planting and digging up potatoes with a certain canopy. Plowing requires grousers for the cultivator. These are reliable assistants for every unit owner, and you can make lugs for a walk-behind tractor with your own hands within a few hours. Grousers are a fairly common attachment that allows you to increase the weight of the equipment and provide better traction of the walk-behind tractor with the soil.
general information
- By design, these devices are wheels with spikes. Today there are many different device transformations, and you should choose them wisely. To a large extent, the quality of work is determined by the weight of the unit. The most functional awnings can only be hung on heavy walk-behind tractors or medium-weight units. If the unit is of high quality and does not give the desired result, you need to additionally purchase wheels with lugs for it.
- Standard devices are metal wheels with spikes that dig into the ground and engage the walk-behind tractor with it. To make devices yourself, you will need to know their structure, which drawings and diagrams will greatly help with. You will need to determine the diameter of the canopy, select the material of manufacture, and, of course, select the necessary tools. The first thing you need is a welding machine and an angle grinder.
- First of all, we decide on the size of the devices. Their height and width depend on the tasks for which the hooks are mounted on the walk-behind tractor. You also need to take into account the requirements for the weight of the devices, because the wheels are put on with them to improve the traction of the walk-behind tractor with the ground. This requires wheels of considerable weight, which a walk-behind tractor may lack. The minimum weight of wheels is 20 kg. If necessary, weights are hung on the soil hooks. This is necessary to achieve better results, or is used when the weight does not reach the norm.
How to choose?
When choosing a suitable model, first of all you should pay attention to the brand of the walk-behind tractor.
For the Neva and Neva MB model range, variations with a 43-centimeter diameter, the depth of immersion of the spikes into the ground is 15 cm, are excellent. For Salyut brand walk-behind tractors, lugs with a half-meter diameter are needed, for which the depth of immersion in the soil will be at least 20 cm. For "Bison" you need tall products - 70 cm in diameter.
Only heavy walk-behind tractors do not require lugs; their mass guarantees them stable movement on almost any surface. But if you decide to improve the maneuverability of your heavy model of walk-behind tractor (weighing more than 0.2 tons), choose wide lug devices - 70 cm in diameter.
The choice of a suitable lug model also depends on the type of soil and the nature of the outer side of the products. Their surface can be designed in the form of spikes or arrows. When purchasing products, keep in mind that the low height of the spikes is not suitable for wet and loose soils - they are ineffective and are easily clogged with soil. Arrow-shaped hooks are the most popular and are considered universal.
When purchasing additional equipment for your unit, first consider options from the same manufacturer.
Pay attention to the cost - it depends on the manufacturer and modification
Making your own hooks
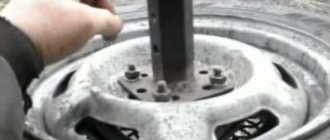
- The easiest way, perhaps, is to make lugs from unnecessary rims from car wheels. Using a welding machine, an axle shaft is attached to the disks, onto which bearings are then placed. Square metal plates are welded to car rims so that they touch the edges of the rim.
- Then the plates are bolted to the rim. Next, teeth are made - steel hooks that will go into the ground. For this purpose, you will need a steel plate, for example, a corner, which is cut into pieces by a grinder, and from these parts the same teeth are welded, which are made in the factory. The resulting hooks are placed on the wheel rim 15 cm from each other.
- Homemade hooks can be made from an old gas cylinder. Two disks are cut out of it for wheel rims, 5-7 cm wide and 30 cm high. Next, the same operations are performed as with car disks.
- To improve the performance of wheels with hooks, you can weld another tooth on top of each hook and lengthen the teeth to 60 cm. An axle is made: a metal plate is attached to one rim on which this axle will be placed.
- The lugs can be made from any round-shaped blank. The main thing is to choose the right width and diameter of the future wheel with hooks. The dimensions of the wheel are determined functionally, that is, based on the purpose of use on the walk-behind tractor.
For "Neva"
Each brand of walk-behind tractor has attachment options that are more suitable to its design than others. It is better, of course, to purchase a universal walk-behind tractor, for which almost all awnings are suitable. Wheels with lugs Ø 340×110 are produced for the Neva.
In design, these lugs are slightly larger than the homemade ones we described. You must follow the instructions above, but choose rims of other sizes. The height of the wheel to hook the Neva should be 340 mm, the width of the homemade device should be 110 mm.
For "Centaur"
The lugs for walk-behind tractors of this brand differ only in size. The dimensions that needed to be taken into account when converting old wheels into lugs for the Neva were described above. The same scheme is used for the manufacture of wheels with large hooks. The wheel height is selected 450 mm. The wheel width should be 110 mm, as for the Neva. Such hooks are suitable for the Centaur 2060 and 2090 walk-behind tractor and units with similar parameters. The factory version will cost about $30.
For "Bison"
The walk-behind tractor of this brand is a heavy professional equipment, and it can be equipped with the best available attachments. In order for the “Bison” to penetrate the ground perfectly, it needs lugs. The standard devices that fit it have a 200 mm tire and a height of 700 mm. Wheels of this width are only suitable for heavy walk-behind tractors and, in addition to the Zubr JRQ78 and 79, are also suitable for the Centaur 1070D, Aurora 101 and Aurora 81, Zirka LX1080D and 1090. In the factory version, the distance between the hooks is 14.5 cm. The wheel hub has a diameter of 60 mm. They are attached to the walk-behind tractor using an additional hub.
What are lugs used for?
One of the important attributes of walk-behind tractors is lugs and wheel weights.
The lugs penetrate deeply into the soil, preventing the machine from turning to the side, and the weights increase the weight of the wheels, which contributes to the coordinated operation of the units.
There are situations when it is not possible to buy factory goods. The question arises, how to make lugs for a walk-behind tractor with your own hands.
There are different types of lugs for motor cultivators. The lugs may consist of machine discs or used gas cylinders. The design is chosen by the owner depending on the available material.
Description and sizes of hooks
Heavy walk-behind tractors are most suitable for working on heavy soils and, accordingly, hooks with a larger width and height are more suitable for coupling the unit with virgin soil or very neglected soil. For highly complex work, weights are attached to the wheels.
The dimensions of the hooks vary between 310-700mm in height and 100-200mm in width. The Salyut walk-behind tractor is suitable for lugs of 500×100 mm and 500×200 mm. The latter are functional together with the plow. You can buy the same size with a sand-filled weighting agent so that the mounted plow plows the soil deeper. If you have 500x200 hooks, you can make the weight yourself. Wheels with hooks measuring 700x130 mm are put on the walk-behind tractor to work with hillers, flat cutters and potato diggers.
Lugs for "Zubr"
In addition to those described above, the heavy Zubr JRQ78 and 79 walk-behind tractor can easily accommodate 700×100 mm hooks. Their width is smaller, and, in addition to heavy ones, they can be used with medium-heavy walk-behind tractors.
The hooks for the Zubr will fit the Neva. Hooks of this size are in great demand , precisely due to better compatibility. Wheels 700×200 can only be put on heavy units, and they are intended for processing virgin soil. Wheels 700×100 are suitable for the average needs of a farmer; they can be safely stored and mounted on another walk-behind tractor when the existing one becomes outdated, even one with weaker power. 700x100 lugs will cost about $70.
Method 2: based on a used gas cylinder.
- We cut out 2 disks from the cylinder, 6–10 cm wide and 30 cm high, they will also be the rims.
- We install metal plates on the resulting rims.
- We attach the teeth to the plate (they must be at least 15 cm).
In principle, these are not the only ways to create such a canopy. This equipment can be made from absolutely any round-shaped metal. It is important to simply choose the correct width and diameter, stick to the diagram, and be able to use welding and a grinder.
Thanks to such attachments, your walk-behind tractor will become a full-fledged agricultural machine. It will cope with work on sites even more efficiently and will significantly increase its cross-country ability and functionality. A motor unit with such equipment will make your work easier on sites and will delight you with quality work done.
The simplest holds
To make it you need the following:
- Steel sheet 4-5mm thick for wheel rims.
- Steel sheet 6-8mm thick for hooks.
- Welding machine.
- Bulgarian.
- Drilling machine or powerful drill.
Two identical disks are cut from a thinner sheet. A hole is made in the center for the hub and mounting on the wheel studs. Saw-tooth projections 10 cm deep are cut along the outer edge. Triangular hooks with cut corners are cut out of a thick sheet. They are welded strictly perpendicular to the sawtooth cuts.
Despite their unsightly appearance , homemade hooks made using this method have a serious advantage - they are heavy enough to provide strong grip even on a muddy or loose surface. Moving on dirt roads is out of the question; such wheels are intended only for work in the field.
Another economical option is to make it from a Ø15mm steel circle. The steering wheel from the valve on the main gas pipeline can be used if a pair is found. The hooks are welded to the outer rim, and the hub is attached to the center.
For the next design you will need car wheels. This manufacturing option for a homemade walk-behind tractor is optimal. When designing, standard car wheel hubs are provided, and the entire set of four wheel rims is purchased. One pair is equipped with tires, and the second is needed for heavy soil.
A steel corner of 50-60 mm is taken and cut into pieces that are slightly wider than the disks. In the middle of one side, a triangular sector of 60° is cut out with a grinder.
The corner is heated with a gas burner and bent along the cutout. The joint can be slightly tacked by welding to provide additional rigidity. The resulting blanks are welded to the outer side of the disk, and an equal distance is maintained.
The assembly is repeated on the second disk, do not forget about the same distance between the corners. Now you can quickly replace rubber wheels with steel hooks, and there will be no problems with the seat, because the disks are the same.
The design of the wheel rims can be simplified. To do this, the horizontal part (rim) is cut off and steel plates are welded on. This option is suitable for frequent wheel changes on the same type of hub. Discs are selected accordingly.
The second option based on Zhiguli wheels
A complete set of disks will be needed, since tires can be placed on one pair and used for transportation on asphalt roads, and the second pair can be used as traditional lugs.
Sequencing:
- cut a steel corner with a side of 5-6 cm into pieces wider than the existing disks;
- In the center of one side, use a grinder to cut out a triangular area. It is this part that they will touch on the lug;
- Heat the corner with a burner and bend it slightly. Additionally, we tack by welding to strengthen the workpiece;
- We weld the spikes from the corners along the outer rim of the machine disk at equal intervals (a step of 15 cm would be optimal, directing the pointed part as the walk-behind tractor moves).
Similar operations are repeated for the second disk, as shown in the video.
Using our recommendations, you can make homemade lugs for any brand and model of walk-behind tractors: Agat, Salyut or Neva. The dimensional differences between the models of these cultivators are insignificant, so the lugs from the Neva MB-1 series are also suitable for later versions - MB-2, MB-21, etc., expanding the scope of their application.
Homemade hooks of complex design
Easy-to-manufacture lugs have characteristics that are far from perfect. Let's imagine a design that is not inferior in quality to factory products .
We will need:
- Steel sheet 4−5 mm for the central disk.
- Steel strip 50 mm wide and 4-5 mm thick for the external supporting surface. There will be six such hoops. The outer rings make the wheel stronger and heavier.
- Steel plate for hooks 8-10mm thick.
- Arc welding machine, drill or drilling machine, grinder.
Connections are made by electric welding, since a gas torch will not heat up metal of such thickness.
Since the diameter and width of the hooks are larger than the seating space for standard wheels, the axles are lengthened.
It is possible to adjust the track, which depends on the width of the rows on the field. By moving the wheels with hooks, you can set any width and position of the attachment. Each wheel weighs at least 10 kg, which means it provides strong grip on the ground.
Such wheels are not devices for loosening or plowing, although there is some soil cultivation. They cannot be used as a loosening cutter, since an independent support point is needed. If weighting the hooks is not required, the design can be made lighter and more openwork. These wheels perform well on “light”, pre-loosened soils. The discs are small in diameter, the rim is supported by an openwork structure with spokes made of profiled steel sheet. For hooks, the steel thickness should be no more than 8 mm. Each wheel is no heavier than 7 kg.
What third-party wheels are suitable for the Neva walk-behind tractor?
Wheels from Muscovites and Lada are best suited for installation on the Neva walk-behind tractor. There is no need to change anything in them, since their diameter is ideal for installation on a walk-behind tractor. They only need to be slightly modernized by welding.
Factory options will cost much more.
The main task when modernizing Zhiguli wheels is to make them heavier, since in the factory configuration they are very light.
Listed below are the main stages of manufacturing wheels for a walk-behind tractor from car tires:
- An axle shaft is installed inside the wheels;
- To make it easier to change wheels, square plates are installed on the axle and holes are made in them. And then the wheels from Zhiguei are attached to these plates;
- A cap is placed on the outside to protect against external factors;
- The tubes should be removed, and only the tires should be left (to improve the quality of traction, winter tires should be used).
Using tires from other cars is problematic because they have a larger diameter or width, so they need to be additionally adjusted using an axle extension or some other method, and this is not always possible for everyone.
To improve the lug-holding properties, some people additionally cover the wheels with a chain. When driving, the chain digs into the ground and provides additional traction. The effect of it is especially noticeable when driving after rain or snow.
The video demonstrates how to install Zhiguli wheels on a Neva walk-behind tractor:
Combined design
If the equipment is homemade and the soil is not too difficult, the wheels should be appropriate. You can make hooks using tractor protectors.
We take halves of wheel rims from a Zhiguli car . We choose tires with good tread from the tractor. We cut off the sides, we get a rubber closed ring with a good protector. We open the halves of the wheel rims and, after laying the tires, twist them firmly. With such lugs, you will be able to move along a compacted dirt road without fear of loosening it. On the soft soil of a plowed field, the wheels will not fail, but the traction force will be less than in the case of the metal version.
If it is necessary not only for the wheels to be grippy, but also to additionally loosen the soil in the rut, knife-type hooks are made. You can create a homemade rim to mount them or weld them to the rims. The only drawback of the blade design is that it does not allow you to move the walk-behind tractor in the usual way.
When loosening in spring together with traditional attachments, the width of the soil processed per pass will double, which will save a lot of time.
What gasoline is suitable for the Neva MB 2 walk-behind tractor
To ensure that the walk-behind tractor can operate without complaints for a long time, it is recommended to use high-quality fuel. 92 or 95 gasoline is poured here. Experts recommend periodically increasing the octane number if AI-92 is used, which allows you to clean the power plant from deposits.
The manufacturer recommends filling in high-octane gasoline no more than twice a season, provided that the walk-behind tractor is used on a regular basis. If this type of equipment is used less frequently, then you can limit yourself to filling 95 fuel once a season.
Important! You should not alternate fuel too often, and, in addition, change the place of purchase, since the content of impurities in the fuel may differ at different gas stations.
This type of special equipment, such as a walk-behind tractor, is very popular among amateur gardeners, as well as commercial agricultural companies. Currently, there are various models and manufacturers of such equipment, but the most popular is the manufacturer Neva and its model MB 2. This unit has proven itself well due to its unpretentiousness and ease of maintenance.
In addition, a whole host of attachments and auxiliary equipment is available for sale for this walk-behind tractor, which allows you to operate the device in all possible senses. However, despite the reliability and quality, in order for this device to serve for a long time, it is necessary to regularly service the equipment, as well as install only high-quality parts and consumables.
How to make snow chains for the wheels of a passenger car and crossover: 3 schemes
The draft version of the manual included a step-by-step description of the manufacture of three types of chains: ladder, honeycomb and diamond. The material turned out to be quite voluminous and we were struck by the idea of presenting the information in a compiled form. Considering that a number of operations in the manufacture of each of the three patterns are the same, you can roll out detailed instructions for one of the weaving technologies, and only make notes on the rest. They decided to take a “rhombus” as the basis, and describe the manufacturing process of the “ladder” and “honeycomb” on the basis of the “diamond”.
DIY "Rhombus"
The difficulty of making a homemade chain is that a number of simple things are unknown. For example, it is not clear how long each of the components of the future product should be; how long to make the same cable or chain located on the sides of the wheel... We suggest that all experiments be carried out in relation to a specific car. Then the percentage of errors is lower and the result is obvious.
- We lay out the chain on one side of the tire. This will help to roughly estimate the number of links included in each of the elements of the diamond-shaped pattern. For ease of marking, use rope and electrical tape. You can use a rope to tie the product along the contour of the side part, and with insulation you can wrap the outer links to be connected with a cable on the sides and rings in the middle.
- We make the mirror part of the resulting circuit. The snow chain conventionally consists of two parts: front and rear or left and right. In point No. 1 we designed the front part. To obtain the back one, it is necessary to mirror the already obtained section or, more simply, measure the same segment of the chain, marking the boundary connection points on it.
- We connect the resulting two halves together. The easiest way to do this is with jump rings. If these are not available, then you can use one of the chain links by disconnecting it. The reverse fixation of the link must be permanent, so welding is indispensable.
- Place the chain on the wheel.
- Measure the required length of the cables located on the sides of the tire. To calculate the exact footage, use a rope to tie the chain front and back.
- Place the turnbuckle eyelet on the front cable.
- Process the ends of both cables by putting thimbles on them and clamping them tightly with clamps.
- Try on the resulting structure again, tying the junction of the ends of the cables with a rope and using a lanyard.
- Replace the rope with a shuckle if the lanyard provides a secure hold, and the homemade version is ready for combat use.
Important! The lanyard must be tied diagonally.
Homemade "honeycomb"
Diamond shapes alternating with straight sections are made by analogy with a diamond-shaped snow chain. First, try on the outer part, which consists of half-diamonds and straight sections on the tire tread. If connecting rings are not used, the outer pattern will consist of a continuous piece of chain. The mirror part here is not solid - it includes small sections that, together with the upper semi-finished product, form a diamond-shaped structure.
The separation point is still located at the peripheral vertices of the diamond. If you want to use chain ties instead of cable ties, you need to stock up on 10 brackets, in three different configurations. In a budget option, the brackets can be replaced with bolts with large washers. And if you are pursuing the goal of creating an indestructible design based on Soviet snow chains, then replace the lanyard with a full-fledged square lock. From the photo it is clear that in design terms this solution is simple: two disks (aluminum can be used) are riveted together. On the same axes there are whiskers (only steel ones).
"Ladder" at home
We left the most traction performance, as they say, for a snack. For two reasons. The ladder is the easiest option for self-production and at the same time the least popular off-road weaving scheme according to known prerequisites.
During manufacturing, it is important to follow a number of rules. For example, it is customary to connect transverse sections here not with a cable, but with a chain. The fact is that the cable tie greatly complicates the installation, to the point that the wheel must be removed, and even lowered, otherwise there is no other way.
Otherwise, everything is extremely simple. It is enough to cut 13-15 equal pieces of chain, fasten them with a chain, make a lock or use a lanyard (again, only in the diagonal direction), and the device is ready for use.
Features of operation of the Neva MB 2 walk-behind tractor
When using a Neva walk-behind tractor, a number of nuances and points requiring attention should be taken into account, namely:
- you should find out in advance the working volumes, as well as how much oil is in the walk-behind tractor;
- clarify what kind of gasoline to fill, since the service life of the equipment depends on the quality of the fuel poured in;
- It is important to take into account maintenance periods;
- you should know when to perform a full comprehensive service;
- During operation, it is not recommended to be very zealous and keep the device running for a long time;
- immediately after purchase, it is necessary to carry out a run-in on unloaded special equipment so that all the parts get used to it;
- After maintenance, it is also not recommended to immediately load the equipment.
Don’t forget to prepare the walk-behind tractor in advance
You should also take into account the fact that you should not allow the device to operate on residual fuel, since over time, impurities accumulate in the tank, which can damage the engine and shorten its service life.
Important! This type of special equipment differs from other devices, therefore the maintenance stages are established not by mileage, but depending on the hours rolled, which is why the time of use should be carefully monitored.
Functions
The lug lugs are produced both as universal ones, suitable for all brands of walk-behind tractors, and as specially tailored for a specific model. Some manage to make such attachments on their own, using old disks from a car as a basis, however, the cost of such a unit turns out to be more expensive than if it were purchased ready-made. Lugs are necessary, first of all, to:
- improve the quality of traction of the walk-behind tractor with the soil on which you have to move;
- increasing the weight of the equipment, due to which it becomes more stable and can be used without fear on uneven surfaces, even when using other heavy attachments;
- The lug provides additional soil treatment;
- The walk-behind tractor can easily move uphill on soft soil.
It becomes clear that without such attachments, most standard tasks would become inaccessible to the walk-behind tractor. It is impossible to talk about the versatility of such equipment without lugs.
To make the walk-behind tractor as functional as possible, you need to purchase a model of attachment specifically for it. In this case, the unit becomes more productive and economical. Sometimes lugs that are made of light alloy are supplied for sale; their use on a light-weight walk-behind tractor is impractical, since the total weight should be above average. Higher quality, heavier ones cost the consumer more, but they fully perform the assigned tasks.
Universal wheels KUM 540 for hilling
These wheels differ from the 680 model in that the rim is not solid, but has only sides, and is hollow inside.
Plus, the spikes are not tilted to one side, but have a V-shape.
When the wheel moves, not only the spikes go deeper into the soil, but also the rim itself, due to this, deeper immersion into the ground occurs and traction properties improve.
- The diameter of the wheel at the outer studs is 54 cm, and at the hoop 46 cm.
- The width of KUM 540 is 9 cm.
Extensions must be purchased separately for them, since no fastenings are provided in the standard form, only holes for connection with a standard diameter of 10.5 mm. It leaves a rut with a diameter of 60 to 65 cm.
The weight of two lugs is approximately 13 kg.
Design of the Neva MB 2 walk-behind tractor
Like any other special equipment, a walk-behind tractor consists of a number of components that work together. Let's look at the main parts that make up this equipment:
- engine (due to this unit, torque is generated, which is transferred to the axle);
- transmission (this component allows you to determine the direction of application of torque, as well as the number of engine revolutions);
- gearbox (this unit allows you to evenly distribute torque to the driving parallel axis);
- transmission mechanisms (allow you to redirect torque from the engine to the gearbox and to the axle);
- wheelbase (the axle moves the device along the surface; there are two-wheel and four-wheel models);
- steering mechanism (due to this mechanism, it is possible to control a motor-cultivator or Neva walk-behind tractor).
In this case, the main components of the walk-behind tractor were considered, but its structure also contains a number of additional mechanisms and parts.
Important! In order for this soil cultivation device to work properly, it is necessary to constantly monitor the performance of the power units, as well as auxiliary mechanisms; in addition, maintenance (replacement of consumables) is carried out in a timely manner.
Homemade accessories for walk-behind tractors with your own hands: video, drawings, photos
The walk-behind tractor is an assistant in cultivating the soil, transporting goods, and harvesting crops. For these manipulations it must be equipped with additional attachments. But in the store they are expensive; a complete set is more expensive than the walk-behind tractor itself. Many craftsmen design and make homemade products for walk-behind tractors with their own hands. Articles, photos, and instructions from the Internet help with this.
Having the simplest skills in working with an angle grinder, a welding machine, or a drill, you can assemble useful homemade products from scrap materials and disused parts. Homemade structures are often made of stronger metal than purchased ones and last longer.
Homemade devices for walk-behind tractor
The necessary attachments on the farm include:
- land cultivators - plows, cutters, rippers;
- for crop care - hillers;
- rake;
- snow shovels;
- seeders, planting devices.
Rake for walk-behind tractor
Homemade rakes for a walk-behind tractor are used when preparing hay for livestock on a small farm. They are made by hand from narrow metal pipes and rods. To create a durable structure, the parts are assembled for welding.
Homemade rakes are foldable for easy transportation.
By designing the rake yourself, you can make the grip width at your discretion. The pick-up height of the rolls is adjustable. Rake rods are made for collecting hay or mown grass on the site. In the second case, both the width of the structure and the size of the teeth can be reduced.
Homemade crow's feet cutters for walk-behind tractor
Crow's feet cutters help to deeply loosen the soil and crush large clods of earth.
This device is a one-piece welded structure, so it is stronger and more durable than conventional walk-behind cultivators. The cutter qualitatively processes hard soil for sowing potatoes. It can be used to plow the ground under the snow.
The quality of plowing depends on the degree of sharpening of homemade cutters. The soil becomes lush and rises 5-10 cm if the edges of the flat cutters are sharp. They crush large and small roots, destroy harmful beetles and wireworms, and saturate the soil with oxygen.
Homemade “crow’s feet” for a standard input mount must be made with a diameter of 52 cm, a gripper of 1.25 m, and a number of beams of 30 pieces. Each beam is bolted to the coil.
Homemade plow
A homemade plow for plowing is easy to make even for a person with minimal skills in working with metal. Milling cutters are used to loosen already used soil. The plow is used to cultivate virgin soil and compacted hard soil. It has a greater margin of safety. The plow is expensive, not every summer resident can buy it, but you can try to make it yourself.
You will need a plate 4-5 mm thick and a pipe with a wall of the same thickness. The structure is attached to the frame. The main element of the device is a sharpened plate; it must be cut with a grinder in the shape of a blade. The ploughshare has the shape of an elongated flat trapezoid. We fix the pipe and assemble the structure completely. It is connected to the walk-behind tractor via a hitch.
In a separate article you can find a drawing of a plow for a walk-behind tractor.
Reversible plow
The plow of this design is a little more complicated. A rounded feather is attached to the top of the homemade product. Not only the land is plowed, but also the cut layer is dumped - when processing virgin soil, this is sometimes necessary. The complex structure of a reversible plow requires its manufacture by a professional craftsman who can calculate the exact parameters of each part.
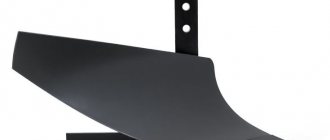
One of the varieties of such structures is the Zykov plow. To assemble it yourself, you will need a stand with which it clings to the walk-behind tractor, the plow body itself with the ploughshare, a board for support and a curved blade for turning over the layers. The plow moldboard is made of a pipe with a diameter of 50 cm.
Blade-shovel
A walk-behind tractor can be used to level land plots for the construction of utility structures. Like a bulldozer, it can clear sidewalks and paths of dirt and snowdrifts. To make a homemade blade, you need to take a metal sheet 2 mm thick.
For strength, plates of thicker metal are welded vertically inside the blade - they will not allow the rear wall of the blade to sag. You also need the lower part of the shovel; it is lined with tin so that the bottom does not get stuck in the ground or snow.
The bottom of the shovel is placed at a right angle to the lower base.
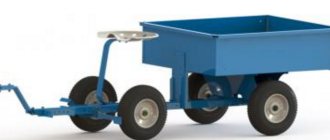
Homemade products for a walk-behind tractor can be made with your own hands from used materials.
To make a homemade shovel you will need a metal saw, a drill and a welding machine. A 200-liter steel barrel is suitable as a material. It must be cut along the height into 3 parts and the outer two of them welded together. The metal of the barrel is thick enough to make the device durable.
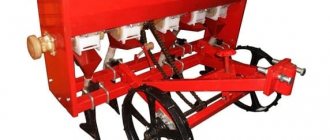
Potato planter
A very popular and indispensable piece of equipment in the garden is a homemade potato planter. It has a tuber expander with a hole at the bottom and disks for burying them in the ground. The rear wheel on the inside must be covered with a plate so that the planting material does not fall under the wheel of the walk-behind tractor. The entire structure is mounted on a steel frame. The depth of its fixation is adjustable.
The bunker can be made of plywood or galvanized thin sheet. A wooden box can be painted with waterproof paint. To prevent the tubers from being damaged, the inside of the bunker is lined with rubber.
You may be interested in a do-it-yourself harrow for a walk-behind tractor.
The planting device consists of a metal tube with a diameter of 10 cm, to which a furrow opener is attached. Its height, and hence the depth of the furrow, is regulated by the vertical movement of the structure.
The furrows are sealed with discs directed towards each other at an angle. They move due to bearings. The width of the row is changed by loosening the bolts of the stepladders and moving the disks. To ensure that there are no traces left on the ground from the planter wheels, the ground can be loosened with cultivation legs welded to the frame.
The seat of a homemade sower for a walk-behind tractor is attached to a metal base frame.
Disc hiller
From scrap materials, you can assemble a convenient device for hilling vegetable crops planted in rows with your own hands.
The main elements of a homemade hanger will be two metal pot lids or disks of the same size. Their diameter is at least 50 cm. The edges of the covers or metal disks must be sharpened like cutters.
These are the main details of the hiller. Flat lids are rounded inward using a hammer.
Read more in the article about homemade hillers for walk-behind tractors.
Disks that collect soil into a roller around the stems of potatoes or other crops are mounted on a metal frame. Small wheels are welded to the bottom of it for support. It is necessary to secure the disk rods movably so that you can adjust the angle of inclination of the processing surfaces.
Source: https://MoyMotoblok.ru/samodelki/samodelki-dlya-motobloka-svoimi-rukami/
The most effective
When choosing appropriate devices, most often, the models that are most effective are taken into account. In practice, this is only true for specific types of attachments. Let's take a closer look at what types of appropriate equipment you should choose for the full cultivation of arable land:
- here, most often, multi-component milling devices are used, which allow processing the soil in different directions;
- you can give preference to a plow with a harrow, since this equipment can simultaneously plow, loosen and cultivate the soil;
- In addition, homemade devices should be highlighted, since they allow you to use everything you need in one mechanism;
- Collapsible multifunctional component cutters and plows with harrows are also in demand.
Each individual case has its own nuances in the appropriate selection of structural elements, but an integral part of any type are special weighting agents that serve to weight the structure when immersed in the ground.
see also
Comments 34
Well done, I respect you.
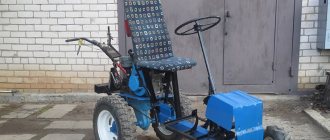
I put my “animal” in Oka’s wheels, and it seems like nothing – it’s crawling. What is the diameter of the axle tubes and what kind of tire (size) is the tire?
diameter is 30 for pipes, and banana is 14
The weight needs to be placed on the wheels themselves, if you attach a load from the front, the load on the gearbox, the hubs are weak, our walk-behind tractor cut off the fingers, and then they will just slip there in the extensions.
there will be no slipping, everything is compressed and there is a locking pin
I drilled roofing screws into the original wheels, yesterday I passed a test drive successfully, with a shovel width of 1.2m the snow pushes and does not slip)
I don’t understand what’s wrong with the standard wheels?
on bananas the speed will increase and it will be softer, I’m interested in trying different things
I don’t understand what’s wrong with the standard wheels?
This is a special racing walk-behind tractor, and slicks provide better grip on asphalt) in America, rednecks embroider on tractors, but here the scale is a little smaller)
Overrunning clutches would go there. It will be difficult to unfold. Or Neva can split axle shafts (I don’t remember).
Then it’s easier. Doesn't the blade break on the gussets?
there is not much snow yet, the scarves should not break
There is no gusset, but the pipes will twist. Mine twisted the 50 by catching a shovel on a frozen stone (metal wheels with lugs).
in what place do you think?
Vertical pipe. Bolt fastening is also not the most reliable.
Why is it not reliable, I drilled the pipe, the pipe is thick-walled
If you finished it, that’s a different matter. Usually a bolt with a nut for adjustment. And the bolt cannot clamp the pipe - it twists it at once. By the way, 57*7 and twisted (I made them like stockings, apparently not enough).
Overrunning clutches would go there. It will be difficult to unfold. Or Neva can split axle shafts (I don’t remember).
MB 2 can disconnect axes
Already discussed with the owner
The wheels won't go into the axle boxes? The weight is small for clearing deep snow...
there will be lugs for snow
what kind of crap is that from a jack? For what?
This is not crap, but a useful tool, it lifts the walk-behind tractor from the front, it’s easy to change wheels
Yesterday my father and I installed a UAZ. It’s harmful to ride on these, they’re dragging a plow or digging a cardboard, the height is just right.
Bananas are purely for drifting, taking the girls for a ride, blowing out the pots with the breeze, but otherwise, on a tractor... WELL DONE!
the original wheels seem to be standing backwards)))) and it’s so cool, what’s the reason for the extra wheels? Is the bolt pattern correct?
Toyota wheels, new hubs machined
if you disassemble the cultivator, then there is a drill bit just for the VAZ wheels, and since there are 3 cultivators on each side, you can put 3 wheels))) it runs very well on soft ground, even the plow pulls instagram.com/p/2QWzNkNxrL/
There are five holes on the axle shafts, I don’t know how the VAZ wheels fit there without drilling new holes, but the Moskichev wheels fit perfectly in the old holes.
no no no... not wheeled but from cultivators...
It's clear. This is how my Moskvich ones are. aa.d-cd.net/6058a6cs-960.jpg
and I disassembled the cultivators just to sharpen them and tap them out, otherwise they became dull and bent, so I tried them on the VAZ wheel, it fit properly, so I screwed them on.