Literally everyone in villages grows vegetables and fruits.
Farming brings not only good harvests for food, but also additional income. However, owners of large plots of land know how difficult it is to cultivate it before planting crops, how difficult it is to care for a large number of plants, harvest and transport it. We live in an age of progress, when technology takes over almost any human labor. Mini tractors are agricultural equipment that is necessary for plowing land, planting crops, caring for growing plants, controlling pests and weeds, and for transporting a wide variety of cargo. There is a large selection of such foreign and Russian-made units on sale, but the cost is quite high and not everyone can afford it. Craftsmen often make mini tractors with their own hands. In this article we will talk about how to make a cabin for a mini tractor.
Necessary components for making a cabin
Working on your own land is useful and pleasant. Over its history, humanity has accumulated many technical developments to help the agricultural sector. The more complex of them (cars, tractors, combines, etc.) have long been put into mass production in factories. But many devices can be made yourself at home. An example would be a cabin for a mini tractor, assembled with your own hands.
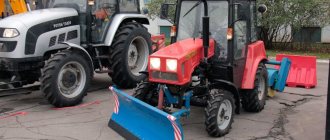
It is known that a lightweight version of a mini tractor without a cabin is the most popular production option. You can also buy a comfortable separate cabin on the market. But, with minimal expenditure of resources, you can make a cabin for a mini tractor with your own hands, and for any known models: DTZ, T-25 (Russia), Xingtai, Jimna, Dong Feng (China).
The homemade cabin is similar in design and quality to the industrial version. To make it you need the following elements:
- steel corners for the frame;
- sheet of steel for the roof;
- window;
- doors;
- glass.
You will also need a number of smaller parts:
- locks;
- steel curtains;
- wipers;
- wiring;
- lights (front and rear);
- electrical appliances;
- rear view mirrors.
Depending on what requirements are set to improve driver comfort, the following can be used:
- thermal insulation materials;
- internal foam lining;
- insulation (usually leatherette);
- fan;
- auto stove, etc.
Making a cabin for a mini tractor with your own hands is a process carried out under certain conditions. It is recommended to carry out all work in a closed workshop. The main tools you will need:
- machines for drilling, grinding and turning;
- welding machine;
- tools for applying paint and varnish.
In order for the cabin manufacturing process to proceed quickly and efficiently, it is advisable to use drawings or photographs of finished samples at all stages of work.
This is interesting: The principle of operation of a garden composter
Do-it-yourself homemade milling cutter for a mini tractor. The device of the cutter and the tasks for its manufacture
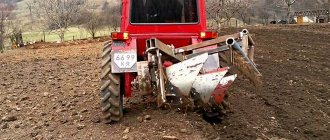
The rotary cutter is an attachment that is efficient and multifunctional. The rotary cutter can work as a plow, a cultivator, and a harrow. The rototiller for a minitractor is started in this way: when the engine is turned on, torque is supplied to the cutter gearbox shaft. The gearbox, on the shaft of which there is a drum with cutting blades, transmits rotation to them. A tiller for a mini tractor is indispensable in private households.
An active cutter for a walk-behind tractor is a complex assembly unit consisting of a rotating shaft to which sharp and curved blades are welded. When moving, the motorized cultivator rotates the drum with cutters and they, in contact with the soil, penetrate deeper and turn it over. Such actions are performed manually with a shovel when plowing the ground. A homemade cutter for a walk-behind tractor is best made with a gripper with a minimum width of 800 mm and a maximum width of 1400 mm. These parameters are quite sufficient to process your own plot.
Despite the fact that there is a large selection of similar tools for tillage on sale, a homemade cutter for a walk-behind tractor, made by yourself, will always meet the requirements and wishes of the user laid down in it. How to make a cutter? In this case, you can use one of 2 options:
- place an order to a specialist;
- do the work yourself.
The first option is the simplest, but it will cost a lot of money. A homemade milling cutter for a mini tractor can be made with skillful hands. This work will require sufficient time and concentration of effort. But later everything will more than pay off. What do you need to do to make a cutter with your own hands? Before you start making homemade cutters, you should familiarize yourself with their structure and design and take into account their features. A homemade milling cutter for a tractor can be made with saber-shaped knives or with knives called “crow’s feet”. Saber cutters for mini tractors are more common and differ from the second type in that they have collapsible connections. Further explanations on manufacturing will concern only them.
To make cutters for a walk-behind tractor with your own hands, you should decide on the following tasks:
- make working drawings and calculate all the dimensions of the cutter for the walk-behind tractor with your own hands;
- manufacture structural parts;
- assemble the shaft;
- secure it to the supporting frame.
After determining the tasks, you can begin work on making a cutter for a walk-behind tractor with your own hands.
Choosing an engine for a homemade tractor
If you decide to assemble a mini tractor with your own hands, then first of all you need to select a power unit for it. The ZID engine is often used as the latter. This is a four-stroke unit with a volume of 0.52 liters. and a power of 4.5 l/s, which is quite suitable for cultivating 2-3 hectares of land. The engine is easy to maintain, so it is often installed on various home-made equipment; moreover, it is easy to buy on the Internet.
Another option for homemade products is the UD-25 engine. This is a two-cylinder unit with a power of about 12 l/s and a volume of 0.42 l. Although this type of motor has long been discontinued, there are a large number of offers on the Internet for the sale of this unit. It can be bought for approximately 5,000 – 8,000 rubles.
Often, when making homemade tractors, craftsmen use motors from cars. For example, you can find mini tractors with an Oka engine.
This engine has a power of 29.3 l/s and a volume of 0.649 l. In fact, this is a VAZ engine (VAZ 21083), only in a lightweight version, since it weighs 2 times less. A distinctive feature of the Oka engine is its low gasoline consumption and high efficiency.
A more expensive option is a Zhiguli engine. The engines of the VAZ car line have an engine power of 59 l/s (VAZ 2101) and higher. A tractor with a VAZ engine is a fairly powerful unit that can cope with almost any agricultural work.
It is easiest for owners of walk-behind tractors to make a mini tractor for the household, since this unit already has all the necessary control units. All that remains is to make a suitable frame, and the tractor is ready.
Homemade mini tractor at home
For the private sector, a tractor is more than necessary. Bags of agricultural products, harvested hay, the same building materials - all this needs to be moved somehow. You can’t apply it by hand, but a small iron “helper” is just right.
There are two ways to get a mini tractor for your yard: either buy it if you have enough money and the worries are not for you, or assemble an “iron horse” from scrap materials. As practical people, we won’t consider the purchase, but we’ll take a look at one of the options for self-assembling a tractor.
As the starting material for the future vehicle, let’s take the “people’s” LuAZ car somewhere in a landfill. Or we'll buy it from a neighbor.
What do we need from all this pile of scrap metal? We leave: — gearbox; — bridges; - electrician; — wheel reducers; — steering mechanism, and don’t forget the steering wheel.
We sell the rest for scrap metal, receiving a double benefit - we’ll earn money and get rid of the trash.
Now we need to solve the issue with the engine. As an option, we buy Sadko DE-300 from a walk-behind tractor plus wheels (4 pieces 6×12).
Our engine speed is “good”, but somewhat too high for a tractor. This is not a racing car. Therefore, we reduce them by 3.5 times by installing the appropriate pulleys.
The transmission of torque from the engine to the gearbox can be organized using a profile B belt. It is better to install two at once.
What to make a frame from
Assembling a mini tractor always begins with making the frame. The frame of the mini tractor acts as a base on which all components and parts of this unit are fixed. The frame should be strong enough and at the same time not very heavy. It is usually made from a metal angle, a profile pipe or a channel. The parts are connected by welding. The frame can be solid or consist of two parts.
A solid frame is the easiest to make. It is enough to weld a rectangle from a channel or corner. Frame dimensions are calculated based on the dimensions of the engine, gearbox and other components.
Also among owners of personal plots, 4x4 mini tractors are very popular. These are all-wheel drive mini tractors with a breakable frame. The word “all-wheel drive” means that the unit has both drive axles, front and rear. An example of such a frame, made from channel No. 10, is shown in the following photo.
The frame fracture unit is most often made from the driveshaft of a car, for example, from a GAZ-52.
The main advantage of a homemade tractor with a breakable frame is the small turning radius of the unit. Thanks to its high maneuverability, the fracture minitractor is successfully used in small areas where turning a minitractor with a solid frame would be difficult.
Below are drawings of a frame connected by a hinge.
Tools and consumables:
- 1. Bulgarian
- 2. Cut-off grinding wheels
- 3. Welding machine and electrodes
- 4. Drill
- 5. Drill set
- 6. Round and flat file
- 7. Rivet gun with rivets
Below is a detailed photo report on the production of a homemade mini car.
It was not by chance that I started creating my car by selecting an engine. I had a motorcycle sidecar and I wanted to install the engine so that it was hidden behind the sidecar body. I also really wanted the car to look like a real car, to have a gearbox and reverse gear. As an engine, I decided to use the engine from a Ural chainsaw; it is compact, powerful (5 hp), has forced cooling and a centrifugal clutch, which was not superfluous for me. I took the gearbox from a heavy motorcycle M-72 or Dnepr, MT-10, etc. The box has 4 gears and one reverse.
In order to connect the engine and gearbox, I took half of the crankcase (from the gearbox side) of the engine, and made a groove in it for the protrusion on the crankcase so that it fits tightly with the engine.
Next, we take the checkpoint and cut out a template along the contour of the cardboard box. In the template we mark the holes through which the box is connected to the engine, and cut out the template.
Now we place the template on a 5 mm piece of metal and trace it, marking all the holes. Next, we cut out the metal along the marked outline and drill holes.
We screw the plate to the box.
Now we select an oil seal with an outer diameter for the hole in the crankcase, and an inner diameter for the diameter of the gearbox input shaft. We put the oil seal on the shaft and place the crankcase on it.
We transfer the crankcase holes to the plate, drill it to the diameter of the bolts and connect the plate to the crankcase with bolts.
Next you need to disassemble the chainsaw gearbox and pull out the shaft on which the clutch cup is attached. We cut the shaft along the gear.
This piece of shaft must be welded to the gearbox input shaft. In order to align everything evenly, I cut out a piece of paronite 1 mm thick and insert it into the middle of the box shaft, and into it the shaft from the gearbox.
After checking the alignment, I scald the shaft around the perimeter.
We screw the plate with the crankcase to the gearbox, and place the clutch plate on the shaft, clamping it with a nut.
Now let's start making the frame. For the frame I bought a profile pipe 50x30x2 mm. I adjusted the length of the frame to the stroller so that it would not protrude too much. To make it clearer to you what the dimensions are, I made a drawing.
From a 40x40x4 mm corner I cut out a mount for the rear axle bearings and drill holes in it for the bolts. Housing bearings of the UCP206 standard for the rear axle with a diameter of 30 mm.
From a 100 mm channel I make brackets to which the turning pins will be attached.
The rotating axle is welded from the shaft and axis at an angle of 10°, for greater controllability and stability of the machine.
Front wheels from a garden wheelbarrow with a diameter of 300 mm.
The front wheel hubs are machined from a car pump housing. I won’t say exactly which car it came from because I found these bodies at a scrap metal reception site.
The brake drum was taken from the front wheel of a Minsk motorcycle. It was ground down on the outside and a groove was made for the washer.
At first I installed a sprocket from a Chinese moped with 428 pitch and 41 teeth, but then I changed it to a homemade one because there wasn’t enough traction. The drive sprocket from the same moped with a pitch of 428 by 15 teeth is machined and welded to the gearbox fork.
The body of my car will be an old cradle from a Java motorcycle sidecar. And now is the time to install it on the frame. The cradle is assembled from two parts and connected in the middle. I divided it and put the lower part on the frame.
The homemade product reaches a maximum speed of about 60 km/h.
In conclusion, I want to say, if you have a child and have a desire, do something like this together. In my childhood, my dad made me and my brother a three-wheeled velomobile, and you can’t even imagine how much joy, positive emotions and impressions there were from such equipment. Many years have passed, but the memories remain for a lifetime. Believe me, if you do something like this, your child will never forget it either.
Video testing a homemade mini machine:
Share this business idea on social media. networks
Technical specifications
Factory manufacturers almost always supply open mini tractors in a lightweight version with attachments. The vehicle is self-propelled, economical, maneuverable, and has:
- grip (good on any surface);
- rear wheels (deep tread improves cross-country ability);
- power steering;
- lights (front/rear);
- protective guards (on wheels).
The engine is available with one or two cylinders, and can be mounted on wheels or on tracks. Adverse weather conditions may not allow excavation work to be carried out on a machine so equipped.
Pros of installing hydraulics
Hydraulics are installed on a minitractor in order to ensure the operation of some of its mechanisms and facilitate the control of this unit. A unit with installed hydraulics has its advantages.
- The car becomes easy to control. The steering wheel can be turned with virtually no effort, with one hand.
- Hydraulics makes it possible to use various attachments.
- The use of hydraulics allows you to modernize the brake system. Thanks to the hydraulic cylinders installed on the unit, the unit brakes instantly.
You can make hydraulics on a mini tractor if you purchase a ready-made system in advance in a store or use parts from old agricultural machinery.
Important! When installing hydraulics on a mini tractor, it should be taken into account that some of the engine power will be spent on servicing this unit. Therefore, for tractors with low-power engines, installing hydraulics will not bring any benefit.
This is interesting: Review of the largest tractors in the world
Design and comfort
To install this part of the structure, it is necessary to make a solid base from corners welded vertically to the frame. A homemade mini tractor with an Oka engine is most often made without springs, so the shocks when moving will be very noticeable.
Working or moving in the dark will require the installation of lighting devices, i.e. installation of electrical wiring and headlights. When using a tractor on a summer cottage, this is not necessary, but can be used to decorate an agricultural machine.
An old Oka in good technical condition can be adapted as a draft force by cutting off part of the body at the back and equipping it with attachments. But the emergency vehicle will have to be used in parts, creating a completely new mechanism on its basis.
Why do you need a PTO?
The power take-off shaft (PTO) is designed to drive various agricultural machinery connected to a mini tractor, for example, various tillers for tillage, potato diggers, mowers, snow blowers, etc.
PTO can be either dependent or independent. In the first case, the shaft is driven by a transmission that transmits rotational motion to the wheels. As soon as the wheels stop, the PTO stops rotating. The independent PTO receives rotation from the engine crankshaft. Therefore, the higher the engine speed, the faster the shaft rotates.
In addition, there are tractors with a synchronous PTO. The rotation speed of the synchronous shaft directly depends on the transmission ratio of the moving tractor. Synchronization of movement and rotation is required when the unit operates with sowing equipment.
Manufacturing a three-point hitch
The hitch is used to connect additional equipment, such as a plow, to the tractor.
The hitch must be movable both in the horizontal and vertical planes . In the first case, mobility helps to reduce the overhang of the nozzle when taxiing. Vertical movement of the suspension is required to lower the equipment into a working position or raise it into a transport position.
The hitch on a mini tractor is made from various parts removed from old agricultural machinery. It is quite difficult to describe how to make a three-point hitch at home. Therefore, it would be more correct to use the following video, which shows the dimensions of all parts of the device.
Personal improvement
A homemade cabin for a mini tractor with your own hands was invented by craftsmen for simplicity and convenience. It is difficult to “invent” it without additional technical assembly diagrams.
A self-made cabin for a mini tractor requires visual material. The drawings will tell you how to make a cabin for a mini tractor. You will need a lot of large elements and smaller parts for its manufacture:
- steel sheet (for the roof);
- iron corners (under the frame);
- iron (doors);
- glass (windows);
- mirrors (rear/front view);
- wipers/electrical appliances/wiring;
- lanterns
If the driver’s task is to work in the cab year-round, for example, to clear snow in winter, additional equipment is needed:
- thermal insulation;
- insulation (leatherette);
- auto stove;
- foam lining (inside);
Homemade plow for a mini tractor with your own hands. Which design should you choose?
Do-it-yourself moldboard plow.
Plow designs are varied and depend on the types of soil being cultivated and the types of work being performed. The following modifications are distinguished:
- Ploughshares - have a working tool in the form of wedges, with the help of which the soil layer is cut, moved and painted. Used on mini tractors and walk-behind tractors in small farms.
- Disc - used on hard and heavy soils for preliminary plowing. Freely rotating knives in the form of metal disks cut the top layer, and the dump elements located further down turn the layer over.
- Rotary - a modern model of a plow, where several working knives are mounted on a movable shaft. This design provides high performance, but is difficult to manufacture independently.
The most common option is a homemade double-furrow plow with working tools in the form of ploughshares and moldboards. This model has been tested by time and the experience of numerous farmers. Such structures are often complemented by skimmers that cut off the top turf layer of soil.
Steering installation
Making a steering mechanism yourself is quite difficult, and in principle there is no point, since all the parts can be taken from any passenger car.
The following is a diagram that shows how the standard steering control installed on most self-propelled vehicles works.
When installing the steering mechanism, the steering shaft with gear is connected to the steering bipods, which are located on the steering knuckles mounted on the front beam (the manufacture of the beam was discussed above).
Shower doors
If the cabin is rectangular, everything is solved more or less simply: the rectangle can be cut out of glass in the workshop. There are many canopies for glass doors, you can choose the one that is more convenient for your case. Just order doors with canopies: you will have to drill holes for them, and it is best to try them on.
It is advisable to take tempered glass. Even if it breaks, it will be into small fragments with blunt edges that are difficult to injure. But, most likely, the fragments will remain hanging on the film. The downside of this glass is that it is expensive. To save money, you can order a regular thick one - 5-6 mm, and at home cover it on both sides with a translucent polymer film. You will have to tinker, but the effect will be almost the same as with tempered glass: the fragments will be on the film.
The simplest, but most expensive option is to install glass doors in a homemade shower stall
One point: the glass is washed before applying the film, then degreased. The film is glued to wet glass. This makes it easier to expel air bubbles, and you can also move the film for a while.
If you don’t want glass doors, but need translucent ones, you can make them from polycarbonate, but not cellular, but sheet. You will have to find a suitable furniture profile, make a frame out of it, and put polycarbonate into the frame with sealant. For reliability, you can also attach it through with screws and washers.
Another option is to buy ready-made doors. There are also glass ones specifically for cabins, or you can use plastic folding “accordion” ones, as in the video.
The nuances of making a caterpillar tractor
Homemade tracked mini tractors are a technique whose main feature is high maneuverability and good cross-country ability. Also, a tractor on tracks creates minimal pressure on the soil, which cannot be said about its wheeled counterpart.
To make a mini tractor on caterpillar tracks, you will need the following structural elements.
- Frame. It is made from a profile pipe or channel.
- Engine. For a caterpillar mini tractor, it is better to use a diesel engine.
- Main bridge. As in the manufacture of a wheeled tractor, for a tracked unit you can also use a ready-made axle from an old car, which should be shortened.
- Transmission. The ideal option would be a box from GAZ-53.
- Clutch. A clutch block from a GAZ-52 will do.
- Caterpillars. They are made from tires from the wheels of large equipment, for example, from a tractor.
To make tracks, you need to take 2 tractor tires and cut off the side parts of them. These tires are then put on the wheels mounted on the frame, as shown in the following photo.
In order for the tractor to turn, a differential must be installed on the rear axle, which will disconnect the right or left wheel from the drive. Also, each wheel must be equipped with a brake that can be controlled separately. When you press the brake pedal and shift the differential, one wheel of the drive axle stops, while the opposite wheel continues to rotate. Due to this, the tractor turns in the desired direction.
Front and rear axles
These units are created from individual spare parts and units removed from cars or even trucks or other agricultural equipment. However, you will have to do some details, as well as the assembly itself, yourself.
To make a front axle, you will need:
- cross beam;
- bushings for supporting rotary axles;
- axle bushings;
- the axles of the wheels;
- bearings (ball and roller);
- bolted connections.
A piece of profiled pipe or metal corner will do the job perfectly as a cross beam. For the manufacture of axle shaft bushings, structural steel 45 is suitable. The rotating support bushings are made of profiled pipe, modified for the installation of bearings, and are closed with steel covers made of steel grade St3. The front axle assembly, consisting of a cylindrical race and roller bearings, is welded in the center of the cross member. Using large bolts, the bridge must be secured to the bushings in the cross member of the frame.
The rear axle is assembled in the same way. The finished design can be borrowed, say, from a UAZ car. The long stocking of such a bridge will need to be shortened so that standard short axle shafts can be used. It wouldn’t hurt to protect the rear axle, or rather its welded joints, from possible impacts during operation. For this purpose, a support is used - a metal corner placed along the welds of the prefabricated bridge structure.
Which technique should you prefer?
Russian-made equipment provides comfort and efficiency in agricultural work. There are examples of good, strong models for the agricultural sector. It's hard to say which is better. After all, competition and growing production requirements force manufacturers to improve and “simplify” the management principles of their “brainchildren”. For example, consider the Uralets - a multifunctional unit that performs:
- mowing grass;
- clearing the garden area;
- loosening/irrigating/weeding between rows;
- plowing the soil;
- sowing;
- viticulture.
Depending on the technical data, the track width, ability to develop speed (several gearboxes), endurance (powerful engine, water cooling), and maneuvering will vary. Loose soil, fertilizers of various kinds, transportation of small livestock (availability of a trailer) are the possibilities for using this machine.
Convertible is another leading “argument” of mechanization to help those who love the versatility of the tractor, ease of use, who are demanding of saving costs and preserving their free time. It will appeal to utility workers, gardeners, vegetable growers, foresters, builders, and winegrowers. high due to indicators. They allow you to work at any hour of the day convenient for a person:
- dashboard (backlight);
- noise level (reduced);
- hydraulic pump;
- canopy system (three-point);
- speed range (wide);
- replaceable elements (filtration, buckets, branch choppers, forks).
One of the conditions is fuel consumption, which is reduced. Huge wheels provide high cross-country ability of this partly “SUV”. The owners of their plots of land need “friends” who do not let them down in the hot season - in autumn and spring.
Mechanical cultivators and walk-behind tractors are adapted to the most difficult operations in the field, in the forest, in swampy areas, for urban and industrial needs. Compliance with the technical inspection schedule (detection of mechanical damage, replacement of engine oil, parts that have become unusable), timely analysis of the engine, and cleaning of the metal surface from rust will give confidence in the performance of the “iron” colleague and will extend the “years” of its life.
Main stages of work execution
The duration of cabin production is reduced by purchasing factory doors, glass, and seals for them. Door and window locks, handles, fasteners, mirrors can be purchased at the store. Do not be afraid of the Chinese manufacturer, since together with the Russian one they are implementing new technologies with the help of Japanese, German and American specialists.
The Chinese mini tractor is equipped with a small engine of up to 1.5 liters running on gasoline or diesel fuel. The buyer receives a warranty for 1 year or 500 operating hours. An important characteristic is the cost of mini-units from Chinese manufacturers, which is lower when compared with Russian or European manufacturers. It should be said that the market sector of the economy represents 40 types of attachments for mini-tractors made in China.
The Chinese mini-tractor has a special design, so you only need to buy side windows, and use the windshield from the MTZ-80 small cab as the front and rear windows. If you buy the entire set of glasses, the cab will be too high, which will subsequently affect the stability of the tractor.
When working on the drawing, it is necessary to provide that the distance from the driver’s head to the ceiling should be at least 15 cm. The size of the frame is determined by the size of the GOST glass and seal. The size of the door determines the height of the frame.
The progress of all further work can be described as follows:
- Preparatory work before assembling the cabin;
- Welding work for the manufacture of the frame;
- Roof fastening;
- Welding the frame mounting bosses onto the tractor frame
- Application of paint, varnish, anti-corrosion treatment of the frame;
- Installation of glass and seals;
- Installation of door and window locks;
- Assembly of all manufactured elements (we get a whole cabin);
- Attaching the cab to the tractor frame.
Since the climate is changing and weather conditions cannot be predicted, the mini tractor cabin is made in such a way that you can work in it all year round, including the winter period. An automatic oven is used for this. It is connected to the cooling system and subsequently installed in the cabin. You need to connect a fan to the toggle switch. This heating system has one drawback - the tap is mounted under the hood.
If you have a “simple” homemade cabin for a mini tractor, you can make a “winter version”. Then, for practicality, everything is made removable and collapsible. The material can be used from garage supplies.
Stages of manufacturing a mini-unit from Oka
A homemade mini tractor is assembled from key components:
Frame. You need two spars (right, left) and two traverses (rear, front). To make the spars, you need channels No. 10, and traverses - No. 12 and No. 16. A metal beam is needed for the transverse beam; Motor
It is important to consider power and torque figures. The best option is a four-cylinder diesel engine with a power of 40 liters
With. and an air cooling system. For a 4*4 unit, the transmission gear ratio increases; Bridge. Does not need modernization. It is attached to the frame with four stepladders. You can use the driveshaft of almost any machine; Transmission. The gearbox is mounted on the frame. To synchronize its clutch with the motor, a new basket is made using a welding machine. The rear plane of the engine flywheel is shortened and a hole is made in the center; Steering. Hydraulics require an oil pump responsible for pressure. It should be located at the drive shaft. The optimal solution is that each wheel of the drive shaft is controlled by a gearbox. The steering system from Oka is fully suitable for the redesigned design; Wheels. The diameter of the wheels is determined depending on the purpose of the unit used. If the equipment will be used to transport goods, the radius of the wheels should be between 13-16 inches. To perform agricultural work, you need wheels with a radius of 18-24 inches.
A fracture with the Oka internal combustion engine is made according to a certain scheme:
- The frame is being made. A standard rectangular structure should be obtained from a channel or sheet iron. It is reinforced with metal corners welded vertically. You can take the UAZ fist by the inter-frame hinge;
- The front and rear axles are soldered to the key parts of the Oka car. A homemade mini-unit is often springless, so the shocks when moving are very noticeable;
- The motor is installed. The power of the half engine is enough to perform standard work with a mini tractor. Cross-country ability can be improved by increasing the wheel clearance. It is necessary to develop a scheme for fastening the mechanism for coupling with attachments. The front and rear side members are strengthened. More powerful engines, for example, from UD 2, allow you not only to process areas, but also to transport cargo;
- The clutch consists of double-V belts, from which rotation is transmitted to the pulley. The latter is fixed on the gearbox shaft. The gearbox also comes from Oka. When mounted, it is turned towards the operator;
- The steering system is installed;
- The fuel tank and brake system are installed;
- The unit is provided with lighting. Lighting fixtures include necessary electrical wiring and lights. If they are available, a small-sized tractor can be used at night;
- The operator's seat is installed. Vibration loads are reduced and operating time is increased thanks to the installation of soft springs under the chair.
Oka's old car can be used as a draft vehicle. The rear part of the body is trimmed to allow attachment of attachments. If the power of the equipment allows, then the list of canopies can be very wide, including one for a mini tractor.
You can make a mini tractor from the Oka in disrepair using the working components and systems of the car. In this case, a completely new mechanism is created. Its advantage is the ability to customize the tractor for yourself. A small-sized tractor from the manufacturer cannot boast of this feature.
The proposed video will simplify the process of manufacturing new equipment.
Cabin structure
A homemade cabin for a mini tractor creates comfort and convenience for workers - with minimal labor and materials, working conditions change dramatically, allowing you to work according to the planned schedule in almost any weather. This applies to any models of mini equipment, including the popular DTZ, T-25 (Russia), Xingtai, Jimna, Dong Feng (China) and others. Largely repeating the design used on production vehicles, homemade cabins are practically no different from them in quality if they are made by professionals under appropriate conditions.
The main components of the future cabin are:
- Durable steel frame made of bent and welded corners No. 45-22;
- Roof made of sheet steel or composite materials;
- Windows and doors mounted on steel curtains, with locks, gas shock absorbers for the rear window;
- Glazing, thermal insulation, seals;
- Sheathing made of foam rubber and insulation (leatherette);
- Electrical wiring and electrical appliances;
- Front and rear lights;
- Windshield wipers;
- Rear view mirrors;
- Lights (front, rear), fan, car heater.
Composter for a summer residence: the principle of its operation, varieties.
Would you like to know how to make a tracked all-terrain vehicle with your own hands?
Do-it-yourself electric vibrating plate: drawings, videos, photos.
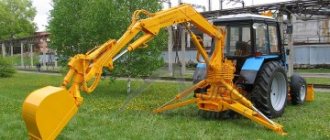
Homemade mini tractor loader with your own hands. 1 Features of homemade forklifts
As a guide, you can take the T 40 or MTZ tractor. They are most often found in domestic agriculture, and are also equipped with a rear and front linkage with a power take-off mechanism and a hydraulic system that ensures the movement of the attachment.
The main advantages of such a homemade device are its low cost if the necessary materials and tools are available. In addition, based on the technical characteristics of the equipment, you can make a homemade mini loader for the rear linkage with the most suitable volume and boom length.
As for the negative aspects, there are two of them:
Homemade tractor loader
- A shortage of material may lead to its purchase, which may be significantly more expensive than the purchased option. In this case, it will be more cost-effective to buy a used tool.
- If you do not have the necessary equipment and experience in working with metal structures and equipment, this may affect the quality of the manufactured device. Weak joining of metal elements leads to a lack of strength of the loader. Incorrect calculation of the balance and length of the device can lead to the equipment tipping over.
If you have everything you need and the decision to make the device yourself has already been made, you should decide on the type of loader you need. The most common options are:
- rear loader;
- front loader;
- mini loader .
1.1 Homemade loader for the rear linkage of a tractor
This type of loader is used on T 25 and T 40. This is a simpler option than a front loader in terms of calculating dimensions and installation on a tractor.
Homemade tractor loader
The first step in making a tractor rear loader is to find or make the correct drawing yourself. It must clearly maintain the proportions and dimensions of the main metal parts.
Next, you should prepare the necessary materials.
For the simplest loader model you will need:
- First of all, you need metal sheets and a profile that will be used as the base of the kosha. The thickness of the metal is selected based on the size of the ladle.
- Based on the drawing and calculations of the load on the loader, cylindrical hinge joints are selected.
- You should also prepare three cylinders from the hydraulic system of old equipment. Two cylinders will be responsible for tilting the bucket. One, larger one, will raise the arrow.
As for the tool, you will need:
- a grinder or a gas cutter, which will ensure the most accurate cutting of metal profiles;
- powerful welding machine;
- hammer, bolts, washers, pliers and other small tools.
Conditions for cabin assembly
A do-it-yourself cabin for a mini tractor is not something out of science fiction. To carry out work, the following conditions must be created:
- a closed, insulated workshop room with an area of at least 30-40 square meters. m;
- welding and gas cutting machines;
- a set of power tools;
- grinding, drilling, lathe machines;
- paint tools and equipment.
Work order
Before starting work, appropriate measurements are taken of the mini tractor elements on which the frame will later be attached.
To speed up the production process, it is advisable to purchase factory doors, glass, seals for them, door and window locks, handles, clamps, mirrors (sold in spare parts stores). Drawings of the frame, doors, windows are made in accordance with the purchased factory components. Factory glass can be replaced with triplex glass - this will extend the service life and make working conditions more comfortable. When making working drawings, remember that the ceiling must be at least 15 cm above the driver’s head. The following are the steps:
- Preparation of frame parts and fasteners;
- Welding the frame and finishing cleaning of welding areas;
- Welding (fastening) the roof;
- Preparation and welding of bosses onto the tractor frame for subsequent fastening of the frame;
- Anti-corrosion treatment and painting of the frame;
- Glazing, installation of seals and locks on windows and doors;
- Assembly of components and parts;
- Installing the cab and bolting it to the tractor frame.
Cabin for Dong Feng mini tractor
IFA car: characteristics, general information, prices, reviews.
KamAZ 43114: technical characteristics (power unit, transmission), price, photo, video of work and device.
Read reviews about KamAZ agricultural truck, model 55102, in the article.
Homemade mini loader with your own hands, drawings for a mini tractor. DIY mini loader
Homemade mini loader, made by craftsman Alik Mirzaev, with his own hands: photo, description, and
I needed a small loader for housework, for clearing and removing snow from the yard, transporting soil, manure in the garden and other work. As a result, this homemade tractor loader was built in a couple of months.
Specifications:
- All-wheel drive (permanent).
- Length without boom - 1.9 m.
- Length with boom - 2.4 m.
- Width - 92 cm.
- The height to the top of the seat is 1.3 m.
- The lifting height of the kun is 2.3 m.
- Load capacity (without counterweight) - up to 150 kg at a height of no more than 80-90 cm, otherwise it begins to outweigh due to the small base.
- The recommended load capacity with counterweight is no more than 200-250 kg. Remember that this is not an industrial loader, but a home one
- assistant, clean the snow, mix manure, mud, gravel. I attached a pitchfork and loaded the hay in the village. Instead of loading pallets with bricks.
- Motor Lifan 15 hp with starter.
- Zhiguli bridges are shortened.
- Steering rack - Oka.
- Steering column - VAZ - 2110.
- Channel channel 80 mm.
- Distributor R-40.
- The fracture unit is the steering knuckle from the front axle of the UAZ.
- The bucket is made for quick removal according to the width of the tractor 90 x 35 x 35 mm.
The axles are directly connected to each other by a cardan from the Niva (short). On the rear axle, where the flange is, there is a rear sprocket from the Izh motorcycle, and on the box from the classics there is a small sprocket from the Izh installed and everything is connected by a chain.
An internal combustion engine “Lifan” with a power of 15 hp is installed.
Homemade author: Alik Mirzaev.
What will you need for work?
A cabin on a motor-tractor or mini-tractor is necessary to protect a person from direct sunlight in the summer and from frost, snow or rain in the cold season. Farmers cannot but agree that working on a mini tractor is much more convenient and comfortable than doing the work of cultivating the land with your own hands, but at the same time, the entire process of working on the land takes a lot of time and you have to constantly be in the open air, which is not always the case comfortable and can even harm your health. That is why the cabin on a mini tractor is extremely important and necessary for all owners of such special vehicles.
The most popular option for agricultural machinery is a lightweight mini tractor without a cabin, such as the Uralets or Cabrio. This way you can save money and get a fairly powerful unit. Of course, you will also find cabins for sale, but it will be cheaper to make one yourself.
To build a homemade cabin for a mini tractor with your own hands, you will need the following materials:
- reliable steel frame consisting of bent and welded corners;
- sheet of steel or composite to create a roof;
- materials for glazing, as well as for thermal insulation of the cabin;
- door and window base;
- electrical appliances and wiring;
- lights for the front and rear of the unit;
- wipers;
- rear view mirrors;
- lanterns;
- Many also equip the cabin with a heater for operation in the winter, and air conditioning for hot weather.
In addition to materials, you must have tools for work, such as a welding machine, lathe, drilling, grinding machines, a set of tools, as well as materials and tools for painting the cabin.
Advantages and disadvantages of a homemade design
In times of crisis, the defining moment that affects many areas of life and industry is the issue of saving money. It is this circumstance that pushes many enthusiasts to independently manufacture not only mini tractors, but also other agricultural equipment.
Modern grain crushers are quite compact and energy-intensive, they are easy to use and delight their owners. A household grain crusher is ideal in terms of price and quality ratio.
In the last decade, a sprayer called the “Bug” has become famous among summer residents and gardeners. Here is all the information about this wonderful device.
This fact, in many ways, becomes decisive, especially for rural areas, where there has been no employment for a long time, and, as a consequence, no money. All that people living in villages and villages have is their personal farm, which feeds them throughout the year.
Therefore, homemade units in rural areas will be popular for a long time.
In addition to the obvious savings in money, self-assembly has a number of advantages:
- Due to its compact dimensions, the homemade unit is capable of performing work in fairly small areas. Considering that most private gardens are small, this circumstance becomes important, because the use of large-sized equipment, in this case, is impractical.
- Quickly achieved payback – literally in one season. This is a consequence of the savings on components that were described earlier.
- Quite good performance indicators, which are demonstrated by a homemade unit.
However, no matter how much you might want it, homemade mini tractors also have certain disadvantages that need to be pointed out:
- When assembling, there is a certain problem of finding the necessary parts and spare parts.
- A consequence of the previous problem is the issue of repair, because if a certain part fails, it will be quite difficult to find it.
- Self-assembly requires certain technical knowledge, as well as the ability to work with a welding machine and a lathe. In other words, assembly is not for everyone.
- Due to the fact that an all-wheel drive homemade mini tractor is made mainly from old components, this may affect the frequency of equipment breakdowns.
As we can see, there are quite a lot of disadvantages. But, at the household level, self-assembly becomes almost the only alternative due to its relative cheapness.
How to make a cabin for a mini tractor
If in the summer you can work on a mini tractor without a cab, then with the onset of the autumn-winter period, using the unit becomes quite uncomfortable or even impossible. Therefore, craftsmen are trying to assemble tractors with cabins in order to use this equipment all year round.
The cabin for homemade equipment is made of sheet steel according to a pre-prepared drawing. You can take the cabin from the MTZ tractor as the basis for the calculations. The following photo shows a drawing, based on which you can make a cabin yourself.
Advice! If the cabin dimensions shown in the drawing do not fit the dimensions of your mini tractor, then they must be changed. But the main thing that needs to be taken into account when adjusting the dimensions is the size of the windshield and the height of the cabin. Its ceiling should be 25 cm higher than the head of the person sitting in the cabin.
The cabin is manufactured as follows.
- First of all, you need to assemble a frame from wooden blocks according to the dimensions of the drawing.
- Next, a metal profile pipe is cut to the size of the wooden frame parts. All parts are connected by welding.
- The welded structure is placed with the roof on the ground and glass holders are welded inside the cabin.
- The roof is made of 1 mm sheet steel. The fragment can be cut out with a grinder and welded to the top of the cabin.
- The floor and side parts of the cabin are made of 2 mm thick sheet steel.
- The door frame is also welded from a profile pipe. To automatically close the doors, gas elevators can be installed on the frame.
- After installing the glass, the inside of the cabin can be lined with foam rubber and covered with leatherette.
- The cabin is installed on the frame, in a place prepared in advance for it.
In general, to better understand how to make a mini tractor with your own hands, you can watch this video, a kind of guide for beginners.
Start of work on creating a mini tractor
The design of the frame will be key, so production begins with it. It is necessary to weld the nodes that will be fastening and the metal frame according to pre-specified parameters. Installation of bridges. At this stage, both the rear and the front are installed simultaneously. The transmission elements, as well as the engine, must be secured to the structure. Next, they begin to assemble all the control components. Fastening of the tank where the fuel will be located. At this stage, a chair is installed where the person who will subsequently operate this equipment is expected to be located.
At this stage, the homemade mini-tractor Perelomka is already beginning to look similar to those shown in the photo in various sources. It is important not to forget about the casings, which should perform a protective function. Next, welding is carried out for attachments. One of the very important stages, namely electrics, on which the entire functionality of the equipment depends. Such a vehicle must also have lighting.