Making a shovel for a mini tractor
Let's look at how to make a blade for a mini tractor with your own hands. To do this, you need to have the necessary tools, materials and necessary skills for the job. So, let's start choosing the material. To make a bucket, you should use a piece of iron pipe, approximately 7 mm thick and 70 cm in diameter. Next, it must be cut with a grinder. But you need to cut not exactly in the middle, but at a distance of about 10 cm from the center. This way the bend of the bucket will be as needed. But you will have to choose the width of the blade yourself, depending on your own tractor. But according to uniform rules, the indentation of the bucket should not exceed 40 cm on each side.
Considering that a homemade shovel for a mini tractor will take on heavy loads, it needs to be reinforced on each side with longitudinal iron pipes with a cross-section of 40x40 mm, which are welded by conventional welding to the bottom of the bucket itself. But longitudinal pipes are not enough here. You will also have to strengthen the snow blade on the mini tractor with transverse pipes of the same cross-section, only their number will increase (6-8 pieces), which will allow it to be stronger and withstand higher loads. At the bottom of the blade, which is in contact with the surface of the earth, it is worth bolting a rubber casing in order to protect the shovel from contact with hard soil or asphalt. A steel plate knife should be welded vertically in the middle.
Now let's start manufacturing the lifting mechanism for the snow blade on the mini tractor:
- In order for the snow blade to be raised and lowered on the tractor, you need to use a hydraulic cylinder.
- To connect the cylinder with the blade and the tractor, you need to make a bracket. For this you need a front linkage.
- It can be welded from a profile pipe in the shape of a capital letter “A”.
- The cylinder can be used from the 2PTS-4 semi-trailer.
- The control for lifting the hitch must be moved to the tractor driver's cabin.
- For safer work, emphasis should be placed on lifting the homemade product.
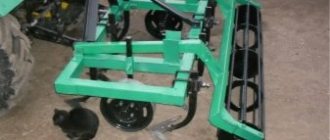
How to make a homemade hiller for a mini tractor - let's describe the essence
Small-sized equipment has found wide application in private households. Mini tractors have become especially in demand when performing a variety of tasks. Thanks to one such assistant, you can forget about the need to purchase other types of equipment.
There is a wide range of attachments on the market, but it is more interesting and economical to create it yourself.
Varieties of hillers
There are several types of hillers:
- lister;
- adjustable;
- disk;
- propeller
The lister hiller is similar in design and appearance to a plow. It has a fixed structure in the form of a ploughshare. This is not the most convenient and practical option due to the fact that this hiller is not adjustable. The advantage is that, through the additional installation of ploughshares, such a hiller can be either single-row or three-row.
https://www.youtube.com/watch?v=Ab2W_IhfkOsu0026t=56s
The adjustable hiller has the same design as the lister one, but the width of its wings can already be adjusted to the width of the beds.
Disk units are considered the most popular and in demand. They are distinguished by reliability, versatility and ease of use.
Propeller-type hillers, in addition to hilling beds, can transfer soil from between rows over beds or to adjacent rows.
Advantages
If the specified condition is met, then hilling potatoes with a mini tractor acquires some advantages over manual work.
- Firstly, it greatly simplifies the process in terms of physical activity.
- Secondly, the speed of work increases, and hence labor productivity.
- Thirdly, the result obtained is many times higher than the quality of manual work.
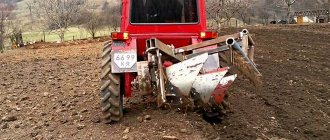
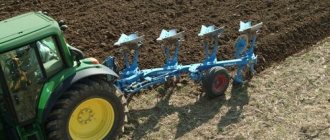
Hiller at work
Agree, the described circumstances characterize the hiller for a mini tractor only from the best side. But this does not mean that it is necessary to buy a potato hiller for a mini tractor as soon as possible. These actions should be carefully considered, since such an acquisition is fraught with significant financial costs. Moreover, you can easily make a hiller for a mini tractor with your own hands, without asking for help from strangers. (The device is shown in the photo).
ICE-based technology
Homemade products with installed internal combustion engines have greater power and functionality compared to their electric counterparts. This allows you to significantly expand the scope of their use. Attachments in the form of a plow, flat cutter, cultivator, rake are easily mounted on the frame bracket. The unit can also be easily transformed into a roller skating rink or a home mini-tractor. Having asked the question “how to make a homemade walk-behind tractor,” first of all you need to understand its structure. To assemble a homemade motor cultivator with your own hands, you first need an engine, transmission and reduction gearbox. For assembly work, you will need a standard set of tools: a set of wrenches, a drill, an angle grinder, a welding machine, and when assembling more complex and load-lifting machines, also turning and milling of some components.
Chainsaw cultivator
Perhaps the best option when making a homemade motor cultivator is to use a chainsaw engine to create it. The advantages here are the performance and power of the unit, undemanding fuel requirements, light weight and compactness. And there won’t be any particular difficulties with the components when assembling it. Everything you need can be found at the car market or flea markets.
General diagram of the walk-behind tractor:
- the walk-behind tractor frame is made in the form of a diamond from a metal corner measuring 3200x3200x3200 mm;
- the engine is mounted on the cross members from above, the gas tank, as a rule, is mounted slightly below;
- the intermediate shaft supports are attached to the front struts;
- The running shaft supports are installed on the longitudinal ribs
With this arrangement, the center of gravity of the unit is located at the rear (above the support wheel), so to shift it, you can install an additional weight at the front.
To regulate the speed, the original gearbox is used; motorcycle sprockets (main and intermediate) are also used, the number of teeth of which is selected taking into account the required power output. The working tools of the unit are made in the form of wheels with knives and can perform the function of a trimmer, a rotary cutter or a rotary hoe.
As an alternative, you can use the engine from a lawn mower, which is similar in its characteristics to the drive of a chain saw.
Motoblock from a motorcycle
Often, old motorcycles can rust for years in garages and sheds, but they can easily find a second life. Motorcycle engines are great for creating a DIY power tiller, but the most commonly used engines are two-stroke engines from older models, as well as from scooters. But recently, motors from scooters or mopeds have also begun to be actively used, giving broken equipment a second life through conversion.
There are several types of transmission:
- gear - the most common and easy to install;
- combined (gear-worm gear);
- chain-belt, toothed;
- hydraulic gearbox is a type of transmission that is gaining popularity, but is the most expensive compared to a mechanical one.
Everyone chooses which system to use depending on the available parts and the intended functionality of the equipment. But from practice, it can be noted that homemade trimmers can compete with factory models in terms of their characteristics.
Important How to make a wood splitter with your own hands from a walk-behind tractor
Possible schemes
A frame of the required size is welded from a corner, to which an engine with a fuel supply system and a gas tank is attached. The transmission of torque from the gearbox, which reduces the speed, to the wheels is carried out through a chain. In this case, you can use a bridge from a donor motorcycle mounted on a wheel axle. All controls are transferred to the steering wheel of the unit. When designing heavier equipment, a standard ZID-5 engine or its other modifications are used, which were previously widely used on various units. It is paired with a Zaporozhets gearbox and a lightweight drive axle.
Preparing for self-assembly
First of all, you need to have the following materials available:
- steel pipe more than 2 m long;
- square steel plates (dimensions no less than 15x15cm);
- at least 20 nuts and bolts;
- rectangular plates with a flat cross-section (dimensions 20-25x5cm).
Also take care of the tools:
- discs for metal work;
- Bulgarian;
- welding machine, electrodes;
- drill with drills;
- emery machine;
- standard set of tools (wrenches, screwdriver, pliers, etc.).
The final dimensions, as well as the type of the above materials depend on:
- on the dimensions of the specific mini tractor (motoblock) to which the cultivator will be attached;
- on the type of node connection;
- depending on the type of tillage tool you plan to use.
Our next article talks about the nuances of using a walk-behind tractor and a cultivator on a summer cottage.
Homemade mini loader with your own hands, drawings for a mini tractor. DIY mini loader
Homemade mini loader, made by craftsman Alik Mirzaev, with his own hands: photo, description, and
I needed a small loader for housework, for clearing and removing snow from the yard, transporting soil, manure in the garden and other work. As a result, this homemade tractor loader was built in a couple of months.
Specifications:
- All-wheel drive (permanent).
- Length without boom - 1.9 m.
- Length with boom - 2.4 m.
- Width - 92 cm.
- The height to the top of the seat is 1.3 m.
- The lifting height of the kun is 2.3 m.
- Load capacity (without counterweight) - up to 150 kg at a height of no more than 80-90 cm, otherwise it begins to outweigh due to the small base.
- The recommended load capacity with counterweight is no more than 200-250 kg. Remember that this is not an industrial loader, but a home one
- assistant, clean the snow, mix manure, mud, gravel. I attached a pitchfork and loaded the hay in the village. Instead of loading pallets with bricks.
- Motor Lifan 15 hp with starter.
- Zhiguli bridges are shortened.
- Steering rack - Oka.
- Steering column - VAZ - 2110.
- Channel channel 80 mm.
- Distributor R-40.
- The fracture unit is the steering knuckle from the front axle of the UAZ.
- The bucket is made for quick removal according to the width of the tractor 90 x 35 x 35 mm.
The axles are directly connected to each other by a cardan from the Niva (short). On the rear axle, where the flange is, there is a rear sprocket from the Izh motorcycle, and on the box from the classics there is a small sprocket from the Izh installed and everything is connected by a chain.
An internal combustion engine “Lifan” with a power of 15 hp is installed.
Homemade author: Alik Mirzaev.
How to make a cultivator with your own hands: simpler options
There is such a cultivator - “Nimble Baby”. Let's look at how you can make one at home. Take the wooden axle. It will become the connecting elements for the remaining parts. It is necessary to attach a pipe 24 mm in diameter to this axis. It will serve as a handle, so in order not to bend too much, choose the length of the pipe to suit your height.
Attach wheels with a diameter of no more than 200 mm to the mentioned axle. the cultivator will rest on wheels, the height of the tool above the ground depends on the height of the wheels that we have adapted to it. By the way, the wheels need to be cut out of metal 2-3 mm thick. After you have connected everything indicated, you can work on the ground.
The word cultivator does not only mean motor units. You can also use hand tools at your dacha. It is much better than a standard hoe and much easier to make at home than a motor cultivator. Have you heard about the Tornado cultivator? It looks like a defective pitchfork.
A round axle to which twisted teeth are welded in a spiral. This type of tool is easiest to make from existing forks, if you don't mind. If you still need your pitchforks, buy others from the store and make a “Tornado” out of them. Believe me, it is cheaper to buy forks and remake them than to buy a ready-made cultivator. Take a hammer and go over the teeth, letting them bend in a spiral.
Homemade cultivator "Tornado"
Tornados are easy to use thanks to the lever that the operator grabs when turning the cultivator into the ground. For the lever we need a pipe, which we need to attach to the handle. The pipe should be 50 cm in length. You can use electrical tape for fastening. As a pipe, you can use a nozzle on the handle, which is usually equipped with shovels. Such a lever will protrude 25 cm on both sides of the handle.
You can make a Tornado cultivator from spring steel. We take a plate half a meter long, 1-1.5 mm thick and 2 mm wide. Bend the steel and make a loop out of it, which you put on the handle. Monitor the height of the cutting
It is important to maintain the diameter of the resulting loop - it should not be more than 20 cm in diameter in order to freely fit into the aisles
There is another version of the cultivator - a rotary disk. We just warn you that you will need to apply a lot of physical strength to make the necessary convex disks. Place regular metal discs and hit them with a hammer. They should become cup-shaped during the process.
We put the main part of the mechanism - and these are the disks - on a bushing, which we attach to the axle. We attach both ends of the axle using cotter pins on a large bracket.
We make a hole in the large bracket into which we insert a pipe with handles and a crossbar between them. We place the rod on the small bracket using a welding machine. It should be 24 mm in diameter and 25 cm in length. Then we screw a 16-diameter rod into the rod.
Important points in work
There are other types of devices, among which we should highlight the rotary hiller, double-row hiller, etc. Despite the fact that a double hiller allows you to process a large area, many people prefer conventional single-row hillers, since only they can work with light walk-behind tractors. Although the single-row hiller allows you to hill up only one bed per pass, it has the advantage that you can fine-tune the device.
Also, in theory, hilling potatoes is quite simple: you should sprinkle the base of the bush with soft and loose soil. This allows you to create favorable conditions for the development of root crops, improves aeration, and destroys weeds. During the hilling process, soil moves from the spaces between the beds to the bases of the bushes. Many people do not know when to hill up and how to properly use hillers with walk-behind tractors.
More experienced people recommend hilling about 4 times per season. This is due to the fact that a potato tuber (or other root crop) is capable of development only when it is buried at a depth of 15-20 cm. Moreover, the hilling process allows the potato to develop in different directions. Thus, the hilling process creates additional opportunities for the development of root crops, increasing the yield and quality of the fruit. In this case, it is most effective to hill up damp soil - after rain, dew, etc.
It is strictly forbidden to hill up with dry soil - this can lead to the death of the plant.
The first hilling is carried out almost immediately after the potatoes emerge.
Before starting work, you need to be extremely careful about setting up the block: it is important to set the distance between the discs or knives so as not to damage the plants, but at the same time so that the seedlings are not completely covered with soil. The height of the hill should cover the base of the stem to the leaves, which allows it not to destroy the plant and allow it to develop
The next hilling is carried out when the tops reach a height of 30 cm.
At the beginning of work, incorrect installation of hiller plows is often revealed. It either buries deep into the ground, or, conversely, walks almost along the surface. The solution to this problem is simple - you need to adjust it more precisely.
The hillers are installed on a minitractor in the same way as on a walk-behind tractor. However, it should be remembered that to work with these blocks, the width of the bed should not exceed the distance between the wheels of the tractor or walk-behind tractor.
One more detail - in some models of hillers it is impossible to adjust the angle of attack, on which the efficiency of the work depends. Therefore, you should be extremely careful about connecting the walk-behind tractor or tractor with the hilling device and carefully adjust the distance between the discs or knives.
General characteristics
There are several types of plows according to their purpose:
- manual - for plowing soft land of a small area;
- horse-mounted - used in situations where it is necessary to cultivate land, access to which is limited for special equipment;
- with rope traction - helps to cultivate the soil in hard-to-reach places, for example, in the mountains or in a swamp;
- mounted – works in conjunction with special equipment, allows you to reduce the turning radius during sequential plowing;
- trailed – general purpose plow.
The mentioned types of plows, in turn, are divided into the following subspecies:
- single-hull;
- double-hull or more;
- disk - reversible;
- rotary.
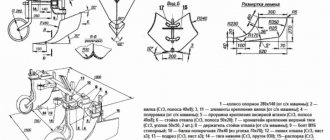
The generally accepted configuration of a plowing tool, which you can construct with your own hands, is shown in Figure 1.
The main parts of the hull structure have the following parts:
- chisel – pad on the cutting part;
- ploughshare – removable “knife”;
- wing, chest and blade feather;
- uglosnim – cuts corners from layers of soil;
- stand – fastening element.
Modern technologies make it possible to make a plow with your own hands. You can design it according to your drawings or modify a ready-made one to suit your needs. A tool made independently has a number of advantages and characteristic design features.
Manufacturers and prices
Let's find out at what price we can buy potato hillers today: let's look at several of the most interesting manufacturers.
Champion C304
This is a hiller from a Chinese manufacturer. This device is a two-row type. The hiller loosens the soil and rolls it to the roots of the potatoes, which significantly improves the quality of work.
From Champion C304
This model is capable of both preparing beds for planting and hilling already planted potatoes. The device is made of high quality steel, which significantly extends its service life. Price - 2200 rub.
The disc hiller is also made in China. Made from hardened steel for highly efficient performance. Forms neat, even ridges that greatly simplify further potato cultivation. Cost - 3280 rubles.
From Scout
Intraskol
This unit is already made in Russia. The Interskol company produces several types of hillers: high-quality and not too expensive. The average cost of a device of this brand is 1200 rubles.
Important Technical characteristics of the all-wheel drive cargo and passenger vehicle UAZ Bukhanka
From Interskol
We looked at the features of hillers for processing potatoes. As you can see, these devices are very useful and can significantly speed up and simplify potato cultivation. If you want a ready-made device, purchase it only from a trusted manufacturer, but if you wish and have the proper skill, you can make the device yourself.
Recommendations
We bring to your attention several useful recommendations for assembling and using a homemade cultivator and its “working parts”:
- Materials for the cultivator must be subjected to anti-corrosion treatment in advance. If this is not done, the moisture contained in the soil will significantly reduce the service life of the cultivator.
- Flat-cutting paws have the same grip (220 - 385mm) as universal pointed paws, however, there is a difference in the crumbling angle: universal - 25-30 degrees and flat-cutting paws - 12-18 degrees.
- To smooth out the furrows left by the knife paw, it is necessary to install a weeding or loosening paw.
As you can see, making a cultivator yourself is not that difficult. The advantages of a homemade cultivator are minimal cost, adaptability to your soil cultivation needs, and versatility. Such structures can be suspended from walk-behind tractors, mini tractors, as well as T-25 and MTZ tractors.
From this video you will learn how to make a homemade cultivator for a mini tractor at home:
How to make it yourself
Most often, craftsmen make their own disc types of hillers. In this case, the main structural element is a pair of steel disks of a specific concave shape, which are installed at an angle to each other. Disc-type hillers can be made with either an adjustable distance between the disks or a fixed one. It is clear that the first option is more convenient, but the second one is easier to manufacture.
Before you begin manufacturing the hiller parts, you must first make a detailed drawing of the future device. You can take ready-made diagrams from the Internet for this. It will be useful for all gardeners to understand how to destroy weeds in the garden using folk remedies.
On the video - how to make a potato hiller with your own hands:
Materials and tools
To make a hiller with your own hands you will need the following items:
- A gas cutter for cutting out parts from sheet steel.
- Welding for fastening parts.
- A gas burner to raise the temperature of metal parts before bending them.
- Plumber's tools will also come in handy: especially a vice.
- High power drill and a set of metal drills for it.
- Grinder for cleaning welds and for sharpening blades.
If you decide to make the device yourself, then in this case it will be important to comply with several requirements. We will tell you about the manufacturing stages and necessary requirements in more detail. The design is simple - it is, in fact, two connected steel disks
The diameter of the discs can be from 370 to 700 mm, their edges must be pointed. The steel sheet for their manufacture must be at least 2 mm thick. You can fasten the discs using welded bushings. And if you weld special hubs to the disks, in which a pair of bearings are provided, then in this case you can achieve free rotation of the disks
The design is simple - it is, in fact, two connected steel disks. The diameter of the discs can be from 370 to 700 mm, their edges must be pointed. The steel sheet for their manufacture must be at least 2 mm thick. You can fasten the discs using welded bushings. And if you weld special hubs to the disks, in which a pair of bearings are provided, then in this case you can achieve free rotation of the disks.
Two concave disks can also be borrowed from an old seeder, if available. And in addition to welding fastening, the disks can be attached to each other with bolts. The discs should deviate outward.
To adjust the length of the top post, you need to drill small holes along its edges and adjust accordingly. It should be borne in mind that the front and rear links of the hiller must be the same in width.
To make cutting discs, use high-density steel sheet. First you need to cut out just a circle, and then give these blanks the desired shape. Outwardly, they should look like discs from a regular plow, which are capable of quickly and deftly turning over layers of earth. When welding the blades to the stand, make sure that the welds are as smooth and straight as possible.
The edges of the blades must be sharpened with a grinder so that they can cut the ground without effort. Experts do not recommend purchasing ready-made wheels for a homemade hiller, as in this case it will be difficult to sharpen them. Accordingly, all work will slow down and become more complicated.
If you plan to install the unit on a walk-behind tractor, the device will need to be equipped with a clutch unit during assembly
It is important to make this unit as strong as possible and carefully weld it to the hiller. Maybe
Exploitation
Before starting work, the equipment must be configured and checked. The first step is to check the presence of all parts, as well as their condition, after which it is assessed whether the bolted connections are well tensioned
It is immediately important to pay attention to adjusting the position of the hiller. If it is necessary to increase the height of the ridge, the disks are brought closer together, their installation angle increases, as well as their depth. Reducing the height of the ridge is carried out by moving the discs apart, as well as reducing the specified parameters
Reducing the height of the ridge is carried out by moving the discs apart, as well as reducing the specified parameters.
To change the space between the disks, you will have to slightly unscrew the nuts on the brackets, change the position, and then tighten them again. To adjust the installation angle, loosen the bolts. Next, the hillers are lined up in the desired position, the bolts are tightened again. In the case when a change in the depth of the depth is required, again it will be necessary to unscrew the bolts, correct the situation, that is, raise or lower the hiller itself, and then fix everything back. It is not customary to place hillers on the front hitch of a mini-tractor, so they are secured at the rear using a double hitch.
When everything has been checked and adjusted, the operation of the hiller should be checked in an empty area; if something is not in order, adjust it again
During a test run, it is important to note both the functioning of individual parts and the entire mechanism. When you start using the hiller, you should avoid making sharp turns at the end of each bed.
You need to turn smoothly in first gear of the mini-tractor. If a sharp turn still needs to be made, then at this moment the coupling with the hiller should be raised.
When a mini-tractor needs to be transported to a storage location or to a new cultivated area, this must be done exclusively in the transport position. In the case when a vehicle together with a hiller needs to be transported over a long distance along unsatisfactory routes, then this must be done using vehicles, partially disassembling the agricultural equipment and fixing its position. In general, the operation of a hiller for a mini-tractor must be carried out in accordance with the instructions supplied with the attachment, in compliance with safety requirements.
After work, the hillers must be cleaned of plant residues, soil and dirt. You should immediately inspect the equipment and assess whether everything is normal. If necessary, the fastenings are immediately tightened. The hiller should be stored for a long time in a dry room with the necessary protection from emerging moisture. Before moving the device there, it should be cleaned, wiped dry and lubricated with a thin layer of special lubricant.
In a protected room, the equipment is fixed in a stable position, after which, if necessary, it is tinted with paints and varnishes. The drums with bearings are washed separately, dried and treated with a suitable product.
Instructions
I would like to start by considering the process of manufacturing a disk hiller, because this type of device is the most in demand today.
By installing disc sizes of different diameters, you can hill up potato bushes of various lengths.
Disc hiller
Many people ask the question - how to make a hiller for a walk-behind tractor with your own hands? At home, this is quite possible if you follow certain recommendations. So, let’s describe the manufacturing process step by step (for example, let’s take a disk hiller for the Neva walk-behind tractor):
- For manufacturing, we will need cutters from an old seeder, or sheets of metal 2 mm thick. They are secured using bearings with seals.
- They need to be placed at an angle to each other. The distance between the lower parts of the disks should correspond to the track width of the walk-behind tractor. They are connected by welding or using ordinary bolts.
- Here you need to follow a strict recommendation - the disks must be symmetrical to each other. Otherwise, the walk-behind tractor with the hiller will drift to the side, which will significantly complicate the entire work process.
- In addition to the discs themselves, the design of the hiller includes screw lanyards, a T-type leash and stands. Lanyards, in this case, perform the adjusting function of rotating the disks along the vertical axis.
- A do-it-yourself hiller for a walk-behind tractor, the drawings and photos of which you see below, must be made in strict accordance with the dimensions. Of course, there will be improvisation, but for the first assembly experience it is best to use other people's work.
- Depending on the capabilities, you can make a fixed or adjustable working width. The second method is more convenient, because you can change the inter-disk distance by simply rearranging the racks.
- To aggregate the hiller with a walk-behind tractor, you need to use a hitch bracket that does not have a beam. The hiller's leash is attached to the hitch using a stopper, connected with bolts and washers. The stopper itself is inserted inside the square pipe and then tightened.
The disk hiller for the Salyut walk-behind tractor is made using the same method, because the design itself and the method of connection to the walk-behind tractor are completely identical to the Neva.
Active hiller
To make such a hiller, we will need exactly the same list of materials and tools that we used in the manufacture of the disk hiller:
- welding machine;
- sheet iron;
- Bulgarian;
- fastening connections.
Using similar tools, you can make an active hiller for the MTZ, Plowman, Champion, Carver, Husqvarna, Lifan walk-behind tractor. The manufacturing principle is in many ways similar to the disk version:
- The axles also need to be adjusted to the parameters of the walk-behind tractor, and the parts themselves are welded using a welding machine.
- As previously reported, this type of hiller places certain demands on the walk-behind tractor. It must have two forward gears, as well as a PTO - power take-off shaft. Many sellers of walk-behind tractors, when they say that a walk-behind tractor has two gears, mean one rear and one forward.
- So you need to clarify this point when purchasing.
- It would be advisable to manufacture several bushings with brackets, as well as additional metal blades.
Double row hiller
The double-row hiller is the same lister type of hiller, but in double volume. Let's look at the whole process step by step:
- For work we need a sheet of metal about 3 mm thick. It is necessary to weld the base of the hiller from this material.
- A 4 mm steel strip can be used as a bracket. The field board is made of a steel sheet 5 mm thick.
- The hiller stand takes on the main load during operation. Therefore, you need to make sure that it is the most stable and reliable in comparison with other parts of the hiller.
- The wings of the hiller can be made from a sheet of steel 2 mm thick. They need to be bent a little using a pipe of the required diameter.
Important Design and principle of operation of the chainsaw oil pump
In principle, this is where the process of making a two-row hiller ends. You can also make an adjustable system of hiller wings, which are attached to the base using hinge technology. At the tail of the structure there are rods that regulate the angle of the wings.
Otherwise, the manufacturing principle is completely identical to that of the fixed list version.
https://youtube.com/watch?v=fSGR4FlZuFY
Types of potato hillers
Depending on the design, the following types of devices are distinguished:
Propeller mechanisms make it possible to move the soil between the rows into the furrows.
The most common are lister and disk devices.
Lister mechanisms
Interesting! Devices of this type are available with a fixed working width. Otherwise they are called plows, as they look like a plow.
They are produced with an adjustable angle of attack (the angle of inclination of the cutting part of the hiller to the ground) and fixed.
Adjustable ones allow you to change the depth of loosening and, accordingly, the gripping area.
Advantages of the device:
- consumes less energy compared to disk devices;
- simpler in design;
- the price is less than for a disk device;
- It is light in weight, so it works great on low-power machines (walk-behind tractors and cultivators).
Flaws:
- does not work well on wet and heavy soil;
- Potato planting should only be level, with strictly fixed row spacing.
Disc hillers
Structurally, they consist of two disks with a sharpened edge. As the hiller moves, the discs rotate and crush the soil. They have a convex shape. Due to this shape, the soil is simultaneously loosened and an earthen ridge is formed.
The disks are attached through ball bearings to the racks, which are located on a horizontal holding frame.
Note! They can be adjusted vertically, less often horizontally. With vertical adjustment, the angle of rotation of the disks changes, due to which the amount of earth needed to form the ridge also changes. Horizontal adjustment moves the discs vertically (raises or lowers). In this way, the angle of attack is adjusted.
Advantages:
- better performance of hilling, the ridges are smoother and higher;
- can be used with different row spacings;
- allows hilling on heavier soil.
The disc hiller can be used with different row spacings
Flaws:
- higher price;
- higher fuel consumption.
Depending on the volume of work performed and the degree of mechanization, the potato hiller can be:
Fact! Manual - designed to perform only hilling, automated - used to perform several types of work: hilling, loosening, planting, harvesting.
Manual - moves due to the fact that a person pushes or pulls the mechanism.
An automated potato hiller is an additional hanging device for a walk-behind tractor, cultivator or tractor.
Manual potato hiller
Allows you to process potato beds, regardless of the presence of a walk-behind tractor or a tractor. For manual types, the most common designs are lister and disk mechanisms.
Potato hiller at work
Advantages:
- can be used in areas where the use of walk-behind tractors or walk-behind tractors is impossible or impractical;
- Cheaper to purchase and maintain.
Flaws:
- more expenditure of physical strength of the employee;
- It takes longer to process the area;
- Possible lower quality processing of plantings;
- When working with the mechanism, two people are needed: one must pull the potato hiller forward, and the second must push it from behind using the handles.
To make it easier to operate the manual mechanism, and so that one person can handle it, you can upgrade the manual hiller by equipping it with a bicycle wheel. In this case, the plow is mounted on a bicycle frame. The steering wheel allows you to direct the device in the desired direction. Why is it convenient to use a bicycle? Because it is light, and the steering wheel is at the optimal height for such work.
Hiller for tractor
These devices allow you to loosen the soil and hill up potatoes.
The design includes:
- metal frame;
- hitch;
- two wheels (usually stamped);
- pointed paws;
- dumps.
Article on the topic: Potato planting rate per 1 hectare and hundred square meters (in pieces and kg) The paws are designed for cutting the soil to a depth of about 150 mm when performing hilling. Thus, the mechanism can be used as a plow for potatoes.
Using a coupling device, the device is fixed to the tractor. Lattice dumps are used directly for hilling the plant.
If there is no need to loosen the soil, then unscrew the paws.
Hiller for tractor
Typically, such a device is used in conjunction with tractors that have low traction force, for example, T-25.
Hiller for walk-behind tractor
To fix it to the walk-behind tractor, you must first dismantle the coulter and install a device in its place. Potato hillers designed for walk-behind tractors can also be installed on a mini tractor.
The industry produces not only single-row, but also two, three and n-row mechanisms, which allow you to speed up the hilling process.
Attention! If you plan to install a hiller with a fixed working width, then the walk-behind tractor engine should have a power of less than 3.5 hp and a weight of about 30 kg. Devices with adjustable working width are installed on more powerful mechanisms.
For cultivators and walk-behind tractors that have an engine similar to a Neva walk-behind tractor, you can use a rotary mechanism. In this case, the wheelset is removed from the walk-behind tractor, and a hiller is installed on the gearbox shaft. The gear wheels perfectly grind the soil, cutting off the roots of weeds, and at the same time hill up the potato beds.
Potato hillers can be installed on mechanisms with gasoline or electric motors. In this case, electric hillers for processing potatoes are lighter and more mobile.
You can purchase the device without any problems in any city in the country, be it Moscow, Novgorod or Rostov. Usually a specialized store allows you to buy a hiller of the desired type, but more often than not you can buy a Chinese product that is not produced of the proper quality.
Hiller for walk-behind tractor
So that you have a reliable assistant at your dacha or on your farm, you can make a homemade manual or automated hiller for processing potatoes.
Homemade loader for a mini tractor with your own hands. Do-it-yourself loader on a mini tractor
When purchasing any agricultural equipment, every owner quite reasonably strives to use it to perform a wide range of tasks. Mini tractors have become extremely popular today, allowing them to perform a wide variety of work, from land excavation to construction. However, it is not always possible to buy such a mini tractor complete with a loader, the cost of which separately is quite high. In this case, making this part yourself can be a real salvation, since it will allow you to use the vehicle to move various bulk building materials.
Where to begin?
To make your own loader for a homemade mini tractor, you should take into account the model of the vehicle itself, since the weight of the attached unit will depend on this. In addition, it is necessary to find a diagram reflecting the mechanism for lifting the bucket to a certain height and controlling it from the tractor cabin
Considering the sufficient complexity of such a mechanism, this task should be approached very responsibly, having carefully thought out the design on paper.
In order not to reinvent the wheel, it is best to take as a basis the lifting mechanism that is used on many models of domestic tractors. The design itself consists of 3 main parts:
- The actual bucket.
- Hydraulic lift mechanism.
- Systems for attaching a loader to a minitractor and bringing control elements inside the cabin.
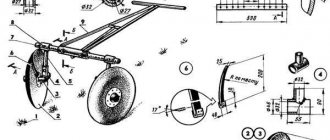
Step-by-step production of all structural elements
First you need to make a loading bucket (1), which can be made from several steel plates, at least 6 mm thick, welded at the desired angle. According to the given dimensions, it is necessary to weld the side elements, and along the lower longitudinal part - ridges that will well grip bulk building materials of various fractions. Then we proceed to the implementation of the most complex mechanism - the hydraulic lifting system, for which we will need the following elements:
- 4 levers (2) – here it is best to use a square pipe of a suitable cross-section, in which it is necessary to make holes for connecting bushings;
- boom (4) – is made of a U-shaped channel and is attached on one side to the bottom of the bucket, and on the other to the frame of the mini tractor;
- hydraulic lifts (5.6) - they are best purchased ready-made, which can be found on the market for transport parts for tractors.
In addition, this mechanism will also need bushings, pins, brackets, adapters and connecting fingers, which should be sequentially assembled and fastened together
It is very important that a homemade front loader for a mini tractor has the correct center of gravity, which will avoid accidental tipping due to overweight. The sketch under number 3 indicates the location of the vehicle wheel, which will allow you to correctly navigate the loading mechanism location system relative to the tractor itself
Key Findings
When performing the entire complex of work, it is very important to maintain the required proportions, since the slightest inaccuracy can lead to the mechanism not working. To do this, from the very beginning you should carefully approach the project, accurately calculating the dimensions of all parts
The elements used should be made of durable materials, which should preferably be treated with anti-corrosion compounds. Thus, making a loader for a mini tractor with your own hands is quite possible, which only requires attentiveness and skills in working with metalworking and welding tools.
Features of the attachment
The hiller for the tractor consists of:
- Metal frame;
- Attachment device responsible for coupling;
- Two stamped wheels;
- Iron pointed paws and dumps.
Thanks to tractor wheels, the load on the weeder is reduced. The paws cut the soil to a depth of 15 centimeters. The paws are attached to the frame with a steel support. Hilling is carried out using lattice dumps. Potato hillers for tractors have the following parameters:
- Processing depth – up to 10 centimeters;
- Working width – 140 centimeters;
- Speed limit – 6 – 10 kilometers/hour;
- Travel speed – 15 kilometers/hour;
- Device dimensions – 180*122*100 centimeters;
- The weight of the canopy is 180 kilograms.
Among the most frequently used models of hillers are the domestic OKN-2x0.7 and KON-2x0.7. The hiller is suspended from the rear linkage of the tractor. The device is picked up by the SA-1 automatic coupler.
Manual disc hiller
Some owners still use manual disk hillers
Made with their own hands and adjusted for work in a potato field, they do not lose their importance when hilling small strawberry beds. They work on the push-pull principle and are similar to disk attachments for a walk-behind tractor.
There is a frame with two disks directed at an angle to each other, and handles 100 and 170 cm long, respectively, one of which is for traction, and the other for pressing the disks to the soil. The distance between the discs is adjustable.
To work with such a hiller, two people are required. Of course, you can work alone if you put a load of about 10-15 kg on the frame. The handles of this miracle hiller are removable, which is very convenient when transporting it to the site.
A hiller for a mini tractor is one of the most popular and widespread types of attachments. This popularity is due to the functionality and purpose of the hiller - it is used for planting potatoes and further filling the beds, while weeding them. It can also be used to make furrows before planting, form rows and hill up other types of useful crops, except potatoes.
Why is hilling necessary?
Some gardeners manage to grow potatoes without hilling the beds. However, in order to grow a truly good harvest of large root crops, hilling is necessary.
This procedure allows the plant roots to have better access to air, and it also helps retain moisture. In addition, hilling causes the plant to begin to develop stolons (side shoots), resulting in more tubers.
Of course, you can hill up potato beds using hand tools, however, this method is only suitable if the beds are small. For large areas it is necessary to use a hiller, which significantly speeds up and simplifies the work process. It is also worth paying attention to why a potato digger for the Neva walk-behind tractor is needed, and what its price is.
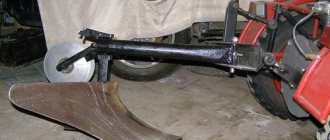
Homemade plow for a mini tractor with your own hands. Which design should you choose?
Do-it-yourself moldboard plow.
Plow designs are varied and depend on the types of soil being cultivated and the types of work being performed. The following modifications are distinguished:
- Ploughshares - have a working tool in the form of wedges, with the help of which the soil layer is cut, moved and painted. Used on mini tractors and walk-behind tractors in small farms.
- Disc - used on hard and heavy soils for preliminary plowing. Freely rotating knives in the form of metal disks cut the top layer, and the dump elements located further down turn the layer over.
- Rotary - a modern model of a plow, where several working knives are mounted on a movable shaft. This design provides high performance, but is difficult to manufacture independently.
The most common option is a homemade double-furrow plow with working tools in the form of ploughshares and moldboards. This model has been tested by time and the experience of numerous farmers. Such structures are often complemented by skimmers that cut off the top turf layer of soil.
How to make a hiller for a tractor with your own hands?
Before you start creating a canopy, you need to study the drawings with the exact dimensions of the future device.
A homemade hiller is made in compliance with the following nuances:
- The finished attachment will be versatile if you carefully evaluate the customization features. The height is adjusted by a telescopic device; it must be placed in the center;
- The angle of attack is controlled by the tilt of the bed. The angle can be adjusted by changing the difference in angle between the vertical post and the front link;
- The front link is attached to the center of the rack with a hinge, this is how the bed is driven;
- The rear struts and two disks are welded to the vertical strut;
- The front link is mounted with a hinge and bolts;
- A vertical tube is welded in the center of the fork. At its end, the entire structure will be installed in a vertical rod;
- The height of the stand is adjustable with additional holes;
- Smooth discs need to be bent and the edges cleaned.
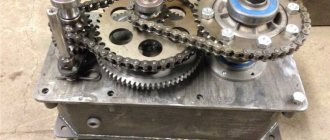
Manufacturing process
The entire manufacturing technology comes down to the following steps:
- Drill holes in all plates to connect them.
- Next, you need to fasten the square plate to the rectangular ones using bolts so that there is one cutter on each side of the square plate.
Homemade cutters for mini tractors
The product is ready, but before you begin processing, you must make sure that each structural element is reliable.