Summer residents and gardeners know very well how difficult it is to manually prepare their plot of land for planting in the spring, care for plants during the summer and harvest while simultaneously preparing the soil for wintering at the end of the season. However, now we are not in Soviet times, when manual labor on one’s own land was practically no alternative. Therefore, in special stores you can buy mini-equipment for plowing, cultivating and other land cultivation.
The feasibility of homemade products
Despite the fact that there is a greater variety of attachments on the market, they may not always be suitable for certain tasks.
And the price-quality ratio sometimes leaves much to be desired. Therefore, many gardeners make the necessary accessories for walk-behind tractors with their own hands. To do this, it is enough to have a drill, grinder and welding machine on hand, as well as have the skills to work with them. Only in individual cases, when more precise calculations and turning work are needed, do you have to turn to highly specialized specialists.
An advantage to homemade products is that at any disassembly site you can easily find the necessary component or assembly from an old car suitable for construction.
Mini bulldozer
You can turn a walk-behind tractor into a miniature bulldozer capable of leveling small areas or removing snow and debris by installing a shovel blade on it. For this, sheet metal with a thickness of at least 3 mm is used. The lower part of the shovel should be slightly bent forward in relation to the general plane, and a strip of thick rubber should be attached to it for snow removal or sheathed with tin (for excavation work). To strengthen the entire structure at the rear, it is necessary to weld several stiffening ribs from a metal corner.
Self-propelled rake
Despite the availability of factory-made rakes, many farmers prefer to make them themselves, taking into account the characteristics of their farm: the size of the meadow, the relief.
Metal pipes and hardened rods are used as materials for rakes. But as an option, you can use factory manual forks by welding them to the base. For ease of work, it is advisable to install small wheels or ski feet at the edges, which will relieve the load on the entire structure.
What is a walk-behind tractor
A walk-behind tractor, or motor-cultivator, is a self-propelled two-wheeled unit that is equipped with an internal combustion engine. The device moves freely forward, and the summer resident walks behind it, holding handles with various components and controls. Many available models have multiple gears for forward and reverse movement. In order for the operation of such an invention to be as productive as possible, it is equipped with additional tools, including a plow, which allows plowing and cultivating the land.
The average weight of a walk-behind tractor reaches 100 kg, and the engine power often exceeds 8 horsepower. Due to such features, such a tool can become indispensable for plowing a garden area.
You should pay attention to the fact that all walk-behind tractors are equipped with a special drive for attachments, which allows you to transfer part of the engine power to a suspended mower. Basically, such a universal mechanism allows you to cope with various agricultural work, including:
- plowing the land;
- cultivation;
- transportation of the crop (in this case, you need to get a small trailer);
- cutting the grass.
With the help of such miniature trucks, residents of our regions transport firewood, fertilizers and crops. In winter, it can be used as a snow removal tool. Even the weakest model can easily pull a load weighing up to 400 kg.
Equipment for land cultivation
To cultivate the land, craftsmen have developed a number of devices that are superior in quality to factory products.
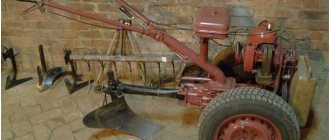
Most often, a do-it-yourself plow is used as a device for a walk-behind tractor, since factory prices are quite high. To make it, you should use sheet iron with a thickness of at least 4 mm, from which the knife itself and pipes with walls of the same size for the frame and fastening are cut directly.
Hiller
A device for hilling beds can be made from two metal disks.
They must be the same size with a diameter of at least 50 cm. It is advisable to pre-sharpen the edges of the disks for better soil sampling. Their fastening to the frame should be thought out so that it is possible to change the distance between the disks in accordance with the width of the bed.
You can also consider new versions of various devices that make the work of caring for a garden easier as homemade products for a walk-behind tractor :
Their drawings can be easily found on the Internet and taken as the basis for a future product.
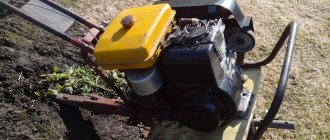
Motoblock from a motorcycle
Here we will consider the option of assembling a walk-behind tractor from the Soviet motorcycle IZH Planet 5. First of all, we dismantle the engine. To optimize its operation, the cooling system will have to be slightly altered - make it active rather than passive.
Easier starting is possible if you increase the thrust. To do this, replace the valve with a reed valve. Since the speed may be too high, it would not be superfluous to install a speed booster.
You can weld the frame of the future walk-behind tractor yourself, but if you have a working frame from a motorcycle, then simply upgrade it. It is necessary to cut off the front wheel fork and all excess. Then weld a mount at the back of the frame to install the hitch.
A particularly important component is the gearbox. The gearbox from the Ant motorcycle is well suited for these purposes. All that remains is to install the axle on the frame and secure the wheels. The wheels can be anything, but it is better to use those from a Lada car, as they have high cross-country ability.
From tractor to boat
The most common modifications from a conventional walk-behind tractor are all kinds of complex equipment and vehicles.
True, the latter can be more called homemade products based on the engine and transmission of the device. Potato planters . If there is a large area for planting potatoes, a device based on a walk-behind tractor would be ideal. It includes several elements at once. First of all, the potato planter is equipped with a small hopper for tubers.
In front of it is a plow that makes a ditch, and behind it is a hiller that fills and forms a bed. All devices must be adjustable in accordance with the planting depth and size of the beds.
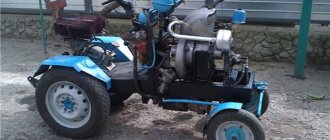
Mini tractor . Most often, craftsmen construct all kinds of mini-tractors. In this case, the shift in the center of gravity of the equipment should be taken into account, since the engine is installed in the rear. Therefore, care should be taken to expand the wheelbase of the rear axle.
Currently, you can find on sale all kinds of components and assemblies for creating a tractor based on a walk-behind tractor, such as front axles, brake system, all kinds of rods and levers, pedals. But if you wish, you can make all this yourself, using suitable parts from old cars.
When using more powerful tires, such a tractor can easily turn into an all-terrain vehicle.
Boat motor . The engine from a walk-behind tractor can also be an ideal replacement for a conventional outboard motor. To do this, the necessary fastening should be made on the boat hull, and the standard engine cutter should be replaced with blades. In the right hands, a walk-behind tractor can also become the basis for creating a small buggy-type car. True, it will not be possible to drive in urban conditions - this is due to the official registration of the vehicle with the state traffic inspectorate. But it can be an excellent help in rural areas for fishing trips or hunting for mushrooms. Also, such an “SUV” is ideal for mastering driving skills for beginners.
Converting the Mole cultivator into a walk-behind tractor
Some craftsmen turn the Mole cultivator, which has very modest characteristics, into a walk-behind tractor for plowing virgin soil. The power of this model is only 2.6 hp, and the total weight with the cutter does not exceed 50 kg.
So, let's look at the stages of remodeling:
- Dismantle the original engine and install a more powerful one (6 hp will be enough). The single-cylinder, four-stroke, air-cooled engine can be removed from any old walk-behind tractor, or purchased at a garden equipment store.
- To install the engine, weld 2 steel angles to the body of the unit and make 3 holes in them to which the unit will be attached. Fasteners in different places are needed so that the motor can be moved relative to the axis of rotation of the cutter to change the center of gravity during different jobs.
- Replace the belt tensioner with a wider one, and the pulley with a double-lane one.
- The Mole's steering wheel needs to be strengthened and lengthened for ease of operation. This is achieved by welding pipes of a suitable diameter onto the racks, and between the handles a crossbar from the same pipe or angle should be welded.
- Install a rotating plow on the frame to make the future walk-behind tractor maneuverable and easier to control.
- Modify the installed cutter by welding segments of homemade “crow’s feet” along the edges, 2 on each side. Such a device is capable of plowing virgin soil and crushing large clods of earth. Thanks to this modernization, the working width increases by 25 cm, and the productivity of the machine increases significantly.
The Mole, converted into a walk-behind tractor, despite its size and low weight, is capable of “raising” virgin soil with amazing speed, but has a significant drawback - it is difficult to control.
How to make a walk-behind tractor from a cultivator
Cultivators and walk-behind tractors belong to agricultural machinery and act as indispensable assistants for the population of the private sector, as they are multifunctional and practical. Many people believe that a cultivator and a walk-behind tractor perform the same function and do not see a significant difference between them. The cultivator is intended only for soil processing, while the walk-behind tractor has wide functionality and is aimed at performing various works on a summer cottage. However, the heaviness of walk-behind tractors leads to rapid fatigue of people who use them to work on their plots. In this article we will tell you how to make a walk-behind tractor from a cultivator in order to greatly facilitate the work of land lovers.
What does a mechanized structure look like?
Let's imagine ideas from which you can make a simple walk-behind tractor. Firstly, the main unit is the internal combustion engine (ICE). Most often single-cylinder to reduce gasoline consumption. Secondly, the design must allow plowing, weeding and becoming a vehicle.
You can attach a number of homemade devices to the walk-behind tractor to make work in the garden easier. The most necessary: a moldboard or moldless plow, a drum or tine cultivator, a grass mower with a minimum grip, or a pump for supplying water from any source.
The question immediately arises: what is the gas mileage? A 4-liter tank is installed on the walk-behind tractor. It is enough for half a day of engine operation. But only if it is not a virgin (compacted) area, but is often cultivated, even with a shovel.
Why do you need to modernize your cultivator?
The cost of a cultivator is several times lower than that of a walk-behind tractor, so many people prefer the first option. However, when performing various tasks with the ground, they are faced with the problem of low functionality of the cultivator, which is not oriented towards shallow digging of the soil or harvesting. Having design skills, you can solve this problem by converting the cultivator into a walk-behind tractor, while saving the family budget.
If you use attachments such as hillers, plows, and the like, then a reduction gear is extremely necessary. Because you need increased torque at low speeds. To do this, it is necessary to accelerate the engine to higher speeds, since the cultivator is designed to work with only one cutter and in order to provide the opportunity to install diverse attachments on it, it is necessary to make a walk-behind tractor from it. To get a low gear on the cultivator, it is advisable to install a special gearbox on it. Initially it seems that this is a complex technical device that can only be made in a factory using special equipment.
However, in fact, remaking a transmission mechanism that converts angular velocity into one or more mechanical gears with your own hands is not a difficult task.
First you need to establish yourself with the basic operational parameters of the power plant. The technical documentation indicates the number of revolutions of the crankshaft. This is the main value that is necessary for making calculations when converting a cultivator into a walk-behind tractor. To create a reduction gearbox for a cultivator you will need the following tools and materials:
- Bulgarian;
- welding machine;
- drill;
- sandpaper and drills;
- ruler;
- vice;
- hammer;
- metal sheet approximately 5 mm thick;
- pipe for fixing bearings.
What can you build on your own?
The market for factory-produced walk-behind tractors offers customers a fairly wide range of products to suit every taste. However, not many people can afford the prices for such agricultural machinery. Therefore, in gardens in rural areas, you can quite often find a homemade walk-behind tractor, which in terms of operational parameters is in no way inferior to its factory counterpart.
When creating universal designs, craftsmen most often use parts of old motorcycles and scrap metal
Morally outdated motorcycle models often serve as the basis for the manufacture of various homemade products and small-scale mechanization tools useful in the household.
Since homemade walk-behind tractors are often created from scrap old materials, the Druzhba saw motor, known to many, is often used as the engine of the unit.
Based on homemade walk-behind tractors, craftsmen create tools that are no less important in agriculture, for example: plows, as well as hillers for hilling corn or potatoes
One of these masters is the inventor Valentin Arkhipov, who is the author of the manufacture of a number of useful devices and the construction of all kinds of household equipment.
A talented designer has created a multifunctional device with which you can not only plow and harrow the land, but also plant and hill tuber crops, as well as harvest and rake tops
Therefore, when thinking about how to make a walk-behind tractor with your own hands, it is better to opt for this proven and successfully used option. Any person can handle a simple and easy-to-use agricultural implement.
Gearbox installation
The basic element of the stroke reducer being created for a cultivator is the body. The quality of the entire mechanism, the mutual arrangement of the axes and shafts, and the single center of rotation of the bearings directly depend on it. In our case, the body will be made of metal sheet by welding. To simplify the procedure for servicing the component parts of the gearbox, one of the walls must be made removable. The bearings and their precise boring are supported by pieces of pipe whose inner diameter coincides with the outer diameter of the bearing. After the trimmings are fixed in the desired position, they are thoroughly secured by welding.
For the manufacture of shafts, a rod with a round cross-section made of high-quality steel is used. The workpiece is machined to the required parameters and the shaft is given the desired shape. During operation, the shafts rotate together with the sprockets, transmitting torque through the chain and keys. The shafts are supported by bearings, which take on significant loads during excavation work. The service life and performance of the created gearbox will largely depend on how correctly the bearings were selected. The best option would be to use closed radial bearings, which require little maintenance. Sprockets and chain can be purchased or used from decommissioned equipment.
The sequence of assembling a reduction gearbox for a motor cultivator:
- Cutting a metal sheet into component parts of the body and cover.
- Pipe cutting.
- Installation of bearing seats.
- Manufacturing of the body.
- Coating the body and lid with paint and varnish.
- Mounting bearings.
- Mechanical processing of shafts.
- Installation of shafts with simultaneous installation of sprockets and chain.
- Securing the housing cover.
After the manipulations have been performed, the converted mechanism is installed on the cultivator frame and sea trials of the cultivator are carried out. The use of a homemade gearbox increases the power of the equipment and makes it possible to expand its scope.
What is needed and how can it be changed
In fact, putting a motor cultivator on wheels is not at all difficult:
- First, you need to carefully measure the fit dimensions of the output shaft, paying special attention to its shape (cylinder or hexagon), outer diameter and distance to the hole for the cotter pin.
- Then you need to visit the nearest gardening store or look online to order hubs (differential amplifiers) that match the dimensions of the cultivator shaft.
- At the same time, you can purchase wheels (the smaller the diameter, the better) for your future walk-behind tractor. By the way, wheels with hubs and drawbar are often sold in a single set, which is very convenient.
- We screw the purchased wheels to the hubs;
- We remove the cutters from the motor-cultivator shaft;
- We install the wheels on the gearbox shaft.
Experts do not recommend upgrading low-power cultivators weighing up to 45 kilograms and equipped with a worm gear in this way, as this modification can lead to serious damage. In addition, when converting a motor-cultivator into a walk-behind tractor, you should not use old car wheels (too much weight and size).
At the same time, it is worth understanding that a cultivator on wheels, the modification of which will require at least three thousand rubles, may be a walk-behind tractor, but not quite a full-fledged one. Of course, such equipment will be able to move independently, but serious problems can arise with the use of attachments if the cultivator’s motor is weak (less than 6 hp) and the reduction gear is of a worm type, rather than a gear, belt or chain type.
Therefore, the next stage of converting the cultivator into a walk-behind tractor should be replacing (if necessary) the gearbox. The cost of this part in stores is comparable to the price of a new cultivator. However, you can try to make a simple gearbox with two opposite shafts at home, if the owner of the cultivator has the skills of a good mechanic/designer and has:
- measuring instruments (ruler, caliper);
- spare parts and consumables (bearings, gears, belts or chains, pulleys, shafts, gaskets, seals, pipe for bearings, bolts, etc.);
- welding machine;
- drill and drill bits of different diameters;
- “grinder” or hacksaw for metal;
- set of screwdrivers and vice.
If all this is available, then you can start manufacturing the gearbox:
- We draw or search on the Internet for a suitable sketch and calculate the gear ratio, taking as a basis the number of engine idle speeds plus 10%.
- We cut a metal sheet with a thickness of at least 5 mm to obtain a blank for the lid and body of the future part.
- We cut the pipe and, using welding, install the seats for the bearings.
- We assemble the body and protect it with paint and varnish.
- We install bearings.
- We produce and process shafts from round steel bars.
- We install shafts with the simultaneous installation of sprockets or pulleys, chains or belts.
- We make a gasket between the body and the cover, and also insulate the shafts using seals.
- Fill the housing with lubricant (oil) and install the cover.
- We place the homemade gearbox on the cultivator frame and connect it to the engine via the output shaft.
- We adjust the operation of the gearbox with the engine turned on, but without any special loads, so that the parts can be worn in.
How to convert a motor-cultivator into a walk-behind tractor
It would be inappropriate to upgrade a light cultivator with a weight of up to 45 kg and an engine power of up to 5 hp, since the tractive effort of the unit will not be enough to perform a wide range of tasks. Let's consider the stages of converting a medium or heavy class motor-cultivator into a full-fledged walk-behind tractor.
- Refinement should begin with strengthening the chassis; for this it is necessary to install large wheels on the unit, which will increase cross-country ability. The first step is to measure the necessary parameters (diameter, length, shape) of the output shaft for the manufacture or purchase of new hubs. To make turning turns easier and improve maneuverability when working, differential extensions can be installed instead of hubs. The wheels are perfect for automobiles, for example, from the VAZ Zhiguli. If you can’t find the wheels you need at a disassembly site, you can purchase new tractor wheels and tires in specialized stores.
- If the future walk-behind tractor will be actively used all year round, it is necessary to install a front drawbar on it. It will be needed to aggregate the machine with various attachments (snow shovel, hiller, potato digger, lawn mower and others). The required part can be purchased at agricultural equipment stores (the best option would be a universal drawbar with a diameter of 30 mm).
- To install an attachment belt to transmit torque from the motor, you will need a steel or silumin double-groove pulley. You can also purchase it in a store, or remove a suitable one from old agricultural equipment.
- Install a new walk-behind gearbox, or make it yourself (as shown in the video above).
DIY hand cultivator
With the onset of spring, summer residents and owners of garden plots have a lot of work, because before planting garden crops, soil cultivation is required. The most difficult work is considered to be digging and loosening the site . For this purpose, most summer residents use an ordinary shovel, but such work takes a lot of time and effort. Fortunately, there is a more effective device - a cultivator. With its help, you can complete a large amount of work in a short period of time. You can buy a device or make a manual cultivator with your own hands, saving a lot of money.
DIY hand cultivator
More about the device
The most popular are small designs whose weight does not exceed 20 kg. They are very productive and compact, and with the help of such products you can perform various tasks on the site: removing weeds, loosening the soil and even applying various fertilizers. A hand cultivator will also be useful when caring for some plants, as it is capable of loosening the soil near the beds, thinning and hilling them.
Small hand cultivators are popular
Note! Of course, you cannot compare a hand-held cultivator in terms of power with a walk-behind tractor, but for basic tasks in a garden plot it is quite enough. The advantages of hand tools include the absence of fuel or electricity costs, as well as the ability to use them in hard-to-reach places.
Such a cultivator cannot be compared in power to a walk-behind tractor.
The design of most types of cultivators includes special cutters, which, moving around the site, loosen the soil. Other attachments can also be used:
- paws for loosening the soil;
- a special sock that loosens and cuts the soil, thereby removing weeds;
- hiller for creating small grooves in the soil, which are needed for sowing various crops;
- needle disk , which is used when a large crust forms on the soil surface;
- feeding knives with special dispensers . They are necessary for applying fertilizers to the soil.
Types of cultivators
The classification of devices is carried out depending on the mechanisms used. Cultivators are shared with the following equipment.
- Electrical . Mainly used for processing large areas. The device can only operate if there is a source of electricity. The design is lightweight and compact in size; moreover, such devices do not pollute the atmosphere with harmful substances.
Electric cultivator DAEWOO
- Rechargeable . This type of equipment is used to work in small areas. The advantages of battery-powered cultivators include high mobility and small dimensions.
- Gasoline. Another type of equipment that is considered one of the most common among summer residents. It has high performance, good mobility, and is easy to use. But such devices must be properly maintained, not to mention polluting the atmosphere with harmful substances. Hyundai petrol cultivator Mechanical. It is no secret that hand cultivators are very easy to use, they do not take much time and effort, and are also low in cost. There are several types of designs of hand cultivators, starting with a simple “Tornado” cultivator, which is an ordinary fork with curved fingers on the bottom, and ending with a flat cutter. Hand cultivator
The advantages of hand cultivators also include the fact that they are easy to make yourself. This does not require special skills, just follow the recommendations. To make a particular design, you need the correct drawing of the product, a little free time, patience and, of course, some tools and materials.Hand cultivator "Gnome"
DIY flower pots
In our new article, we share the best flower pot ideas! The most original and beautiful options, step-by-step manufacturing instructions, useful tips - all this can be found in this article!
What do you need for work?
To make various devices for soil treatment at home, you need to prepare special materials for this. First of all, you need to take care of getting steel. The more different pipes, sheets or metal rods you have, the better. You can’t do without a set of tools, but they are present in any garage, so you don’t have to bother finding them.
When working with metal pipes, you cannot do without special tools.
A welding machine is one of the most important tools for working with metal products. With it, you can connect different parts made of metal in just a few seconds. Of course, in most cases you can do without a welding machine by connecting the parts using self-tapping screws. But the quality of such connections cannot be compared with the quality of welds.
Inverter welding machine
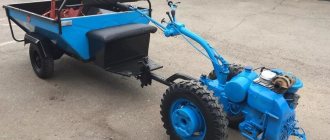
Homemade walk-behind tractor according to Arkhipov’s instructions
The design of such a walk-behind tractor is made in the form of a self-propelled two-wheeled unit, which comes with an engine from a VP-150M scooter.
This motor model has such a design that under increased loads the cylinder head is forced to cool using air. If you follow Arkhipov’s instructions, then at the next stage you will have to make a U-shaped frame welded from a corpse, and then turn the wheel axle on a lathe. For the main and control rods, 3 hinges should be created, which will act as connecting elements between the walk-behind tractor, the steering wheel and the plow.
In turn, the frame of the unit is equipped with a steel pipe with an axle using a welding machine. This will allow tensioning of the cables going to the gearbox. The tension itself is provided by a rocker arm. Gear shifting is carried out using a welded piece of steel pipe.
As for analogues of such a development, there are indeed a lot of them, however, the original version has some undeniable advantages.
Advantages of the Arkhipov walk-behind tractor:
- The presence of a swivel joint. It is no secret that most processing devices and tractors are equipped with a rigid connection, which negatively affects the maneuvering of the unit, making it difficult to work with it. All elements of Arkhipov’s design are connected to each other using hinges. Due to this parameter, it becomes possible to change the direction of movement during work without removing the plow from the furrow.
- Shift of the axis to the direction of movement. When cultivating the soil using a walk-behind tractor, many summer residents have a problem such as a gradual displacement of the unit to the side under the influence of resistance. It takes a lot of effort to level the furrow. To compensate for skidding, the master placed the plow axis at a slight angle in the direction of movement. While performing work, the structure moves slightly to the left, and the required direction is adjusted through the rod hinges.
- Plowing depth level. In most existing models of walk-behind tractors, the immersion depth of the working element is determined by lowering or raising the plow. In the case of this variety, it is changed automatically. To adjust, the angle of the plow relative to the furrow changes. In turn, the structure is equipped with a field board, which acts as a lifting force when the plow is arbitrarily buried in the ground. If the problem manifests itself in the opposite way, and the ploughshare appears above the surface of the ground, then the angle of attack again sinks into the ground to a specific depth.
Assembly of hand cultivators
Once you have prepared everything you need for work, you can begin making a hand cultivator. This is a unique product that has a number of advantages, for example, compactness, availability of materials for its manufacture and the efficiency of the finished cultivator.
Manual soil cultivator
A homemade cultivator will make it possible not only to remove weeds throughout the entire area, but also to thoroughly loosen the soil. But, as noted earlier, hand cultivators are not intended for large areas , so if your garden or vegetable garden has a large area, then it makes sense to purchase a gasoline cultivator. Manual structures are best suited for country work. At home, you can make such types of hand cultivators as rotary, disk, flat cutter and others.
Cultivator-weeder: 1 — wheel assembly (from a garden cart), 2 — main frame, 3 — spring, 4 — chain lock, 5 — hook, 6 — U-shaped rotary handle assembly, 7 — Ml2 fixing screw with hexagon head (3 pcs.), 8 — rotating bracket, 9 — weeder frame (steel strip 20×7), 10 — mounted raker (steel chain from a rod with a diameter of 10), 11 — 15-star weeder-clump breaker (from agricultural machinery), 12 — M10 nut with lock nut and washer (2 pcs.), 13 — rotating cultivator arm (from agricultural machinery, modified), 14 — axle bolt with nut and washers (2 pcs.), 15 — M14 bolt with nut (2 pcs.) .).
Rotary cultivator
The main tasks of the rotary structure are to harrow the soil and further level it. The cultivator consists of special hemispherical disks in the amount of 2 or 4 pieces. Each pair of these disks is attached to an axis, due to which the base of the structure can move. This allows you to increase or decrease the angle of inclination of the disks during operation.
Diagram of a rotary disk cultivator
The base must be metal, since it is subject to a large load during operation. The base itself can be attached to the handle. If all the parts are made of metal, this will significantly increase the weight of the structure, which is why many summer residents make handles from wood. When working, grass will not cling to the discs of such a cultivator, which is very convenient, especially when cultivating areas covered with weeds.
Lightweight DIY cultivator Disc rotary cultivator
Cultivator "Tornado"
An excellent cultivator with the simplest design, consisting of only three parts - a submersible element, a handle and a handle . In many ways, the principle of operation of a cultivator is similar to the operation of a corkscrew. You need to press the structure into the ground and rotate it, and then the cultivator can be lifted. During the treatment of the site, weeds are removed along with the root system. The product can easily be made at home if you follow the step-by-step instructions below.
"Tornado" - manual cultivator
Table. Manufacturing of the Tornado cultivator.
How can you upgrade a homemade walk-behind tractor?
The Arkhipov walk-behind tractor is multifunctional. It can be used as a plow or a cultivator. To do this, it is enough to replace the removable parts for the plow with parts with removed moldboards for the cultivator. As it moves, the walk-behind tractor will deepen furrows into the ground and place potato tubers in them. To plow the tubers, you just need to put the moldboards in place and walk the unit between the planted rows.
The same principle can be used to hill up sprouted plants. You can learn more about how to independently design a hiller for a walk-behind tractor from the material: https://diz-cafe.com/tech/okuchnik-svoimi-rukami.html
The agricultural unit is also convenient for harvesting. Using different blades you can change the working width. The unit is also good because it is capable of collecting missed potatoes and plant tops remaining after harvesting. For these purposes, it is equipped with a rake or harrow.
The universal design can be used not only for agricultural work. In winter, it is successfully used for snow removal. A faithful assistant will also come in handy for cleaning the paths of the local area. By installing a roller with a round brush and an additional sprocket on the walk-behind tractor, the owner will make it easier for himself to clear the sidewalks.