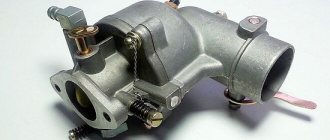
All lawn mowers and trimmers that run on gasoline have such an important element in their design as a carburetor. Externally, it is a small aluminum structure, which is connected through a heat-resistant gasket to the cylinder-piston group. The part plays a very important role, and if it malfunctions, the tool will function intermittently or will not start at all. If adjustment does not help correct the situation, then you should clean the trimmer carburetor. Every master can do this independently, having at his disposal the necessary tools, materials and knowledge.
Why clean the carburetor with a trimmer: what will this procedure do?
All trimmers running on gasoline, as well as brush cutters, are equipped with two-stroke internal combustion engines, the operation of which is impossible without supplying a fuel-air mixture. It should be noted right away that trimmers use two-stroke gasoline engines, which come in two types:
- Classic two-stroke engines - their design features, as well as the principle of operation, can be found here.
- Two-stroke modernized engines called 4-mix. Their description, design and operating principle can be found in this material.
Petrol mowers use conventional carburetors, the design and operating principle of which are identical to those of chainsaw units. The main difference between them is the presence of manual pumping, which is called a primer. If you are interested in understanding in detail the question of how the carburetor of a lawn mower works and works, then it is recommended to read this article.
Knowing the structure and operating principle of the mechanism, you can understand the issue of cleaning it. However, first, let’s find out why you need to clean it, and whether such actions will help solve the problem with the lawn mower.
If you have read an article about the design and principle of operation of a gas trimmer carburetor, then you already know that one of the main elements is a rubber membrane. It is this part that forces fuel from the gas tank to flow into the carburetor, that is, it plays the role of a gas pump. In this small but very important mechanism, fuel is mixed with air (the required proportion is created) and fed into the cylinder for combustion.
When answering the question, why clean the carburetor of a lawn mower, let’s remember the quality of the fuel that is poured into the tank. This is predominantly a gasoline-oil mixture, which contains small particles of sand and other contaminants. A filter located inside the gas tank is responsible for trapping these particles. However, the smallest particles still penetrate the fuel line and end up in the carburetor.
These small particles gradually accumulate in the channels, reducing the permeability of the fuel. In addition, they clog the valves and also cause failure of carburetor components.
This is interesting! The carburetor is made of aluminum alloy, so over time, a process such as metal oxidation develops. This also negatively affects the efficiency of the mechanism.
Most owners of gas powered tools do not store them properly. After all, the most important condition for proper storage is not to leave fuel in the tank for a long period of time. Why can't this be done? Over time, the oil begins to deteriorate, and therefore, the next time the engine is started, pure gasoline enters the internal combustion engine. Oil is located at the bottom of the tank, which enters the carburetor and causes clogging of the channels.
This is interesting! It is important to understand that the carburetor design has a rubber membrane that is resistant to aggressive substances. However, it must not be allowed to dry out, which can happen if all the fuel in the tank is used up, and the instrument is left to be stored in this condition for a long time. The membrane will dry out, causing it to malfunction. You should leave some fuel in the tank when storing the gas trimmer for a long time.
Flushing is needed to clean the channels and remove all contaminants that have accumulated over many years of operation.
If you follow the procedure, and you need to do it correctly, the performance of the instrument will improve. When the carburetor is clogged, the performance of the internal combustion engine decreases, power drops, interruptions occur, difficulties starting, etc. All this is solved by cleaning a small but very important mechanism called the carburetor.
Fikrlar • 107
The trimmer starts and goes into overdrive, the idle is not adjustable, the caburator is like in the video. What to do?
Sergei Radionov, perhaps the reason is different. is spreading, which means foreign air is getting in
In general, my fastening broke off, that is, the eye that holds the cable, I need to replace this valve, it’s difficult to remove it, put it on, or I need to make some adjustments later
LIKE! Is it difficult to change the fastening of the throttle cable with the ECHO GT22 valve in a trimmer yourself?
vatunov is not difficult, but the cable is expensive. the valve is also not difficult to replace, just set it
Yes, I'm joking))))
It would be better if I hit him with a Karcher)
Sergiy Khabibulin if it were all so simple)))
through the carburetor. Gasoline runs out near the air filter and does not start. floods. tell me what the problem is
Alexander Solopenko just wrote, they brought a calm 180 with the reason it stalls at high speeds, I opened the gas tank cap. I got a familiar smell))) I drained the hell out of this mixture, I’ll clean the carburetor right now
Technician Special Master thank you!
Alexander Solopenko there is a problem with gasoline, at many gas stations they make 95 gasoline from 95, change the octane number, and at the same time we add two-stroke oil. And. Imagine what kind of mixture your instrument eats. I have such a gas station next to my workshop. and the people who refueled there later bring it to me for repairs, but the gasoline there doesn’t even smell like gasoline, either felt like paint, or felt like gas, or some kind of acetyl. and this gasoline does not want to ignite at all, you pull the starter, gasoline enters the engine, but it does not ignite. and you pull harder, thereby flooding the spark plug, after that I unscrew the spark plug, turn the engine over (saw or trimmer) and pull the starter from the cylinder, “gasoline” flows out, with such a smell. I pull until all of it comes out. Then I fill in the new mixture and everything starts, well, I let the tool wear itself out. and then everything is ok! I'll try to make a video about this
Arsenbait, I filled up with gas from another gas station and this problem appeared (leakage from the air filter). I worked on this gasoline for about ten minutes. At the same time, during operation it could only operate at low speeds; when giving gas, the speed decreased and threatened to stall, and at idle the speed spontaneously increased. Or maybe this is a coincidence (different gasoline and the occurrence of this problem)?
Artyom. Candles cost on average 150 rubles. If you took cheap ones, then nothing surprising.
OK thank you very much!
If the spark strikes every once in a while, then the ignition is off, I don’t remember, but on the channel there is how I set the gap on mowers and paddles. worth looking for. check the coil visually, the wire and magnetic parts, whether it touches the flywheel, etc. write me I’ll tell you)
Artyom Kuprin the ignition can be set
Thank you very much, I’ll check, but how can I determine if the coil is bad and adjust the ignition, if anything?
Tell me what can I use to wash it other than carb cleaner. Is it possible with a bucket?
Evgeniy Raevsky Galoshes are not advisable - the elasticity of the membranes will deteriorate, it is better to just use pure gasoline or alcohol
Technician Specialist, is gasoline “galosh” suitable?
Andrey Beleush under no circumstances soak parts in gasoline, except for membranes and gaskets..
It turned out funny. The only reason was the fuel hose that was disconnected. Thank you
. Eventually it stopped starting altogether. What to do?
I bought a “champion” trimmer completely new from the store, I checked it when I bought it and it starts up. I assembled it at home and worked too. The fuel was left over from the store. Then I added gasoline as required. I started it and cranked it a little, but there wasn’t enough power for full throttle and it stalled. Started it up several times the same way.
Any elastic part is called a gasket?
Good afternoon everyone. The third day they are trying to trimmer. What's the problem? For about 20 minutes, half an hour it works like a beast. Then it gradually begins to choke, and eventually kirdyk. I disassemble the carb, blow it out, put it on, and that’s it for half an hour maximum. I thought it was warming up and left it until the morning. Until I get into the carburetor there are no changes. I tried installing a different carburetor. The same. The leader changed the filter. The adapter is on the cylinder too. Also hoses, spark plug. Question. Seals can suck in oil, but not throw out oil? Because it's dry. It's also dry under the cylinder.
after it stalls, unscrew the cap on the gas tank and work for another half an hour or clean the breather, which may be in the cap itself, depending on the manufacturer
Sasha Sh brought me two saws from different areas, but they were filled with gasoline from the same gas station, as it turned out later. As a result, the entire fuel system needed cleaning
Oleg thank you. I've often wondered about the gap. Thanks, I'll take it into account. But the problem was gasoline. I bought it at another gas station, and everything was just as my grandmother whispered.
Sasha Sh set the gap between the flywheel and the ignition coil. Fold A4 paper in two and adjust it to normal
Signs that your lawn mower carburetor needs to be flushed
The relevant factors will indicate that the time has come to diagnose the mechanism on the lawn mower. One of the main signs is interruptions in the operation of the tool. In this case, you should immediately clean the carburetor, otherwise it is fraught with the development of negative consequences. Other symptoms of malfunctions include the following:
- The engine cannot be started.
- The revolutions begin to float.
- The motor does not develop full power.
- The response to pressing the gas button occurs with a delay.
- Fuel consumption increases.
- When the engine warms up, malfunctions occur.
- Excessive amounts of black smoke are emitted from the muffler.
However, if the above symptoms occur, you should make sure that the cause is really a carburetor malfunction. Rule out other types of breakdowns, and only then proceed to cleaning and repairing the product on the trimmer.
This is interesting! It is not recommended to disassemble the carburetor unless absolutely necessary, and even more so if there is no experience in this matter. The mechanism consists of small parts that can be damaged or lost during dismantling.
In most cases, the above symptoms can be eliminated by adjusting the carburetor. Detailed instructions about this process are described in this material. All devices on lawn mowers have adjusting screws, with the help of which the idle speed, as well as the range of high and low speeds, are adjusted. The number and appearance of adjustment screws depends on the instrument model.
The spring may interfere
My first attempt at adjusting the carburetor braid failed because the spring on the fuel mixture adjustment screw prevented it. The factory spring was too thick when compressed and did not allow the fuel flow to be reduced to the required level. I had to assemble another spring and continue making adjustments after replacing it.
Spring adjusting screw
In the photo above. Factory spring, below the adjusting screw with the selected spring. I am writing about this because I am not sure if this is an isolated case and someone else may face the same situation.
In what cases is it better to replace the carburetor and not waste effort on washing it?
There are cases when it is easier to buy a new carburetor for a trimmer than to try to restore the functionality of an old device. It is important to take into account that you should only choose a carburetor that is original for a particular model of brush cutter, otherwise this will negatively affect the performance of the tool. There are cases when flushing the mechanism will not solve the problem, but to make sure of this, you will need to disassemble it.
- If corrosive deposits formed due to oxidation of aluminum are found inside a disassembled product, then repairs in the form of washing will simply be useless. You can try to restore the mechanism in such a situation using ultrasonic washing, but there are no guarantees.
- If the metal parts of the carburetor are damaged in the form of chips, cracks and other types of defects. In this case, you can immediately order a new mechanism.
- Failure of components - the product consists of various parts and elements that can fail. Most parts are not repairable and cannot be replaced due to the lack of spare parts, so in this case you will need to replace the mechanism completely.
This is interesting! There is an opinion that the carburetor can be cleaned using sandblasting equipment. However, this is not recommended due to the fact that it is impossible to clean the channels inside with sand, so this method for cleaning carburetors is simply unacceptable.
Experts say that working with a carburetor requires a special approach. If you are not confident that you can cope with the task, then it is better to entrust the work to professionals. However, in any case, nothing prevents you from trying to clean the fuel-air mixing mechanism of the lawn mower yourself, even if you are a beginner. There are two ways to clean the carburetor on a lawn mower:
- Automatic - involves disassembling the mechanism and then placing the parts inside the ultrasonic bath. You can read how to carry out this procedure in this article, where the flushing process is presented using the example of a carburetor from a chainsaw.
- Manual. If special equipment is needed to implement the first method, then in this case nothing other than a tool and a can of liquid for cleaning carburetors will be needed. This is the method preferred by most tool owners.
Due to the popularity of the manual washing method, we will pay special attention to this method and consider step by step how this can be done.
Operating principle
Fuel Injection and Filtration Procedure The brush cutter engine operates as follows.
- Using the air damper, set the amount of air supplied to the diffuser. The more air supplied, the more oxygen must be burned, and the more energy is released as heat. The thermal energy is then converted into mechanical energy.
- The diaphragm pump pumps the required amount of gasoline.
- The gasoline then passes through the engine fitting.
- Fuel passes through the intake and exhaust valves.
- The fuel is filtered through a sieve.
- Through the needle valve it also enters the chamber with the membrane.
The step-by-step operation of the carburetor is as follows.
- The air enters the air duct with an air damper. The damper sets the desired air flow.
- In the gas injection unit, the diffuser is narrowed. This is necessary to ensure higher air flow rates.
- The fuel passes through the float compartment and flows through this narrowing of the tube. The float compartment supplies gasoline. In this compartment the pressure is in equilibrium. In the narrowed pipe it goes down. Due to the difference between the two pressures, gasoline also passes through the injector.
- The accelerated flow atomizes gasoline, turning it into aerosol vapor. The resulting gasoline-air mixture is ready for ignition in the combustion chamber.
- After passing through the fuel line, this mixture enters the carburetor cylinder.
Conclusion: to set the required power, first of all, you regulate the rate of combustion of the fuel using the air damper. If the gap is too small and the oxygen content of this mixture is less than 10%, the fuel will not burn, so the engine will not start or stop immediately.
If you buy a Chinese trimmer, keep in mind that it is not much different from a European one. Same 2 or 4 stroke engine and drive.
However, they skimp on the quality of parts, forcing the consumer to change them more often. Check what compatible parts are offered by non-Chinese companies for your device.
Instructions for cleaning the carburetor of a lawn mower: a quick method
Many people prefer to use a quick method of flushing the carburetor of a lawn mower. This method is effective when isolated device faults are detected. Let's take a step-by-step look at how the disassembly and cleaning process happens with your own hands:
- To begin, you need to unscrew the four fixing bolts from the primer side.
- We will only clean the part where the membrane is installed, that is, the bottom. To do this, we separate the parts and, using a gun from the compressor, begin blowing with compressed air.
- We blow through the part of the carburetor with the jets.
- We remove the mesh and blow it through carefully so as not to damage it. Its contamination indicates the need to clean the channels.
- We check the condition of the foot (rocker arm) connecting to the needle valve. It should not be bent and move freely. Using gasoline or WD-40, you need to check that it is working correctly. After filling the bath in which the foot is located, you need to press on it. If liquid flows out of the needle valve, it means it is functioning properly.
- After making sure that the foot (rocker arm) is working properly, you can assemble the product.
- Assembly is performed in the reverse order of dismantling.
- Finally, install the cover with the primer and tighten it with 4 fixing screws.
After the carburetor has been cleaned using compressed air, do not rush to put it on the brush cutter. Now you can check the proper functioning of its operation, or more precisely, how it pumps fuel. To do this, connect the hoses to the outlet fittings.
We lower the supply hose into a can of gasoline and pump it with primer.
If gasoline flows out of the return line, it means that the work on cleaning the carburetor has been completed successfully. Now you can install the part on the lawn mower and check the quality of the tool’s functioning. This completes the process of quickly cleaning the product. The entire cleaning procedure is presented in more detail in the video.
Read also from the section
Why does my lawn mower stall at idle?
Why does a gasoline trimmer stall? A gas-powered scythe is a necessary thing for owners of personal plots and lawns, and when the trimmer suddenly stalls, the work of clearing the area of grass stops. The device itself is a rather complex mechanism, therefore there are many different circumstances of its breakdown. More frequently encountered problems are contained in the instruction manual. Know the prerequisites […]
Spark Lost at Petrol Mower
Build your own House! There is no spark on the trimmer. Many owners of trimmers are faced with a problem when the device simply does not start. One of the reasons for this may be the lack of a spark. This usually happens when fuel floods the spark plug. In addition, it is necessary to check the spark plugs for serviceability, as this can also lead to a lack of spark. The first sign of a faulty spark plug [...]
How to clean the carburetor on a trimmer: comprehensive cleaning with photo description and video
If your lawn mower is many years old, and you feel that the tool is working intermittently, and attempts to adjust the carburetor are not crowned with success, then you need to resort to the procedure of cleaning it. To do this, we dismantle the part from the tool and, using a table with high-quality lighting, get down to business. The following is a step-by-step process for disassembling, repairing and cleaning the carburetor from a brush cutter, which will be useful not only for novice mowers, but also for experienced craftsmen:
- We have a carburetor that needs troubleshooting and cleaning.
- It is best to carry out work on a clean cloth or clean sheets of paper to eliminate the possibility of contamination.
- For the convenience of considering the cleaning process, we will divide the mechanism into three main parts: upper, middle and lower. The lower part is on the same side as the primer.
- We start disassembling from the top part, where the mechanism connecting to the throttle cable is located. To do this, unscrew the two screws with a screwdriver.
- We remove the upper part along with the internal contents.
- Most often, the spring in the upper part of the carburetor wears out, which is responsible for returning the valve to its original position.
- The upper part must be thoroughly washed in gasoline. In this case, pay attention to the serviceability of the spring. If it is worn out, it is recommended to replace this part.
- Next, we move on to disassembling the lower part, which is the basis of the carburetor.
- Initially, we check the serviceability of the primer. To do this, you can connect the hoses and lower them into a can of gasoline. If gasoline comes out of the outlet hose, this means that the primer is working correctly. You can also close the hole in the supply fitting with your finger and pump it with primer. The absence of a corresponding sound indicates that the device is working properly.
- The primer still needs to be checked for compression strength. Over time, the silicone material from which the element is made begins to harden, which leads to the need to exert significant physical effort. If this situation happens to your lawn mower, it is recommended to replace the carburetor immediately.
- To clean the carburetor of a brush cutter, you need to unscrew the four screws that connect the lower part to the middle part.
- After this, separate the lower and middle parts.
- We remove the gaskets (2 pieces - they are made of different materials).
- We evaluate the condition of the middle part. Clogged channels must be cleaned and blown out with a compressor.
- If there is significant wear, the gaskets should be replaced. To do this, you will need to buy a repair kit for the carburetor of the corresponding model. The use of sealant as a gasket is strictly contraindicated.
- Using flushing liquid, it is supplied to all available channels.
- Next we move on to the bottom part with the primer. We remove the screws and remove the cover to which the silicone “prick” is attached - also known as a primer.
- The primer is attached to the steel cap using an O-ring, which must be in place.
- Next, we evaluate the condition of the rubber channel located on the plastic part. If the rubber element is dry, it should be replaced.
- Between the plastic and metal parts, where the foot with the needle valve is located, there is a membrane. We assess her condition. Signs of wear indicate the need to replace it.
- If there are remnants of the membrane gasket on the metal part, then the latter must be noticed. Residues should be cleaned out.
- Next, we disassemble one of the main devices - the rocker arm or foot, which is connected to the needle valve. This is done in order to clean the needle valve along with the channel. To do this, unscrew the screw shown in the photo.
- When unscrewing it, it is very important to hold the rocker arm so that it does not shoot under the action of the spring force.
- We remove the rocker arm along with the spring.
- Very carefully remove the needle valve.
- We thoroughly wash the valve in gasoline, avoiding the slightest warping, residues and contamination. Similarly, we clean the channel in which the valve is installed.
- After washing and purging all parts and components of the carburetor, you can begin assembling it. The assembly process is performed in the reverse order of disassembly.
This is interesting! For flushing, it is recommended to use gasoline or a special flushing fluid, the photo of which is shown below.
At this point, the disassembly and washing process is considered complete. Now let's sum up the conclusions about the work done. A video on how to clean a trimmer carburetor is shown below.
When is tuning needed?
In particular, in rare cases it is necessary to adjust the carburetor of a chainsaw; more often problems arise related to fuel consumption or wear of parts. But sometimes “symptoms” indicate the need to regulate the mechanism. Here are some signs:
- When the engine starts, it stops immediately. Alternatively, it won't start at all. The reason is too much air and not enough fuel.
- Fuel consumption increases as a result. Large amount of exhaust gases. This is due to the reverse process. Oversaturation of the mixture with fuel.
Reasons for failure may be mechanical:
- Due to severe vibration, the protective cap is damaged, causing all three bolts to become loose.
- Due to wear on the engine piston. In this case, adjusting the chainsaw carburetor will only help temporarily; it is better to replace the worn part.
- Due to clogging caused by poor quality fuel, scale or filter damage. The carburetor requires complete disassembly, cleaning and adjustment.
If the chainsaw suddenly stops working, it must be disassembled to find out the reasons.
Results of work on flushing the carburetor of lawn mowers
The carburetor flushing procedure is not difficult and takes no more than 1-2 hours. However, before you get started, you need to consider the following points:
- During the cleaning process, it may be necessary to replace parts and components, which should be purchased in advance. If the lawn mower is Chinese, it may be difficult to find spare parts.
- You need to be prepared for the fact that the mechanism may not be suitable for further use, so it will need to be replaced. The cost of carburetors depends on the model of the tool.
- After completing the work, you will need to resort to the setup procedure. There will be no difficulties with this, since detailed instructions for adjusting lawn mowers and trimmers are described here.
The most important thing when carrying out work is to remember the correct location of all parts and elements. It is strictly contraindicated to use sealant. Worn and dry gaskets should be replaced.
If you are faced with the need to clean the carburetor of a lawn mower, then you should not put off the procedure. Prepare your tools for the next season in advance so as not to miss the opportunity to tidy up the surrounding area around your house or prepare hay for winter.
Reviews of the GGT-1900T brand trimmer
This Hooter trimmer, reviews of which will allow you to make the right choice, is modern equipment for which you will have to pay 7,300 rubles. This device is powered by a two-stroke gasoline engine, which is cooled by an air system. The ignition is electronic, which, according to users, makes starting the equipment easier.
To increase the convenience of control, a bicycle handle is provided, on which all the necessary control buttons are located. This equipment, according to buyers, is used for cutting grass in personal plots. The design is durable and designed for intensive and long-term use.
Reviews about the main features and advantages of the model
- vibration damping system;
- structural strength;
- long service life;
- location of controls on the handle;
- easy start.
The Huter 1900 trimmer has a fairly impressive power of 1.9 kW. A knife or fishing line is used as a cutting element. The tank capacity is 0.7 l, and the thickness of the fishing line is 2 mm. Before purchasing this equipment, you should consider that its weight is quite impressive. This is claimed by many novice users. The weight of the equipment is 7 kg.
Clogged adjustment cavity
If dirt accumulates in the adjustment cavity, the inlet needle cannot tightly close the hole and a lot of fuel pours into the chamber.
This causes the fuel to become over-rich and the engine starts to operate incorrectly. It is necessary to disassemble the carburetor and clean the cavity of the adjusting membrane.
Fuel injector malfunction
The most recurring failure is wear and tear of the membrane. As a result, its non-adherence. Fuel passages are not sealed at certain stages of the engine cycle. The reasons here are:
- you work for too long on a lawn mower or trimmer without a break;
- low-quality fuel was filled;
- exhaust gases enter the pulse channel.
A deformed membrane has several bad consequences:
- there is not enough gasoline or oxygen in the created combustible mixture;
- the engine starts after 10 or more unsuccessful attempts;
- the engine knocks, clatters during operation, etc.;
- the working piston is deformed.
As a result, the internal space of the fuel pump becomes contaminated on the pulse channel side.
How to avoid brush cutter breakdowns?
The only way to avoid situations where a gasoline trimmer spontaneously stalls is to properly maintain the device, as we discussed in this article.
Carry out all routine maintenance in a timely manner, and when inspecting and checking the trimmer, be as meticulous as possible, this will allow you to detect a problem before it begins to affect the operation of the device.
Remember - all gasoline engines that are installed on lawn mowers are designed in such a way that they cannot stop working without a serious reason , so after even a single spontaneous engine stop, carry out a full diagnosis.
Why does the engine stall?
We've put together a brief overview of situations where a walk-behind tractor stalls under certain conditions, as well as a list of possible causes.
In the vast majority of cases, it is possible to eliminate the causes of an unplanned stop of a lawn mower only in a workshop, even if it is located in your garage, but even understanding the correct procedure will help you quickly find the source of the problem.
When you press the gas
To determine the reason why the gas trimmer does not start or stalls when you press the gas, proceed as follows:
- check the condition of the breather;
- check the condition of the fuel hoses and filter;
- Try adjusting the fuel supply at high speeds using the appropriate screw.
If all this does not help, you need to disassemble and wash the carburetor, and also look for air leaks.
At high speeds
To determine the cause, proceed like this:
- make sure the breather is working properly;
- check the hoses and fuel filter, they may be clogged with dirt;
- increase the fuel supply using the appropriate bolt on the carburetor;
- check the condition of the spark plug;
If these steps do not help find the cause, look for air leaks and check the carburetor, it may not be working properly or is clogged with dirt.
At idle
If the trimmer stalls at idle, but picks up speed and cuts the grass, then there are only two possible reasons:
- the idle speed adjustment on the carburetor is broken;
- There was an air leak between the carburetor and the engine.
To check and eliminate the first malfunction, try increasing the fuel supply with the idle speed screw; if the adjustment does not produce results, remove the carburetor and look for the air leak.
Doesn't pick up speed and stalls
Here is a list of possible reasons that the device is not gaining momentum:
- old expired gasoline;
- dirty air filter;
- clogged breather;
- clogged fuel hoses and filter;
- faulty or dirty spark plug;
- air leak between carburetor and engine.
Starts and stalls immediately
The reasons why the gas trimmer starts and immediately stalls may be:
- dirty fuel filter;
- clogged breather;
- carburetor clogged with dirt or damaged;
- damaged vacuum hose connecting the crankcase or carburetor.
After warming up
If the lawn mower stalls a few minutes after starting work, then most likely the cause is :
- clogged breather;
- clogged fuel filter;
- stuck piston rings.
Under load
Sometimes a lawn mower stalls when under load, that is, during operation, here is a list of possible causes of such a malfunction :
- clogged gasoline hoses or fuel filter;
- dirty air filter;
- soot-covered candle;
- exhausted fuel;
- air leak;
- carburetor clogged with dirt or out of adjustment.
Elimination methods
The list of upcoming work on the engine may be as follows:
- replacing the fuel pump;
- disassembling and washing the strainer;
- replacing the adjustment lever;
- it is also necessary to clean the adjustment space;
- replacing the membrane (or the entire block where this membrane is located);
- adjusting intake, exhaust and needle valves;
- replacing dampers;
- cleaning fuel channels and diffuser;
- replacing screw springs;
- change of primer.
Not all of these jobs can be completed. It often turns out that many of them are not needed if a specific malfunction is immediately detected.