Manufacturing methods and materials
When choosing material for a future caterpillar with your own hands, you should take into account the type of work for which they are intended. The product must not only be extremely durable, but also lightweight for convenient operation of the unit.
The first step is to install additional wheels on the walk-behind tractor so that there are a pair on each side. Future units will be mounted on them, the length of which will be the circumference of each wheel plus the distance between their axles, multiplied by two. All wheels must be the same diameter.
The most popular starting materials for making caterpillars with your own hands include:
- Conveyor belts and bush-roller chain.
- Unnecessary car tires.
- Chains and belts.
Each method implies its own course of action.
Conveyor belt and chain
The method of manufacturing a unit from these materials, according to most, is the simplest. It does not require a large number of tools and materials. It is recommended to consider the following tips:
- The thickness of the conveyor belt should be more than 7 mm, since it will be subject to strong physical stress that must be withstood.
- The tapes are fastened together using a bushing-roller chain.
- To increase the strength of the structure, it is recommended to sew the tape on the sides and ends using frequent stitches. The step between them should be about 1 cm.
If you follow this simple list of recommendations, you should get a durable and high-quality track for a walk-behind tractor that will serve its owner for a long time.
Tire construction
In addition to making a product from a transport belt, you can make a caterpillar from a tire with your own hands. Here you won’t have to stitch or hook anything together, since the tire already has a closed structure with a special clutch protector.
Tyres for regular passenger cars will not work. You need to find products for trucks or tractors that have a pronounced tread pattern.
The manufacturing procedure for such a unit can be divided into three main stages:
- A goose tape of the required width is cut out of the rubber. To do this, you need to use a very sharp knife dipped in soapy water.
- Using an electric jigsaw and a sharp, fine-toothed file, cut the sidewalls off the tire.
- The inside of the tire also needs to be cut with a knife or jigsaw.
- All that remains is to put the finished tire on the pre-installed wheels.
It is worth carefully studying the tread pattern. It must be clearly defined to maximize the throughput capacity of the walk-behind tractor by increasing the adhesion of the track to the surface.
Belts and chains
This method uses standard V-profile belts. They are attached to each other using rivets that are placed on them. Such a caterpillar is made from two pieces of identical chain and belts. The algorithm of actions is as follows:
- The ends of both circuits are opened and connected to each other to form a closed system. After joining, they must be compressed back and welded together for greater strength.
- Take suitable steel thickness. Small sections are cut out of it to be used as lugs.
- Using double-sided bolts, the lugs are attached to all links of both chains, and all the belts are attached to them.
Thus, you can get a durable and high-quality track made from belts and chains, made by yourself. This method is the most labor-intensive of all presented.
About the manufacturer Composite
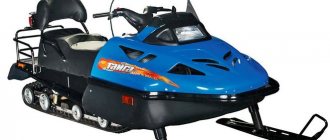
(official full name - CJSC NPO "Composite") specializes in the manufacture of tracks for snowmobiles. Its products have a good quality-price ratio, so it is not surprising that they are very popular among owners of this type of transport.
She also contacts the population of the northern regions, conducting surveys to find out their opinion on the performance of certain products on the market.
The name of the company itself accurately reflects the essence of its products - after all, the company uses the latest composite materials in the production of tracks. Together with the results of ongoing research, this allows us to achieve many important goals:
- the products are economical, their use can reduce fuel costs by 5-10%;
- manufactured caterpillars are lightweight;
- they have high elasticity, and this increases their performance characteristics;
- the tensile strength of the tracks increases;
- the effort required to move away becomes minimal.
Among its products you can find tracks for all popular models of the world's leading manufacturers:
For more information about the Yamaha snowmobile, watch the video:
- Lynx;
- Ski-Doo;
- BRP.
A wide range of tracks for domestic products is also available, producing tracks for snowmobiles from companies such as:
- Buran;
- Russian mechanics;
- Taiga;
- Varyag 550;
- Tiksi;
- Lynx;
- Ermak;
- Dingo;
- Stels.
So, the entire product range of the company can be divided into three main types of tracks:
- tracks for imported snowmobiles;
- tracks for domestic snowmobiles;
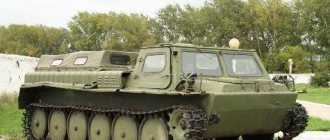
The latter include components intended for use on swamp vehicles, motorized towing vehicles, all-terrain vehicles and tracks on a walk-behind tractor. This vehicle is also widely used in different parts of our country, and the company is ready to provide the owners of such vehicles with tracks for all occasions.
A large number of people are engaged in sowing potatoes on their plots. Here you will learn about planting potatoes with a walk-behind tractor.
When choosing, you need to take into account not only the specific model of the vehicle, but also other important factors. These include:
- terms of Use;
- the nature of the routes you will travel on most often;
- the purposes for which the snowmobile is used;
- driving style.
For greater convenience for customers, a special service operates on the website www.composit.net: the program will help you choose the appropriate models for any snowmobile.
Track tracks
Tracks are the main part of any track. Fortunately, you don't have to buy them in specialty stores. They are quite easy to make yourself from various materials. The main thing that needs to be taken into account is the level of load that is planned to be placed on the walk-behind tractor. Tracks can be made from:
- plastic pipes;
- wooden blocks;
- metal tracks.
Read also: Rotary compressor principle of operation
To make tracks from plastic pipes, you will need water pipe No. 40. It is cut into pieces the length of which is equal to the width of the track. After this, each such segment is cut lengthwise into two halves. A circular saw with a wood cutting disc will help with this.
When all the tracks are ready, they can be attached to the main structure. For this, furniture bolts No. 6 and large hemispherical heads are used. With these bolts, each segment is attached to the structure itself.
Thus, we get an excellent relief track for a walk-behind tractor, allowing it to pass through difficult places even in winter.
A caterpillar made of wooden blocks is suitable for light loads, since the structural strength is not so great. To make a track from this material, you will need birch blocks of the same size and length equal to the width of the tracks.
The main advantage of a caterpillar with wooden blocks as tracks is the availability of materials, the lightness of the entire structure, and the ability to quickly make repairs.
It is not surprising that the most common and reliable are metal tracks for tracks, because their level of strength is quite high. Most often, metal pipes or a profile are used, which is cut into pieces of suitable length and attached to the track in the same way as was done in previous methods.
The main disadvantage of this design is the large mass and difficulty of repair. If one of the tracks bends during operation, you will have to spend a lot of effort to replace it.
It is recommended to make tracks from iron only in cases where the walk-behind tractor operates under heavy loads. In other cases, it is better to resort to other methods.
It is not so difficult to make a caterpillar for a walk-behind tractor with your own hands, although it takes quite a lot of time. It is important to treat the process with the utmost care and perform all calculations correctly. Also, it is necessary to assess the degree of load with which the walk-behind tractor operates and select the most suitable materials for the product.
An original homemade tracked snowmobile, made with your own hands from a 200 cc Sadko engine: photo of step-by-step assembly with a description, also a video of testing a tracked snowmobile.
The author of the homemade product, Evgeny Venglovsky, decided to thoroughly prepare for winter and take his wife and children for a ride on his own homemade snowmobile. The idea was a success, at the end of the article there will be an interesting video of driving through snowdrifts, but first, let's look at the process of assembling the vehicle.
About the manufacturer Composite
(official full name - CJSC NPO "Composite") specializes in the manufacture of tracks for snowmobiles. Its products have a good quality-price ratio, so it is not surprising that they are very popular among owners of this type of transport.
The company constantly conducts research on existing models to identify opportunities for their improvement. As part of such research, Composite conducts sea trials of tracks.
She also contacts the population of the northern regions, conducting surveys to find out their opinion on the performance of certain products on the market.
The name of the company itself accurately reflects the essence of its products - after all, the company uses the latest composite materials in the production of tracks. Together with the results of ongoing research, this allows us to achieve many important goals:
- the products are economical, their use can reduce fuel costs by 5-10%;
- manufactured caterpillars are lightweight;
- they have high elasticity, and this increases their performance characteristics;
- the tensile strength of the tracks increases;
- the effort required to move away becomes minimal.
Among its products you can find tracks for all popular models of the world's leading manufacturers:
For more information about the Yamaha snowmobile, watch the video:
A wide range of tracks for domestic products is also available, producing tracks for snowmobiles from companies such as:
So, the entire product range of the company can be divided into three main types of tracks:
- tracks for imported snowmobiles;
- tracks for domestic snowmobiles;
The latter include components intended for use on swamp vehicles, motorized towing vehicles, all-terrain vehicles and tracks on a walk-behind tractor. This vehicle is also widely used in different parts of our country, and the company is ready to provide the owners of such vehicles with tracks for all occasions.
The Texas walk-behind tractor is reliability and European quality. With its attachments, work will become much more efficient.
A large number of people are engaged in sowing potatoes on their plots. Here you will learn about planting potatoes with a walk-behind tractor.
When choosing, you need to take into account not only the specific model of the vehicle, but also other important factors. These include:
- terms of Use;
- the nature of the routes you will travel on most often;
- the purposes for which the snowmobile is used;
- driving style.
For greater convenience for customers, a special service operates on the website www.composit.net: the program will help you choose the appropriate models for any snowmobile.
The easiest way to select a product with the desired characteristics is to contact the company’s managers directly, from whom you can get all the necessary advice.
Snowmobile assembly.
Engines of the Lifan type are very suitable for building snowmobiles; the author decided to use a similar 200 cc engine with 6.5 horsepower, the Sadko GE 200 R.
This engine already comes with a reduction gear (½) and a centrifugal automatic clutch, which is activated when the engine speed increases, which is ideal for homemade snowmobiles, walk-behind tractors, go-karts and other equipment.
The photo shows a Chinese-made Sadko engine.
The snowmobile frame is made of a 25 x 25 profile pipe with a wall thickness of 2 mm.
The caterpillar is made of a conveyor belt 3 mm thick, the width of the belt is 300 mm, the belt itself was cut in half lengthwise at 150 mm.
The tracks are made of plastic water pipe with a diameter of 40 mm and a wall thickness of 5 mm. The pipe is cut lengthwise.
The tracks are screwed to the conveyor belt with M6 bolts with a wide head, the bolts are tightened with a nut through a washer and a screw. The edges of the tape are connected with the same bolts.
Track drive axle.
Guided star from Minsk.
Stars for the caterpillar track from the Buran snowmobile, homemade guide drums.
The support ski removes part of the load from the track; there are guide rollers at the top.
The rear axle moves along the frame along a guide, which allows you to tension the snowmobile track.
The front axle is stationary.
Driven and driven sprockets, as well as a chain from a Minsk motorcycle. Chain drive with a gear ratio of 1 to 3.
Steering rack.
The hinges are made using a threaded connection, nut and stud on M16.
The skis are taken from a children's snowmobile and reinforced with a profile pipe.
The photo shows how the star engages the track track.
Read also: Zero grade sandpaper, what is the number?
The seat is made of plywood in the form of a box, in front there is room for a child, in the back for two adults.
Middle support ski.
The equipment is ready for testing.
The snowmobile moves confidently when fully loaded.
In the photo is the author of the homemade product: Evgeniy Venglovsky.
I recommend the author’s interesting video about assembling a tracked snowmobile and testing it.
Drive system
A small diameter drive sprocket is installed on the engine output shaft. From it, torque is transmitted through a chain to the driven shaft, located under the engine seat. On the driven shaft there are:
- Large diameter driven sprocket.
- Gear wheels that drive the tracks.
- Guides for tracks.
The driven shaft is mounted on the frame using bearings. Gear wheels push the tracks, causing the tracks to move. The chain and sprockets are removed from one device. Old motorcycles and snowmobiles (Buran) are suitable donors. Gear wheels for tracks can only be removed from other tracked vehicles.
The guide rollers rotate with the shaft, are attached next to the gears and serve to tension the belt. They are made of wood or plastic and have a layer of soft rubber at the ends. Rubber prevents damage to the track. It is easy to make such rollers yourself by securing the edging with a furniture stapler.
How to make a homemade snowmobile with your own hands: diagram, photo and device
This homemade snowmobile was made in a few weeks with my own hands in my own garage. As we can see, its device is very simple, and will be quite within the capabilities of many home craftsmen.
Several years ago I built a snowmobile for my nine-year-old daughter with a homemade track made from conveyor belts and plastic water pipes as lugs. At first I had doubts about the reliability of such a track and how the plastic parts would behave in the cold. But during two years of winter operation, no breakdowns or severe wear of the pipes occurred. This inspired me to create a light snowmobile for myself with the same homemade track.
In the photo above is a homemade tracked snowmobile - at the top is a single-seater version and at the bottom is a two-seater version.
Understanding full well that the smaller the mass of the snowmobile and the larger the supporting area of the caterpillar, the better its cross-country ability in loose and deep snow, I tried to make the design as light as possible.
TOOLS FOR HOME AND GARDEN, HANDCRAFTS, ETC. PRICES VERY LOW
The operating principle of the snowmobile is very simple (Fig. 1). There are four wheels installed inside the caterpillar, which, when moving, roll along a conveyor belt on which lugs are attached. And the caterpillar drive from the motor is carried out by a chain through the driven shaft using special drive sprockets. I took them from the Buran snowmobile.
With an engine from a conventional walk-behind tractor with an automatic clutch with a power of only 6 horsepower, you will not accelerate quickly. I planned to ride the snowmobile not on compacted paths, but on loose snow, so I abandoned the soft track suspension and skis to reduce the weight of the snowmobile and simplify the entire design.
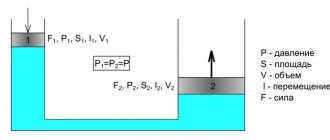
The principle of movement of caterpillar vehicles
For a tracked vehicle of any purpose, be it a tank or a snowmobile, forward motion is provided by a tracked propulsion unit (CT).
It uses two motivating factors:
- torque Mk transmitted from the engine/power drive to the drive wheels;
- adhesion of tracks to the ground.
A caterpillar or caterpillar chain of a main engine is a link structure, which is a continuous continuous belt or chain.
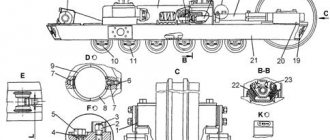
The caterpillar principle is illustrated by the kinematic diagram of the main engine operation located below. The following positions are indicated on the diagram:
- pos. 1 – caterpillar;
- pos. 2 – support rollers that prevent the track belt from sagging;
- pos. 3 – drive sprocket (drive wheel), which converts torque from the engine into traction force necessary for the forward movement of the machine;
- pos. 4 – support rollers, ensuring full contact of the track belt with the surface of the ground support;
- pos. 5 – shock absorbers;
- pos. 6 – guide wheel, which serves to direct the forward movement of the machine and transfers part of its weight to the ground.
Movement according to the caterpillar principle is carried out as follows:
- Torque Mk is supplied to the drive sprocket (item 3).
- The rotating sprocket rewinds the continuous track belt/chain (item 2).
- The caterpillar (item 2) is in close adhesion to the support surface (soil, loose soil, etc.). It is affected by:
- force Rz – reaction of the supporting surface that the caterpillar transmits to the vehicle frame;
- weight load G;
- tangential reaction of the ground support Pk.
The rewindable track belt/chain is continuously laid in the direction of forward motion of the vehicle on the surface of the ground support under the road wheels, creating a path for the vehicle wheels with lower resistance to movement than on soft ground.
The specific pressure on the support (soil) along the length of the track is uneven - increased in the area of the drive sprockets, decreased in the front part in the area of the guide wheel (item 6). The maximum pressure on the ground from the main engine is in the area of the road wheels (item 4).
Tracks for a homemade snowmobile
First I made the caterpillar. A plastic water pipe with a cross-section of 40 mm was cut into blanks for lugs 470 mm long. Then I sawed each piece lengthwise with a circular saw into two equal parts.
Using the device shown in Fig. 2, I used a wood circular saw to cut plastic pipes for lugs lengthwise.
Figure 1. Drawing diagram of a homemade snowmobile
I attached the lugs to the conveyor belt with two 6 mm furniture bolts with a large semicircular head. When making a caterpillar, it is very important to maintain the same distance between the lugs, otherwise they will “run” onto the teeth of the drive sprockets and the caterpillar will begin to slip and slide off the rollers.
Figure 2. Device for cutting plastic pipes: 1. wooden block; 2. plastic pipe; 3. metal corner.
To drill holes in the conveyor belt for 6 mm mounting bolts, a jig was made. The holes in the tape were drilled using a wood drill with a special sharpening.
Using such a jig, you can drill 6 holes in the conveyor belt at once to attach three caterpillar lugs.
At the store I purchased four inflatable rubber wheels from a garden cart, two drive sprockets from a Buran snowmobile and two sealed bearings No. 205 for the caterpillar drive shaft.
I asked a turner to make the drive shaft of the caterpillar and supports for the bearings. I made the snowmobile frame myself from 25x25 mm square pipes.
Since the axes of the ski and steering hinges are on the same line and in the same plane, you can use a continuous tie rod without ball ends.
Ski turning bushings are easy to make. I welded 3/4″ female plumbing couplers to the front cross member of the frame. I screwed pipes with external threads into them, to which I welded the bipod of the steering rod and ski racks.
I recommend using skis from the Argomak children's snow scooter. They are lighter and more flexible, but they need to be equipped with corners for attaching to the snowmobile's rotating stand and a metal undercut at the bottom - for better control of the snowmobile when moving on crusty or compacted snow.
Read also: How to attach a bracket to a shelf
The chain tension is adjusted by moving the motor.
Driving a snowmobile is very easy. When you increase engine speed with the throttle handle located on the steering wheel, the automatic centrifugal clutch is activated and the snowmobile begins to move. Since the estimated speed of the snowmobile is low (only about 10-15 km/h) and depends on the density of the snow, the snowmobile is not equipped with brakes. It is enough to reduce the engine speed and the snowmobile stops.
Design Features
A homemade snowmobile made from a walk-behind tractor is represented by key elements in the form of a driving and driven part. The latter consists of runners, steering column and shock absorbers. The driving part must consist of a drive, a frame and a power unit. To have a clear idea of the design of your future home-made equipment, select a suitable drawing taking into account the conditions of further operation, then make a sketch and make a cardboard mock-up.
As for the operating options, they should be thought through in advance so that when working on the drawing you have the opportunity to supplement and correct it. This way you will have a clear idea of what you can make yourself in the future, and which elements you can get rid of altogether. It remains to decide between wheeled and tracked travel; both options were discussed in detail above.
DIY snowmobile: manufacturing tips
I’ll share a few tips that may be useful when repeating this design.
1. I cut the pipe for the tracks lengthwise using a hand-held circular saw for wood, first on one side, then on the other. This makes it smoother than cutting both walls at once. It is more convenient to process small workpieces. If you immediately cut a long pipe lengthwise, then the plastic will melt and the saw blade will jam.
2. Caterpillars can be made of any width. And each designer has the right to choose what is more convenient for him: to make a wide but short track or a narrow and long one. Just remember that with a large caterpillar the snowmobile will be difficult to control and the engine will be more loaded, and with a small one it may fail in loose deep snow.
3. Some of my photos show that plastics are installed inside the tracks. These are guide stops for the slide, which should prevent the caterpillar from sliding off the rollers. But during the operation of the snowmobile, the caterpillar did not slide off the rollers even without slipping, so “barrels” can not be installed, which will reduce the weight of the snowmobile.
4. At the end of winter, I completely disassembled the snowmobile to determine its weight. The weight of its individual nodes turned out to be as follows:
- caterpillar - 9 kg;
- drive shaft assembly - 7 kg;
- two pairs of wheels with axles - 9 kg;
- engine and steering wheel - 25 kg; pair of skis - 5 kg;
- frame—15 kg;
- double seat with posts - 6 kg.
In total, everything together weighs 76 kg.
The weight of some parts can be further reduced. Nevertheless, the weight indicator for a snowmobile with a track of this size is quite satisfactory.
The geometric dimensions of my snowmobile are as follows: snowmobile frame length - 2 m; the distance between the axes of the support wheels (rollers) is 107 cm; The width of the caterpillar is 47 cm. The pitch of the caterpillar lugs depends on the thickness of the conveyor belt and it must be selected experimentally (I got 93 mm).
I do not provide exact dimensions and drawings of the snowmobile parts, since anyone who plans to repeat the design will be guided by those parts and components that they can purchase or manufacture on their own.
The photo shows the stages of manufacturing a snowmobile according to the above diagrams and drawings:
- Blanks for the lugs of the future caterpillar.
- Special drive sprocket from the Buran snowmobile.
- Homemade track drive shaft with sprockets installed for the chain and track.
- A jig for drilling holes in the conveyor belt.
- Track rollers with axles and mounting brackets to the snowmobile frame.
- The drive shaft of the track is driven from the engine by a chain from the motorcycle.
- Snowmobile frame with drive shaft and track rollers.
- Ski turning control mechanism.
- On this snowmobile I installed plastic skis from Chinese children's sleds. But the plastic from which they were made turned out to be very fragile and by the end of winter one of the skis broke.
- Skis from the Argomak snow scooter with an installed undercut (skate) and mounting angles for installation on a snowmobile.
- Ski turning bushings. It's very simple: no bearings. You only need to apply lubricant to the threads, and a long service life is guaranteed. In addition, by screwing in or out the pipes, you can change the ground clearance of the snowmobile.
- The axle of the front wheels (caterpillar rollers) is fixedly attached to the frame, and the axle of the rear wheels-rollers can be moved by rotating the bolt to regulate the tension of the track.
How to make a snowmobile on tracks: photo for article
Suspension type
Hard sporty or softer for a relaxed driving style? The choice depends on your driving style. A stiffer suspension is not always the best option. The important thing to consider here is the speed at which you usually drive. For example, the x-level suspension is great at high speeds, but can feel a bit too firm at moderate speeds. Some of the most modern models are equipped with springs with variable stiffness, which provide greater speed capabilities.
Dual or dependent suspension . In recent years, the most significant technological changes in the world of snowmobiling have occurred in the area of suspension. In particular, we are talking about the transition from dependent to dual suspension. The difference is especially noticeable when driving on an uneven road - when hitting bumps.
If the snowmobile is equipped with a dependent rear suspension , when hitting a bump, first its front part is compressed, and then its rear, and the rider receives a rather sharp blow to the spine area. Dual suspension works differently: when hitting a bump, the entire suspension compresses at the same time, giving the driver a slight vertical jolt that causes less discomfort and therefore has less impact on handling control. If you prefer a hard driving style, you will undoubtedly appreciate the dual suspension. Previously, it was possible to get a perfect rear suspension only by resorting to tuning, but now such a need has disappeared - all thanks to the Ski Doo SC-10III suspension!
Does everyone really need a snowmobile with only dual suspension? Of course not. Many models designed for moderate speeds, such as the entire Ski Doo Summit line, are available with dependent suspension , which works great in action. It’s just that on such a snowmobile you won’t be able to go over bumps as comfortably or ride at high speed on an uneven track. Remember, different models are suitable for different purposes.
Additional accessories
The category of additional elements includes shock absorbers, sleds and trailer.
Thanks to shock absorbers, riding a snowmobile will be more comfortable. To achieve the correct design, you can use levers designed for motorcycles. They can be new or used, but this point must be decided in advance.
Sleighs are a great way to transport luggage or passengers. If you decide to use an old sled, make sure it is strong and safe enough.
If you initially have a single-axle, two-wheeled walk-behind tractor, a compact trailer will help turn it into a two-axle, four-wheeled snowmobile. It must be tightly welded to the vehicle frame.
What else should you consider before purchasing a kit?
Manufacturers offer a huge variety of such accessories for ATVs. When choosing a model, consider the following points:
- Season. There are tracks that are designed specifically for use in winter (marked with the words “winter” or “snow”). There are also tracks on which you can operate an all-terrain vehicle throughout the year; they have o ().
- Route. Think about what roads you plan to travel on. If you want to increase your grip on the snow surface, take a closer look at models that are equipped with studs. At the same time, for loose snow, a tape with high hooks is better suited. A more universal option is with short hooks, which is designed for use on any type of coating.
The specialists of the motorboat center will help you choose the models that suit your goals and expectations.
To get detailed advice on availability, prices and characteristics, just call.
Basic elements of a motorized dog
The most important piece of equipment is the engine. Typically, a single-cylinder carburetor gasoline engine is used to create motorized dogs.
An equally important part is the rubber-metal track - the propulsion unit with suspension. With the help of the caterpillar you can drive on snow, ice, soft ground in warm weather
It is worth taking a closer look at all the components of a motorized dog.
Car engine
The motor from the Sh-58 moped, designed for manual gearbox shifting, is considered popular. Scooter engines can also be used. The main thing is that the product has good traction characteristics, a power of at least 6 hp. With. This is enough to transport one person and a load of 30-50 kg on a motorized dog. For a trip of two people and a load of 150-200 kg, it is better to choose an engine with a power of more than 9 liters. With. A chain tensioner is often used as an engine tuning element.
Motorized dog support frame
The frame must be of excellent quality, because on the road it experiences high loads, especially when driving off-road. This design is made entirely with your own hands, welded from rectangular metal pipes. Usually a pipe thickness of 3 millimeters is enough; thinner metal is not suitable, it quickly deforms.