Tractor trailer device
The design of the tractor cart consists of the following parts:
- Wheels and chassis;
- Frames (frame part);
- Flatbed body;
- The mechanism responsible for lifting the body;
- Tow hitch.
Based on their functional features, tractor trailers come in two types:
- Single axle tractor trailer – popular models that are suitable for transporting bulk and semi-liquid materials;
- Biaxial – for machines transporting heavy loads or bulk materials in large quantities.
Depending on the type of trailed equipment, there are also two types of tractors: - The cart is a dump truck - the trailer is tilted by an automatic system. This type is simpler and more convenient. Unloading is performed by turning a special lever;
Forced tipping - the body is lifted by additional mechanical devices.
Types of tractor trailers and their design
This category of agricultural machinery belongs to the category of special-purpose mechanical elements, which, with their design, size, weight and functionality, must fully comply with the specific agricultural purposes and technical features of the original tractor machine to which they plan to attach it.
Their device is extremely simple:
- chassis and wheelbase;
- frame base element;
- the body itself;
- lifting mechanism;
- drawbar (attachment to the tractor itself).
In accordance with their functionality, the following types of towed devices are distinguished:
- single-axle - a universal option that can be adapted for all categories of cargo transportation, not only bulk, but also in a liquid or semi-liquid state. They are most often found in the agricultural sector, as well as in construction work;
- biaxial - they cope well with transporting heavy loads of any volume and quantity, even if they are small agricultural units.
Another important point is how the trailer will be freed from loaded material. In this regard, trailed equipment is:
- self-tipping - its design is based on the principle of a conventional dump truck, reminiscent of a mechanical lever;
- forced lifting – in which the use of external mechanical means is necessary to lift the body part. This could be a high-power motor, an oil pump, or car lifts that are mounted directly under the body.
The first option is undoubtedly more convenient. It implies the presence of a central axis under the body structure, which is supported on it using hinge elements or simply bearings. The body is lifted by a lever mechanism, which must be locked to prevent spontaneous overturning.
DIY tractor trailer
Before you start making a trailer, you need to develop drawings and prepare consumables: metal sheets, channels, plywood, chassis block, metal pipes, two wheels with the same radius.
A homemade cart is made according to the instructions in seven stages. The first stage is organization and planning. It is necessary to develop drawings and lay the technical foundations for the future device.
If we take into account all the dimensional characteristics, we get a spacious and reliable tractor cart, which has a stable wheel configuration and a powerful frame.
List of required materials for the trailer:
- Sheet steel;
- Channel, preferably steel or other durable material;
- Sheets of plywood;
- Metal or aluminum pipes;
- Running block;
- Wheels of equal diameter;
- Electrical equipment;
- Grinder or metal saw;
- Fasteners and other elements for securing structural parts.
The presence of electric welding will simplify the process of manufacturing the trolley, and will also strengthen all structural elements.
Features of making a homemade cart
First of all, before directly assembling the tractor trailer, the manufacturer will need to study detailed diagrams, which should indicate the dimensions of the parts used, as well as the order and method of their installation in the overall structure.
The drawings indicate that the tractor cart should consist of several parts.
Their list includes:
- frame – the main strength element;
- chassis, including wheelbase;
- body;
- lifting part;
- a drawbar with which the trailer will be attached to a utility tractor.
To assemble each of these elements, the manufacturer will need:
- a pair of sheets of steel;
- steel or metal channel;
- blanks made of thick plywood;
- metal pipes;
- chassis block;
- 1–2 pairs of identical wheels;
- electrical connection equipment;
- Bulgarian;
- fasteners.
If you have all the materials and equipment, you can assemble the following types of carts:
- single-axis - the simplest and most popular option. A single-axle tractor trailer can be used to work with any type of agricultural machinery. It can be used to successfully transport bulk, liquid or semi-liquid materials;
- biaxial - they are distinguished by their high resistance to particularly large and heavy luggage.
For unloading, the tractor cart must be equipped with a separate mechanism.
Depending on the principle of operation, carts are divided into the following types:
- tipping randomly - they work on the principle of an ordinary dump truck, which is driven by a mechanical lever;
- forced lifting - in these structures, lifting the body requires the use of technically complex foreign components. Most often, for this purpose, the tractor cart is equipped with an oil pump, engine or car lift.
The most convenient is considered to be a single-axle tractor cart, in which the components of the body are held on the central axis by means of hinges. To make unloading possible, the easiest way is to make a randomly tipping trailer. It will be activated by a lever, which must be equipped with a stopper to reduce the risk of the structure overturning.
Manufacturing process of key trailer parts
Scheme for creating a homemade cart:
- Trailer frame. Design: front traverse, powerful rear beam, central axis, which strengthens the plate blade. For the manufacture of these elements, pipes with a diameter of 0.4 meters are suitable, which are connected by welding. The welded block will be static and motionless during movement when using channel side spars. It is better to reinforce the connections of the side members and the rear beam with gussets for greater structural strength;
- Wheel base. When designing, a steel rod with a diameter of 0.35 meters can protrude beyond the axis. The wheel base is attached to the frame by longitudinal hinges or supports from the corners;
- Body. Can be made of wood if suitable timber is available. But a more reliable option for containing heavy soils is metal or steel sheets. The dimensions of the body are determined individually and depend on the volume of work performed and the weight of the cargo. A wooden trailer requires high-quality solid planks. They are mounted on a metal base. The edges of the cart are secured to maintain balance;
- Connection of structural elements. Once all the key parts are ready, you can start connecting them. The frame must be positioned horizontally. Otherwise, the mount is balanced to withstand high friction and vibration during tractor operation;
- Lifting component. It is better to use a ready-made lift as a hydraulic cylinder. To connect to the frame block, you need a strut (under a truncated triangle). The upper stop (a regular steel circle is welded) is connected to the body frame. The hose is connected to the hydraulic drive of the unit itself;
- Run-in. The finished device must be checked to ensure that it is as reliable, functional and safe as possible during use. First, the trailer must be run in without any load. If no problems arise, tests can be carried out with an initially small mass.
A homemade trailer is suitable for various equipment, including the MTZ 1221 tractor. To make and use the cart easier, it is worth watching a special video on the topic.
Features of operating a homemade cart
In order for the cart to withstand intensive use and serve its owner for as long as possible, you must follow the rules for its use.
To do this, the user needs:
- Constantly monitor the reliability of fixation of fasteners. It must be remembered that even when moving on a flat road, the tractor creates vibration, which is transmitted through the lifting mechanism to the supporting frame of the trailer. Because of this, the bolts eventually turn out and fall out of their regular places. This can cause the cart to lose rigidity and cause cracks or deformations in the body. To prevent this from happening, you need to check the reliability of fasteners before each trip to the field;
- Inspect the trailer regularly for rust and rot. If pockets of corrosion are not eliminated in time, they will spread further over time. This will lead to disruption of the metal structure, as a result of which it will begin to crumble. To prevent this, you need to regularly tint the metal parts of the supporting frame and body of a homemade cart;
- Try to avoid overloading the tractor trailer. If you carry more weight on a cart than it can support, then this threatens to upset the balance and loss of structural rigidity. Over time, the trailer will skew to one side and it will be impossible to transport cargo on it, especially bulk cargo;
- control the pressure in the hydraulic pipes - a sharp drop or surge in pressure in the system will lead to the inability of the trailer to rise for unloading. This can happen at any inopportune moment, so the user should check the air pressure in the tubes and their integrity before each time they leave the house.
To avoid most of these problems, you should try not to use a tractor trailer to transport large luggage over severe off-road conditions. This will reduce the risk of increased load on the supporting frame of the cart and prevent it from tilting away from the central axis.
Types of trailers for tractors, their features
A trailer for a tractor belongs to the category of mechanical equipment that can be used in conjunction with a tractor.
In terms of its design, functional and size-weight characteristics, the trailer must correspond to all the technical features of the tractor to which it is planned to be connected. Particular attention should be paid to the type and condition of towed equipment.
Tractor trailer device
As a rule, the design of a trailer used with a tractor is simple and its design is not complicated:
- wheels and chassis;
- frame (frame element);
- flatbed body;
- mechanism for lifting the body;
- trailer hitch.
According to their functional characteristics, tractor trailers can be divided into two types.
- Single-axle is a popular trailer that can be used when transporting bulk and semi-liquid materials.
- Two-axle trailers - designed for transporting heavy loads or bulk material in large volumes.
Modern trailers are also divided by type of towed equipment. It can also be divided into two types.
- Tipping is carried out independently - the design is based on the principle of a dump truck.
- Tipping is performed forcibly - additional mechanical devices are used to lift the body.
The first type (tipping) is much more convenient than the second, because the trailer is unloaded by turning one lever.
Description of the cart
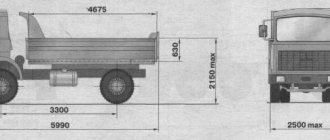
The 2PTS-4 trailer can be used in conjunction with any wheeled tractor with a traction class of 0.9 tf (T-40, LTZ-55, TTZ-80.10, VTZ-45AT) or 1.4 tf (YUMZ-6, Belarus-921, MTZ-50/52 , MTZ-80/82, LTZ-60AV), which is equipped with a pneumatic hydraulic system. Designed for driving on any type of hard-surfaced roads (asphalt, concrete, stone), as well as on country roads. The cargo that is allowed to be transported is agricultural, as well as bulk construction (except for cobblestones and rocks). The platform is quite spacious. It can recline on three sides at an angle of 50 degrees.
Specifications:
- weight of the equipped trailer – up to 1750 kg;
- maximum load capacity – 4000 kg;
- maximum speed – 40 km/h;
- overall dimensions (length/width/height) – 6250/2500/1800 mm;
- height with additional (extension) sides – 2780 mm;
- platform dimensions inside – 4080/2308/1600 mm;
- platform lifting mechanism – telescopic, using a hydraulic cylinder;
- suspension - leaf spring "all around".
The trailer allows you to transport various loads
Tractor cart. 7 points on how to do it yourself
We offer you instructions that are divided into 7 steps. Thanks to these instructions, you can make your own trailer on one tipper axle.
Development of drawings and preparation of source material: sheet metal, channel, metal pipes, plywood, running block, two wheels with the same radius.- Making the frame. Features: presence of a front yoke, a powerful rear beam and mounts for the central axle.
- Manufacturing of the wheel base. When attaching the axle to the frame, we use longitudinal-type hinges and lateral side members.
- Body manufacturing. If there is a sufficient amount of sheet metal, it is better to make the body from it. Overall dimensions are determined based on the dimensions of the frame and the intended tasks for the trailer.
- Making a trailer hitch. At this stage, the main thing is to balance the mounting of the drawbar and the frame.
- Tipping mechanism. At this stage, it is best to use a ready-made hydraulic cylinder, which is capable of overturning the manufactured body.
- Run-in. At this stage the trailer is used without any load.
Tipper single-axle trailer for tractor: 7-step instructions
For the description, we chose this particular design option, since it is the most convenient and most often used for agricultural work. It is advisable to present the entire cycle of its independent production in the form of 7 interconnected processes:
Step 1 - Organizational planning
During which a drawing is developed, the technical foundations for the future design are laid.
The photo below shows a ready-made drawing of such an agricultural mechanism, but with a wooden body, which, if desired, can also be made in steel or metal form. By following the established dimensional characteristics, you can get a fairly roomy and reliable cart with a stable wheel configuration and a powerful frame that will move even on the most difficult field roads without any problems. In addition, at this same stage it is necessary to prepare all the necessary initial parts and materials, namely:
- sheet steel;
- channel, preferably also made of steel or durable metal;
- plywood blanks;
- metal pipes, you can use the aluminum version;
- running block;
- wheels of the same diameter;
- electrical equipment;
- grinder or metal saw for trimming;
- elements for securing the structure.
It is very important to have electric welding on hand, which will not only simplify the process, but will also allow you to make a real monolithic mechanism, no worse than the factory one.
Step 2 - Making the supporting frame
Its design must necessarily have a front traverse, a powerful rear beam, and a main central axis reinforced with a plate cloth. It is better to make these components from pipes with a cross-sectional diameter of at least 0.4 m, which are connected to each other by welding. In order for the entire welded block to be static and not “walk” while driving, do not forget about the side spars made of channel bars. In addition, experienced craftsmen advise strengthening all connections of the side members and rear beam with gussets, which will give the structure an even more durable appearance;
Step 3 - Moving on to constructing the wheel base
Its axis can be represented in the form of a steel rod, the diameter of which is best taken 0.35 m. The wheel axle is attached to the frame itself, which is already welded, using longitudinal type hinges, supports from the corner or side spars. With this approach to compiling a body composition, we will get an excellent result, allowing us to significantly expand the field of activity of such equipment, which can handle not only cabbage or organic fertilizers, but also, for example, a cinder block for the construction of utility rooms (photo 8).
Step 4 - We begin the process of producing a homemade body
If you have suitable timber, you can make it wooden.
If funds allow and you need a more reliable option for storing future heavy loads, it is better to pay attention to metal or sheet steel. Their overall configuration should be selected individually depending on the volume of work and the size of the transported mass (photo 9). If this is a wooden product, you need to select boards of exceptional quality, which should not be raw and preferably solid, not from separate bars. They must be attached to a metal base - an ordinary corner. It is also worth securing the side positions of the trailer so that when the center of gravity shifts, the balance is not disrupted. There is another option for the frame - take a ready-made one, if of course you have one.
Step 5 - Having made the key elements for the hitch
It's time to start making the connecting structure of the frame itself with the body and wheels of the tractor. This may be a drawbar that goes into a special tubular sheet. In this case, you should ensure that the frame is in the correct horizontal position. otherwise, the mount will need to be balanced so that it can withstand the high friction and vibration generated by the tractor itself.
Step 6 - Lifting Component
For a hydraulic cylinder, you can take a ready-made lift that can tilt the body up to 50 0 and even more. In order for it to become part of the frame block, a special structure is made - a strut, shaped like a truncated triangle. It can be made from channel wood. The upper stop can be an ordinary circle, which can be cut from a metal sheet and then welded to the body frame. The hose from it can be connected to the hydraulic drive of the tractor itself.
Step 7 - Break-in
That very moment of assembly, which it is advisable to do not alone, but with assistants, so that the assembly is neat and of high quality, and all fastenings of hinges, bolts and other things are reliable and guarantee not only functionality, but also safety during field work.
Like any other mechanism, a newly manufactured tractor cart must go through a running-in process, for which it is initially used without loads. Only after making sure that everything is in good order and ready for full operation can you begin introducing this home-made model into production. In conclusion, it is worth noting that a tractor with a trailer is a more functional thing than without it. And the fact that there are no available funds to purchase a capital production modification of the cart can be easily eliminated by making it yourself from the available means at hand in almost every household.
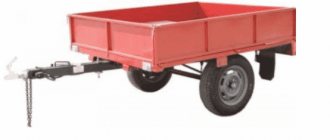
How to make a single-axle dump trailer for a mini tractor with your own hands
Many farmers are interested in how to make a homemade trailer for a mini tractor. Most rural residents appreciated agricultural machinery, but only more economical and compact ones, such as a mini-tractor. With such a vehicle you can not only plow, loosen the garden, mow grass and remove snow, but also transport various loads. And for this type of work you need to have a convenient and reliable trailer. Many people do not dare to buy such a simple but expensive product on the Russian market, but try to do it with their own hands. But where to start and how to make a tractor trailer with your own hands?
Photo: alexhobby.ru
Tractor trailer: step-by-step manufacturing instructions
Walk-behind tractors, tractors and mini-tractors are indispensable assistants for modern rural residents and farmers. Very often, a tractor in a subsidiary farm plays the role of a vehicle and a loader. To transport goods comfortably and safely, you need a trailer, which is often expensive.
If you have the necessary materials and tools, you can easily and quickly make a homemade tractor trailer yourself. We will tell you how to make a homemade tractor cart below.
How to make a trailer for a mini-tractor with your own hands
First you need to decide what kind of agricultural work a trailer or homemade cart for a mini tractor will perform. You can simply transport various loads, or you can transport manure and unload it using a dump truck. Making the first option won’t be too difficult, but the second one will have to tinker. There is no need to rush, you need to immediately do it efficiently and thoughtfully. First you need to draw diagrams. A homemade cart or other types of trailers and tractor equipment will be manufactured according to the drawings. It is worth considering that the tow hitch must have good load capacity and light weight. Then you should determine what kind of trailer to the tractor will be - two-axle or single-axle.
Let's look at how to make a single-axle trailer for a mini tractor with your own hands:
- First you need to weld the frame and the reinforcing crossbar.
- It is better to make all connecting elements and pipe joints by welding. This will ensure the reliability and strength of the structure.
- Then you need to weld the seat posts from pipes of a smaller cross-section.
- Now let's decide on the choice of wheels. Since the product has 1 axle, 2 wheels are required.
- It is better to take wheels for walk-behind tractors. They fit perfectly in diameter and have a reliable composition. With a reinforced tread, the tractor will be able to perform more complex types of loads and drive on bad roads without subjecting the tires to punctures.
Tips for choosing
When it comes to new trailers, it’s worth paying attention to the overall quality of workmanship. Some manufacturers use low-quality paints, so even on a new product it can sometimes crumble. Instead of normal operation, you will have to invest money and time in repainting. In addition, if the wiring to the lights is laid carelessly (and this happens quite often), then in winter it will rot.
When purchasing a used trailer, you need to carefully inspect the frame. If you constantly drive with an overload (and this happens all the time), a deflection or even a crack may form on it. A used frame (if you can’t weld the existing one) will cost 10 thousand rubles. Also require attention when choosing a trailer and sides made of boards or metal. Wooden ones may already be rotten, and steel ones may be subject to corrosion.
Be sure to read: Yamobur for a tractor
It is worth paying attention to the documents , which must be in perfect order. The cheapest used trailers do not have them at all (hence the price at the bottom of the market). Under certain circumstances, such a cart can even be registered, but this procedure is not very simple. Some even drive “as is,” although this risks a fine, as well as having the trailer delivered to a special parking lot. You can buy documents for the 2PTS4 trailer and separately from the cart itself - for about 15 thousand rubles.
How to make a dump trailer
Let's look at how to make homemade dump truck trailers for mini tractors with your own hands. If you decide to make a dump trailer, then you need to decide on the choice of lifting mechanism. There is nothing complicated here as it seems at first glance. There are 2 options for dumping the trailer: manual self-tipping and mechanical. The first can be done by welding handles to the front of the trailer. The tractor driver will lift the structure with his own hands. But you can’t do it with just one pen.
It is necessary to make an L-shaped pin, after pulling it out the trailer will tip over itself under the force of the load. A mechanical one will be a little more difficult to do than a manual one. You can make a mechanism that lifts a trailer from different types of lifting equipment. For example, it could be a jack or an electric motor with a battery, a winch or a hydraulic system, or you can get by with an oil pump. You need to attach the mechanism to the body in the most convenient way for you.
To attach homemade trailer equipment for mini tractors to the vehicle itself, you will need to weld an extended beam and attach a towbar to its end that fits your tractor. The finishing touches are painting the structure you made, upholstering the seats, and inflating the wheels. Then you need to check how the homemade product works.
Comparison of homemade and factory trailers
You can buy a factory semi-trailer or a dump trailer. Trailers for mini tractors are sold in all cities of Russia. It's just the price that may disappoint you. The cheapest type costs 10 thousand rubles, not to mention the design with a lifting mechanism.
Why spend money when you can make a reliable and durable trailer for your equipment with your own hands. You just have to have the materials necessary for the business and, most importantly, the desire. By the way, if you have not decided on the choice of the tractor itself, then a reliable assistant for working on agricultural land is the Belarus MTZ tractor. This brand of manufacturer differs from others in its quality and durability. The price may be higher than average, but the characteristics are not inferior to other devices.
In order not to get confused in the choice, it is necessary to take into account the parameters described above. The choice is always yours, but remember that with your own hands you can make a more reliable and high-quality product than what is available on trading platforms.
Do-it-yourself tractor trailer-dumper
The process of transporting any cargo always consists of three components: loading, delivery and unloading. Let's assume the load has already been transported to the farmer's yard. The moment of unloading comes - it usually happens here manually, rarely when it is possible to use a crane, except to remove some large weights from the vehicle.
And everything is done by hand! The work is labor-intensive, be it bulk or piece cargo. Here the question of “mechanization of the process” involuntarily arises.
I did this too. I decided to design a small “self-dumping” trailer for a tractor with a lifting capacity of 2 - 3 tons. As strange as it may seem, my eye initially settled on. kvass barrel. Officially, it is called the ATsPT-9 tank trailer for transporting kvass. Of course, I only considered the trailer itself, its frame, which can support a barrel of kvass with a total weight of about a ton.
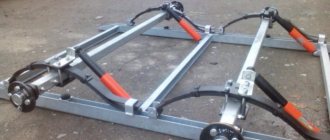
Homemade trailer frame parts
To make the trailer frame, I selected metal profiles similar to the channels standing on the frame: front traverse with a cross-section of 100x46x5 mm, side spars (to avoid longitudinal bends when passing on an uneven road) - more powerful - with a cross-section of 140x58x5 mm; the rear beam, which bears most of the load when lifting the body, is 120x52x5 mm. The frame was reinforced in diameter with a central beam of a slightly smaller cross-section - 100x100x4 mm. In addition, I secured the connection between the rear beam and the side members with gussets. Thus, a metal frame with dimensions of 1800x1700 mm was obtained, all connections of which were welded.
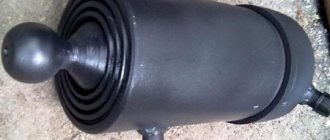
Dump truck trailer lifting mechanism
A 1PTS-9 tractor trailer lift was used as a hydraulic cylinder. The stroke of its rod is 850 mm, which made it possible to raise the body at an angle of slightly more than 50°, sufficient for complete sliding from the ground.
Body frame diagram:
1 — side stand (channel 500x50x5); 2 — stringer (channel 120x52x5); 3 — spar (channel 100x46x4); 4 - loop; 5 — floor trim (corner 80x80x6)
However, in order to install a hydraulic cylinder on the frame, it was necessary to make a truss in the form of an inverted truncated triangle - a strut - from a channel with a section of 120x52x5 mm. On the resulting lower platform of the strut, 300 mm wide, I placed a hydraulic cylinder. As a stop in the upper part, I used a metal circle with a diameter of 650 mm, welding it to the parts of the body frame. I connect the hose directly to the tractor’s hydraulic system. The strut clearance is 300 mm.
Hydraulic cylinder in strut:
1 — hydraulic cylinder, L 675 mm, 0102, stroke 850, weight 26 kg; 2 — strut, channel 120x52x5; 3 — front cross member of the frame; 4 - central beam of the frame. Strut clearance - 300 mm
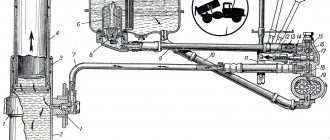
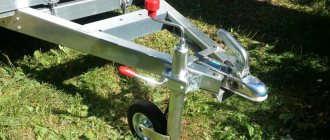
Drawbar for single axle tractor trailer
I had to tinker with the drawbar a little longer. The wheels of the cart - from GAE-53 (8.25R20) - have a diameter of 962 mm, and it turned out that when connected to the tractor, the frame was not installed in a horizontal position, but with a significant inclination. I had to “lower” the drawbar, and to do this, weld a reel under it from a channel with dimensions of 100x45x4 mm, in addition, put a trailing thrust plate in front with dimensions of 150x20 mm. After this, the frame “leveled out”.
Frame front:
1 — front crossmember; 2 - drawbar; 3 - transverse reinforcement; 4 - shook; 5 - stop