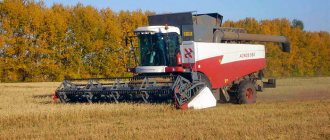
The SK-4 self-propelled grain harvester is equipped with two independent hydraulic systems: main and additional. The main one is intended for servicing the V-belt variator of the chassis speed, raising and lowering the header and reel and adjusting its rotation speed. The auxiliary hydraulic system only serves the power steering. In the latest production combines, the main hydraulic system is also used to drive the stacker mechanisms.
The threshing cylinder or rotor of a combine is driven by a hydraulic rotor motor. The rotary pump, driven by the internal combustion engine, supplies hydraulic fluid to the rotor motor to drive the rotor. A variable speed traction drive moves the combine across the field to harvest the crop. The control system varies the ground speed of the harvester based on the hydraulic fluid pressure supplied to the rotor hydraulic motor to maintain a substantially constant rate of feeding material through the threshing cylinder or rotor.
Tank 1 with an 18-element drain filter is common to both systems. The filter safety valve is adjusted to a pressure of 1.5 kg/cm2. Pump 2 of the main hydraulic system, brand NSh-32, right-hand rotation, with a nominal speed of 1480 per minute. Pump 3 of the power steering system - NSh-10, right-hand rotation with a nominal speed of 1700 per minute. Both pumps are driven by the engine timing gears. Pump 1 of the NSh-10 brand (Fig. 2) is fixed in spacer 2 and is driven into rotation by a non-disengaging cam clutch 3. Pump 4 of the NSh-32 brand is driven by clutch 6, activated by fork 5 only when the engine is not running.
Description of the invention for the patent
The control system may be an electronic system that senses hydraulic fluid pressure on the upstream side of the rotor hydraulic motor and modulates ground speed to maintain the measured hydraulic fluid pressure substantially constant.
The control system may also include a pressure control valve that modifies the ground speed to maintain hydraulic pressure at the inlet to the permanent rotor motor. A combine containing a frame; a harvesting mechanism mounted on the front of the frame, a threshing cylinder and a concave unit mounted on the frame, which receives cultivation material from the harvesting mechanism and threshes the material for sowing; a hydraulic cylinder drive motor that rotates the threshing cylinder; a variable speed traction drive that moves the harvester across the field; and a controller connected to the variable speed traction drive and the cylinder drive hydraulic motor, which senses the pressure of hydraulic fluid driving the cylinder drive hydraulic motor, compares the measured pressure with the selected pressure set point, and modifies the variable speed traction drive to control the material feed rate. for seeding going into the threshing cylinder and concave assembly.
Distribution valve 11 (see Fig. 1) is used to control plunger power cylinders 5, b and 7 of single-acting action. The diameter of cylinder 5 is 60 mm and the stroke of the plunger is 360 mm. A valve 4 is installed in the cylinder line 5, which closes the cylinder cavity during long journeys of the combine with the header raised. The device of valve 12 for controlling the power cylinder 13 of the variator of the combine chassis is the same as that of valve 11, the difference is that its plug only makes a rotary movement. The valve is connected to the pump discharge line behind the safety valve 14 and the accumulator control spool 15. The valve plug can be in three positions: “neutral”, “increase speed” and “decrease speed”. In the “neutral” position, both cavities of the power cylinder 13 are locked, and the oil from the pump passes through the cavities of the valve 12, and then through the distribution valve 11 is drained into the tank. To increase the speed, the valve handle is turned to the left, while oil is supplied to the rod cavity of the power cylinder 13. To reduce the speed, the valve handle is turned to the right, as a result of which oil is supplied to the piston cavity of the cylinder. Cylinder 13 piston, double-acting, piston diameter 40 mm, stroke - 153 mm. When the piston moves in one direction or another, the block of variator pulleys lowers and rises accordingly. As the piston moves downwards, the pulley block lowers and the V-belt enters deep into the block, which leads to an increase in the rotation speed of its pulleys. When the piston extends, the block rises, and the belt moves to the periphery of the pulleys, and their rotation slows down. To improve the process of stack formation and facilitate the work of the combine operator, a mechanism for automatically closing the bottom and valve (rear grill) of the stacker has been introduced on combines. This mechanism consists of sensors, which are hinged strips 20, connected by a system of rods 17 and levers with a spool 15, power cylinders 18 and a hand lever 16. In Figure 1, the bottom 22 and the stacker valve 21 are shown closed. In this position, the cylinder rods 18 are extended to the end, and the spool 15 is in the extreme right position. Oil from pump 2 enters the spool body and then, as shown by the arrow, flows freely through valve body 11 into the tank. The cavities of the power cylinders are also connected to the tank by spool 15. When unloading the hay, the spool remains in the same position, and the plungers of cylinders 18 move down, displacing oil into the tank. Throttle washers are installed at the entrance to the spool, which are discarded when drained and do not prevent the oil from leaving the cylinders. When pumping, the washers are pressed against the distributor body and, limiting the oil supply, contribute to the smooth closing of the valve and bottom. The mop, coming off the bottom, deflects the sensor bars 20 upward. After unloading the hay, the slats fall and, using a system of rods 17 and levers, move the spool to the left. In this case, the drain channels of the spool are blocked, and the pump discharge line is connected to the cavity of the power cylinders 18. The plungers, moving upward, close the valve and the bottom. As soon as they close, the feedback mechanism 19 will operate, which will bring the spool to the drain position shown in the figure. The hydraulic drive of the stacker uses the same cylinders as for lifting the reel. The hydraulic system of the SSh-75 self-propelled harvesting and transport chassis is similar to the hydraulic system of the SK-4 self-propelled combine. Two pumps NSh-32 and NSh-10 with a common drive are installed on the engine.
The combine harvester of claim 1, wherein the harvester comprises an engine and a cylinder drive hydraulic pump driven by the engine and connected to the cylinder drive hydraulic motor by a supply pipe that supplies hydraulic fluid under pressure to the cylinder drive hydraulic motor.
Adjusting the main hydraulic system units
The harvester of claim 1, wherein the variable speed traction drive includes a traction drive hydraulic motor that provides torque to move the harvester across a field, and the speed of the traction drive hydraulic motor is varied to vary the rate at which material is supplied for planting.
Master the disassembly, assembly and adjustment of the oil tank, gear pump NSh-32U, sectional distributor, air intake hydraulic cylinder and grain bin vibrator.
Consider the design features of the main hydraulic system units on the SKD-5 and SK-5, SK-6 combines.
Workplace equipment
. Training combines SK-5 or SK-6 with complete hydraulic systems; valve spring remover with split washer; caliper ShTs-P-0.1-200; spanners 27X30, 22X27, 22X24, 17X19, 12X14; mechanic's hammer 800 g; combination pliers 200 mm; screwdriver L200X 1.0 mm; calibration key.
The combination harvester of claim 5, wherein the variable speed traction drive includes a traction drive motor and a traction drive pump connected to each other by a traction drive supply line and a traction drive return line that forms a closed loop hydraulic traction drive system.
Disassembly, assembly and adjustment of components of the main hydraulic system
A self-propelled harvester comprising a frame; many wheels supporting the frame; at least two driven wheels mounted on the frame to move the frame; a harvesting mechanism mounted on the front of the frame for transporting the cultivation material into the separator body; threshing and separating rotor, with the ability to rotate on a frame inside the separator housing; concave, mounted on a frame that interacts with the thresher and the separating rotor to grind the grain; a separating grid mounted on a frame, which interacts with the thresher and the separating rotor to separate the grain from the threshed material; a cleaning unit mounted on a frame inside the separator casing; an internal combustion engine mounted on a frame to drive the combine; rotary hydraulic motor that controls the threshing and separating rotor; a rotary hydraulic pump driven by an internal combustion engine and connected to a rotor hydraulic motor to supply pressurized hydraulic fluid to the rotor hydraulic motor; hydraulic traction drive motor driving the driven wheels; a traction drive hydraulic pump driven by the internal combustion engine and connected to the traction drive hydraulic motor to supply pressurized hydraulic fluid to the traction drive hydraulic motor; a pressure sensor for measuring the pressure of hydraulic fluid entering the rotor hydraulic motor; an adjusting screw that changes the speed of the traction drive hydraulic motor; an electronic controller connected to a pressure transducer and an incline controller that compares the pressure signal from the pressure transducer to an adjustable pressure setpoint and sends signals to the incline plate controller as required to adjust the speed of the traction drive to maintain a substantially constant material feed rate for sowing through the threshing and separating rotor.
Work sequence
. Repeat the design of the main hydraulic system, designed to control the same working bodies as on the SKD-5 combine and, in addition, ensure cleaning of the radiator air intake mesh, unloading of loose grain from bins with vibrators, tipping the trailed trolley when working with a straw chopper, and on combines "Niva" - control of the movement of the conveyor frame of the ZhNS-6-12 windrower.
Operation of the steering wheel hydraulic booster
A self-propelled harvester comprising a frame;
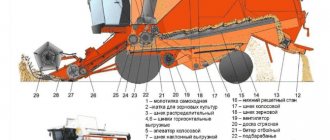
many wheels supporting the frame; at least two driven wheels mounted on the frame to move the frame; a harvesting mechanism mounted on the front of the frame for transporting the cultivation material into the separator body; threshing cylinder with the possibility of rotation on the frame; concave, mounted on a frame that interacts with the threshing cylinder to fill the grain; an internal combustion engine mounted on a frame to drive the combine; a threshing cylinder hydraulic motor that controls the threshing cylinder; a source of hydraulic fluid connected to the hydraulic motor of the threshing cylinder; hydraulic traction drive motor driving the driven wheels; a traction drive hydraulic pump driven by an internal combustion engine and connected to the traction drive hydraulic motor to supply hydraulic fluid under pressure to the traction drive hydraulic motor, a traction pump inclined plate installed in the traction drive hydraulic pump to control the flow of hydraulic fluid to the traction hydraulic motor drive; a traction pump clutch control valve connected to a traction pump hydraulic pump that controls the position of the traction pump inclined plate; and a feed rate control valve connected to a hydraulic fluid inlet of the hydraulic motor of the threshing cylinder, a source of hydraulic fluid under pressure and in hydraulic communication with a control fluid inlet in the pump control valve of the oscillating pump, and wherein the feed rate control valve controls the flow of hydraulic fluid through the control input fluid to control the feed rate of material to trim material through the threshing cylinder and concave mold. Find the locations of the hydraulic units on the combines: oil tank 6 (Fig. 86), gear pump 7, safety valve 9 and accumulator spool 10.
Inspect the sectional distributor 4 and the placement of pipelines running from the distributor to the front part of the combine to cylinders 1 for raising the reel, cylinders 2 of the header and to the variator of the reel speed 17. The pipelines to the cylinder 13 of the variator of the chassis and to cylinder 5 of the air intake are routed to the right side of the combine. Pipelines are also laid from the distributor to the vibrators 3 of the hopper and to the cylinders 11 of the stacker.
A method for controlling the material feed rate of a combine harvester for controlling the speed at which cultivation material is fed to a threshing cylinder, and a harvester threshing concave material containing. Selection of the set pressure corresponding to the torque load on the threshing cylinder.
Measuring the pressure of the hydraulic fluid entering the inlet of the hydraulic motor of the threshing cylinder drive. Comparison of the measured hydraulic fluid pressure entering the cylinder drive hydraulic motor inlet with the selected pressure setpoint.
Considering the installation diagram of the main hydraulic system, repeat the principle of its operation, which is as follows: a large 7 gear pump NSh-32U (see Fig. 86) sucks oil from the oil tank 6, common to all hydraulic systems, and pumps it when the safety valve 9 is not working through accumulator spool 10 to distributor 4.
Increasing the speed of the combine when the measured pressure of the hydraulic fluid entering the inlet of the threshing cylinder drive hydraulic motor is less than the selected set pressure by more than a certain amount.
Reducing the speed of the soil movement of the combine when the measured pressure of the hydraulic fluid entering the inlet of the hydraulic motor of the threshing cylinder drive is greater than the selected set pressure by more than a certain amount; and adjusting the set pressure when the feed rate needs to be changed.
When the distributor spools are in the neutral position, oil pressure opens the bypass valve, and the oil goes through the outer drain channels of the distributor through the pipeline to be drained, passing through the oil tank filter.
When one of the distributor spools is moved from the neutral (middle) position to the working position, the front drain channel is closed and the oil is directed to the switched-on consumer.
Regulating the material feed speed of the combine harvester according to claim 21, including: selecting the maximum soil speed of the harvester, which is not exceeded when the measured pressure of the hydraulic fluid entering the inlet of the threshing cylinder drive motor is less than the selected set pressure.
This invention relates to combine harvesters and, more particularly, to a control system that controls ground speed to maintain a constant load on the threshing rotor. The grain threshing, separating and cleaning assemblies of the combine operate at maximum efficiency only if there is a constant flow rate of feed material. Changing the grain feed rate or the feed rate of crops other than grain affects the operation of the threshing, separating and cleaning assemblies.
Find on combine harvesters the mounting points for single-acting plunger hydraulic cylinders, which lift the reel, change the speed of its rotation, lift the header and the bottom of the stacker. A special feature of these hydraulic cylinders is that they reverse under the influence of the weight of the working element or spring.
Consider the design of plunger hydraulic cylinders, which consist of a plunger and a housing. The housing has seals in the form of rubber rings and a wiper lip. The fitting connects the hydraulic cylinder to the pipeline, and the locking ring limits the exit of the plunger from the housing.
Standard adjustments found on harvesting machines allow different crops to be placed and harvested in different crop and weather conditions. However, these adjustments require time and skill. Changing the amount of material flowing through the combine can significantly change the efficiency of a harvest operation, even if weather and crop conditions remain the same.
Reducing the amount of seed passing through the threshing cylinder or rotor and concave can result in a significant increase in the amount of cracked grain. The cracked grain is blown out of the combine and onto the ground using the cleaning system's fan.
Find places to install double-acting hydraulic cylinders on combines, which clean the radiator air intake meshes, rotate the rear wheels of the combine, raise and lower the block of pulleys of the chassis variator for steplessly changing the speed of the machine.
Repeat the general structure of piston hydraulic cylinders using the example of a hydraulic cylinder for a variator, which consists of a sleeve within which a piston with sealing rubber rings moves. The sleeve is attached to the right side of the thresher. The rod passes through the cylinder head, which also has O-rings and a wiper seal. The piston rod is attached to the fork lever of the pulley block.
Increasing the amount of seed passing through the harvester can overload the cleaning system, creating a mat of seed material on the shredder screen, and most of the crushed grain will end up on the ground rather than in the grain tank. Increasing the amount of seed passing through the harvester can also overload the separating units and cause grain loss.
Combine harvesters are designed to operate at maximum threshing unit capacity, separation of assembly and cleaning units, and power source at any given time. To do this, the capacitance of each of the assemblies and the power supply must be balanced with each other. Due to changes in crop and weather conditions, it is impossible to achieve a perfect balance between threshing, separating and cleaning units and the energy source. In practice, operators typically adjust the threshing, separating and cleaning assemblies to feed crop material feed rates that provide sufficient power to advance the combine with current field conditions and to empty the grain tank.
On combine harvesters, find the installation location for shut-off valve 16 (see Fig. 86), which is designed to lock the oil in the plunger hydraulic cylinders of the header during transport crossings. At the same time, the valve is a tee that branches the fluid flow from one pipeline into two hydraulic cylinders.
After lifting the header, the spindle is screwed all the way into the conical seat of the valve body. Rubber ring seals eliminate oil leaks.
Disassembly, assembly and adjustment of components of the main hydraulic system
Disassemble and assemble the oil tank of the SK-5 combine
:
Assemble the oil tank and install it on the combine.
Disassemble and assemble the NSh-32U pump
:
Assemble the pump in the reverse order of disassembly.
Disassemble and reassemble the sectional distributor
:
- Disconnect the pipelines and control rods from the distributor body and unscrew the fastening bolts from the hopper wall. Remove the distributor from the combine.
- Unscrew three bolts 24 (Fig. 89) and separate the distributor into its component parts.
- Unscrew plug 18 (see Fig. 89) of the overflow section, remove sealing ring 17, pull out spring 16 and piston 15.
- Unscrew the glass 25 of the section adjacent to the cover 23. Remove the lock ring 1, thrust washer 2, spacer sleeve 3 and spring 4. Remove spool 22 of the section body without shut-off valves.
- Disassemble the section that controls the operation of the combine speed variator cylinder. Unscrew the glass and carry out all the operations according to point 4. Additionally, unscrew the plugs 6 of the shut-off valves, pull out the springs 8 and balls 9, press out the bushings 13 and remove the plunger 19.
Table 1: Diameter of orifice holes in rotary coupling bolts
The distributor section without shut-off valves, but with two connected pipelines, controls the operation of the hydraulic cylinder of the air intake valve drive mechanism.
Disassemble and assemble grain bin vibrator
:
- Disconnect the fork with the lock nut, located inside the hopper, from the vibrator rod 7 (Fig. 90). Remove the vibrator from the combine by disconnecting the pipelines from the housing fittings 8.
- Unscrew bolts 2 securing flange 4 of the vibrator and remove it. Pull out piston 7 with rod.
- Unscrew the bolts securing the spool covers 10 and 15, pull out the pusher 13 and spool 12.
- Remove the rubber sealing rings 5,6,11 and 14 of the spool and vibrator covers.
Assemble the vibrator in the reverse order of disassembly and install it on the combine.
Scientific supervisors – KLOCHKOV A.V. – Doctor of Technical Sciences, Professor
BUTOV S.V. – Head of CLAAS ACADEMY in the CIS
EE "Belarusian State Agricultural Academy", Gorki, Republic of Belarus
The final stage of cultivating agricultural crops is harvesting, and even having grown a high yield, you can lose a significant part of it during harvesting. In our republic, grain harvesters, both domestic and foreign, are used for harvesting grain crops, but both one and the other can harvest grain with or without losses.
Losses behind a grain harvester consist of losses from the reaping, cleaning, threshing-separating device (MSD) and compaction of the combine. Regarding losses due to combine compaction,
then there should be no talk about them; the combine harvester must have seals that prevent the harvested crop from spilling out. Setting up the header is also quite simple. For high-quality operation of the header, the cutting height must be correctly selected to prevent the spikelets from not being trimmed, and the reel operating parameters must be correctly selected. It is much more difficult to adjust the combine thresher and its very heart - cleaning.
The MSU performance indicators are separation, under-grinding and
splitting up.
An important parameter when setting up a grain harvester is the speed of its movement; it is the speed of movement that we
must set up the combine. Obviously, the higher the speed
movement of the combine harvester, the higher its productivity. Therefore, an important task of setting up a grain harvester is to set it up for high-quality work at the highest possible speed.
At the beginning of the setup, we recommend opening the upper and lower sieve, as well as the extension of the upper sieve, 15-20% more than specified in the instruction manual. Set the threshing drum speed close to maximum, set the gap between the concave and the threshing drum based on the recommendations given in the operating manual. Now we begin
work, gradually increasing the speed of movement, in order to determine the lowest productive link in the combine harvester, which will limit the operating speed. As a rule, for machines with a keyboard straw walker (the most common in our republic), it is this that has the lowest productivity. However, there is an opportunity to reduce losses behind the straw walker. To do this, it is necessary to reduce the supply of grain mass to it. Reducing the feed can be achieved in two ways: reduce the speed of movement, which is not entirely acceptable and will entail a decrease in productivity, or increase separation through the concave of the MSU. The latter can be achieved by increasing the drum speed to close to the maximum, but this may entail an increase in grain crushing, which is a negative factor. To reduce grain crushing in this case, it is recommended to increase the gap between the threshing drum and the concave. Practice shows that increasing the drum speed and increasing the gap improves grain separation, which makes it possible to unload the straw walker and reduce losses behind it.
Indicators of the quality of cleaning work are losses during cleaning and the purity of grain in the bunker.
Many recommendations for setting up combine harvesters talk about incorrect adjustments involving changes in several parameters at the same time. When setting up a combine clean, this is not entirely true. The loss of grain during cleaning is determined by the upper sieve, its extension and the fan, namely their correct adjustment and
collaboration. When setting, it is necessary to take into account the opening size of the upper sieve blinds and the air supply from the fan.
There is a certain connection between them that cannot be broken. The task of the air flow is to fluidize the grain mass entering for cleaning. In the case of low air supply and a large opening of the upper sieve, the mass will remain dense and not all grains will pass down through it, which will cause grain losses. Otherwise, with a large air supply and a small opening of the upper louvers
The sieve produces a “pudding” effect when the bread mass is cut by streams of air into layers of width equal to the distance between the blinds. In this case, the grains are partially blown out and come together with dense layers into which the mass received for cleaning was cut by air. Therefore, it is necessary to strictly coordinate the amount of air supply and opening of the upper sieve blinds. When adjusting, we recommend opening the shutters of the upper sieve to increase
reduce the air supply and vice versa. But in order for this system to work effectively, it is necessary to maintain the layer of the cleaned mass at a constant height, and this depends on the qualifications of the combine operator who, by adjusting the speed of movement, will be able to maintain a constant load of the combine. In this regard, we can say with confidence that grain losses are inevitable when entering and exiting the pen, since the constancy of the layer on the upper sieve is violated at these moments.
The lower sieve is responsible for the purity of the grain in the bunker, and its adjustment is the final step when setting up. To achieve the required purity of grain in the bunker, it is necessary to cover the lower blinds
sieve, however, if it is closed too tightly, there is a possibility of clogging of the grain elevator and circulation of already threshed grain through the combine.
You cannot adjust the combine by driving 10-30 meters, as many combine operators do; it is necessary to drive 100-150 meters to achieve the established operating mode of the combine and only then make a conclusion about the quality of work.
The described method for setting up a combine is quite complex and labor-intensive. This is due to the lack of remote adjustment of the gaps in the sieves (all domestically produced grain harvesters do not have this capability) and to change the gap it is necessary to stop the combine, stop the thresher, and only then
this is to set the gap. It is also not unimportant how accurately the loss sensors work and how they are calibrated, because if they do not work or produce incorrect measurement results, we cannot configure the combiner.
By applying this tuning technique to CLAAS combine harvesters, in particular LEXION560, we were able to achieve the following results during comparative tests of grain harvesters
combines carried out in the Belgorod region (table).
Currently, a modern grain harvester is a complex mechanism, consisting of many sensors, modules, indicators, complex hydraulic systems, but it is controlled by a person and configured for high-quality work.
Comparative tests of combines in an agricultural enterprise
"Oskol lands" of the Belgorod region during wheat harvesting
(5 bunkers threshed)
| Harvester | Harvest ness, c/ha | Travel speed, km/h | Performance | Operating time, min | Crop losses | ||
| ha/h | t/h | % | c/ha | ||||
| LEXION 560 | 69,3 | 3,72 | 3,91 | 25,5 | 82 | 0,17 | 0,11 |
| TUCANO 450 | 3,32 | 2,49 | 17,6 | 103 | 0,18 | 0,12 | |
| MEGA 360 | 3,73 | 2,46 | 16,93 | 105 | 0,3 | 0,24 | |
| NH CS 6090 | 3,34 | 3,01 | 19,82 | 93 | 2 | 1,12 |
Material taken from: Technical support of the agro-industrial complex: Materials of the XI International Scientific Conference of Students and Masters “Scientific Search for Youth of the 21st Century”, dedicated to the 170th anniversary of the Belarusian State Agricultural Academy
(Visited 31 130 times, 1 visits today)
Adjusting the main hydraulic system units
Adjusting the stroke of the distributor handles
: adjust the length of the rods and forks so that the levers to which the distributor handles are connected are in a vertical position. The stroke of the handles should be limited only by the stop of the spools in the body.
Adjustment of safety valves is carried out with the engine running.
- Release the valve spindle from the safety wire.
- Determine the time for raising the header from the lowest position to the highest. It should be equal to 4-5 s.
- By turning the valve spindle 1-1.5 turns, achieve the required time for raising the header.
- Lock the spindle.
Such adjustment is carried out in the field without the use of a pressure gauge. If there is a pressure gauge, it is installed between the pump and the distributor or between the distributor and the consumer. By placing, for example, the header in the uppermost position, by rotating the spindle, the valve is activated at a pressure of 61-67 kgf/cm2 (6.1-6.7 MPa).
Sunflower harvesting: attachment, device, combine harvester settings
Harvesting is the final stage in the production of any agricultural crop. Making a profit depends on how timely, quickly and efficiently the work is carried out.
Sunflower harvesting requires particularly careful attention to its timely start and the correct use of agricultural technology and transport.
Collection time
Sunflower harvesting begins under certain conditions. Since each plant has its own individual pace of development, one field can contain sunflowers with three degrees of ripeness:
- yellow - the reverse side of the basket and the leaves that surround it become lemon yellow. The plant has reached its maximum development and no longer accumulates nutrients. moisture in the stem, leaves and basket is 85-88% of the total mass, and in grains (seeds) from 30 to 40%;
- brown - the entire plant (including the basket) becomes pale or dark brown due to drying. Humidity decreases to 40-50% for the plant itself, and for seeds to 10-12%. This is a medium grade that requires additional post-harvest processing;
- complete - the plant is almost dry with a moisture content of 18-20%, and its seeds have a moisture content of 7 to 10%. This degree requires a minimum of post-harvest processing.
How to adjust the clutch?
After repairing or replacing the clutch, and sometimes when using the car, the gears stop shifting clearly and smoothly, the car jerks, and slips when starting off. This happens due to an unadjusted clutch, and we will talk about this in our article.
You can adjust the clutch yourself
Adjusting the hydraulic clutch
Hydraulically operated clutches are mostly self-adjusting. But you can also adjust them manually if the pusher on the working cylinder has a thread and a control nut. Here's how to do it:
Stage 1 - check the fluid level in the clutch. It should be at a normal level.
Stage 2 – create conditions for working under the machine. You can place the car on a ramp or risers, use a lift or inspection pit.
Stage 3 - find the working cylinder pusher.
Stage 4 - unhook the spring from the fork with pliers. Push the fork forward as far as possible and measure the distance between it and the pusher rod. We release the fork and take the same measurements. We get the size of the clutch gap, which we check with the standard one. If it does not fit into the range specified in the technical documentation (usually about 5 mm), we make an adjustment.
Stage 5 - remove the spring installed on the bracket of the working cylinder and fork.
Stage 6 - loosen the fixing nut on the threaded connection of the pusher, turn the adjusting nut in the direction of the working cylinder to increase the size of the gap. Or in the opposite direction. to reduce them.
Stage 7 - tighten the control nut when the gap dimensions become normal.
At the end, we carry out a control check of the clutch operation.
Hydraulic clutch , like mechanical clutch, can be adjusted manually
What happens if you don't adjust the clutch in time?
A clutch that is not adjusted in time will quickly fail, so it will soon have to be repaired or completely replaced. With increased pedal travel, the clutch is not completely disengaged; its disk is constantly pressed against the engine flywheel. With a small stroke, the clutch is not able to fully engage the driven disc, which leads to slipping and lack of torque.
Driving a car with an unadjusted or faulty clutch is dangerous and can lead to an accident!
Lack of adjustment is the reason for rapid clutch failure
The main signs by which you can understand that it is time to adjust the clutch
The approximate mileage interval at which it is recommended to check and adjust the clutch operation is 10,000 kilometers. It is worth checking the car maintenance schedule established by the manufacturer - other numbers may be indicated here.
adjustment is required after replacing/repairing the clutch or its elements, for example, the drive cable. The procedure is required even if there is a suspicion of deviation of the pedal amplitude from normal values:
- the car starts moving jerkily;
- the clutch pedal sinks or moves with difficulty;
- the fluid level in the hydraulic drive decreases;
- When changing gears you notice shock, noise and vibration.
you determine if the clutch needs adjustment. We start the engine, smoothly release the clutch pedal and slowly move away. If the car remains in place when the clutch is fully released, then the pedal travel has increased. If the car starts moving before you even take your foot off the pedal, its travel is too slow.
Adjusting the mechanical clutch
First, let’s find out whether the pedal stroke decreases or increases. We press the pedal all the way and measure how far from the floor it stops. Let's release the pedal and take measurements again. From the second indicator we subtract the first. Most models have a normal range of motion. in the range of 12.14 cm, it can be clarified in technical documents. If the number is less, the pedal stroke needs to be increased, if it is more, it should be decreased.
After the measurements, we move on to the adjustment procedure itself:
Stage 1 - open the hood, find a rod near the transmission lever that secures the cable coming from the clutch pedal.
Stage 2 - lubricate and loosen the nuts that secure the rod with liquid lubricant.
Stage 3 – using wrenches, turn the nut that was closer to the pedal. If you turn the nut towards the clutch pedal, the free play of the pedal will become greater, if in the opposite direction - less.
Stage 4 – again measure the amplitude of the pedal stroke. If it is within the normal range, tighten the second nut – the control one – until it stops. This is necessary to record the adjustments made. If the stroke is still too large or small, tighten the nut that is closer to the pedal.
Checking the clutch operation. The pedal should be pressed easily, without noise or friction. When starting, the car should not slip or move jerkily. Speeds should change smoothly and accurately.