One of the characteristic signs indicating the need to disassemble and adjust the gearbox is increased noise when the vehicle is moving. Causes of increased noise:
— displacement of the contact patch in the meshing of bevel gears as a result of a violation of the adjustment of the tapered bearings;
- scuffing and chipping of gear teeth, wear of bearings, as well as insufficient oil level in the axle housing.
device and roll the cart out from under the car.
Dismantling process
When repairing components of the Ural 4320, you should take into account: removing the front axle gearbox differs from the rear axle in that it is removed from the vehicle upon completion of dismantling.
After dismantling and installation on stands, the Ural gearbox is removed in the following way:
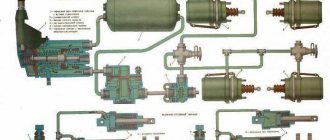
- disconnect the brake hoses, steering linkage rod, elements of the sealing device;
- unscrew the nuts connecting the ball joints;
- a mounting blade will help in dismantling the steering knuckle assemblies;
- We remove the entire side cover of the gearbox housing with an oil supply type fitting;
- unscrew the bolts and nuts holding the crankcase together with two bolts located inside;
- Using a device for lifting the load, we remove the unit itself from the axle housing.
The Ural rear axle gearbox is dismantled directly on the vehicle:
- Ural 4320 is installed on an inspection ditch. First, close the wheel valves by disconnecting their hoses supplying air, and remove the protective casings. Then drain the oil from the crankcase.
- We unscrew the bolts holding the tops of the hubs together, remove the angles that supply air from the axle shafts; and remove the tops of the hubs in parallel with the hoses and seals. Using a puller, remove the axle shafts.
- We remove the propeller shaft 4320 of the rear axle drive by disconnecting and moving to the side: the reaction rod, its upper bracket, pipelines, hoses of the braking and sealed system. We remove the side cover of the unit together with the oil supply fitting, unscrew the bolts and nuts located in the middle of the crankcase. We remove the gearbox from the crankcase.
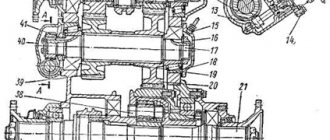
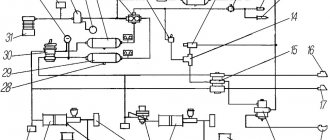
Details of the front axle gearbox Ural 4320
Assembly and adjustment
General assembly of the unit involves performing preliminary manipulations: assembly of components, lubrication of seals, thread surfaces and sealing plugs, welding surfaces of covers and gearbox housing; lubrication of bearings with transmission oil, and the working edges of the sealing collars with lubricant.
The installation process is a dismantling operation in reverse order, which requires:
- Checking the adjustment indicators of the bearing preload by selecting the diameter of the adjusting type shim pack.
- Measuring the amount of torque under the condition of continuous uniform rotation of the driven bevel gear assembly. Condition: manipulation is carried out no earlier than after five full revolutions.
Features of damage, diagnostics, repair of gearboxes of the URAL 4320 truck
Civilian and military modifications of the URAL 4320 truck are equipped with all-wheel drive. To ensure the operation of the all-wheel drive transmission, separate gearboxes are installed on the three axles of the truck. During extreme off-road use of a truck, breakdowns and misalignment of the gearbox become a frequent malfunction. In the initial stage, the malfunction manifests itself:
- unnatural noises (humming, howling, metallic knocking, crunching);
- crankcase overheating;
- oil leaks.
If the gearbox is not repaired, the following stages of failure cause destruction of the differential housing and separation of the axle shafts.
The causes of failure are:
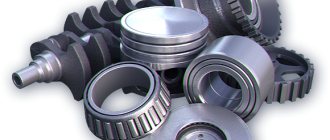
- natural wear of gearbox parts;
- oil starvation of gears (lack of transmission fluid in the crankcase);
- broken gear meshing adjustments;
- broken bearings;
- mechanical damage to gears (chips, scuffing, pitting of teeth).
You can independently determine the initial malfunctions of the gearbox when the engine is revved up while the truck is stationary (without engaging the gear), or while driving in neutral gear with the engine turned off. The absence or increase in noise indicates a malfunction of the mechanism. Accurate diagnostics and identification of repair areas can only be carried out with complete disassembly of the gearbox.
Dismantling gearboxes
When dismantling the middle and rear axle, auto mechanics carry out the following operations:
- They drive the truck into the inspection hole. Loosen the wheel fastenings, remove the covers, air hoses of the brake system, and tire inflation.
- The rear part of the Ural is lifted and placed on supports. Remove the wheels and secure the bridge to chain hoists. Separate the brake pads and disconnect the driveshaft. Release the reaction rods.
- The bridge is lowered onto a mounting trolley using hoists and removed from under the truck.
When dismantling the front axle, additional operations are required to disconnect the steering rods from the power steering, steering knuckles, ball joints, and dismantle the brake hoses. After this, the crankcase covers are removed, the outer and inner gearbox mounting bolts are unscrewed. The gearbox mechanism is removed from the axle housing and transported on a trolley.
Disassembling the gear mechanism
The disassembly operations for all gearboxes are similar and do not depend on the location of the mechanism. When disassembling the gearbox:
- bend the locking plates;
- remove the lock washers, unscrew the bolts;
- dismantle the bearing caps, unscrew the adjusting nuts, remove the outer rings;
- fix the shaft flange, undo the cotter pin, unscrew the connecting nut, remove the flange (it is necessary to use a puller);
- dismantle the sealing collar, remove the rear bearing cover;
- Having unscrewed the bolts, remove the bearing cups;
- remove the adjusting shims, shaft, inner rings of bearings, and drive gear from the crankcase;
- unscrew the sealing system plug;
- remove the cover, use a puller to press out the tapered bearing cup and shims;
- The driven gear is removed through the crankcase window.
Disassembly
To disassemble the gearbox 4320 of the front or rear axles, similar manipulations are carried out, namely:
- The bolts are unscrewed, the lock washers and locking plates are bent. The differential bearing caps are removed. Be sure to mark them with paint to avoid depersonalizing the lids.
- Before removing the differential, remove the adjusting nuts with the outer rings of the bearings.
- We fix the structure - this will allow us to unpin and unscrew the nut connecting the flange of the drive bevel gear shaft. This makes the flange accessible for removal.
- Having unscrewed the bolts that hold the structure, we remove the cover with the sealing collar. In the bearing housing, we pay attention to the bolts, and in the crankcase of the unit, the following should be removed: the shaft, a pack of adjusting type gaskets, the inner ring of the rear bearing and the drive bevel gear. The bearing cup is ready for the pack of adjusting shims to be released from it and the bridge sealing plug to be unscrewed.
- We unscrew the bolts that connect the bearing cup cover to the drive type spur gear. Now it is possible to dismantle the cover in parallel with the gasket package of an adjusting nature. Before removing the washer, we smooth it out and unscrew the bolts that secure it. Using special threaded holes in the flange, we squeeze out a glass with tapered bearings and a package of adjusting gaskets. We fix the latter on the cover and the bearing cup. The driven bevel gear assembly is removed through the 4320 gearbox housing window.