Causes
The need to pump may arise for several reasons:
- air has entered the brake system;
- the main brake cylinder (GTC) has been replaced or repaired;
- replacement or repair of working brake cylinders;
- repair of the brake system (pipes, hoses);
- the pedal falls through without any visible fault;
- fluid change.
Of course, if only one working cylinder was repaired, there is no point in bleeding the entire system. If the gas turbine engine has been replaced, then full maintenance is necessary.
How to bleed brakes on a UAZ
To bleed the brakes on a UAZ I always called an assistant, but somehow I found myself in a situation where there was no one to call.
I had to dodge it myself and have been pumping the brakes alone ever since. The UAZ is quite a tall car and, unlike the VAZ, you don’t need to remove the wheels, and you don’t even need a pit to bleed the system.
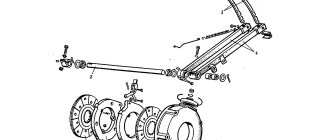
Brake system UAZ
Tool
To carry out the work you must have:
- brake fluid, usually DOT4 or the one that is poured into the system;
- a clean container for collecting fuel fluid;
- hose for draining fluid from brake cylinders;
- key 10, unscrew the bypass valve.
The hose or tube must be such that it fits tightly onto the bypass valve and has a length of 40 centimeters.
Bleeding the brakes of the rear right wheel of the UAZ
Bleeding brakes UAZ-3151
Fill the hydraulic drive only with special brake fluid according to the instructions in the lubrication table in the following order:
1. Check the tightness of all hydraulic drive connections and the condition of flexible hoses.
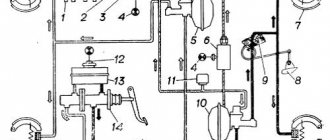
2. Lift the hood (remove the radiator trim on a car of the UAZ-3741 family) and unscrew the caps of the master cylinder tanks. Fill the reservoirs with brake fluid.
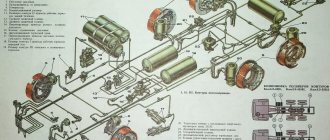
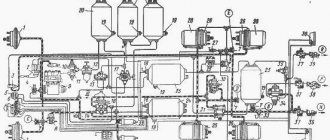
Figure 1 .
Drive of the UAZ-3151 service brake system
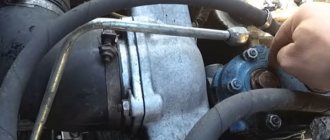
3. Remove the rubber cap from the bypass valve of the brake cylinder of the right rear brake mechanism and place a rubber hose about 400 mm long on the valve.
Place the other end of the hose into a glass vessel with a capacity of at least 0.5 liters filled with brake fluid (Fig. 2).
4. Unscrew the bypass valve ½ - ¾ of a turn, then press the pedal several times.
Press the pedal quickly, release slowly.
Fluid under pressure from the master cylinder piston will fill the hydraulic drive and displace air.
Bleed until the release of air bubbles from the hose, lowered into a container with brake fluid, stops.
While bleeding, add brake fluid to the master cylinder reservoirs, making sure to avoid exposing the bottom to prevent air from entering the system again.
Keep the end of the hose immersed in liquid during the entire filling operation.
Fig. 3. Drive of the service brake system of UAZ-3741
5. Tightly tighten the wheel cylinder bypass valve while pressing the pedal, remove the hose and put on the cap.
Bleed the hydraulic drive not only when it is filled with liquid, but also in case of depressurization of the hydraulic drive of the working cylinder of the rear brake mechanisms
6. Bleed the rear left brake cylinder, then the pressure regulator and the front brake cylinders.
On the brake mechanisms of the front wheels, first the lower and then the upper cylinder are pumped.
7. Turn off the alarm device, do the following:
– unscrew the bypass valve of the right or left working cylinder of the rear brake mechanisms;
– gently press the pedal until the warning light on the instrument panel goes off; if the warning light flashes, this will mean that the indicator pistons have passed the neutral position, and therefore the operation must be repeated from the beginning, but only by unscrewing the front wheel bypass valve;
– close the valve while pressing the pedal.
After bleeding all brake mechanisms, add fluid to the master cylinder reservoirs to a level 15–20 mm below the upper edges of the filler holes.
Close the lids tightly.
Do not add fluid to the brake master cylinder that is collected in a glass container during bleeding. If the brake fluid in the system is dirty, drain it and refill the system with fresh fluid.
Do not press the pedal with the brake drum removed, as pressure in the hydraulic drive will force the pistons out of the wheel cylinders and fluid will flow out.
After filling the system with fluid, check the car for braking.
With proper adjustment of the working brake mechanisms and correct bleeding of the hydraulic drive, full braking should occur within ½ - 2/3 of the pedal stroke, after which the foot should feel a “hard” pedal.
Replacing brake fluid
Not all car owners know that brake fluid needs to be replaced every two years when the car is used in moderate conditions. The main mistake is often that many people simply add lubricant to the required level, rather than change it completely.
Every 60 thousand kilometers, the brake fluid needs to be replaced. Car brake fluid can withstand very serious loads. During intensive driving and sudden stops, the temperature range can vary from 170 to 2000°C. It needs to be completely changed because as it moves, water gets into the liquid and dilutes it. A lower concentration negatively affects the quality of the substance. If the liquid is too diluted and boils, it can block the brakes with steam and subsequently lead to an emergency.
Nowadays, car companies have developed a special device that determines the boiling point of brake fluid. The device diagnoses the substance and displays appropriate recommendations. It can show the condition of the fluid at the moment and how necessary it is to replace it as soon as possible. The entire procedure takes no more than a minute, but this frees car owners from unnecessary hassle.
Messages [1 to 25 of 44]
1 Topic by Dybinka 05/22/2012 21:53:03
- Dybinka
- Participant
- Inactive
- Registered: 02.11.2011
- Messages: 1686
Topic: Bleeding brakes on UAZ 31512
I replaced the front brake cylinders with Volgov self-piping ones, one rear pad and replaced the BSK brake fluid with dew and tried to bleed the brakes. When bleeding the rear ones, the pedal went well. When bleeding the front ones, the pedal almost didn’t move, but the air came out and clear liquid came out. After pumping, the pedal goes to the floor and the car hardly brakes. The car has a GTZ vacuum with two tanks and some kind of regulator with a sensor
2 Reply from Dybinka 05/22/2012 21:53:38
- Dybinka
- Participant
- Inactive
- Registered: 02.11.2011
- Messages: 1686
Re: Bleeding brakes on UAZ 31512
Help with advice
3 Reply from DIMON 686 05/22/2012 22:05:54
- DIMON 686
- Participant
- Inactive
- From: Krasnodar, Elizavetinskaya station
- Registered: 12.02.2011
- Messages: 9895
Re: Bleeding brakes on UAZ 31512
Open the lower nipple fitting, connect the hose to it and stick it into the bottle and open it a little so that the liquid flows by gravity, and let it out from the top!
4 Reply from Dybinka 05/22/2012 22:08:35
- Dybinka
- Participant
- Inactive
- Registered: 02.11.2011
- Messages: 1686
Re: Bleeding brakes on UAZ 31512
“lower nipple fitting” is the one on the lower brake cylinder of the front wheels
5 Reply from DIMON 686 05/22/2012 22:12:15
- DIMON 686
- Participant
- Inactive
- From: Krasnodar, Elizavetinskaya station
- Registered: 12.02.2011
- Messages: 9895
Re: Bleeding brakes on UAZ 31512
There is both below and at the top he is in front.
6 Reply from Hotei 05/22/2012 22:15:29
- Hotei
- Participant
- Inactive
- From: Tuapse
- Registered: 22.03.2011
- Messages: 1757
Re: Bleeding brakes on UAZ 31512
There was a similar problem. For some reason, air bubbles are not immediately expelled on self-supply systems. I attached a gazelle breather to the end of the hose and pumped it alone. Don't feel sorry for the brake. Pour on top and pump with short breaks. It worked out in the end. Those. there are no miracles. When the brakes are pumped, the pedal becomes numb.
Edited by Hotei (06/21/2012 11:48:27)
7 Reply from DIMON 686 05/22/2012 22:24:22
- DIMON 686
- Participant
- Inactive
- From: Krasnodar, Elizavetinskaya station
- Registered: 12.02.2011
- Messages: 9895
Re: Bleeding brakes on UAZ 31512
There was a similar problem. For some reason, air bubbles are not immediately expelled on self-supply systems. I attached a gazelle breather to the end of the hose and pumped it alone. Don't feel sorry for the brake. Pour on top and pump with short breaks. It worked out in the end. Those. there are no miracles. When the brakes are pumped, the pedal becomes numb.
It’s like a stake, well, when I just pump it up by gravity!
8 Reply from Dybinka 05/22/2012 22:29:09
- Dybinka
- Participant
- Inactive
- Registered: 02.11.2011
- Messages: 1686
Re: Bleeding brakes on UAZ 31512
I know that there should be a stake, but it sinks to the floor, I read on the UAZ book that before bleeding the wheels you need to bleed the regulator, but how to bleed it?
9 Reply from Hotei 05/22/2012 22:31:39
- Hotei
- Participant
- Inactive
- From: Tuapse
- Registered: 22.03.2011
- Messages: 1757
Re: Bleeding brakes on UAZ 31512
DIMON 686 Self-supply pipes are poorly pumped by gravity. The opinion is not mine - from UAZbuki. I didn’t immediately try it by gravity. I attached a check valve and pumped as always. And even then, it didn’t work out right away. It seems that everything is done, clear liquid has come out. Then it stood for 30 seconds, shook it, again small, small bubbles appeared. Like dust. And so on several times. In the end I pumped it up from the 5th time. I poured the full bottle on top (400 ml). Collected from below for the future
.
10 Reply from KirDyK 05/22/2012 22:40:26
- KirDyK
- Participant
- Inactive
- Registered: 07.03.2012
- Messages: 492
Re: Bleeding brakes on UAZ 31512
Hotei , it’s more likely that you didn’t have air in the system, but residual pressure, which, by the way, was initiated by self-supply. Thus, when pumping, the brake fluid expanded at the outlet and showed you bubbles, much like mineral water when opening a bottle.
11 Reply from Hi Com 05/23/2012 07:44:17
- Hi Com
- Participant
- Inactive
- From: Krasnodar
- Registered: 28.09.2009
- Messages: 9286
Re: Bleeding brakes on UAZ 31512
Dybinka-83 , After draining the BSC, was the system flushed?
12 Reply from IA 05/23/2012 07:50:51
- IA
- Participant
- Inactive
- From: Krasnodar
- Registered: 30.09.2007
- Messages: 4400
Re: Bleeding brakes on UAZ 31512
Replaced. brake fluid bsk for dew.
Educational program about brake fluid: https://www.avtonov.svoi.info/brfluid.htm Brief quote: “. What type of fuel fluid should be used in a car is decided by its manufacturer. The brake system of a car (including rubber and structural materials) is developed for a specific type of brake fluid. Each car is made of different materials, and different TJs can affect them differently. The main rule for using brake fluid is to follow the recommendations of the instructions supplied with the car. “Maybe I’m wrong, but it seems to me that the dog rummaged around somewhere there.
13 Reply from IA 05/23/2012 07:51:39
- IA
- Participant
- Inactive
- From: Krasnodar
- Registered: 30.09.2007
- Messages: 4400
Re: Bleeding brakes on UAZ 31512
Dybinka-83 , After draining the BSC, was the system flushed?
Well, I thought I would be the first
While I was writing and looking for the link Hi Com got ahead
Edited by IA (05/23/2012 07:53:51)
14 Reply from Hi Com 05/23/2012 09:13:16
- Hi Com
- Participant
- Inactive
- From: Krasnodar
- Registered: 28.09.2009
- Messages: 9286
How to bleed the brakes on a UAZ alone
If no repair work has been carried out, make sure the system is tight and the pedal has normal free play.
- When changing the turbocharger, bleed it first. We fill the tanks with liquid and, without screwing the outlet tubes in completely, fill it. As soon as the liquid appears and the bubbles stop coming, we screw the tubes.
- I start pumping from the right rear wheel, then the rear left. Next is the front right and front left.
- I pour a little TJ into the container. Having connected the hose to the valve, I lower the second end into the container and unscrew it 1 turn.
- I top up the tanks to full level.
- I sit down in the cab and press the pedal 20 times. You need to press it smoothly, but throw it sharply. The essence of the process is that when the pedal is abruptly released, the liquid does not return from the tubes, but the brake cylinder valve is activated and the fuel fluid is sucked out of the reservoir.
- The number of presses may be greater; it is important not to let the tank become empty, otherwise everything will have to be repeated all over again.
- I filter the DOT drained from the system well (since there is no time to settle) and use it again. If the fluid is very dirty or has not been changed for a long time, I immediately pump in a new one.
- You can’t see whether the bubbles are coming or not, but we can safely say that by repeating the operation 2-3 times, the air will definitely come out of the tubes.
- Having pumped one wheel, I tighten the valve, put on the cap and move on to the next one.
On a UAZ 3303 or a “loaf” you can pump it without sitting in the cab. When the grille is removed, you can use a pry bar, hooking it on the lever, to move the GTZ pistons from the front and periodically add DOT.
By resting the pry bar on the lever you can bleed the brakes on the UAZ
The principle for self-pumping is suitable for all UAZ cars, even with ABS. However, in order to properly bleed, you will need to take into account for each ABS system the principle of its operation and the order of the wheels.
Try it, it’s an established stereotype that when pumping, you need to pump the valve with the valve screwed on and, opening it, drain the liquid. Why complicate everything by making some adaptations.
Source
Brake pads for UAZ loaf
Brake pads for UAZ loaf are produced by a small number of companies. In most cases, Riginal products are found on the market. Medium Despite their low price, the pads provide comfortable and reliable braking. At the same time, brake disc wear remains minimal. Effective braking is guaranteed over a wide temperature range.
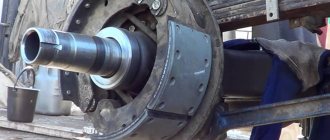
First, use a jack and a wrench to remove the wheel. Then you need to bring the brake pads together. To do this, the wheel rotates forward, and the eccentric bolt is immediately rotated until the wheel brakes. In this case, the adjusting bolt rotates in the direction of wheel movement. For information, the “17” key is useful.
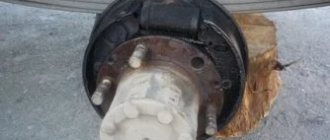
Then the eccentric slowly lowers until the wheel begins to spin freely without touching the drum with the block. The gap of the 2nd pad is adjusted in the same way. After the above manipulations, unscrew the screws (3 pieces) securing the brake drum.
The brake drum is removed. If necessary, the drum is removed from the hub using a mallet or a block of wood and a hammer. Next, the tension springs of the pads are removed. For such an operation, it is best to use special forceps.
Then you need to hold the head of the brake pad rod with one hand and press on the cup, compressing the spring. The spring cup must be rotated 90 degrees. As a result, the slot on the cup should align with the tip of the pad support pin.
Next, the cups with the spring are removed, and the rod is removed from the hole on the brake shield. Then the nut of the block support pin is unscrewed. For such an operation you need a key “19”. The support pin is removed. Together with it, the bronze bushing and washer are removed. The block is removed.
The 2nd block is removed using a similar method. Next, new pads along with bushings and washers are installed on the fingers. The pins are fixed to the brake shield using nuts
It is important to pay attention to the fact that the marks on the end of the fingers should look towards the tees of the brake cylinders. After this, rods with springs and cups are installed on the pads. Tension springs are installed
The eccentric bolts are turned until the pads are brought together. The brake drum is installed on the hub. It is necessary to separate the drum and block to their previous state. Replacement details can be found in the video -
Tension springs are installed. The eccentric bolts are turned until the pads are brought together. The brake drum is installed on the hub. It is necessary to separate the drum and block to their previous state. Replacement details can be found in the video -