The entire line of UAZ all-wheel drive vehicles has the same transmission design. On the Patriot and Hunter models, as well as all additional models created on their basis, Spicer type units are installed, which are equipped with a continuous crankcase. They are named in honor of the engineer K. Spicer. He is the author of a large number of patents, which are now owned by Dana Co. This type of front axle first appeared on the 3160 and 3162 models, after which they began to be used for the Patriot, Hunter models and pickups based on them.
Adjusting the front gearbox of the UAZ Patriot
The entire line of UAZ all-wheel drive vehicles has the same transmission design. On the Patriot and Hunter models, as well as all additional models created on their basis, Spicer type units are installed, which are equipped with a continuous crankcase. They are named in honor of the engineer K. Spicer. He is the author of a large number of patents, which are now owned by Dana Co. This type of front axle first appeared on the 3160 and 3162 models, after which they began to be used for the Patriot, Hunter models and pickups based on them.
How to change?
If the mechanism is seriously damaged, it makes sense to replace it with a new one. To do this you will need a new gearbox and a small set of tools:
- wheel wrench;
- jack (if the work is done in an inspection hole);
- chisel:
- hammer;
- hex wrench 12;
- ring or open-end wrenches for 13, 17 and 27;
- syringe for filling transmission oil;
- container for processing.
Important: replacement or repair of the gearbox cannot be performed without a lift, inspection ditch or overpass.
Operating procedure
- Place a waste container under the gearbox.
- Unscrew the drain plug, then the filler plug.
- Wait until the entire transmission flows out of the gearbox.
- Unscrew and remove the front wheels.
- Unscrew the cardan shaft from the flange on the shank.
- Undocking and hanging the cardan.
- Unscrew the fastening of the right cover from the suspension cross member.
- Unscrew the fastening nuts and disconnect the shock absorbers from the front control arms.
- Unscrew the threaded connections holding the wheel drive bearing caps.
- Unscrew the nuts securing the brackets holding the gearbox.
- Unscrew the nut securing the left gearbox cover to the cross member.
- Remove the hub cap and unscrew the right wheel hub nut.
- Remove the centering sleeve.
- Compress the suspension spring and unscrew the ball joints.
- Move the steering knuckle to the side.
- Disconnect the exhaust pipe from the exhaust manifold.
- Pull the gearbox back.
- Remove the right wheel drive.
- Remove the gearbox from the machine
To install the new unit in place, you must perform the operations in reverse order.
Important: after installing the gearbox, do not forget to fill it with transmission oil. Otherwise, you will soon have to change it again with another one
Bridge design.
The front axle of the UAZ Patriot has combined functions. He can be both a leader and a controlled person at the same time. It is based on a hollow beam, inside which the main gear and differential pass. Through them, torque is supplied to the front hubs.
The axle shaft is made in the form of a whole part, with installed CV joints, which allow it to enter a large angle of rotation, while maintaining torque.
At the moment, such hinges are also installed on other UAZ models on units of the old type - Timken. This allows you to combine the greater reliability necessary for cargo-passenger transport with good handling. Such models are called hybrid bridges.
The rear axle of the UAZ Patriot is also made in the form of a hollow beam, at the ends of which the hubs of the drive wheels are secured using special bearings. They are driven by a differential located inside. In this regard, the design of the rear and front axles is quite similar.
Installation of a special block
It is installed as follows:
- The axle drive housing has a cover; unscrew it with five nuts
- Remove the shaft and coupling
- We install the bridge block in place of the removed cover.
- Installing the transfer case in place
- If necessary, add transmission oil
The cost of this mechanism is around seven thousand rubles, but by installing it you will feel more confident when driving off-road, and at the same time save on gasoline when the need for all-wheel drive is not needed.
Design features.
To give the structure greater strength, the thickness of the substrate has been increased by almost 10 millimeters. As a result, reliability has increased significantly, but the noise level has decreased. The first type was mainly used on cars with gasoline engines, the second only on diesel engines, produced since 2015.
When purchasing, it is also worth considering that the width of the bridges for some models is different. For example, front units with catalog number 31605-2300011 are installed on Hunters. They provide a track size of 1445 millimeters, a gear ratio of 4.111. Model 3162-2400010-10 is installed on Patriots and pickups
The rear assembly has part number 3162-2400010-10 with a gear ratio of 4.111.
Gear Modes
Let's take a closer look at how to use the transfer case on a Chevrolet Niva. It serves to switch to a lower gear and also blocks the center differential; this can be done at the same time. In order to engage a lower gear, you need to shift the lever to the right and up; to lock the lever, you need to pull it to the left all the way. The handle has the following designation:
- Low(L) - decrease;
- N-neutral;
- High(H) - normal, increased.
Low gear is engaged at a speed of no more than 5 kilometers per hour, or after a complete stop. In order to overcome a steep climb, or when driving where there is soft ground, so that the vehicle speed is minimal and at the same time stable, a lower gear must be engaged in advance. For example, if you are driving on a flat road in second or third gear, and a bad section of road appears in front of you, you need to stop and shift to a lower gear.
It is not recommended to turn on the center differential at high speed, since the car may skid strongly at the moment of switching. It is advisable to block where there is a slippery surface and the wheels begin to slip.
These include:
- Switching the transfer case should only be done when the car is not moving.
- You can also engage the differential while the vehicle is moving.
- You can switch to a lower gear while the car is moving.
- To ensure long-term and uninterrupted operation of the differential, it is necessary to periodically turn it on, especially in winter. This should be done once every 7 days.
Among domestic car enthusiasts, the Chevrolet Niva is a fairly popular SUV that appeals not only to fans of extreme driving, but also to fans of measured driving outside the city. Many people know that one of the features of a car of this brand is the presence of a transfer case in it.
Using this unit, you can enable downshifting, locking, or two functions at the same time, depending on the conditions. The question of how the Niva Chevrolet transfer case should be used correctly is of interest to many happy owners of such a vehicle and those who only intend to purchase it.
It should be immediately noted that you can engage both the lock and the transmission at the same time using the Chevrolet lever that changes gears. So, the lever shifts to the right, and then immediately up to engage a lower gear. To switch back to higher, the lever should simply be moved back.
Using a Niva Chevrolet transfer case, in addition to the above, neutral gear is also engaged, while the car will remain reliably in one place. The lock can be engaged at any time - in normal gear, in low gear - just switch the Chevrolet lever to the left.
This mechanism can operate in five modes:
- Neutral is on.
- The differential is unlocked when the "lowering" is turned off. In this case, the torque is distributed in a ratio of one to two.
- The differential is locked when overdrive is engaged. Here, torque distribution is carried out automatically, depending on the quality of wheel grip on the road.
- Downshift is engaged and the differential lock is disabled. The transfer of forces occurs in the same ratio as in the first case.
- The differential is locked and the gearbox is engaged. In this case, all axles are rigidly locked together, including the axle shafts. Torque is produced unevenly, depending on the type of road surface (dirt, sand, etc.). In this mode of operation, the best cross-country ability of the vehicle is achieved. But driving with a constantly engaged downshift and with locks will not work. This increases the load on the transfer case bearings. The Chevrolet Niva will soon require serious intervention in the transmission. Fuel consumption also increases significantly, which greatly eats up the tires.
Adjusting the gaps.
Axial clearance is the most common problem that arises during vehicle operation. This is due to severe wear of the gear teeth, which over time can lead to jamming of the bridge.
You can check the condition by shaking the drive gear by the flange.
To fix this problem, you need to properly tighten the flange nut. This may require a little force as there is a slight core applied to it. You should tighten it until the gap goes away.
Control and adjustment of gears
This stage is considered very important for the assembly of a spur gearbox. During the inspection, the error of the work performed is determined, and the gaps necessary for long-term operation of the device are established. These are the final stages of assembling a spur gearbox. They include 3 operations:
- Checking and adjusting the runout of gear wheels.
- Assessment of the contact patch of teeth in gear mesh.
- Setting lateral clearances in engagement.
Control of the contact spot of the gearing is carried out with paint. The teeth of the smaller diameter gear should be lubricated with a thin layer of paint, and then slowly turned 2-3 turns. The presence of a displacement of the contact spot indicates a change in the distance between the axes or an axial misalignment. The problems listed above can lead to premature equipment failure.
The parameters of the contact patch are determined by the degree of accuracy of the gearing. In terms of tooth height, it should be from 30 to 75%, and in length - from 30 to 95%. An increase in percentage means an increase in gearing accuracy. The side clearance is determined with a feeler gauge. After installation and adjustment, the mechanism must be checked for smooth operation and noise. Eliminate problems by re-adjusting or replacing defective components.
see also
Comments 17
If you don’t change anything in the main pair, then no adjustment is needed.
The question is, why did you decide to switch from bearings?
They didn’t live up to expectations (it took about 15 thousand km, and they pulled it up and injected it in time. Maybe the bearings are made of poor quality.
The rollers rivet nests into the cups, causing play to appear. No matter how much you tighten, the play will only increase, because... The contact of the roller with the cup is linear, and not superficial, as on bronze. I understood this immediately as soon as I saw and felt the worn out bearing pins that had been removed.
They didn’t live up to expectations (it took about 15 thousand km, and they pulled it up and injected it in time. Maybe the bearings are made of poor quality.
I've been riding bearings for many years now and have never changed them. Ugh, ugh
In general, the diff bolts were unscrewed and there were no signs of it; as a result, a piece of the gearbox housing broke off.
this is sad (okay, I climbed at home, not in the forest or on the highway))
So he took me out of the forest 200 km away. from home, and for another month I drove without a front end, wounded but alive.
On my blog I wrote more or less everything about how to disassemble and how to reassemble.
Hello, take out the “diff” (unscrew the 4 bolts on the yokes, loosen the spacer nut (on the right side of the “diff”), remove the hubs from two wheels, pull out the CV joints assemblies. Wash the axle stockings, the gearbox. Half the diff, see what’s there with satellites, if you change the broken ones. You look at the CV joints; if the second one is intact, you don’t need to change it. You look at the main pair to make sure it is intact, you look at the shank whether it’s intact or not. And everything that is defective is replaced with a whole one, if the main pair is alive, then you collect everything. Adjust if there are replacements G. P. didn’t need anything.
Thank you ! I went to take pictures)
Don't forget the thread glue...
Under the bolts on the yokes?
Are you going to inject the differential? Here it is necessary to “glue it together”.
Hello, take out the “diff” (unscrew the 4 bolts on the yokes, loosen the spacer nut (on the right side of the “diff”), remove the hubs from two wheels, pull out the CV joints assemblies. Wash the axle stockings, the gearbox. Half the diff, see what’s there with satellites, if you change the broken ones. You look at the CV joints; if the second one is intact, you don’t need to change it. You look at the main pair to make sure it is intact, you look at the shank whether it’s intact or not. And everything that is defective is replaced with a whole one, if the main pair is alive, then you collect everything. Adjust if there are replacements G. P. didn’t need anything.
There is no need to adjust if there was no need to replace the GP and bearings. And if the bearings and/or GP have been changed, then it is already necessary
A lot of people in private messages asked me to publish in more detail how I installed new main couples in Spicer. In no way do I claim to be an exemplary solution, just my personal experience. In total, 4 g.p. were changed in this way. Yesterday I did a hunter, installed lower pairs (there are also spicer bridges). The front and rear axles are the same, with the exception of small nuances - you have to remove the hubs at the front, and you don’t even need to jack the rear ones, just pull out the axle shafts and that’s it, disassembly and assembly of the axle can be seen here: www.drive2.ru/l/9015967/, www.drive2. ru/l/9093386/, www.drive2.ru/l/9093672/, www.drive2.ru/l/9104055/ and bridge assembly: www.drive2.ru/l/9885152/, www.drive2.ru/l /9885438/ And so the adjustment of the front/rear main pair: Let’s imagine that you have completely pulled out all the guts from the axle gearbox. 1. Place the adjusting washer and press in the race of the internal bearing of the shank; 2. Press in the outer shank holder (the one on the cardan side); 3. Put the oil squeegee on the shank, press the bearing in (by the way, it’s very convenient to do this with an old race) 4. Put on the spacer sleeve, and put the shank in the seat; 5. From the cardan side, we put the bearing on the shank and press it in until it stops 6. We put the washer on the splines (the washer is like this with teeth on the inside); 7. We put on the flange (we don’t install the oil seal yet), the washer and tighten the nut, twist until there is no play at all. We put paint stripes on the nut and on the flange so as not to overtighten the bearings later. 8. We install the diff assembly (at the same time we stock up on adjusting rings in the store, I bought 4 thinner than it was, and 4 thicker than it was, then I handed it all back to the store, they are not damaged); 9 We put the original washer, spread it with the nut, which is on the right side, apply paint that does not dry out for a long time (I used an ordinary stationery corrector, water-based) 10. Scroll the main pair a couple of times and look at the pattern of the shank teeth on the driven gear
If the pattern is different, choose which one is similar to yours, and proceed to adjustment:
Let me explain the adjustment: 1. correct contact in engagement 2. It is necessary to move the shank by increasing the thickness of the adjusting ring, while in order to maintain the amount of side clearance, move the driven gear away from the drive gear by reducing the thickness of the ring 3. It is necessary to move the shank by reducing the thickness of the adjusting ring, while to maintain the value of the side clearance, move the driven gear towards the drive gear by increasing the thickness of the ring 4. It is necessary to move the shank by increasing the thickness of the adjusting ring, while in order to maintain the value of the side clearance, move the driven gear away from the drive gear by reducing the thickness of the ring 5. It is necessary to move the shank away by reducing the thickness of the adjusting ring , at the same time, to maintain the value of the side clearance, move the driven gear towards the drive gear by increasing the thickness of the ring. I had enough adjustment with the ring on the left “diff”; in 4 cases the original washer remained under the race of the inner shank bearing. AND THE MOST IMPORTANT THING! After adjustment, do not forget to press in the bridge seal and tighten the flange and lock the nut. Tighten the nut until the marks previously applied to the nut and flange match.
Source
Repair or replacement, which is better?
Car owners of VAZ classics often cannot decide what is best to do - buy a complete ready-made REM assembled or purchase individual parts and repair the gearbox. It’s really difficult to decide here - the price of a new gearbox, of course, is higher, but the owner of the car is freed from the headache of adjustment. The thing is that it’s not so easy to find a good specialist in VAZ gearboxes, and there is no guarantee that the new main pair will not hum.
If a car owner buys a new gearbox, but it hums, the part can be exchanged under warranty, but the car owner loses money on removing and installing the gearbox. If you purchase a defective main pair, the repair itself will be more expensive - you will have to pay a technician for a secondary overhaul of the gearbox.
Front axle UAZ Patriot device repair
Reading time: 8 min
UAZ Patriot off-road vehicles are well known to domestic consumers. The manufacturer equips them from the factory with a pair of drive axles: rear and front. The main difference between them is that the front one is controllable and can be turned on if the need arises. Despite the fact that the UAZ Patriot front axle was developed back in the 90s, it is actively used to this day due to its technical characteristics.
- Main advantages of the design
- Description of components and construction diagram
- Main types of faults and their causes
- Repair of key types of failures of the UAZ front axle
- Monitoring and scheduled maintenance
Lateral clearance in GP and differential bearing preload
In accordance with the instructions, the lateral clearance and preload of the bearings are adjusted using tool A.95688/R.
In its absence, a caliper of a suitable size will perform the specified role.
To ensure the required preload, fix the distance relative to the bearing caps at the beginning of tightening and at the end. The required difference between the values is 0.2 mm.
The side clearance is adjusted by bringing the driven gear closer to the drive gear until it disappears. Initially, one of the nuts is in a loose position, the other (working) is tightened. After eliminating the gap, gradually tighten the attached nut until the jaws of the caliper move apart by 0.1 mm. The backlash adjustment stops when a slight knocking sound of the teeth appears. Next, both nuts are tightened evenly to a distance of 0.2 mm. The correctness of the work is indicated by uniform play in any position of the gears.
UAZ Patriot axles device, UAZ Patriot front axle
UAZ Patriot bridges , their design and maintenance are quite an interesting topic among UAZ drivers. Many people are especially concerned about the UAZ Patriot front axle , because the front axle is structurally more difficult to repair and install.
Today we will tell you more about the bridges of the modern Patriot. First, a little history of UAZ drive axles and the design of these transmission elements. Initially, the bridges of UAZ SUVs were “military” and “collective farm”; they differed significantly in their design from each other. Among SUV lovers, it is the “military” types of bridges that are valued. But the current UAZ Patriot is equipped with completely different bridges, which have a number of features, although some parts are interchangeable with the old bridges. Modern Patriot axles of the “Spicer” type now come with a track increased to 1600 mm. After all, the old bridges were only 1445 mm and were not suitable for the rather wide Patriot. The design has also changed the main gear housing, which is closed with a removable steel cover, and to access the main gear and differential there is now no need to remove and disassemble the axle, you can simply remove the cover.
The design of the front and rear Spicer axles are similar, and we’ll talk about the features below. So, the axle housing consists of a one-piece cast main gear housing, axle housings (stockings) pressed into it and a stamped cover. The absence of a connector in the transverse plane of the bridge gives the structure high rigidity (continuous type of bridge). Placing the main gear and differential in a single housing ensures durability and high accuracy of meshing of the teeth of the main pair.
Transfer case alignment
Correct installation of the transfer case can be done in several ways. Most often in auto repair shops, repairmen use the following method:
- hang the car on a lift;
- loosen the transfer case;
- start the engine;
- engage the gear and accelerate the car according to the speedometer to the speed at which vibration occurs (often it occurs at speeds from 40 to 80 km/h);
- without using the brakes, reduce the engine speed, then turn off the ignition.
The transfer case itself is centered in place, all that remains is to tighten the fastenings of the supports.
You can also adjust the position of the RC using a wire; we do it as follows:
- loosen all four fastenings of the transfer case supports;
- fasten one end of the wire to the rubber coupling of the propeller shaft;
- we attach another piece of wire to the CV joint, bring the other ends of the wire to each other;
- rotate the shaft; if the transfer case is not centered, the ends of the wire will diverge during rotation;
- the task comes down to installing the transfer case using the selection method so that the ends of the wire practically do not diverge from each other in any position when turning the shaft.
Source
Frequent malfunctions
The design of the front drive axle is highly reliable; possible malfunctions arise due to natural wear of rubbing parts or violation of operating conditions. Gearbox failures are associated with loss of crankcase sealing or damage to gears. The car owner can independently find the cause of the breakdown and carry out repairs in a garage.
High noise level
An increased noise level indicates a decrease in oil level and mechanical wear of the rolling bearings or gears of the main pair and differential. If adding lubricant does not reduce the operating noise, then it is necessary to disassemble the unit and replace worn elements.
After reassembly and restoration of the oil level, the functionality of the Patriot front axle is checked.
Noise during operation of the bridge occurs due to incorrect adjustment of the main gear gears. To restore normal operating conditions, the position of the parts is adjusted (using steel spacers), but if the teeth are damaged or worn, it is impossible to ensure the required contact patch. In this case, a complete replacement of gears is carried out; installing gears from different sets is strictly prohibited.
Oil leakage
Oil leakage from the Spicer UAZ Patriot axle occurs through the gasket between the cover and the gearbox housing, as well as through the sealing gland. The cause of the defect is wear of parts or damage to elements during installation or maintenance of the vehicle. To restore normal operating conditions, it is necessary to replace damaged parts; it is permissible to apply a sealant to the surface of the gasket. After repairs, it is necessary to restore the transmission oil level in the front axle gear housing.
Grease drying out
During operation of the machine, degradation of the lubricant located in the axle housing occurs. At high temperatures, the oil evaporates, and when overcoming water barriers, water enters the cavity. To check the lubricant level, use a control hole closed with a screw plug. If the owner regularly overcomes water obstacles, it is recommended to install extension hoses on the ventilation ducts. The lines are routed under the hood of the car, reducing the risk of water and dirt getting into the crankcases.
We recommend: Rating of the 10 best automotive compressors 2020-2021
Node jamming
Jamming of the gearbox occurs in the case of increased axial clearance in the bearing supports on which the drive shaft of the main pair rotates. Due to the movement of the axis, the contact patch between the gears is disrupted, which leads to wear and destruction of the teeth.
During operation, it is necessary to periodically check the condition of the bearings by rocking the drive axle by the flange intended for attaching the propeller shaft.
Preparation
The main stage is preceded by preparation, which includes: 1. Draining the oil from the RPM through the drain hole;
2. Disconnecting the driveshaft with a 13 key
3. Removing the right wheel drive.
4. Dismantling the lower ball joint on the left side.
5. Removing the suspension extension.
6. Removing the gearbox from the brackets on the right and left, using a stop.
This is followed by disassembling the gearbox, thoroughly cleaning the surfaces from dirt and grease, and troubleshooting the components.
Device, design and maintenance features.
The UAZ Patriot cars , as well as all models based on them, are equipped with front and rear single-stage Spicer-type drive axles with a one-piece crankcase, named after the American engineer Clarence Spicer, author of more than thirty patents and owner of the Spicer Manufacturing Company, now Dana Corporation.
Front and rear axles of the Spicer type began to be installed on the UAZ-3160 and UAZ-3162 Simbir cars, instead of axles of the old design, and from them they were inherited by UAZ Patriot, UAZ Pickup, UAZ Cargo and UAZ Hunter.
Front and rear axles of the Spicer type on the UAZ Patriot, device.
The front axle is combined, simultaneously performing the functions of drive and steered, and is a rigid hollow beam, inside of which the main hypoid gear and differential are located. From the main gear, torque is transmitted to the front hubs through the axle shafts.
The axle shaft is a single part with constant velocity joints (CV joints) of the Rzepp-Birfield type, named after its inventor Alfred Rzepp and the American company Beerfield, which produced it under a patent. It is more compact than the Bendix-Weiss joint on Timken axles, can operate at larger angles and transmit more torque.
Front axle UAZ Patriot Currently, front axles of the old Timken type design, which are still installed on UAZ cars of the passenger and utility-passenger model range, are also equipped with such hinges. For this reason, they got the name - hybrid bridges.
The rear axle is a rigid hollow beam, at the ends of which the hubs of the drive wheels are mounted on bearings, and the main hypoid gear and differential are located inside. From the main gear, torque is transmitted through the axle shafts to the hub. The front and rear axles have main gears and differentials of similar design.
Rear axle UAZ Patriot
Design features of the front and rear axles of the Spicer type.
Spicer-type axles are largely unified with single-stage axles of the old Timken type; they have the same differential bearings, rear axle axle shafts and almost all parts of the hub units.
The thickness of the driven gear substrate in the new axles was increased by 8 millimeters, this reduced noise and increased the reliability of the main gear. The new differential can be used on old single-stage axles with a split crankcase, provided that a compensator ring is installed on the cup stud.
Currently produced front and rear axles of the Spicer type have a final drive ratio of 4.111 or 4.625. The former are installed mainly on UAZ cars with gasoline engines, and the latter on cars with diesel engines, and all cars starting from the 2015 model year.
UAZ Hunter cars and all models based on it are equipped with so-called narrow axles with a track of 1445 mm, the catalog number of the front axle is 31605-2300011 - the final drive ratio is 4.111, or 31608-2300011 with a gear ratio of 4.625. Rear axle catalog number 31605-2400010-30 - gear ratio 4.111 or 31514-2400010-10 - from 4.625.
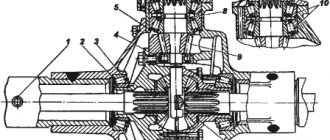
Device
The unit parts are housed in a durable metal case that protects the mechanism from damage. Gear oil is used to lubricate rotating parts.
The force of the propeller shaft, screwed to the flange on the shank of the unit, is transmitted to the drive gear. Next, through the satellites, the torque is distributed between the axle gears (left and right).
The gearbox mechanism also includes bearings, nuts, gaskets, and adjusting rings. Plugs are provided for filling oil and removing waste into the housing. The drive gear, like the axle shafts, is equipped with oil seals that prevent transmission leakage while the vehicle is moving. The figure shows the gearbox design in detail:
Maintenance
Maintenance of the UAZ bridge is simple and comes down to monitoring the level of lubricant and topping it up and replacing it. The second point is to check the seals for leaks. It is regularly necessary to check the reliability of the fastenings, especially if the machine is used in difficult road conditions. Eliminate axial play in the differential bearings in a timely manner.
Assembly and connection diagram
When assembling the structure, do not remember several features:
- Press the bushing into the trunnion flush with the end of the washer socket. After completing the procedure, the sleeve must be deployed;
- Place one thrust washer inside the trunnion, the second - in the support. The oil lines in the thrust washers should face the joint. The washer is secured by punching in 3-4 places;
- When installing the hinge, add lubricant to the ball joint;
- Treat the pins and bushings with liquid lubricant.
To obtain the required axial tension, you need to select a certain number of spacers (but not less than five). They are installed on the ends of the knuckle body at the top and bottom. Their number should be the same. Soak the felt ring of the ball joint oil seal with engine oil. If possible, check the bridge on a bench after assembly. If the assembly is done correctly, the axle shafts should not heat up or make excessive noise when braking. Leaks through seals, cuffs, and bolted connections are not allowed.
How to disassemble a bridge
The first step is to remove the brake drum. Next, the hubs and hubs are dismantled. Along the way, inspect the bearings, which may have worn out and will have to buy new ones.
- Unscrew the brake system hose, it will get in the way, and remove the brake shield;
- Pull out the CV joint;
- Remove the rotating mechanism and shank;
- Divide the stocking into two parts;
- Remove the pair from one part of the bridge and the other.
Dismantling the bridge when the car is in a hanging position
Differences in VAZ rear axle gearboxes
RZMs differ in the gear ratio of the main pair; in total, there are four types of gearboxes on the VAZ classic:
- 2101;
- 2102;
- 2103;
The slowest one is the RZM 2102, its drive gear has 9 teeth, and the driven gear has 40 teeth. To calculate the gear ratio, you need to divide the number of planetary gear teeth by the number of teeth on the drive shaft; for the VAZ 2102 the drive gear is equal to 4.44.
The “penny” gearbox (2101) accordingly has the number of teeth on the gears 10/43, so its IF is 4.3. The next, faster one is RZM 2103 - it has a ratio of 10/41, which means the gear ratio is 4.1. And finally, the “fastest” will be the 2106 gearbox, with the number of teeth 11/43 and an inverter frequency of 3.9, respectively.
Many VAZ 2101-07 owners strive to install the fastest gearbox, but this is not always necessary. If the car often carries cargo, that is, the car is a “workhorse”, high speed is of no use, but high-torque power will be very useful. It should be noted that RZM 2102 was not supplied as spare parts; it was installed only on station wagons.
How to turn on and off the front axle on a UAZ Patriot
The front axle on the UAZ Patriot is engaged by the transfer case. The manufacturer installed two types of transfer cases on the model. Older versions are equipped with mechanically controlled valves.
The front axle is engaged on a mechanically controlled transfer case using a lever installed in the car interior between the driver and passenger seats. The lever mechanically moves the transfer case rods.
Newer versions of the car are equipped with an electronically controlled transfer case.
The transfer case control unit turns on the electric motors. Electric motors move the rods to the required position.
To turn on the front axle on a UAZ Patriot you need to:
- disengage the clutch. To do this, depress the clutch pedal installed in the cabin;
- After disengaging the clutch, set the lever or regulator to the required position;
- After releasing the clutch pedal, the front axle of the car will be engaged. Disabling the axle drive should be done in reverse order.
ATTENTION: The manufacturer does not recommend turning on the front axle for long trips on good quality surfaces. Violation of this rule may lead to incorrect operation of the node.
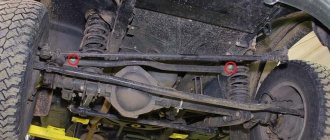
Eliminate vibration with additional fasteners
Vibration in the body is the main “disease” of the Niva; it often occurs due to improper alignment of the transfer case. Most often, vibration occurs on VAZ 21213/21214 cars, since the transfer case is mounted only on two supports on the sides of the body; on the Chevrolet Niva, the transfer case is already installed on three supports.
- driveshafts are poorly secured;
- wheels are not balanced;
- there is play in the cardan crosspieces (vibration is especially affected by play in the rear driveshaft crosspieces);
- The vibration comes from the engine itself.
Vibration when starting off on a Niva can also occur for the following reasons:
- the mounting supports of the transfer case have become loose;
- The rubber on the RK supports themselves broke.
Installing the third support of the transfer case on VAZ 21213/21214 vehicles allows you to reduce the level of vibration of the transfer case; with this support it is easier to center the transfer case. The part can be purchased at auto stores or made yourself. The finished product comes with three long studs (for model 2121); to install the third support on this machine, you will need to unscrew the short studs from the transfer case housing and install new studs from the kit. We carry out repairs as follows:
- dismantle the front passenger seat in the cabin;
- remove the floor tunnel lining;
- in the cabin we move aside the carpet covering the body amplifier (in front of the handbrake lever);
- remove the transfer case (alternatively, you can simply hang it up, but removing the third support makes it easier to install);
- We attach the bracket of the new support to the body of the RC;
- we install the transfer case in place, center it in the optimal position, and fasten the side supports;
- we combine the third support with the body, drill two holes in the bottom;
- Using washers, bolts and nuts (from the kit) we attach the support to the bottom of the body.
Also interesting: Design and repair of Niva Chevrolet cooling system fans
In order to install the subframe, the transfer case must be removed. It is more convenient to carry out such work in a pit; we carry out repairs as follows:
- leave the car in neutral gear;
- disconnect the propeller shaft from the transfer case, it is advisable to mark the driveshaft flange and the drive shaft so that during installation, align the driveshaft according to the marks - this way, the occurrence of unnecessary vibrations is eliminated;
- dismantle the muffler mounting bracket;
- remove the gearbox traverse;
- jack up the transfer case, remove the side fastenings of the transfer case;
- We treat the places where the subframe fits to the body with Movil;
- place the subframe on the gearbox studs;
- we mark the attachment points of the subframe on the side members, drill holes, attach bolts to the body;
- we tighten all fastenings, except for the transfer case supports themselves;
- we perform alignment of the steering wheel;
- Finally tighten the transfer case supports.
It should be noted that installing an additional support or subframe on the steering wheel does not always lead to the desired effect; in some cases, vibration only increases.
Determining the malfunction
CV joints are also popularly called “grenades”, which actually comes from the type of product. A CV joint malfunction can be caused by many reasons, which we will consider below:
- The main reason for the failure of the “grenade” is damage to the boot, which ultimately entails the penetration of aggressive environments into the working element of the product.
- If the part was made from low-quality materials, but this phenomenon is extremely rare.
- Aggressive handling of the car while driving.
- Lack of lubricants.
Thus, based on these reasons, the “grenade” malfunctions, which requires its immediate replacement. A CV joint is a kind of hinged product, the structure of which contains parts that work in close contact and under constant loads. As a result, any of the above factors leads to CV joint failure. It is not difficult to determine a CV joint failure. A characteristic sign of a malfunction of this product on the UAZ Patriot SUV is a crunching sound. This characteristic crunching sound comes from the balls moving along the groove due to the high degree of production.
A characteristic sound from under the wheels is heard at the moment of making a turn, during sudden accelerations and overcoming obstacles. But this is not the only sign by which you can be sure that the CV joint is faulty. To dispel doubts and make sure that the CV joint is faulty, you should resort to the following types of checks:
- when the UAZ Patriot car starts moving, constant signs of jerking movements are observed;
- the presence of free play of the CV joint shaft when trying to move it in different positions.
We recommend: How do we recycle different types of batteries?
If such types of faulty operation of a UAZ Patriot car are detected, the car owner must immediately carry out repairs, or, more precisely, if there is the slightest disruption in the functioning of the “grenade”, it will need to be replaced. We’ll look at how to replace a grenade on a UAZ Patriot later.
CV joint replacement
So, let's consider the process of replacing an important part of the front axle - the “grenade” or CV joint. Let us present the main stages of preparation, dismantling and installation of a new part on a UAZ Patriot SUV.
It is worth noting right away that replacing a CV joint is not an easy task, but any driver can handle it if he devotes a little time and attention to his car. Of course, the technicians at the service station will replace it in a matter of hours, but you will have to pay a considerable amount. But are such problems worth the big costs? Only in case of great hurry!
Important! Before starting to consider the process, it should be noted that “grenades need to be changed in pairs, even if only one CV joint has failed, then in the process of replacing it you need to install a new one on the other side.
So, replacing the main part of the UAZ Patriot front axle is carried out in three stages.
Stage No. 1 – preparation
The UAZ Patriot vehicle must be placed in an inspection hole and the parking brake must be turned on. For greater safety, shoes are placed under the wheels of the car to protect the car from unauthorized movement. Having taken a standard set of tools, you can go down into the pit and begin the process of dismantling the front axle element. Let's give an example of how to replace the left CV joint on a UAZ Patriot, and for the right one the replacement process will be similar.
Stage No. 2 - dismantling
- Initially, the car wheel is removed. You can remove both wheels at once for ease of work. Everyone knows how to remove a wheel, so there is no point in dwelling on this event. Be sure to install supports under the vehicle body for added safety.
- The brake disc is removed together with the ABS anti-lock braking system sensor.
- Continuing the removal of the front axle CV joint, you need to unscrew the bolts securing the axle to the steering knuckle block.
- Now you need to dismantle the axle together with the hub and coupling.
- We proceed to dismantling the axle shafts and hinge.
- The right CV joint is dismantled in the same way as the left one. It is important to take into account that during installation, do not confuse the parts removed from the right and left sides. Now you need to remove the “grenade” by applying force. A hammer and chisel will come in handy for this task.
It is important to strike correctly, as a result of which the “grenade” will disengage with the axle.
Replacement of this element of the front axle is carried out in case of complete wear of the old part. We will look at how a CV joint is repaired in other materials, but now it remains to figure out how to install a new “grenade”.
Stage No. 3 – installation
Before installing a new front axle product, fill the CV joint to the top with lubricant (it is recommended to use CV joint grease-4 or Litol-24).
It should be remembered that the right drive shaft is longer than the left one.
- A plastic plug is mounted on the end of the shaft.
- To equalize the air pressure inside the cover, use a screwdriver to press out its edge.
- Do not forget also about the size from the end of the CV joint toe to the small edge, which should be 210 mm.
- At the end of the work, you need to tighten the clamps well.
Thus, the left CV joint of the front axle of the UAZ Patriot is mounted. After carrying out the work for the first time, it will be easier for the driver to do this all subsequent times. The approximate service life of a CV joint is 60-100 thousand kilometers, but proper operation of the product also plays an important role in this.
Based on this material, you can completely freely replace the “grenades” of the front suspension of the UAZ Patriot.
Motor scooter repair Ant
Before starting repairs, you need to buy all the necessary spare parts and tools. Of course, you first need to diagnose the device in order to understand what the real problem is.
It is also necessary to take into account a few tips on how to change certain spare parts:
- If you want to change a tube or tire, you don’t need to bead the wheel at all. It is enough just to unscrew all the bolts securing it.
- The wheel begins to spin thanks to a roller chain running through the gearbox. At the same time, the rear suspension is completely independent.
- The gearbox can be easily removed without any additional tools, because it is located in the very center of the scooter.
Repair is accompanied by the following basic actions:
- drain the oil from the engine, then remove the engine and place it on some flat surface;
- remove the cooling casings and dynastrater;
- remove the final drive sprocket;
- loosen the clutch cover from the bolts and remove it;
- remove several clutch discs;
- after this it will be possible to easily remove the basket along with the chain and sprocket, the washer and the bushing;
- to disconnect the cylinder head, you need to unscrew the four washers that secure it; if there are noticeable burrs on the cylinder mirror, then it should be sharpened;
- remove the cylinder, remove the piston pin ring using pliers;
- unscrew the crankcase tightening bolts; an impact screwdriver can help, which is very useful in such cases;
- turn the engine to the disassembled side, gently hit it with a mallet until the crankcase separates into two equal halves;
- lay the engine straight, using a mallet, carefully knock out the driveshaft;
- After this, access to the bearings and seals appears.
Design Features
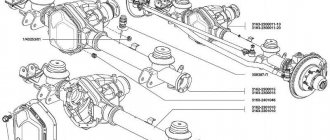
The front axle of the UAZ 3160 Patriot is a device that transmits torque from the transfer case through the main gear and differential to the wheels.
It has the appearance of a hollow beam in which two axle shafts are placed. The axle shaft is an intermediate link that performs the function of receiving torque from the driven gear and transmitting it to the hub. The hollow beam is called a crankcase. The transmission of torque is carried out through elements such as CV joints. You can learn more about them from the material on this portal.
As mentioned above, the front axle is activated only when the need arises. To put it into action, you need to turn on the hub couplings located on the axles of the front wheels. These couplings are also called hubs, and they are installed independently after purchasing a new car. Below is a diagram of the front axle of the UAZ 3160 SUV, which shows the main structural elements: gears, differential, etc.
As you can see, the structure of the front axle is quite complex, so it is very important to pay attention to its timely repair. Actually, let’s pay attention to this issue and consider how to repair a unit from a UAZ 3160 with your own hands and in what sequence it is carried out.
Gear running-in
The final stage of assembling a spur gearbox is running in the gears. Using the procedure, contact spots are corrected, existing defects are corrected, and the contact area is increased. After running-in, the roughness of the meshing surface decreases, the noise level decreases, and the working life of the gears increases.
The running-in of surfaces in contact with the gear clutch includes grinding them with an abrasive paste. The grain size of the material is selected based on the accuracy of engagement and the hardness of the teeth. The recommended procedure for processing gearing is contained in technical documentation and instructions. General algorithm of actions during running-in:
- The teeth are coated with a thin layer of abrasive material.
- The mechanism is started for 5–10 minutes. The motor frequency is set to 20–30 rpm.
- Remove the paste from a pair of teeth and check the condition of the working surfaces. The procedure can be considered complete if there are traces of contact and there are no scuffs or other effects.
- The paste must be replaced and then the device must be started again, gradually increasing the braking torque on the output shaft.
- Every 30 minutes the mechanism is stopped, the working surfaces are checked, and the abrasive paste is changed.
- After removing the abrasive paste, you need to run-in the mechanism for 90–120 minutes. Industrial oil must be periodically applied to the teeth so that the surface becomes smooth and shiny, and the remaining abrasive material is completely removed.
If there is a multiple number of teeth in a pair, the gear tooth and the two meshing wheel teeth must be marked before the procedures. When assembling, they are brought into engagement to ensure that the previously run-in teeth match. If there is an odd number of teeth, all elements are run in, so there is no need to mark them.
Main types of faults and their causes
Let's look at possible malfunctions that await the driver when operating the UAZ Patriot, related to the design of the bridge. As a rule, they are associated with excessive wear or operation in harsh conditions, or natural aging of metal components and can be expressed in the following symptoms:
- An increase in the noise level in the operation of the axle, which can be caused by the failure of the differential bearings, their incorrect adjustment, or an insufficient level of lubrication in the oil pan.
- The occurrence of knocking noises when the car starts moving is most often caused by wear of the satellite axle.
- The operation of the Patriot's front axle may increase noise during acceleration and/or braking. This is usually due to poor clearance of the main gear gears or poor engagement. Another reason for the phenomenon may be increased clearances of the bearings themselves.
- A decrease (loss) in oil level is detrimental for a number of reasons. Firstly, the bridge seal immediately loses its elasticity. Secondly, the bridge cover holds worse, and the seals of the internal hinges wear out.
- If noise is observed while cornering, then most likely we are talking about wear on the CV joints.
It will also be interesting to read: Lada Niva Urban 4x4: review and technical specifications
Removing and replacing the axle shaft seal of the rear axle Niva Chevrolet
Replacing the rear axle axle seal on a Chevrolet Niva
produced when there is a visible leak of transmission fluid from the axle
To do this, after parking, pay attention to the condition of the car’s drums. If there are problems with the seals, small streaks will be noticeable on the wheels.
If it is not brake fluid, then most likely the problem is in the oil seal and should be replaced. A transmission fluid leak will cause serious problems with axle components.
To carry out the work you will need a regular set of tools. The only special tool you will need is a puller for the axle shaft, but if you don’t have one, you can do without it.
Before carrying out work, ensure that the machine is as motionless as possible. To do this, wheel chocks are installed under the front wheels. First gear is engaged. The work is carried out in the following order:
- The wheel fastening becomes loose. The car is raised on a jack. The wheel is completely removed. Supports are placed under the thresholds in case of problems with the jack; ordinary blocks or several wheels folded in a stack will do;
- Before removing the brake drum, make sure the wheel is completely released. In this case, the handbrake lever must be lowered, the wheel rotates freely;
- The decorative cap is removed. To do this, disconnect it by prying up the fasteners with a screwdriver;
- The gap between the flange and the drum is moistened with penetrating lubricant (liquid wrench, WD-40);
- The brake drum is secured with two screws, they must be unscrewed. For this you will need a key “12”;
- Gently tap the drum with a hammer so you can move it relative to the axle shaft;
- In some cases, the drum can be removed quite easily. But sometimes you have to shoot him down. To do this, it is necessary to strike the rim of the drum with a hammer from the back side. Just do this through a block, otherwise you can damage the drum;
- The screws holding the axle shaft and the drum casing are unscrewed;
- The bridge rises slightly;
- The shock absorber bracket should be removed from the axle bearing plate;
- The axle shaft is removed; for this you will need a special puller. If it is not there, then you can do without it. To do this, put the wheel on the axle shaft. Screw on 3 nuts, but so that there is free space between them. We press the wheel against the axle and pull it harder towards us. After several passes, seasoned with strong words, the axle shaft should move. All that remains is to extract it;
- Now you can change the oil seal. Remove it using a screwdriver. Just pry the oil seal in a convenient place and pull it out;
- To install, the new oil seal is pressed back in, and the removed part is used as a mandrel.
Reassembly is in progress. All dismantled parts are installed in place.
Many drivers combine oil seal replacement and transmission oil change. If you decide to do the same, then it makes sense to find out what type of lubricant is used in your case. It is not recommended to mix different types of oils. This will lead to performance problems. If it is necessary to change the type of lubricant, it is recommended to first flush the system.
When removing the axle shaft, oil will begin to flow out. Therefore, it is better to drain it in advance. If you do not want to change the lubricant, then you need to take measures against its leakage. To do this, simply raise the side of the car from which you are changing the oil seal higher. This way you will avoid lubricant leakage. But, in any case, there is a risk of lubricant leakage. Be sure to add a new portion of oil after all work has been completed.
When reinstalling the brake drum, pay attention to its condition. Often there is a development along the shoulder
It should be removed using a regular file. This simple action will significantly improve braking.
In some cases, oil seal wear can be caused by a bent axle shaft. In this case, knocking noises will be heard when moving, and the oil seal will be worn out on only one side. In many cases, you can even visually determine the damage. Such a defect can only be corrected in a workshop on a special stand. If this is not possible, then you will have to buy a new part.
The rear axle on this model is quite weak. Problems with it arise quite often. That is why, replacing the rear axle axle seal on a Chevrolet Niva is familiar to almost all owners of this car. This work is not difficult. If you have even average repair skills, you will only need half an hour on one side. The most important thing is to do the work carefully
It is especially important to ensure that dirt does not get inside the bridge. Even the smallest particle of sand can cause problems with the operation of this part of the machine.
Adjusting the toe and camber of the front wheels of the car
The distance between the beads of the front wheel tires should be less at the front than at the rear by 8-12 mm for the ZIS-150 car and by 1.5-3 mm for the GAZ-51 car. This wheel setup reduces tire wear.
To adjust the wheel toe, you need to set the front wheels to a position corresponding to the vehicle moving in a straight line, loosen the nuts of the tie rod end bolts and, turning the cross rod with a pipe wrench, set the toe to the normal value.
The toe-in and camber of the front wheels are checked with a special sliding ruler.
Rice. Checking the toe-in and camber of the front wheels: a - ruler: b - installing a ruler when checking; 1 - bracket; 2 - flat stops of the bracket; 3 - gear sector; 4 - spur gear; 5 - arrow; 6 — dial; 7 - rod; 8 - spring: 9 - level.
The sliding ruler consists of two rods that are moved apart by a spring. At the ends of the rods, brackets with flat stops are hinged. The brackets are equipped with gear sectors meshed with cylindrical gears, on the axis of which arrows are attached. When checking the installation of wheels, a ruler is placed between the wheels so that the stops of the brackets are pressed tightly against the edges of the wheel disks, and the brackets are strictly vertical. The correct installation of the ruler is determined by the levels on the lower stops of the brackets. A small deflection of the bracket causes a significant deflection of the needle along the dial (provided by the gear ratio). The deviation of the arrow from the zero position shows the angle of deflection of the wheel in degrees or millimeters. The same ruler is used to check wheel alignment.