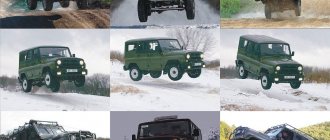
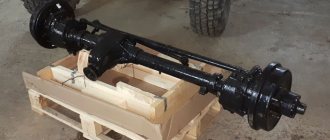
Starting from the very first models, all cars of the Ulyanovsk Automobile Plant had a 4 x 4 wheel arrangement and had high cross-country ability on all types of roads. Naturally, the legendary UAZ-3303 is also an all-wheel drive van, the basis of its chassis is the front and rear axle.
The design of the front axle of the UAZ “Bukhanka” is a little more complicated than the rear one, since it is the drive axle and plays an important role in driving the car.
We act independently: how to turn on the front axle on a UAZ
By buying a UAZ car, we acquire reliability, practicality, and endurance.
This SUV is capable of driving where the most sophisticated foreign car would lose ground, and it pleases with its unpretentiousness and wear resistance. But nothing material lasts forever, and one day the UAZ driver is faced with the question of repair. Today we will talk about such an important detail as the bridge. Many people wonder how to turn on the front axle on a UAZ. The answer will be given below.
Definition and purpose
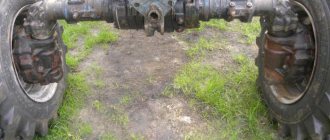
The wheels of a car need a connecting beam that would support them and provide reliable support and fasteners. A bridge acts as such a beam. It takes on all the loads that arise during movement and absorbs them with elastic parts. If this device were not provided, the car would not cope with the tasks that it has to perform.
If the axle is a drive axle, then, in addition to its connecting function, it also acts as a torque transmitter. The drive axle is a complex device, a unit consisting of a mass of parts. Each of them carries out certain operational functions. Remove one part and the machine will no longer be functional. This is why it is so important to regularly check the quality of all components of the car. The bridge structure includes the following elements:
Existing types of bridges
Improved bridges on UAZ
- Managed. This is, as a rule, the front axle of the car, equipped with either rear-wheel drive, which is outdated today, or all-wheel drive. But there is another option: in transport equipment for public utilities or agriculture, it is the rear axle that is steered, not the front axle. This type of design is divided into two subtypes.
- Uncut. This is a special beam equipped with a mechanism for steering knuckles, fixed on the sides; wheel hubs are placed on the knuckles. The purpose of this design is to control the rotation of the wheels while driving. The most important conditions are the lightness and strength of the continuous beam. That is why, as a rule, it is made of high-strength steel using forged technology.
- Split. This is already a gearbox equipped with drive shafts. The purpose of the cutting mechanism is to transmit torque to the wheels. The split bridge provides ample opportunities for vehicle maneuvering.
- Supportive. This design is used to increase the lifting power of the machine and acts as an additional supporting element. Without this part, a car designed to transport large cargo would simply fall apart within the first kilometer. The support device can be found in such a unique vehicle as a motor home.
- Continuous leader. This is a rather complex structure, consisting not only of a beam, but also axle shafts, bearings, and a differential. On the beam of this design springs and brackets are attached to secure the suspension. Thanks to the continuous drive axle, the drive wheels can rotate at different rates, in addition, the design softens the load and controls the car when cornering. Some bridge parts undergo additional processing to give them greater strength and elastic properties. Thus, the axle shafts are made of high-quality steel and then hardened with high-frequency heat.
Return to contents
UAZ transmission components
The new UAZ 452 family vehicles have a manual transmission (four-speed). Inertial type synchronizers provide easier gear shifting. The five-speed ADS gearbox is synchronized in all forward gears.
The UAZ can be equipped with a 5-speed manual transmission Daimos (DYMOS). This gearbox is distinguished by its reliability. Its average service life is 300,000 km. The filler plug is located in the middle of the box, the drain is at the bottom. It seems possible to unscrew them using a hex key. When oil is drained, special containers should be prepared. New fluid must be filled to the level of the oil filler hole on the box. The dipstick allows you to accurately determine to what level the liquid is filled. An alternative to the probe can be a long nail. For preventive purposes, the oil level must be measured every 15,000 km.
The presence of mechanics on this version of the vehicle is completely justified. It is important to use such a car on rough terrain and off-road. In addition to this, there will be no problems with towing.
The gearbox has external shift levers. The lever in the cabin moves freely both parallel and perpendicular to its axis.
The machine is equipped with a transfer case. The design of the transfer case for the UAZ 452: drive axle shafts, gears. All of the listed components are located in a cast iron crankcase. The crankcase and the cover are connected with nuts. The shift fork rods are securely fixed in the cover.
There is a spline and bearings. There is a helical gear for the speedometer drive. The intermediate shaft is fixed to the “loaf” bearings. This box has reliable gears with straight teeth.
Thus, the gearbox on the UAZ 452 consists of many components and assemblies. This unit requires regular maintenance.
Main design problems
It is better to install reinforced axle shafts on UAZ axles
A bridge is a complex structure, the failure of which causes the entire vehicle system to fail. Main malfunctions of the rear and front axles.
- Defective teeth of the main pair.
- Axle shaft defect.
- Oil leak.
- Bearing defect.
- Washer wear.
For what reasons do these malfunctions occur? If the car is equipped with rear-wheel drive and the front axle is connected here, then wild rides on bumpy roads will lead to catastrophic consequences. The transmission fails first, followed by everything else. If you often use gear oil without taking into account the season, then do not expect good performance from your car.
If axial gaps occur in the bearings, all sorts of failures occur, so it is very important to periodically inspect all parts of the car to identify problems. If the pressure in the tires changes frequently, then their long operation will lead to the destruction of parts. Defects in the shaft, crosspieces and suspension bearings also lead to problems.
The main cause of most problems is wear of components or their poor quality. Strong overloads will not have a positive effect on the operation of the parts; still, take care of your car. Insufficient lubricant for parts is another cause of malfunctions. Incorrect adjustment of the front axle bearings will also lead to unpleasant consequences.
Axles from MTZ significantly increase wheel clearance
Tuning is a good thing, but only if it is carried out by real professionals. But quite often, unscrupulous specialists make gross mistakes, as a result of which the stroke and dimensions of the driveshaft completely do not coincide with the required parameters. The result is a serious breakdown and the need for almost major repairs.
Symptoms of structural failure.
- The front axle on the UAZ, like the rear axle, begins to emit a characteristic sound.
- At first the car is almost imperceptible, and then it begins to lose control more and more.
- The driver notices that fuel consumption is higher than before.
- Engine and transmission parts wear out quite quickly.
- Wedge while moving. Note that this is the worst of the symptoms. This means that there is a gap between the bearings, which can lead to serious problems. The wedge is accompanied by noise and crackling. In this case, urgent repairs are necessary.
To prevent malfunctions, timely adjustment of the UAZ rear axle, and the front one too, is necessary.
Disassembly
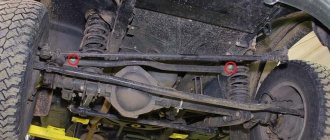
The front axle requires regular inspection and maintenance. Maintenance consists of adjusting bearings and steering knuckles. From time to time it is necessary to change the lubricant in them. If you notice that some part is behaving unpredictably or incorrectly, do not be afraid to take on the repair of the front axle. Armed with useful information, patience, and tools, you'll be sure to get the job done.
First you need to remove the front axle, for which you should place bricks or blocks under the rear wheels of the car to make it more convenient to work. Then we remove the pipelines; they are attached to a flexible hose, going to the brake devices. We unscrew all the nuts securing the shock absorbers, as well as the bolts connecting the drive gear to the driveshaft. We disconnect the rod from the bipod, remove the stepladders, pads and gaskets.
Dismantling the front beam
Now you need to slightly raise the front bumper of the car. The next, most important stage of work begins - dismantling the front axle.
- Remove the wheels by unscrewing all the nuts.
- We dismantle the bipod rod.
- Remove the brake drums and wheel release clutches.
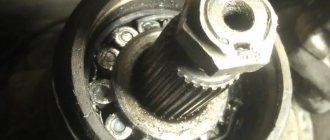
- Then you need to disconnect the inner ring and lock washer by straightening the edges of the so-called lock washer.
- The next stage is the disassembly of wheel hubs, brake flaps and steering knuckles.
- Unscrew the ball joint and steering linkage rod.
- Disconnect the steering knuckle housing and the gasket set.
After disassembling the front axle is completed, thoroughly wash the parts and inspect them in the light to find damage. If you notice even the slightest crack or wear, do not spare the part, feel free to discard it and install a new one. The main thing is not to throw away good nuts and spare parts along with an unnecessary element, so you should always have order in your garage.
Device and how it works
The transfer case is a mechanism located in a separate housing made of gray cast iron. The assembly is divided vertically into a crankcase and a cover, which are connected by bolts. Both halves undergo joint processing, so it is impossible to install a part from another gearbox. The crankcase has a separate hatch for installing a power take-off. The oil-filled unit with the parking brake drum installed weighs 37 kg.
The transfer gearbox will only work correctly if it is correctly centered on the gearbox housing. For this, a 2-row angular contact bearing and a steel cylindrical cup are used. The gearbox shafts are mounted on ball and roller bearings, secured with nuts and retaining rings, respectively. The output shafts pass through sealing seals installed in the covers.
The drive shaft of the unit is the driven axis of the gearbox, which is equipped with a splined tip on which the gear is located. This part has 2 positions that allow you to get forward and reduced speeds. The shift drive is equipped with a special fuse that prevents the low range from starting until the front wheel drive is connected.
When the gear is connected to the gear wheel of the rear axle drive shaft, direct transmission is ensured. The gearbox device includes a special lever that allows you to move the gear to the side, engaging it with the gear of the intermediate shaft. In this position, the rotation speed of the driveshafts of the axle drives is reduced.
Switching technology
When you're driving on a normal road, your car doesn't require much. But when a real obstacle arises on the way in the form of impassable swamps, mud and potholes, you need to be prepared for them so as not to ruin the car. What can be done in this case? The best option is to engage the front axle.
To do this, you need to stop the car and check whether the front axle release clutch is activated. If yes, then turn the couplings clockwise and slide them forward. Now the front wheels will rotate simultaneously with the rear ones, which will significantly improve the vehicle's maneuverability. Clutches, or hubs as they are also called, make the car more controllable, stable, and maneuverable, but in addition to this, fuel consumption increases, which is a disadvantage of the system. That's why many drivers prefer to disable all-wheel drive and replace it with front-wheel drive. To do this, you must first turn off the hubs, and then the transfer case.
When the clutches of the UAZ front axle are activated, the rear and front axles rotate at the same speed, which, when moving on asphalt, leads to increased wear of the transmission and tires, as well as a significant deterioration in handling.
Hub is a device designed to connect or disable the freewheel working option. It comes in two types: manual and automatic. The first one is much easier to operate and easier to repair, but the second type opens up great possibilities.
In order to avoid defects in hubs and other parts, this device should be connected when the machine is completely stopped. To determine whether the device connection was successful, you can use three popular methods.
- The first one is this: once you start moving, you need to monitor how the rear wheels behave - they should work without the help of the front ones.
- The second test is to check the car's handling when cornering: with front-wheel drive connected, the car drives stronger than with it disabled.
- The third way to check is even simpler - ask an outside observer to see whether the drives are spinning or not. If not, then the couplings are disconnected, which is what we needed.
Front axle structure of the UAZ “Bukhanka”: turning the axle on and off
Dear UAZ drivers, please tell me, I climbed the entire UAZbuka, but I still haven’t fully found the answer to the following questions: 1. How to correctly turn on/off the front axle (loaf, bridges, as I understand it, are collective farm)? If possible, write an algorithm, or even better, with an explanation of why it is this way and not otherwise? 2. What happens if you turn on the front axle with a lever in the cabin, without turning on the clutches (as I understand it, I have an ELMO, because you have to turn them by hand)? 3. How much is the life of the front axle reduced if the clutches are kept constantly on and the axle is connected as needed?
Thanks in advance for your answers.
1. How to correctly turn on/off the front axle (loaf axles, as I understand it, collective farm axles)? If possible, write an algorithm, or even better, with an explanation of why it is this way and not otherwise? 2. What happens if you turn on the front axle with a lever in the cabin, without turning on the clutches (as I understand it, I have an ELMO, because you have to turn them by hand)? 3. How much is the life of the front axle reduced if the clutches are kept constantly on and the axle is connected as needed?
Thanks in advance for your answers.
2 - I use this method when parking in the summer. It’s very convenient in that you can stick the gear down and not burn the clutch when starting smoothly, while the engine doesn’t strain at speeds just above idle + the front axle doesn’t work, which means there’s no load on the units on dry and hard surfaces caused by the lack of a center differential due to the fact that the “center differential” is formed due to the separation of the couplings and CV joints of the front end. You can also warm up in this mode if the first 100-200 m of the road is dry, but the primer is broken. you move 2-3 km/h until it reaches 40. The only caveat. You can’t make sudden jerks, that is, start in 1st or 2nd and move evenly. The torque on the rear gearbox is high, if the bridge is a collective farm you can cut a carrot.
3. The bridge is unlikely to wear out faster; it threshes idle without a load, or rather there is a load, but in the form of CV joints, a cardan, and a CV shaft. There will only be a slight excess fuel consumption and unnecessary noise. In winter I drove with it connected, because... in the city I drove off the road a little and ended up on the front line - hit the front end. And by this time the oil is already warmed up (if it’s mineral water).
Let me explain. It was thanks to the information from the site and the forum that I asked this question. Before this, I naively believed that the front axle could be engaged at any time, but had no idea about clutches. As for the amount of information, unfortunately, it is so fragmentary that I did not have complete answers to the questions posed. Maybe I missed the global thread with this question somewhere. As for the structure of the forum, I have not been on the Internet for the first time, believe me, I surfed and searched before asking a question.
Well, thank you. All clear.
What if the engine is running at xx? Why did I ask - I tried to turn it on - there was a grinding sound. Then the owner of the car explained that the clutches must first be engaged. Could you explain in more detail what exactly is the risk of such inclusion? I only found something that can cut bolts, but where and why?
And yet, according to the forum, it was found that it is better to turn off the front axle while moving (.), at a speed of 20-40 km/h. What is this for.
Understood nothing. Do you still turn on the front end when the clutches are disengaged? For what?
In general, what is the resource of the front axle? It seems to be the same as the rear one, i.e. Is it theoretically possible to drive it all the time?
And one more thing - since this conversation has already started - are there any pitfalls in the distribution? Can the reduced gear be engaged in any way in any combination with the front axle clutches/front axle engagement handle?
What I know, I’ll say that you really need to engage the axle this way (if the clutches on the wheels are turned on by hand): 1. Turn on the clutches 2. We climb under Buhan and pump the front driveshaft by hand until you feel that it does not spin forward for any length of time nor back (sometimes, when the clutch is not fully engaged, it can spin in one direction, but not in the other). We pump until the clutches engage and the shaft stops spinning (only swing by the amount of play in the CV joints and other parts). 3. We turn on the front axle with a lever in the cab and only after that we drive. if the bridge does not turn on, but turn it on while driving at low speed with the clutch depressed.
Switching mechanism design
So, we looked at how the UAZ transfer case works. The transfer case design is practically no different from the boxes on other cars. Now let's look at what the switching mechanism is.
Thus, the switching system consists of several main components. These are shift fork rods that are secured in the crankcase cover using a locking plate. The device also has forks for engaging the front drive axle and those gears that can move along the rods. The bodies of the plugs have special sockets. Springs and retainer balls are installed here.
While moving along the rod, each of the forks is fixed on it with a special lock. The lower parts have special tabs that fit into the grooves of the gears. There are rectangular recesses on the upper parts. With their help, the fork is connected to the levers to select a gear. What else is special about the distribution box? The UAZ (“loaf”), the gearbox design of which we are considering, is made so that the shift levers are placed in separate covers. The parts are located on the inclined crankcase hatch and are attached to the rod using pins.
The front ends of the rod are equipped with fingers with which they are connected to the rods. In the front part of the cover, the holes for the rods have seals. At the rear they are closed with spherical plugs. There is a small ball between the rods. It functions as a lock. The mechanism prevents the driver from engaging a downshift until the front drive axle is engaged. This is how the UAZ distribution box (“loaf”) was made. Its device is not complicated. The mechanism is quite reliable and repairable, according to reviews from car owners.
How the UAZ front axle works
The diagram of the UAZ loaf front axle allows us to determine that it consists of several components:
Below is the structure of the components of the front axle of the UAZ loaf car.
Carter
The UAZ loaf axle housing consists of 2 parts. The parts are bolted together to form a gearbox housing. Parts of the crankcase are equipped with fastenings for installing springs and shock absorbers.
IMPORTANT: As the vehicle is used, the lubricant in the crankcase heats up and expands. At the same time, the pressure in the crankcase cavity increases. To prevent leakage of the axle housing, a breathing valve is provided. It is installed on the axle housing of the UAZ front axle and is necessary to communicate the crankcase cavity with the atmosphere.
There are turning mechanisms along the edges of the bridge. They are necessary to drive a car. The mechanisms are pivotally connected to the edges of the crankcase casing. Trunnions are installed on the rotating mechanisms. They are necessary for articulated connection with the vehicle hubs. To reduce the degree of friction, the hub is mounted on roller bearings.
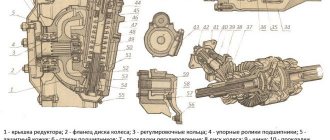
Gearbox
The UAZ loaf front axle gearbox consists of a main gear and a cross-axle differential. When the front axle of the UAZ loaf is turned on, the torque from the gearbox is supplied through the driveshaft to the gearbox flange. It is mounted on the same shaft with the main gear drive gear.
As the drive gear rotates, it transmits torque to the driven gear. Compared to the drive gear, it has a large diameter. This allows you to reduce the torque transmitted from the transfer case.
REFERENCE: The teeth of the gears of the main gear of the UAZ vehicle gearbox are located at an angle. This prevents the gear teeth from hitting each other, thereby reducing the noise level when the vehicle is moving.
An interwheel differential is located inside the driven gear. It consists of conical satellites and their axes. The differential mechanism includes axle shaft splines. The differential allows, when turning a car, to achieve a difference in the speed of rotation of the wheels of one axle. You can also read about UAZ 390945.
Half shafts
The front axle of the UAZ loaf car is a shaft with splines on the edges. On the one hand, the splines are installed in the differential gearbox. The second side of the axle shaft drives the wheel hub. The transmission of torque from the front axle gearbox to the wheel mechanism is carried out using a CV joint. It allows you to transmit torque regardless of the angle of rotation of the wheel mechanisms.
A distinctive feature of the front axle of the UAZ Bukhanka is the ability to disconnect the wheel hubs from the axle shafts. This is necessary to prevent wear of the rotating parts of the gearbox during prolonged movement on good quality surfaces.
Description
Untie the front axle in the field with your own hands
Weight -132kg. Width -0.45 m, Height -0.35 m, Length -1.77 m.
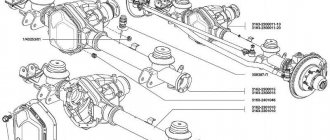
Front axle (3741-2300011) UAZ-452, UAZ 469 (3151-2300011).
Front axle (3741-2300011) UAZ-452, UAZ 469 (3151-2300011) from
There are two types of front axles installed on cars - with a single main gear or with additional wheel reduction gears.
The bridge with a single main gear consists of a cast-iron crankcase that is split in a vertical plane and steel tubular axle housings pressed into it, additionally fixed by welding. The crankcase halves are bolted together through a gasket. The main gear with the differential is located in the left half of the crankcase and forms the axle gearbox.
The main gear drive gear is installed in the crankcase on double angular contact roller and radial roller bearings located on both sides of its ring gear. The driven gear is bolted to the gearbox. The gears are bevel gears with a spiral tooth, the gear ratio is 4.625.
The satellite box consists of two halves connected by bolts. It is installed in the crankcase on two tapered roller bearings. The box contains two satellite axles, four satellites and two semi-axial gears with thrust washers.
Adjustment of the bearings and the engagement of the main gear gears is carried out by changing the thickness of the gaskets between the inner rings of the drive gear bearing and the number of washers at the inner rings of the satellite box bearings.
On a bridge without wheel reduction gears, a ball joint with two holes into which bronze bushings are pressed is bolted to the flange of each axle housing. The bushings include two kingpins that are pressed into the steering knuckle. A hollow axle is bolted to it, on which two identical tapered roller bearings of the wheel hub are mounted. Five bolts are pressed into the hub, to which a stamped steel wheel with a landing diameter of 15 or 16 inches is attached with cone nuts. The hub bearings are adjusted by nuts installed on the threaded end of the axle.
Each axle shaft consists of a driving and driven part connected by a Weiss constant velocity ball joint. The hinge is located inside the ball joint and consists of two profiled knuckles that engage with each other through four balls located in their grooves. The fifth (central) ball is located in the center of the hinge on the same axis with the pivots. The driven part of the axle shaft passes inside the axle and is connected to the drive flange of the hub through a splined wheel release clutch. The flange is attached to the end of the hub with studs through a gasket.
The front axle with wheel reduction gears is distinguished by:
a gearbox with a spur gear internal gear and a gear ratio of 1.94 is attached to the steering knuckle body; the main gear drive gear is mounted in a cantilever on two tapered roller bearings with a spacer sleeve between them; the final drive ratio was reduced to 2.77, and accordingly, the dimensions of the final drive housing were reduced.
The drive gear of the gearbox is mounted on the splines of the driven part of the axle shaft.
Thanks to the use of wheel gears, the vehicle's ground clearance increases by 80 mm, which increases its maneuverability.
The main gear and wheel gearboxes are lubricated with transmission oil poured into their crankcases. The main gear housing and wheel gearboxes have holes for oil changes, closed with plugs with conical threads. The hub bearings, constant velocity joints and king pins are lubricated with grease.
To prevent the leakage of oil and grease, as well as to protect against the penetration of dirt inside, the front axle is equipped with gaskets between the fixed parts, cuffs in the hubs and on the drive gear shaft, as well as combined felt-rubber seals sliding along the spherical surface of the ball joints. To prevent oil from the gearboxes from penetrating into the cavity of the ball joints, cuffs are installed on the axle shafts, and the ball bearing of the wheel gearbox has an oil deflector.
Possible bridge malfunctions and their causes
The front axle of the UAZ loaf car is distinguished by its reliability and unpretentiousness to operating conditions. The most common malfunctions are:
- Crankcase seal failure. Excess pressure that occurs when the oil heats up while the car is moving causes the crankcase to fail to seal. To prevent malfunction, it is necessary to regularly check the functionality of the breathing valve;
- Bearings are worn out. Occurs as a result of improper operation of the front axle of a UAZ loaf car. Switching the UAZ loaf front axle to the on position when driving on a good quality surface leads to rapid wear of the gearbox bearings. To prevent bearing damage, it is necessary to connect the front axle only for off-road driving;
- Increased wear of rotating parts. Occurs due to poor quality lubricant. It is necessary to change the oil in the front axle regularly. The cause of the malfunction may be water entering the gearbox housing when fording. To prevent water from entering the gearbox housing, the breathing valve is equipped with a hose attached under the engine compartment cover.
- Malfunction of the cross-axle differential. Often occurs due to wear on the pins. To prevent damage, it is necessary to regularly inspect the pin mechanism for play. If the permissible values are exceeded, the kingpins should be replaced;
- Breakage of the main gear drive shaft bearing. Occurs due to a malfunction of the driveshaft crosspiece. It is necessary to regularly check the integrity of the crosspiece.
- High degree of wear of conical satellites or their axes. The integrity of the conical satellites and their axles is affected by the difference in pressure in the tires of the front axle wheels. To avoid damage, it is necessary to constantly monitor tire pressure.
UAZ Hunter transfer case device
The UAZ Hunter single-lever transfer case, the purpose of the product is to distribute the impulse removed from the power unit to the working pairs of wheels. Structurally, the unit is equipped with two stages and a reduced speed. There is no differential between the axles in the design.
The impulse arrives at the transfer case shaft after the classic gearbox. The secondary shaft is in constant contact with the main stage of the pair of wheels behind the car, the connection occurs through a cardan. Activation of the first pair of wheels connects the shafts to each other using a gear coupling, and the parts rotate at equal speeds.
Transfer case diagram:
The design contains a tray made of cast iron and closed with a plug. In addition, the composition includes shafts: main, secondary, middle, front wheel activation shaft; wheels with teeth and clutches that disengage the front wheels.
The transfer case of the UAZ “Hunter” is fixed to the pallet of the classic box with four bolts; a hermetic compound is used to seal the joint. The alignment of the products to each other occurs with the outer part of the bearing of the secondary shaft of the gearbox. The handbrake parts are attached to the rear of the transfer case. The transfer case tray contains the main, middle shafts, activation shafts of the front and rear wheels, the parts are fixed in swing bearings.
The end of the secondary shaft of a classic box with splines cut on the surface is the main shaft of the transfer case, inserted into the main gear of the product. The shaft that activates the rear wheels is mounted on two ball bearings; the part is placed coaxially relative to the main shaft. In addition, in the middle of the shaft there is a gear that activates the speed measurement device. The middle shaft is made together with the gear of the reducing stage; fixation occurs by means of bearings with balls and rollers. The activation part for the front wheels is made together with the gear and is mounted from below in the tray on two bearings with balls.
The transfer case is controlled by two rods and two forks, the location is the transfer case pan plug. Shifting occurs by sliding the forks along fixed rods.
UAZ "Hunter":
Connection diagram for the front axle UAZ loaf
Some car owners are wondering how the front axle on a UAZ loaf is engaged? The front axle is engaged in two ways:
- A lever installed in the cab. The lever controls the transfer case. When the front axle of the UAZ loaf is turned on using a lever installed in the cabin, torque from the transfer case is transmitted along the driveshaft to the drive axle.
- Using couplings installed in wheel mechanisms. It is possible to disconnect the drive axle hub from the axle shaft. Switching the UAZ Bukhanka front axle on and off using clutches allows you to reduce the load on the gearbox when driving on hard surfaces.
IMPORTANT: after disconnecting the clutches located in the wheel mechanisms, connecting all-wheel drive using a lever from the passenger compartment will be impossible.
To engage the clutch, it is necessary to remove the protective cover of the drive axle hub. Using a hexagon, screw the coupling cap until it stops. The axle shaft splines will engage and the hub will be connected to the gearbox. To disengage the clutch, perform the procedure in reverse order.
To connect all-wheel drive using a lever installed in the passenger compartment, it is necessary to do the following:
- Disengage the clutch;
- Set the gearshift lever to neutral position;
- Move the control lever to the extreme forward position;
- After completing the steps, all-wheel drive will be turned on. All-wheel drive must be turned off by moving the lever to the rearmost position.
ATTENTION: Before disabling or engaging the front axle on a UAZ loaf, you must disengage the clutch. To do this, depress the clutch pedal located in the cabin.
How the all-wheel drive system works
The Patriot's engine is connected to a 5-speed synchronized manual transmission.
The secondary shaft of the box transmits torque to a 2-stage transfer gearbox, which is connected to the axles using cardan shafts with needle bearings and movable couplings. Splined couplings ensure the operation of the transmission when the axle moves on a suspension. The drive to the rear beam operates in continuous mode; the driver turns on the front axle when driving off-road. The classic UAZ transfer gearbox is equipped with gears with straight teeth, which are switched using a lever. The gearbox housing parts are made of cast iron, the primary and secondary shafts are located inside, and there is an intermediate element with a movable carriage. The gearbox cover houses a switching mechanism equipped with two rods and forks. The mechanism is connected to a lever located inside the car.
The Dymos gearbox (with an aluminum crankcase), used since the summer of 2013, uses a chain to transmit power to the wheels, and the design includes a double synchronizer (when all-wheel drive is engaged in direct drive). The manufacturer claims a gearbox life of 200 thousand km, but with frequent use of the vehicle in severe off-road conditions, the unit fails earlier. To change gears, an electric servo drive is used, connected to a control puck.
The car's all-wheel drive distributes torque between the axles in a 50/50 ratio. There is no center differential in the transmission design. The rear axle is equipped with a differential; axle shafts installed inside the axle stockings are used to transmit torque to the wheels. To supply torque to the front wheels, axle shafts and steering knuckles with hinges are used. The units allow power to be transmitted to the steered wheels. The front axle housing also has a cross-axle differential.
On cars manufactured before 2007, factory couplings (hubs) were installed in the front wheel hubs. The devices allow you to disconnect the hubs from the axle shafts and differential, which has a positive effect on fuel consumption. The products are equipped with splined couplings; a special rotary washer in the center of the hub is used to control the position. The plant refused to install hubs in order to simplify the design of the vehicle, but owners of Patriot vehicles can install the hubs themselves.
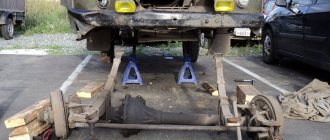
Front axle removal and repair
The front axle of the UAZ loaf has a simple design, which allows you to carry out repairs yourself with minimal technical knowledge. To remove the unit from the car you must:
- Car on a viewing hole, overpass or lift;
- Immobilize the machine to prevent spontaneous rolling. To do this, install anti-roll devices (shoes) under the rear wheels;
- Jack up the car frame. To simultaneously lift both sides, the jack is installed in the front of the frame in the center;
- To avoid injury, install the car frame on specialized supports;
- Unscrew the nuts securing the bridge to the semi-elliptical springs;
- Remove the steering bipod rod;
- Unscrew the shock absorber mounting nuts;
- Remove the shock absorbers;
- Remove the vehicle's drive axle.
REFERENCE: If it is necessary to replace the elastic cushions installed in the spring mounting brackets, the axle is dismantled along with the springs. To do this, instead of the stepladder nuts, the bolts that secure the bracket covers are unscrewed.
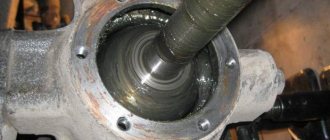
Repairs and adjustments to the front axle of a UAZ Bukhanka can be carried out by a person who has certain skills in repairing equipment. To diagnose a malfunction, it is necessary to conduct a visual inspection of the unit. From the outside, the UAZ crankcase is inspected for oil leaks. The presence of oil drips indicates crankcase depressurization. To eliminate oil leaks, it is necessary to replace the gaskets and seals. When installing, the gaskets are lubricated with sealant.
After disassembling the unit, it is necessary to pay attention to the integrity of the bearings. Failed parts must be replaced with new ones. Particular attention is paid to the wear of rotating parts. If the permissible limit is exceeded, worn parts should be replaced.
ATTENTION: The drive and driven gears of the final drive of the gearbox are replaced at the same time. Replacing one of the main gears can lead to rapid wear of it due to damaged teeth of the second gear.
From the above it follows that the UAZ front axle, due to its design, improves the technical characteristics of the car. The front axle is equipped with rotating mechanisms. This allows torque to be transmitted from the gearbox to the wheels of the vehicle regardless of their angle of rotation. It is possible to disconnect the gearbox and wheel mechanisms by disengaging the clutches.
The process of changing the oil in the transfer case of UAZ 469
Before starting work, it is necessary to warm up the transmission. To do this, drive a car for 2 to 4 kilometers. When heated, the viscosity of the oil decreases and it will be easier to drain it from the crankcase.
Changing the oil in the UAZ 469 transfer case is carried out in a certain sequence:
- Place the vehicle on a pit, overpass or lift. Some motorists prefer to carry out the procedure while lying under the car on a specialized tray;
- Clean oil stains and dirt in the area of the drain and filler holes. A metal brush is used;
- Remove the filler plug. Necessary to prevent the occurrence of a vacuum in the crankcase when draining liquid;
- Place a container to collect used lubricant under the drain hole. The container must have a volume sufficient to collect waste liquid. It is better to choose a vessel with a wide neck. A bucket or cut plastic canister will do;
- Remove the drain plug. To prevent the plug from falling into the waste oil container, it must be held firmly;
- Wait until the fluid drains completely from the crankcase;
- Clean the drain and filler plug from dirt and metal particles;
- Install the drain plug;
- Fill in new lubricant using specialized tools. Syringes or pumps are used;
- Install the filler plug.
REFERENCE: When carrying out the oil change procedure on a UAZ 469, it is recommended to check the functionality of the breathing valve (breather). Malfunction of the product can lead to depressurization of the crankcase.
After replacement, it is necessary to eliminate oil leaks formed during the work. A rag is used for this.
Blog about UAZ
The front axle of carriage-type vehicles of the UAZ-3741, UAZ-3962, UAZ-3909, UAZ-2206, UAZ-3303 models is the drive axle. The crankcase, final drive and differential of the front axle do not differ from the corresponding parts and assemblies of the rear axle. All disassembly, assembly, maintenance and adjustment operations are the same as for the rear axle.
The design of the steering knuckle of the front drive axle of UAZ-3741, UAZ-3962, UAZ-3909, UAZ-2206, UAZ-3303.
A ball joint with pin bushings pressed into it is attached to the axle housing with five bolts. The steering knuckle housing is mounted on the ball joint using two kingpins. The steering knuckle pins are installed with a preload along their common axis, the value of which is 0.02-0.10 mm. When turning in the steering knuckle body, the pins are locked with pins.
Adjustment of the preload must be done with shims installed at the top - between the steering knuckle lever (left) or lining (right) and the steering knuckle body, at the bottom - between the linings and the steering knuckle body. To lubricate the upper kingpins and add grease to the ball joint, grease fittings are installed on the steering knuckle arm (left) and on the upper kingpin pad (right). The lower king pins are lubricated by grease supplied by gravity from the ball joint.
A constant velocity joint (CV joint) is installed inside the steering knuckle. The design of the hinge ensures the same angular speeds of the drive and driven shafts, regardless of the angle between them. The hinge consists of two forks, in the curved grooves of which four balls are located. In the central sockets of the forks there is a fifth ball, which is an adjustment ball and serves to center the forks. The hinge is limited from longitudinal movement by a thrust washer.
Clutch for disengaging the wheels of the front drive axle UAZ-3741, UAZ-3962, UAZ-3909, UAZ-2206, UAZ-3303.
The inner drive fork of the CV joint is splined to the differential side gear. At the driven end of the hinge knuckle there is a device for disconnecting the front wheels of the car, which consists of a movable coupling mounted on splines and a bolt with a spring and a ball. The movable coupling is connected by external splines to the internal splines of the drive flange, bolted to the wheel hub.
To reduce wear on parts of the front drive axle and save fuel when operating a vehicle on paved roads, along with turning off the front drive axle, it is advisable to disable the front wheel hubs.
To do this, remove the protective cap and unscrew the bolt, install the coupling in a position where the signal ring groove on its surface is located in the same plane as the end of the flange. Having installed the coupling in the required position, screw on the protective cap. The wheel is turned on by screwing in the bolt and tightening it securely.
On some vehicles UAZ-3741, UAZ-3962, UAZ-3909, UAZ-2206, UAZ-3303, it is possible to install a different design of the front wheel release clutch 31512-2304210. To disengage the wheels, you need to turn the clutch disc counterclockwise until it stops, aligning the pointer with the inscription “4×2”. Switch on by turning the dial clockwise until it stops, aligning the pointer with the inscription “4×4”.
Operations to engage and disengage the clutch must be performed on both wheels of the front drive axle simultaneously. Engaging the front axle with the wheels disconnected using clutches is not allowed.
Maintenance of the front axle of UAZ-3741, UAZ-3962, UAZ-3909, UAZ-2206, UAZ-3303.
When inspecting the steering knuckles, you need to pay attention to the serviceability of the adjusting bolts, wheel rotation stops and the reliability of their locking. The angle of rotation of the right wheel to the right, and the left wheel to the left should be no more than 27 degrees. An increased steering angle leads to destruction of the steering knuckle joints.
Adjusting the tightening of the front axle steering knuckle pins.
The tightening of the steering knuckle pins is adjusted at the factory with a preload along their common axis, and the same number of shims are installed on top and bottom. When the rubbing surfaces wear out, the preload disappears and an axial gap forms between the ends of the pins and the support rings of the ball joint. This gap is eliminated by removing the same number of shims from above and below. The difference between the total thicknesses of the upper and lower gaskets should not exceed 0.1 mm.
Adjusting the toe-in of the front axle wheels.
Wheel alignment is adjusted at normal tire pressure so that dimension A , measured along the center line of the side surface of the tires at the front, is 1.5-3.0 mm less than dimension B at the rear. Wheel alignment can be checked on the outer or inner surfaces of the tires.
Checking wheel alignment on external surfaces must be done on a special stand. In this case, it is necessary to find points of equal lateral runout of the tires and place them in a horizontal plane. Otherwise, due to significant lateral runout of the tires, the toe will be adjusted incorrectly.
Determining the toe-in of the front wheels on the inner surfaces of the tires must be done in the absence of a special stand. To do this, place the car in a viewing hole with the wheels positioned to move in a straight line. Using a rod with a movable ruler, measure the distance between the inner surfaces of the tires at the rear, approximately at the height of the center of the wheel. At the same time, install the bar horizontally, and mark the points of contact of the bar with the tires with chalk.
Then roll the car forward or backward to such an amount that the points marked on the tires are at the same height in front, and the measurement between the marked points is repeated. The difference between the first and second measurements gives the wheel toe value.
If necessary, wheel toe adjustment must be done by changing the length of the steering linkage rod by rotating the fitting after first loosening the locknuts with left and right threads. After adjustment, tighten the locknuts.
Names of switch switches, where what is turned on on UAZ vehicles
Gearbox - like on the Volga with a 4-mortar, transfer case (I'm talking about 3151 (469)) - NEAR LEVER forward - straight, middle neutral (another one, like in a gearbox), back - low. Shift only on the spot with the front axle engaged! The front axle is activated by the FAR LEVER: forward is on, back is off. Fig. 1.16. Gear shift lever and its positions.
On a UAZ, unlike, say, a Niva, you can disconnect not only the axle from the gearbox, but also the hubs from the axle. This is usually done (but not necessarily!) when driving on asphalt in order to save gasoline and the front axle. That is, with the clutches disconnected, the UAZ turns into rear-wheel drive. If bad roads are not uncommon, then you should not disconnect the hubs (not the axle!). And they are turned on and off either by quick engagement clutches (turned by hand to the 4x4 or 2x4 positions, standing instead of the hub caps) or by tightening and unscrewing the nut under the hub cap. It is known where the hub cap is located, so there is no need to crawl under the car.
Front axle engagement lever, a - for UAZ-31512 b - for UAZ-3741 Transfer case control lever, a - for UAZ-31512 b - for UAZ-3741
Features of driving a UAZ on ice with differential locks
Peculiarities of driving on ice with blockages Somehow I’m driving here at 15-20 km/h, in rear-wheel drive. As usual, bare ice, holes and all that. Suddenly I suddenly start turning 90 degrees, I can’t do anything and I crash into the garage door. Why is that? Then I went to check this case on an area where there is ice and snow, and indeed you can turn 180 degrees around the front axle, just give the gas to the floor.
This happens because one wheel hits a more slippery area and slips, while the other one hits a less slippery area and spins the car around its axis. To prevent this from happening, standard cars have a differential. With blocking, cross-country ability and acceleration on slippery roads increase, but you just need to be prepared for this and be able to drive with blocking.
I agree, on ice a car with locks does not behave the best. In the Volga-Volga I drove into a ditch in an ABSOLUTE STRAIGHT! So be careful with blocking.
Features of driving UAZ vehicles in various road, meteorological and climatic conditions
Vehicle performance and service life largely depend on how you drive it. Proper driving of a car gives it the opportunity to move at a high average speed and low fuel consumption when overcoming difficult sections of the road. When starting off on horizontal sections of roads or downhill, we recommend starting in second gear. In all other cases, start driving in first gear. Change gears with the clutch disengaged.
Shift gears by smoothly pressing the lever without jerking. If you cannot engage the required gear before moving off, then lightly release the clutch pedal, and then disengage the clutch again and engage the gear. Synchronizers in the gearbox make it possible to change gears without using the clutch twice. However, in order to speed up the gear shifting process and increase the service life of the synchronizers, it is recommended to use the clutch twice with a short press on the throttle pedal when switching from a higher gear to a lower one. Engage the reverse gear in the gearbox only after the vehicle has come to a complete stop. When driving the car, do not keep your foot on the clutch pedal, as this leads to partial disengagement of the clutch and the disc slipping. On a slippery road, the car should be driven evenly, at low speed.
On cars with a carburetor that has a forced idle system, when braking the engine, fully release the carburetor throttle pedal, otherwise the economizer will not turn off, which will lead to an increase in fuel consumption. Brake the car smoothly, gradually increasing pressure on the brake pedal. Any excessive braking increases tire wear and increases fuel consumption. When braking, do not let the wheels slide, as in this case the braking effect is significantly reduced (compared to rolling braking) and tire wear increases. In addition, strong and sudden braking on a slippery road can cause the car to skid. When driving the vehicle off-road (sand, mud, snow, etc.), slippery roads, on large inclines (over 15°) and other difficult sections of the road, do not overload the engine. Under these conditions, engage the front axle, and in particularly difficult conditions, also engage the downshift in the transfer case. Before engaging the front axle, engage the front wheels. The front axle is engaged while the vehicle is moving by moving the lever to the forward position. Engage the downshift in the transfer case only when the vehicle is completely stopped by moving the lever to the rear position and disengaging the clutch. Turn it on only when the front wheels and front axle are turned on.
Overcoming steep ascents and descents
Driving a car on roads with steep ascents and descents requires increased attention and speed from the driver. Determine the steepness of the climb in advance and engage the gear in the gearbox that will provide the necessary traction on the wheels, so as not to change gears on the climb. Cope with steep climbs in low gear in the transfer case and in first gear in the gearbox. Climb climbs without stopping and, if possible, without turning. Short climbs with convenient access and a relatively flat road surface must be overcome from acceleration without engaging a reduction gear in the transfer case, in second or third gear in the gearbox, depending on the steepness of the climb. If for some reason the climb cannot be overcome, then take all precautions and slowly go down, engaging reverse gear. Go down gradually, without accelerating the car and without disengaging the clutch. When overcoming steep descents, take measures to ensure the safety of the descent. When overcoming a long descent (more than 50 m), first assess its steepness and engage those gears in the gearbox and transfer case in which the car would overcome a rise of such steepness. Such descents must be overcome using engine braking.
It is forbidden to descend without using the brakes with the gearbox and transfer case disengaged or the clutch disengaged. Do not allow the crankshaft to rotate at high speeds on a descent; periodically slow down the vehicle, reducing its speed.
Overcoming ditches, roadside ditches and ditches should be done at low speed with the front axle engaged in a direction perpendicular to the slope, taking into account the size of the vehicle that determines its cross-country ability. Do not drive over obstacles immediately if there is a possibility of a frontal impact on the wheels. When overcoming ditches and ditches, take into account the possibility of the vehicle hanging askew and getting stuck due to wheel slip.
Driving along dirty country roads and profiled roads on clay and black earth soil. On clay and chernozem soils, after heavy rain, the car may slip sideways when driving. Therefore, exercise great caution when choosing the direction of movement. When driving, choose relatively horizontal sections of the road, skillfully using the already laid track, which prevents the car from lateral skidding. Particular driving difficulties may arise when the vehicle is driven on excessively wet profiled roads that have a steep profile and deep ditches. On such roads you should drive along the ridge carefully and at low speed.
Cross wetlands in a straight line, without making sharp turns or stops. Start moving smoothly, without jerking. Drive with the front axle engaged and the reduction gear in the transfer case engaged, with a gear in the gearbox that would provide the necessary traction force on the drive wheels without slipping. Make the necessary turns smoothly with a large radius, without reducing the speed of the vehicle, which will eliminate the possibility of the turf being torn off and the wheels slipping. Avoid following the trail created by the vehicle in front.
When crossing sandy areas, move as smoothly as possible, avoiding jerks and stops. Make turns smoothly and with a large radius. When driving, use the highest possible gears with the front axle engaged, and overcome slopes and short sandy slopes on the move. Avoid wheel slipping. Determine the road situation in advance and engage the gear in the gearbox that would provide the required traction on the wheels. When driving in a convoy, follow the tracks of the vehicle in front.
Cross the ford with great care. The vehicle is capable of wading at low speed through hard soil up to 700 mm deep with the fan belt removed and the radiator shutters closed. A ford up to 500 mm deep can be overcome without removing the fan belt, but with the radiator shutters closed. Before overcoming a ford, carefully check the condition of the bottom, make sure there are no deep holes, large stones, swampy places, and also select and check the places where the car enters and exits the water. You should cross the ford carefully, without creating a wave in front of the car, in first or second gear in the gearbox with the front axle engaged and the reduction gear in the transfer case. Avoid maneuvering and sharp turns. After crossing the ford, at the first opportunity, but no later than the same day, check the condition of the oil in all units. If water is found in the oil, drain the oil from this unit. The presence of water in oil can be determined by its color change. You should also lubricate all chassis grease fittings before squeezing out fresh grease. Every time the car exits a ford, perform several incomplete releases of the clutch and brakes to dry the clutch friction linings and brake pads. When stopping the car's engine while crossing a ford, you can make two or three attempts to start the engine with the starter. If the engine does not start, the car must be immediately evacuated from the water by any means necessary. If water penetrates into the vehicle components, you should not move under your own power after removing it from the water. Tow the vehicle to a location where it can be serviced.
The car can drive on virgin snow in snow up to 350 mm deep. Turn the vehicle in the same way as when driving through a wetland. When driving on loose snow, apply the same driving rules as when driving on sand.
Features of driving an all-wheel drive vehicle
The most important thing is not to lose control of the car. This can be achieved with some experience. There is no need to immediately storm steep slopes.
Descent from the hill. The main thing is not to be afraid :o) It’s very good when there is a person who watches and controls the behavior of the car from the outside. The first thing is to stand strictly perpendicular to the slope line. We carefully approach the slope and record the moment when the front wheels have already fallen into the slope and when the brake is released the car is about to roll... that's it! from this moment there is no way back, unless they drag you back with a winch :o) We don’t touch the steering wheel any further, it is assumed that the wheels are straight, no pedal brakes, only the engine, carefully roll down in one of the lower gears, steering slightly at the end of the descent . There are nuances... how to choose the right gear on a descent. This is different for different cars and of course depends on the soil of the slope. The main thing is that the engine does not slow down the wheels so much that they skid - otherwise the wheels will fall off, an uncontrolled trajectory and ears will fall (on a steep slope). If the car starts to skid, you need to add gas so that the wheels regain traction, then you can release the gas. To perform this maneuver, preliminary training on long slopes without interference from the front is recommended.
The climb is more difficult and treacherous. We engage the lower range and accelerate in second or third gear and move forward. There are several main points. The first and very important thing is to move only perpendicularly along the rise. No inclined trajectories. Second, you can’t switch. Changing gears means braking, which leads to the wheels falling off and digging in. Third - if you stop... do not turn the steering wheel. The main rule is that you can’t go up a hill that you wouldn’t go down, because if you don’t get there, you’ll have to go down, and backwards.
If the car can be held on a slope with standard brakes, then slowly engage reverse gear and, as slowly as possible without braking with standard brakes, roll back to the starting position. [Marat_TERRANO] If the car stalls, then holding the brake with one foot, engage reverse gear and simultaneously release the brake and clutch. Then roll as if descending.
Experience in the middle mountains of 1500-3000 m. There is a very treacherous moment on the descent along a rocky road (in the sense with boulders) - running into boulders with a bridge, protection. Moreover, you can fly through these places without even scratching. I choose the speed on the descent depending on the slope. Whether you like it or not, you have to use the brakes on rocks, especially in places where there are rocky outcrops. You also have to slide off large boulders while using the brakes. Still at altitude after 1800m. there is a possibility that the engine may stall on a sharp descent and pressing the brake in front of a boulder or hole.
Never descend from sand dunes using the brakes. You should select the lowest gear of the low range and go downhill by braking the engine. Although we have met people who like to rush around the dunes at high speed.
The passage of the climbs will depend on the machine. In the field, I usually (if the surface allows) accelerate the car and try to cover as much distance as possible, then switch to a lower gear until the dynamics drop. On heavier machines, it is better to immediately plug in the right one before heavy lifting. (usually assessment comes with experience). It’s also not a good idea to turn on the lower one too much; the wheels start to slip when you lift the front or rear part. At the same time, short-wheelbase vehicles begin to sway terribly. If there are a lot of gullies, ruts and stones, then you must immediately select a speed sufficient to pass the climb plus the intersection. In this case, you should avoid getting wheels into longitudinal potholes and gullies, especially if the speed is high enough.
It should be taken into account that engine thrust decreases noticeably at an altitude after 2 thousand meters. and falls very sharply at altitudes close to 3 thousand meters. Therefore, the choice of speed must be made with adjustments.
Wet rocky descents in places where rocky ledges emerge are passed as in icy conditions without using brakes (where possible), or at a very low speed (almost standing still) with the brakes on and lower gear engaged (Preferably when the road is completely unknown or there are a lot of boulders). In other cases, they simply hope for a good outcome. In the rain, on long clay slopes or rich black soil, no matter how tempting it is to ride, you have to wait for the sun or wind to dry the ground. In the mountains, descending a long, steep, wet clay surface is tantamount to suicide, especially if the edge of the road is not even a cliff, but simply a very sharp descent.
Short straight wet descents ending in flat clearings can be safely passed by braking the engine without brakes. You can already catch a car in the clearing :-))
Descending and ascending snowy slopes with wet snow is also fraught with lateral slides into potholes and the car lying sideways in a snowdrift.
What to do if there is no heavy hitch, but you need to tow?
A method learned from distillers. At the back of the UAZ (315*) there are mini bumpers - bump stops. You screw the bump stops (there are holes in them) of two UAZs tightly “tail-to-tail” with bolts. You can put a metal ring on the towbars of both cars. The slave's steering wheel does not need to be fixed. Only in this position there will be no problems with turning.