The UAZ (loaf) car is one of the most common cargo and passenger vehicles, which has a spacious body, an impeccable safety system and a durable power unit. This is a fairly reliable car, however, during intensive use, malfunctions and breakdowns occur that require immediate attention.
In most cases, UAZ gearbox repair
necessary due to normal wear and tear, which indicates the excellent reliability of this device. The main reason for the premature failure of this unit is that there is an increased level of fuel in the system, so it is necessary to use oil of impeccable quality.
If this recommendation is not followed, noise of a special nature may appear in the design of the unit. The synchronizer or its internal components may also fail, which always results in difficult gear changes. These are not all the breakdowns that cause the need to repair the UAZ “Bukhanka” gearbox.
.
The main signs of gearbox failure:
- knocking out speeds;
- oil leaks in the gearbox area;
- extraneous noise when changing gears;
- inability to switch on one or more speeds.
If these problems occur, the device should be diagnosed to accurately identify the cause of the breakdown. This will save time in the process of repairing the UAZ gearbox.
, and will also contribute to a high-quality restoration of functionality. It is recommended that this procedure be performed by specialists.
The main tools needed to restore the transmission's functionality:
- bearing puller and various screwdrivers;
- chisel, copper pin, core, as well as a hammer and a small spatula;
- a set of special gaskets and retaining rings for vehicles;
- small containers for storing screws and nuts (for ease and convenience of assembly).
Repair of UAZ “Bukhanka” box
consists of a number of steps that must be performed one by one. In the process of professionally restoring the performance of a gearbox, qualified technicians perform a number of actions.
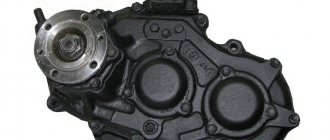
Dismantling the gearbox
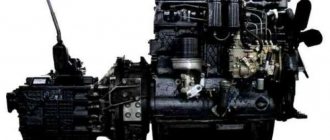
The transfer case and gearbox of UAZ vehicles are attached to each other into one unit, which is the correct technical solution. This unit weighs more than 80 kg, so it is extremely difficult to remove it yourself.
Before you start repairing the UAZ gearbox
the vehicle needs to be placed on a level surface, since during restoration activities it will be necessary to move back and forth by approximately a meter. After draining the oil, you should remove the seats, clutch release forks, and the two halves of the hatch. In addition to the above, components such as brake system levers and suspension mounts in the chassis are subject to removal. This will make it possible to extend the checkpoint.
Restoring gearbox functionality
Detection of defects in component parts is possible after complete disassembly of the unit. Based on this, in consequence, it seems possible to repair the UAZ “Bukhanka” gearbox
. All components are washed in kerosene and dried.
This will make it possible to more effectively detect any breakdowns or damage. Particular attention must be paid to the shafts and crankcase. In case of any malfunctions, chips or other damage, each component is replaced with a new component.
Disassembly and installation
After repairing the UAZ “Bukhanka” box
, you need to install the device in place in the car. The most important and responsible action is to mount the input shaft into the clutch. With slight translational movements, moving the gearbox up and down, the unit is installed in place.
Grovers with nuts are inserted on the left side. Next, the clutch fork and spline oiler are mounted. Upon completion of the previous step, you need to insert the speedometer drive and other parts. Next, the frame cross member and muffler bracket are secured, after which the hand brake mechanism is calibrated.
Malfunctions and repairs
The first signs indicating a malfunction of the automotive system should force the car owner to carry out diagnostics. In some cases, this can be done on your own. Simple breakdowns can be repaired with your own hands. It is better to entrust more complex faults to a service center.
Signs indicating the need to repair the UAZ gearbox:
- deterioration of management;
- squeaks and extraneous noises when changing speeds;
- independent activation of transmission.
In most cases, when uncharacteristic noise is observed, the cause lies in wear or defect of the bearings and gears. Stiff gear shifting indicates a malfunction of the synchronizers.
The main reason for the problems that arise is the natural wear and tear of parts.
The need to check the transfer case is indicated by deterioration in wheel adhesion to the road surface and increased noise levels from the area where the unit is located. Damage is caused by: careless operation of vehicles, untimely maintenance, use of low-quality consumables, fuel and gear oil, lack of control over the volume of working fluids.
Another group of problems is related to the leakage of the oil mixture from the gearbox. Possible reasons:
- exceeding the maximum oil volume in the box;
- water entering the system when refueling;
- a crack on the unit cover or on the crankcase.
The UAZ high-speed gearbox consists of a large number of working elements and components. Their normal functioning and interaction ensure reliable use of vehicles. Gearbox repairs will not be required if you regularly inspect your vehicle.
Mechanism adjustment
After assembling and installing the new switching mechanism, it is necessary to adjust the rods and the entire system. The goal is achieved by changing the length of the vertical and horizontal rods. Do-it-yourself setup sequence:
- Move the gear shift lever to the neutral position, and move the element responsible for selecting the gear all the way.
- Move lever 1 to positions corresponding to speeds 1 and 2. While checking that the elements are not pulled up, connect and secure the selection rod.
- Similar actions must be carried out for other gear stages.
After work, you should check that the gears are fully engaged by starting first gear and reverse. The lever must not come into contact with other parts or controls. The optimal gap size is up to 3 mm.
How to disassemble
Before repairing a 5- or 4-speed gearbox (new model), you must carefully study the device diagram, prepare material and tools. To dismantle the unit yourself you will need:
- wrenches: open-end and socket;
- screwdrivers;
- hammer;
- assembly shovel.
The large weight of the product due to contact with the dispensing system requires an assistant during operation and removal of the box.
Disassembling the gearbox occurs in the following sequence:
- Fixing the machine above the inspection hole.
- Removing transmission oil to reduce unit weight.
- Removing the seats in the cabin.
- Dismantling the speed release fork, clutch pan near the muffler, frame, speedometer shaft and cardan.
- Disconnecting the dispensing system from the main structure, securing it to the side with a rope.
- Removing fasteners.
After this, you can remove the body from the car. The next step is to disassemble the gearbox stages, check all elements of the mechanism for wear, and replace non-functional parts with new ones.
How to assemble
Assembly and installation of the automatic transmission is carried out in the following order:
- Placing the box in place, tightening the bolts and other fasteners.
- Attachment to the main structure of the transfer case.
- Installation of the speed release fork, clutch pan near the muffler, frame, speedometer shaft and cardan. At this stage you can assemble the lever.
- Installation of seats in the interior.
- Filling the container with new transmission oil.
After this, you can remove the car from the inspection hole. To install a new gearbox on a UAZ and replace other parts, first carefully read the mechanism diagram.
Why are our partners' clients always satisfied?
Our partners carry out highly qualified repairs of the UAZ “Bukhanka” transmission
at a high professional level. Our specialists have specialized knowledge and significant practical experience, and use functional tools. This makes it possible to guarantee each client the impeccability, efficiency and reliability of the UAZ gearbox repair performed.
If you have any questions, please contact us, and our specialists will give comprehensive and competent answers to all your questions.
Now we will disassemble the gearbox itself
Apparently, the problem is in this gear block bearing, because sometimes the entire shaft does not engage because it is loose. And the synchronizer has practically no teeth. I have a familiar VAZ specialist nearby, I will now consult with him and continue the repairs.
I consulted with a specialist and they said that both the intermediate shaft bearings and the input shaft bearing need to be replaced. They told me not to touch the worn-out synchronizer, just leave it like that, because there were no crackers or balls there. It will work fine. We also need to change the oil washer.
I went to the store and bought bearings: 50 208 with a groove for the input shaft; 50 306 for the intermediate shaft. I also need an open 305 bearing without groove, but there was no open one, so I bought a closed one. Then I’ll remove these rubber things - it will be open. Also sealant, gaskets for the box, oil drain washers and bolts for the cardan.
Now we will disassemble the box. To remove the intermediate shaft, you need to remove these gears. To do this, I unscrewed this bolt. It needs to be unscrewed. Now I will knock out the axle. That's it, knocked it out.
Now we need to press out the input shaft. There is a place here on the gear where there are no teeth. It must be placed so that it does not interfere with the exit, so that the teeth do not cling to this gear. We've twisted it, we've installed it, now we'll press it out. I found an iron screwdriver, I’ll install it now. This input shaft came out very easily.
Let's go further. We pulled out the primary shaft, now let's move on to the secondary shaft. You need to unscrew these bolts, remove this lock washer, and hit the bearing there so that the bearing comes out. I have already unscrewed these plates that held the bearing in the groove. Now I remove the lock washer, then I remove this washer. Now you can hit the bearing so that it comes out. Now I will press out the bearing with hammer blows. I need to pull the bearing out of here, I'll try now. After removing the bearing and removing (inaudible 09:35) the washer, I pull out the output shaft.
To remove the intermediate shaft, you need to unscrew this nut and drive it in there. Now let's try how it will be. I unscrewed the intermediate shaft nut, there was a race from the bearing left, and now we will pull out the gears. He understands everything here and should come out that way. We collect them so as not to forget how they stood. Now I’ll wash, clean and start replacing parts and assembling the box. The box has been disassembled, now I will clean this centuries-old dirt with a scraper. Then I’ll try, I have a cutter, I can use a torch, I’ll burn it all so that it’s clean. Only then will I collect everything.
We install the intermediate shaft. First we put on the ring, then the small gear, then this smaller one will go. Then we put the big one like this. We’ll just insert everything inside, so we’ll take it all apart again.
Now we will press in bearing 50 306. This side is pressed in, let’s move on to the other side. Now we press the bearing on the other side. Install the secondary shaft. We glued the rollers to the solid oil, now we will insert them into the secondary shaft. That's it, there's nothing more interesting here yet. Now we will collect everything and connect it to the distribution box. The most interesting thing will begin when we put it in place.
Also, look who will remake the body of the loaf, I have such a table. I have it open on bearings, and there is access to the rear of the engine. Now I will try to lift the box from here. Everything, as we see, the box has settled into its fastenings. The hatch helped, but only two holes would be enough to pull the rope through. That is, I stretched out the rope, tied it in a knot, began to twist it with a crowbar, and the box began to rise. I hope I did everything right. That's it, let's collect further.
After twisting a few turns, the box was lifted to the end, and now you can easily tighten the fastenings of the box cushions. So the hatch passed the test - it’s a necessary thing. That's it, the work is finished.
It took me 1,500 rubles for the materials: all the gaskets, oil, bearings. Last time I repaired the gearbox at a car service center, the first gear fell out, and they charged 10,000 rubles. Today I had to do it myself, but saved money.
I spent two days on this!
4
5 ( 40
votes)
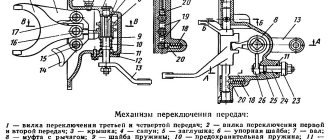
UAZ-452 gearbox, mechanism adjustment
The gear shift mechanism of the four-speed semi-synchronous gearbox of the UAZ-452 family is installed in the side cover of the gearbox. The shift forks are attached to the rods using a tapered screw that engages with a wire.
The fork moves when switching using rods that have a socket for a set screw and grooves for a lock and a locking device. The middle rod additionally has an intermediate pin for the locking device. When one of the gears engages, the rod moves and locks the adjacent rods with a pin.
Thus, each of the remaining rods is locked by a locking pin and cannot be moved from the neutral position until the previously moved rod returns to the neutral position. The same lock prevents two gears from being engaged at the same time.
The forks are locked in the neutral position and in the positions where the gears are engaged by balls. To move the forks, a lever coupling is used, mounted on the splines of the vertical shaft. The head of the clutch lever fits into the grooves of the fork. The coupling can move along the shaft in the axial direction. When the shaft rotates, the clutch rotates, and its lever moves one or the other fork.
At the same time, in the uppermost position, the clutch is connected to the first and second gear forks, in the middle position - to the third and fourth gear forks, and in the lowest position - to the rear wheel fork. The middle position of the clutch is fixed by the clutch stop in the washer against which the spring rests. To move the clutch to the lower position, additional force must be applied to compress the spring. The outer end of the shaft has grooves and threads for attaching the gear shift lever.
Service station or self-repair?
It is this question that often makes bus owners think. In this case, it is recommended to proceed from the specific situation. There are minor malfunctions, to eliminate which it is enough to tighten a few nuts, which is quite possible to do yourself.
If you are faced with a serious breakdown of the UAZ 452 gearbox, it is advisable to turn to professionals. Moreover, you need to focus on a service station that specializes in transmission repair. One of them is an atelier in St. Petersburg, whose services can be found on the portal spb-avtoremont.ru.
A distinctive feature of this service station is its specialization in the repair of mechanical transmissions, transfer cases and engines. This allows craftsmen to work with boxes, regardless of model and year, and also maintain reasonable prices. In particular, the price for repairing a removed gearbox starts at 3,000 rubles. In addition, station employees, if necessary, help the client find spare parts.
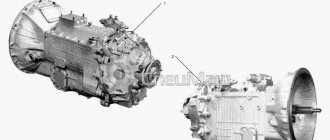
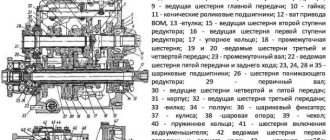
UAZ transmission components
The newly designed UAZ-452 family vehicles have a manual transmission (four-speed). It allows you to easily switch inertial type gear synchronizers. The five-speed ADF gearbox is synchronized in all forward gears.
The UAZ can be equipped with a 5-speed DYMOS gearbox. This gearbox is distinguished by its reliability. Its average service life is 300,000 km. The filler plug is located in the middle of the box, the drain plug is located at the bottom. They can be unscrewed using a hex key. After draining the oil, you need to prepare a special container. Fill in new fluid to the level of the oil filler hole on the box. A dipstick is a good way to determine exactly where the fluid was poured. As an alternative to the probe, you can use a long fingernail. As a preventative measure, the oil level should be checked every 15,000 km.