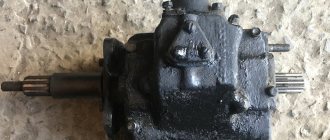
Uazovskaya checkpoint
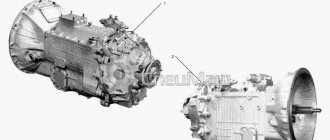
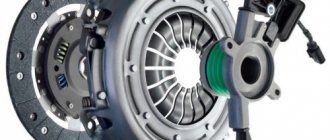
The UAZ gearbox is designed to transfer the force created by the car's engine to the transmission, stepwise changing the speed of rotation and, accordingly, the speed of the vehicle. It provides reverse gear and the ability for the car to stand with the engine running. The gearbox on the UAZ 452 is located under the bottom of the vehicle between the clutch and the transfer case and is attached with studs to the clutch housing. Its weight is about 34 kg.
The operating principle of the UAZ 452 gearbox is based on the mechanical transmission of torque through pairs of toothed gears with different numbers of teeth and different gear ratios. The UAZ loaf gearbox provides 4 forward driving modes with the following gear ratios: 4.12; 2.64; 1.58; 1.00. The reverse gear ratio of the UAZ 452 gear shift mechanism is 5.23.
Transmission diagram
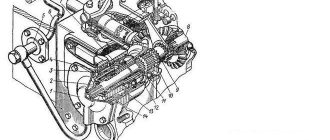
Let's look at an example of a gearbox design diagram and the features of this unit. The engine gearbox housing contains several types of drives, including:
- transmission drive shaft;
- intermediate shafts;
- driven shaft of the UAZ 452 gear shift device.
Gearbox device
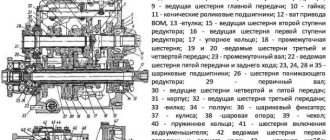
Bearings serve as supports for these nodes of the transmission. It is worth paying attention to the picture posted here. The diagram on it explains in sufficient detail the structure of the transmission: the front bearings are roller type, and the rear bearing has a double-row ball modification. The driven shaft has a front bearing mounted into the end of the drive shaft. The driven axle is equipped with gears of 1st, 2nd, 3rd gearbox operating modes, and the intermediate axle is equipped with gears of 2nd and 3rd gears of the UAZ 452.
As the diagram of the UAZ 452 gear shift device shows, the 1st stage gear has a larger diameter and is located in the rear part of the driven shaft, while the gear from the third mode is the smallest in size, located in the front part of the driven shaft, next to the synchronizer clutch.
In the lower part of the crankcase, where a separate axle is located, reverse gears are installed. The side cover of the gearbox hides inside the crankcase a control device for switching engine operating stages. A gear mechanism is mounted in its rear part to send readings to the speedometer.
Gearbox UAZ 469, 31512, 31514, 31519
Gearbox repair after UAZ 31512 wedge
Opening the gearbox revealed a crack that had come out of the 3rd and 4th gear clutch:
One of those fucking crackers. With a slight movement of the screwdriver, the coupling became movable and functional again. But for how long?
One of the three bastards
We move the coupling to the side and use a flat-blade screwdriver to carefully hammer it. We pick out the fragments of crackers and put them together like a puzzle to make sure that there are no other foreign bodies left in the gearbox.
Puzzles
While I was chopping and picking out crackers, I was turning the gearbox input shaft and involuntarily noticed a large (!) transverse play of the primary. I decided to take it off and check it out, and my surprise knew no bounds! The rollers of the rear bearing of the input shaft spilled into the gearbox housing like peas onto the floor. Although manuals for troubleshooting and repairing gearboxes assure that this should not be the case.
Bearing that ate itself
It’s good that I bought these rollers in advance and had them in stock, so I didn’t have to run headlong to the store with these rollers...
I coated the bearing seat generously with lithol and assembled the rollers in their installation location:
Here, of course, I had to sweat and swear putting the videos together. 13 videos became normal, but the 14th, last one, just didn’t want to take its place among its twins. I had to get rid of it and lay out some of the rollers in a “rose pattern” and at the same time put everything together into the shaft. After long shamanic dances with a tambourine, calls to the UAZ gods and curses from the crooked designers, the videos fell into place. Naturally, the shaft was immediately installed in its original place.
After I screwed the input shaft flange on, I was pleasantly surprised by the lack of lateral play. So the problem with the crack popping out of the clutch was associated with a crumbling rear input shaft bearing...
Then the assembly operation begins and we remove the pre-purchased sets of gaskets for repairing the gearbox and gearbox.
The manufacturer is of course noname, this is annoying but also leaves no choice. Everywhere in the stores there are the same sets of gaskets...
I separately assembled the gearbox and immediately threw it into the UAZ interior and separately assembled the gearbox, carefully examining the gearbox mounting plate. The slightest crack will cause vibration and will either make it difficult to engage the gearbox and gearbox or knock them out.
We clean all the surfaces from the remnants of old gaskets, degrease them, apply sealant and assemble the gearbox with the manual transmission into a monoblock in the cabin.
Let me remind you that I carry out all operations in one face, and my face is not so wide that a 90-kg unit can be lifted from the floor and installed alone.
I couldn’t get the box back in place for a long time—I removed and installed the gearbox three times. Either I can’t insert the fork into the clutch of the release bearing, or the gearbox won’t sit on the studs, although the splines of the input shaft engage with the clutch disc, and the shaft itself fits into the KV bearing. The engine was tilted and raised, but the gearbox did not move even if it cracked.
Subject of Meditation
The checkpoint spent the night in such a “suspended state”
I decided not to fool myself because... “Morning is wiser than evening” left the garage to wash and sleep.
Waking up after morning exercise, I rushed back to the garage to finish what I started and then - bang - the gearbox flew straight into place, the clutch fork went into the release bearing like a nasty mother-in-law under the ice. I immediately replaced the gearbox cushions with new ones.
The new pillows surprised me with bolts and nuts.
The bolts themselves do not have holes for cotter pins, and the nuts do not have cuts for these same cotter pins. But it doesn’t matter - we’ll use old ones that don’t seem to have been killed. Moreover, the new bolts are made of plasticine iron, as evidenced by the strength class 4.8 stamped on the bolt heads.
And the further into the forest, the thicker the partisans became - the gasket for the gearshift lever from a non-name gasket set was not even surprising:
The gasket was cut Monday morning on a shaky knee.
What was more surprising was that all the other gaskets in the kit were aligned with the holes. Only this one stood out. Doesn't matter - I have sealant.
Well, then everything is simple - we put on the cardan shafts, fasten the traverse, check the operation of the gearbox and control gear. I filled the crankcases with diesel fuel and drove the units in different gears and then filled them with fresh TAD-17 and assembled the interior.
Testing the gearbox after removing the cracks showed that the gears are engaged more clearly, but double depressing of the clutch is required both when shifting gears both up and down.
Defects of UAZ gearbox parts
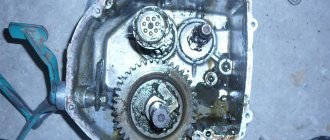
This photo shows the cover with the gear shift forks. Visually, I did not notice any wear on the forks! But you must definitely move your fork hands. If they start to dangle on the rods, then you need to unscrew the wire holding them in place and tighten the bolts tighter! So, visually they look great.
Now looking inside the box. You can only sigh. Here you don’t even need a feeler gauge to see how much wear there is on the second gear gear and on the end of the secondary shaft in the area of the coupling teeth. Ideally it should be 0.2mm. After working, of course, a little more. But here you can clearly see that the gap is at least 3.5 mm. Such a gear is only for discarding. Because its coupling teeth will only engage halfway. Compare the length of the teeth and the width of the backlash yourself.
When the input shaft is removed, let's inspect it. The synchronizer is no longer good for anything, since its guide teeth are clogged to stupidity. The coupling teeth have already done a good job. Uniform stripes of wear are clearly visible from the bottom of the teeth. But from above, on the other hand, the rust on the far half of the tooth is clearly visible. This indicates that the gear clutch became sideways or was pressed out when releasing the gas. So, the input shaft is ejected along with the synchronizer.
We take out the synchronizer clutch with the hub. Visually. The 4th gear teeth on the clutch look great. Unfortunately, their lateral wear from the teeth of the input shaft is not visible?
I wonder if the retaining ring came out on its own? If so, then the locking groove on the secondary shaft has broken into a cone and the ring has been squeezed out of it under load. This means you’ll have to go to a turner, and he’ll carefully straighten out this hardened groove with a very strong cutter. Behind the ring you can see the spacer sleeve or washer, as you wish. You will have to immediately install a new bearing on the shaft at the turner, put the retaining ring back in the groove, and the turner will immediately turn you a new spacer washer. The washer should be so thick that it fits between the bearing and the retaining ring with a slight tension or no more than 0.1 mm minus. Although it is possible that the store sells new retaining rings and spacer bushings of different thicknesses. At least for Land Rover this is how it is done. But I hope the retaining ring has been removed.
Here, too, I see some wear and tear on the walls. If yes! This means you need to install a new lock washer that is thicker. But, if the synchronizer hub also dangles on the shaft splines. It’s best to change the shaft too! Although the splines look neat and there are no signs of wear. Most likely the shaft is in good condition.
Addition to what was written: The retaining ring itself may play in the groove along the shaft. The main thing is that when the third gear gear and synchronizer clutch are mounted on the shaft, the gap between the retaining ring and the synchronizer clutch is minimal. That is, the larger the gap, the more the gear and clutch dangle on the axis. That’s why we strive to ensure that all gears and couplings have the minimum possible backlash. Ideally from 0.1 to 0.2 mm. Although I assembled boxes in which this play was 0.5 mm. But the less the better. If the gap between the lock washer and the synchronizer hub is more than a millimeter? You need to install a thicker lock washer. Or it’s more difficult to do if the backlashes are not removed, because the third gear gear is new, and the end of the shaft to which it presses is already very worn. It is necessary to sharpen this end on the shaft, to which the gear is pressed, a little. And put a bronze washer 3...4mm thick there. such a thickness that it would select the entire movement of the 3rd gear gear on the shaft and press the synchronizer clutch to the locking ring.
The clutch and teeth facing the third or fourth gear look good. The edges of the teeth are intact. I don't notice any oblique wear. But if the gears are changed, then the clutch and hub assembly automatically changes. Although I would put this part aside as a spare part, just in case. And if you really don’t have enough money, then I would install it. If everything is adjusted correctly, nothing will be loose and the transmission has not been knocked out before. I don't see any crime. The main thing is that the hub sits tightly on the shaft.
The same goes for the hub.
The replacement synchronizer has blunted tooth edges. In this case, they will not slide to the side when the clutch teeth pass through them; accordingly, the gear lever will have some difficulty engaging the gear.
The teeth of the third gear gear are clogged to the point of stupidity, and even traces of chips are visible. It will be difficult to engage third gear, and only every once in a while. She's not a tenant! Replacement only. The former owner clearly did not bother to wait until the synchronizers equalized the shaft rotation speeds. Moreover, Nigrol contributes to this.
And this is what she looks like from behind. The distance washer that stands behind is very worn out. You need to buy a new washer, preferably adjusted to size. As a last resort, carve a new one from bronze. On my Lada, that’s where the bronze one is. The main thing is that the 3rd gear gear fidgets on the shaft no more than 0.2 mm. And the copper bushing has already begun to crumble. This means that the gear was simply hanging on the shaft. But she has a tolerance of 0.06mm.
Addition
Now comes the hard part. Yes, you can measure the inner diameter of the gear with a bore gauge or a digital caliper. Then measure the shaft journal, subtract one from the other and get the result. But unfortunately, this measuring tool costs more than a new shaft, and much more! Therefore, I can only offer two options.
1) The bushing on the new gear still has a ready-made size, and you can hardly change anything here.
2) Now a way to check the runout of the shafts in the bushings. On fingers. And in the literal sense of the word. The human hand begins to feel the beating of parts in the region of 0.1 mm. Well, if you feel the beating already with a clear knock. This means the runout is already around 0.2mm. and more.
But the most important thing here is not the beating of the gear on the shaft, but how large the movement of the gear along the shaft is.
The gear should move as little as possible from the 3rd - 4th gear clutch to the thrust end on the shaft. Ideally 0.08...0.2mm.
And the second gear gear is beyond competition. It was so worn out that the workings had eaten away the sharp edges of the coupling teeth. And this is about a millimeter. This means that the gear was moving on the secondary shaft by at least 3.5 mm (second photo) with a tolerance of 0.2 mm. This one needs to go to a museum!
The teeth on the first gear gear are also clogged, so it will be very problematic to engage the second gear.
The intermediate shaft gear had no broken teeth or broken splines. As a rule, this is always the case. If something has not damaged the teeth of the intermediate shaft, then, as a rule, only the bearings on the shaft are replaced. The exception is severely damaged reverse gear teeth.
The teeth on the reverse gear are jammed. Quite a common defect. It also needs to be replaced, since wear occurs on the cone, and after a while the gear may begin to knock out. Take a closer look at the larger gear - you can see it better from below.
The axis on which the reverse gear rotates looks good. I really don’t remember that it was ever changed.
But the bearing needs to be changed since it is already showing wear. The main feature of roller bearings is: if the roller falls out of the cage, then the bearing has worn out.
Judging by the photographs. The crackers were removed from the synchronizer clutch. Nothing surprising. With such a large backlash in the gears (along the shafts), the runners of the 3rd and 4th gear clutches began to go beyond the synchronizer clutch when the gears were engaged. After which they began to bulge outwards under the influence of the spring and as a result it was impossible to turn off the gears. Precisely, to prevent this from happening, I try to remove all the play on the gearbox shafts and power forks during repairs.
Verdict. In the box you need to change gears 1,2,3, gears. Also replace the input shaft, all bearings, and the reverse gear. Not strictly necessary, but you need a clutch with a hub and both synchronizers. If the new gears hang on the old shaft by more than 0.15 mm. (The hand perfectly feels a knock above 0.1 mm.) This means that the secondary shaft must also be replaced.
If you increasingly have to hold the gearshift lever while driving, if the transfer case levers have long been tied with ropes :), if when driving, even on the rear axle, a discordant concert begins under you, then it’s time. It's time to remove the box and figure out how this collection of gears and bearings works.
I warn you right away - I’m not going to argue with the authors of books on UAZs, this article is only an addition to the books, taking into account the fact that you don’t have a service station, a lift, three mechanics and the like.
UAZ gearbox repair (manual)
Look at what kind of gearbox you have. If you're not familiar with the concept of double-throttle, all gears, both up and down, shift easily, and the lever travels the same distance when engaging first gear as when engaging third - you have a fully synchronized gearbox. Everything that will be written further about the gearbox does not apply to you. However, the transfer cases are the same, and you may still find some of this article useful. For off-road use, a gearbox with synchronizers only in third or fourth gears is preferable, the so-called. "old style".
Having decided on the type of your box, we will prepare the tool. To completely disassemble and reassemble the “old-style” gearbox and transfer case without any special tricks, you need the following tool:
Open-end wrenches - 10, 12, 13, 14, 17, 19, 22. It would be better in two copies. Particular attention should be paid to the 14th key - it should not be very thick and under no circumstances bend, otherwise turning the rear driveshaft away from the transfer case flange can cause trouble.
Socket wrenches - 10, 12, 13, 14, 17, 19, 22, 24, 27, 36. The thinner the walls, the better. The usual domestic set of heads did not fit everywhere. 36 heads are not found in all sets; I bought a hub key from a GAZelle and passed it with flying colors. And it was cheap.
A special wrench for tightening flat nuts - these are found on the steering column of bicycles. I also picked up a bicycle key, but in general this is wrong.
Screwdrivers - flat and Phillips. Both powerful for large screws and small ones.
Platypuses - regular straight ones with curved noses for removing and putting on locking rings.
Something copper to stick between the gear teeth when loosening and tightening the shaft nuts. I used an old synchronizer.
A drift is a metal pin, preferably made of copper.
A piece of metal pipe - for putting on keys. Sometimes the nuts and bolts are so tight that they cannot be unscrewed otherwise.
Core and chisel. The core must be of high quality so that upon impact, its pieces do not fly into the brand new bearing.
Mounting blade. This is how the wheels are usually mounted. A very necessary thing.
Hammer. It should be quite heavy, sometimes you have to hit it “as hard as you can.”
Cans for screws and other small items. The more, the better - when you put everything back together, you will appreciate this advice.
Bearing puller. You can do without it, but it’s a convenient thing.
A book and catalog with good pictures. Necessarily. And read before you start unscrewing anything. Pay special attention to places where there are left-handed threads and the location of washers, stops and other small items. It’s best to remember (or write down) everything when disassembling
I use red ABRO sealant for gaskets. Domestic white is only suitable for water supply, and even then not everywhere.
I use Litol as the cheapest grease. Gaskets are sold in sets “For gearbox” and “For transfer case”. All gaskets need to be changed; leaving the old ones will not work. It is also useful (but not necessary) to buy a “Gearbox Repair Kit” and a “Transfer Box Repair Kit”, which consist of retaining rings, shims and other small things that would be better to change. I really couldn’t find a distribution kit in all of St. Petersburg, but there are almost no small things there.
Removing the Gearbox-Transfer Box Assembly
In UAZ vehicles, the gearbox and transfer case are interlocked into one unit, which is very correct. But it’s very heavy (80 kg). Therefore, it is quite difficult to remove this weighty unit alone (and this is exactly what happens most often). The photo shows how I get out of the situation - using the Lika-2 manual winch. But I have a roll cage that I hook her to. Having once forgotten the winch, I got out of the situation with the help of an ordinary crowbar and rope. But I won’t undertake to put the box in place without a winch alone.
So let's begin. We place the car on a flat surface, taking into account that it will have to be rolled half a meter back and forth. We drain the oil - the gearbox and transfer case have separate drain and filler plugs, although the volume is the same.
While the oil is draining, remove the front seats. Then we unscrew and remove the two halves of the hatch in the floor. We unscrew and remove the speedometer drive away.
The oil is just glass, we wrap it in place of the plug. We unscrew the frame cross member that runs directly under the handbrake drum. We unscrew the cardans from the transfer case flanges. It is more convenient to unscrew the front driveshaft if the front axle clutches are disconnected. If your cardans have weak spline joint nuts, it’s better to remove the cardans completely, but in general it’s enough to tie them to the frame so they don’t get in the way. It is much more convenient to unscrew the rear driveshaft from above, from the hatch; this is where the car will have to be slightly rolled forward and backward. We unscrew the muffler from the transfer case and loosen the clamp on the muffler itself, otherwise it will interfere.
Unscrew the clutch pan. We unscrew the fastening of the oiler of the input shaft splines (on the right side of the bell) and push the hose inside the bell. We unscrew the four bolts securing the clutch fork housing, remove the spring, twist the adjustment on the working cylinder rod and pull out the fork.
We wrap a rope around the box with the transfer case and hang it up. We unscrew and remove the bolts of the pillows, unscrew the nuts securing the box to the bell. Do this gradually; the nuts on the left side will only be completely unscrewed when the box has already partially moved away from the bell. Help yourself with editing. In this case, it is better to support the engine with a jack, otherwise it will remain on two supports and the “rear” part will lower and interfere. When the box finally hangs, carefully lower it down. It is better to change the studs in the bell - they are under heavy loads, and it is 50/50 that the threads on them are damaged. If the car is standing on the ground, to make it easier to pull it out from under the car, the levers must be removed. When removing the gear shift lever, you need to hold the cover - there is a spring under it.
Remove the handbrake lever so it doesn't interfere. By unscrewing two bolts and two nuts, we disconnect the gearbox and transfer case. Since the gasket between them is probably sealed, they are separated by several blows to the bracket securing the unit to the frame. Don't lose the "Countershaft Thrust Washer". If it is there and differs from the photograph, I beg you to take a photograph and send the photo to me, I have never seen it. The photo shows an oil squeegee ring out of the box, the correct diameter.
Transmission
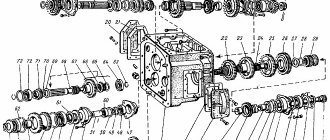
Remove the cover with the gear shift forks. Remove the input shaft cover. Having engaged any gear, we put the copper into the teeth and unscrew the flat nut on the input shaft (it’s the left one!). Now we look inside the box - on the input shaft gear there is a cutout for a large intermediate gear. We position the shaft so that the cutout coincides and, using careful oblique blows on the shaft, press out the bearing of the input shaft. The main thing is not to rush and hit in a circle so as not to distort the bearing and ruin the seat. In the photo there is a shaft that I have already taken out three times, I don’t know what happened before me. As you can see, it is hardened and does not suffer from blows. If the input shaft bearing is worn out, knock it down and install a new one. He suffers, perhaps, the most, so 90% of him will have to be changed. These bearings come with a closed and open cage, I don’t understand the difference - it’s still under the cover.
Inside the input shaft lives a roller bearing without a cage. Most likely it fell apart during disassembly. Collect it. If the last roller stands up easily, it needs to be changed. With a new set of rollers, the last one can only be inserted with great difficulty and “lengthwise”. It even seemed to me that they slipped me the wrong one.
Remove the retaining ring from the secondary shaft and unscrew the double-row bearing stoppers. We knock out the secondary shaft. By the way, when I needed to replace only a double-row bearing, I managed to do it without disassembling anything else. I took off the retaining ring and picked it out. By the way, the box still drives.
Now we take out the 3-4 gear clutch assembly. Remember how it stood - on the contrary, it will fit onto the shaft, but the input shaft will not fit. The copper synchronizers will most likely need to be replaced, as well as three crackers with springs and balls (nowadays they sell crackers without balls, with protrusions, which are easier to assemble). When assembling the coupling, do not turn the inner part relative to the outer one. We take out the secondary shaft and repair the shaft, double row and gears.
Remove the reverse gear shaft. To do this, use a flat-head screwdriver to unscrew the locking screw from the hole (marked in red in the figure), and then knock the shaft out of the box. Inside the gear there is a multi-row bearing with a plastic cage; we take out the retaining rings, the metal tube and remove the defective bearing. The box from the 72nd edition turned out to be intact.
Unscrew the cover of the front bearing of the intermediate shaft. Try to keep the rubber seal on the lid - it’s a problem to buy. I do not recommend unscrewing it with a core - the lid is made of silumin. I unscrewed it with duckbills with curved ends, but you can make a key like a grinder from a piece of metal and two bolts. The photo shows how the holes become deformed after a couple of unscrewings. We put a piece of copper in the teeth of the gear and unscrew the bolt and nut of the shaft. Left bolt! The nut is 36, I specifically mentioned the key for it. Now you can knock out the shaft and replace (if necessary) the gears and bearings. Well, that's all, now we assemble the box with new parts in the reverse order. The outer bearing races must not rotate in their seats. You can combat this by piercing the entire surface of the seat with a herringbone pattern every 5-7 mm (c). If this does not help, the case needs to be replaced. When installing the rollers in the input shaft, generously coat them with “Litol” or something similar and put them on very carefully (the process is fun, like threading a needle). When installing the input shaft bearing cap, pay attention to the cutout in the gasket for the oil channel - it will probably have to be modified. Before installing the gear shift cover, compare the result with the photo. It wasn't all right for me the first time :). When installing a cover with forks, make sure that the forks are in the right place.
Transfer case
First you need to loosen the nuts of the flanges and transfer case shafts - to do this, insert bolts of suitable diameter into the two holes of the flange and hold them in place. The shaft nuts are hidden under the covers; they must be unscrewed - the shafts can be removed with the nuts, but then it is very difficult to unscrew them. By unscrewing the flanges, remove the handbrake (at the same time you can check its functionality and change the pads). The soured working cylinder is disassembled and soaked in diesel fuel, checked. There are no spare parts for the brake - either pads or everything assembled.
We remove the covers with seals and change the seals (unless they are completely new), not forgetting to fill the free space with “Litol.” Unscrew the bolt by 10 and remove the speedometer drive. We unscrew the breather and replace it with a new one (100% soured). Better yet, call the phone to the salon. Unscrew the stopper of the guide forks.
Now you can “halve” the transfer case - Remove all the retaining rings from the bearings, unscrew all the bolts around the perimeter and remove the large cover. If necessary, we change the roller bearing in this cover, the inner race is pressed onto the shaft. There are two bearings on the rear axle shaft, the second one must be inspected.
The transfer case is assembled in reverse order. You need to carefully inspect the flanges and replace them at the slightest sign of wear on the splines; it progresses very quickly. Wear on the forks is also unacceptable. Don't forget to core the nuts.
Assembling the unit and installing it in place
We glue the gaskets between the box and the transfer case onto the sealant. We put the mounting bracket to the frame in place. We place the transfer case on the handbrake drum, and holding the gear in the transfer case through the “power take-off hatch,” we lower the box into place, not forgetting to place the same “intermediate shaft thrust washer.” Let's take care of our fingers. We tighten two bolts and two nuts, put on the covers with levers and check the operation of all gears of the box and transfer case. We're glad it worked out.
We replace the release bearing with one pre-welded in nigrol. We remove the levers, drag the unit under the car and hang it on a rope. We put the release assembly on the box and install the spring. Now the most difficult part is to insert the input shaft into the clutch. Slightly moving the box up and down, turning the engine with a jack and turning the engine by the flywheel, sooner or later we put the box in place. You shouldn’t place the box right next to each other - first, on the left, insert the growers with nuts into the gap. We pull the unit to the engine and attach it to the cushions. Reinstall the clutch fork and oiler for the input shaft splines. We put in place the speedometer drive, covers with handles, handbrake, cardan shafts. Please note that stores often sell disposable cardan bolts. A normal bolt is hardened, with the letter “X” on the head. The letter “CH” on the head indicates the manufacturing plant and does not serve as a guarantee of strength. We put the frame cross member in place and attach the muffler bracket to the transfer case. Setting up the handbrake.
We fill in the oil, put the hatch in the floor and seats in place and go check the results.
Characteristics of the gearbox for UAZ
There are quite a few transmission options for UAZ cars, and personally we were faced with a rather difficult choice... Refurbish our gearbox (4 mortars of the old model) and RK (old model), or replace it with a new model gearbox (4 mortars of the new model) or just go even further and install a five-speed gearbox (ADS, Arzamas, Ulyanovskaya, DYMOS) and a small-module RK... Arzamas was not even considered, because This is the worst thing you can imagine on a UAZ car. It is almost impossible to find a Ulyanovsk gearbox in our area... Well, DYMOS... again, expensive, and there is an almost complete lack of spare parts for it in our city. So the choice consisted of 3 options - the “Old Model” checkpoint, the “New Model” checkpoint and the “ADS” checkpoint.
4-speed gearbox
There are two types of 4-speed gearboxes on UAZ: “old” with synchronizers only at 3 and 4 speeds and (since 1989) “new” - with synchronizers at all four speeds.
Gear ratios of the “old” gearbox:
I gear - 4.124 II gear - 2.641 III gear - 1.58 IV gear - 1.00 R reverse - 5.224
Gear ratios of the “new” gearbox:
I gear - 3.78 II gear - 2.60 III gear - 1.55 IV gear - 1.00 R reverse - 4.12
Advantages of the “old” gearbox: greater traction, simpler design, ease of repair, cheaper spare parts, indestructible, reliable.
Disadvantages of the “old” gearbox: Less dynamic than the “new” one, lack of synchronizers in 1st and 2nd gears.
Advantages of the “new” gearbox: Dynamics are better than those of the “old” gearbox, relative ease of repair, presence of synchronizers in all gears.
Disadvantages of the “new” gearbox: Less traction than the “old” gearbox, more expensive spare parts than for the “old” gearbox, less reliability.
5-speed gearbox
Gear ratios:
I gear - 3.83 II gear - 2.16 III gear - 1.29 IV gear - 1.00 V gear - 0.79 R reverse - 3.52
Pros: Less noisy, more economical, faster, smoother shifting, 5th gear available.
Cons: Price, more expensive spare parts, less reliability.
PRICES "ADS" manual transmission5 - from 28 tr. (new) up to 10-15 for used Manual transmission4 "Old" model - from 20 tr. (new) up to 1 tr. for used Manual transmission4 “New” model - from 21 tr. (new) up to 1 tr. for used
https://www.drive2.ru/l/4086056/, https://www.uazbuka.ru/repair_gearbox_2.html, https://www.uazbuka.ru/repair_gearbox.htm
next article:
Replacing the flywheel. Defects of the flywheel and clutch of the UAZ 469.
When unscrewing the gearbox, we rest against the nut of the upper left gearbox mounting bolt. She just doesn't have the physical ability
Rating 4.75 [2 vote(s)]
Operating principle
Car checkpoint
In order to understand and imagine how the process of changing the speed modes of the engine and the corresponding indicator of the permissible speed occurs, let us turn to a short explanation. The lower stages, which ensure the vehicle starts, are activated by the most powerful gear, which moves along special skids located on the driven shaft. This action allows you to transfer enough force to a heavy car for the car to start moving.
As soon as the car starts moving, you can switch to second gear, due to which the car does not stop and its movement is not very fast. However, the second speed stage will not be enough if you need to reach a speed of about 40-50 km/h. In this case, higher gears will be required.
As for the 3 and 4 speed modes and the corresponding gears, which provide a high number of revolutions per second, they are controlled by a synchronizer clutch. Some modifications of the gearbox on the UAZ 452 were produced, where the switching of 1st and 2nd speed modes of the transmission was also carried out using an additional synchronizer clutch. However, in this case we are considering a transmission option with one synchronizer clutch.
The UAZ gearbox has a synchronizer, which is designed to smoothly switch on modes by equalizing the rotation speeds between the intermediate and driven shafts. This feature of the device not only provides more comfortable driving, but also protects the leading clutch mechanisms from damage and rapid wear.
Description
Cardan drive adapter UAZ PROFI 4*2 (236021) / ## 2360-1800220-01
- article ## 2360-1800220-01;
- available to order;
- check price and delivery time;
- there are analogues in stock (check);
- Delivery is carried out throughout Russia.
Find out the availability, price and delivery time of this product by calling 8 800 700-9-554 or using the feedback form. If necessary, our specialists will select for you similar products available in stock.
You must be logged in to the site to leave a question about a product.
Phone: 8-800-700-9-554 (calls within Russia are free)
© 1997-2021, “BAZA EVERYTHING FOR UAZ” sells spare parts in Russia for all types of UAZ: Bukhanka, Patriot, Cargo, Pickup, Pro, Hunter, 469, Simbir. We deliver auto parts by transport companies.
WE ACCEPT PAYMENT
Order spare parts by VIN number
To select spare parts by VIN number, you need to log in to the website.
Source
Quality of RK parts:
- Each UAZ RK is assembled using new factory parts from UAZ OJSC
- high-quality assembly and installation of RC parts, eliminates the “overshoot” of a lower gear;
- each pair is tested for noise and contact patch on a noise-control machine, so the set of reduction gears is absolutely silent;
- transfer cases are made on the basis of factory RCs using sets of reduction gears RC UAZ "Avtogur73", made of structural alloy steel, 18ХГТ.
This grade of steel is used for the manufacture of parts operating under impact loads, which require increased strength, high surface hardness and core toughness. The use of this grade of steel provides high levels of bending and contact endurance of teeth. In simple words: parts made of this grade of steel, having undergone a certain processing process, are strong, durable and hard, but at the same time they are capable of absorbing mechanical energy in the process of deformation and destruction under the influence of impact load, i.e. do not collapse.
Disadvantages of the new type gearbox:
Sales are carried out from a warehouse in Ulyanovsk. Delivery of the goods “4-speed gearbox UAZ 31519 Hunter thin shaft, under the petal basket “ADS”” is carried out to Moscow, Samara, St. Petersburg, Nizhny Novgorod, Yekaterinburg, Saratov, Krasnodar, Kazan, Perm, Orenburg, Penza and any other cities and regions of Russia.
For regular customers and wholesale buyers, cooperation with us is beneficial thanks to the existing system of discounts, the program of which you can find out from our managers.
The photo of the product card is for informational purposes only. There may be some differences in the completeness and appearance of the original product from the image shown in the photo. For detailed information on the characteristics of the product, contact the manager (Autogur73 store), the call within Russia is free.
Attention! UAZ company is not the manufacturer of this product. This trademark is used for informational purposes only to show the buyer which specific vehicles the product is suitable for.
Source
Applicability:
Transfer case for UAZ 315195 Hunter and 3163 Patriot, UAZ Pickup 23632, UAZ Cargo 2360, UAZ Profi 23602 with the Daimos gearbox and their modifications with a standard reduction of 3.26
Applicability of helical transfer cases on UAZ vehicles with hood layout.
For vehicles with 4.111 final drive in axles.
— 3162-1800021 : speedometer drive 624 revolutions/kilometer, together with ADS gearbox, Ulyanovsk, primary shaft diameter 29 mm, or with AMZ gearbox, Arzamas — 31627-1800020 : speedometer drive 624 revolutions/kilometer, shift mechanism from two levers, together with the ADS gearbox, Ulyanovsk, input shaft diameter 35 mm - 3163-1800021: speedometer drive 624 revolutions/kilometer, together with the Dymos gearbox, Korea - 3162-1800021-10: speedometer drive 1000 revolutions/kilometer, together with the AMZ gearbox, Arzamas city - 3163-1800021-10: speedometer drive 1000 rpm/kilometer, crankcase changed, together with gearbox Dymos, Korea - 31631-1800021: speedometer drive 1000 rpm/kilometer, crankcase changed and added to the design front axle engagement sensor, together with gearbox Dymos, Korea
For vehicles with 4.625 final drive in axles.
— 3162-1800020: speedometer drive 624 revolutions/kilometer, together with ADS gearbox, Ulyanovsk, primary shaft diameter 29 mm, or with AMZ gearbox, Arzamas city — 31627-1800020-10: speedometer drive 624 revolutions/kilometer, mechanism switching from two levers, together with the ADS gearbox, Ulyanovsk, input shaft diameter 35 mm - 3163-1800020: speedometer drive 624 revolutions/kilometer, together with the Dymos gearbox, Korea - 3162-1800020-10: speedometer drive 1000 revolutions/ kilometer, together with the AMZ gearbox, Arzamas city - 3163-1800020-10: speedometer drive 1000 rpm/kilometer, crankcase changed, together with gearbox Dymos, Korea - 31631-1800020: speedometer drive 1000 rpm/kilometer, crankcase changed and in front axle activation sensor added to the design, together with the Dymos gearbox, Korea
For vehicles with 5.38 final drive in axles.
— 3162-1800022: speedometer drive 624 revolutions/kilometer, together with the ADS gearbox, Ulyanovsk, primary shaft diameter 29 mm, or with AMZ gearbox, Arzamas — 31627-1800022: speedometer drive 624 revolutions/kilometer, shift mechanism from two levers, together with the ADS gearbox, Ulyanovsk, input shaft diameter 35 mm - 3163-1800022: speedometer drive 624 revolutions/kilometer, together with the Dymos gearbox, Korea.
Applicability of helical transfer cases on UAZ cars with carriage layout.
For vehicles with 4.111 final drive in axles.
— 390995-1800021: speedometer drive 1000 rpm/kilometer.
For vehicles with 4.625 final drive in axles.
— 3909-1800020: speedometer drive 624 rpm/kilometer — 390995-1800020: speedometer drive 1000 rpm/kilometer
Additional service:
We can modify your RC with a set of reduction gears. The cost of the work is 5,000 rubles + shipping costs.
Articles:
Sales are carried out from a warehouse in Ulyanovsk. Delivery of the product “Transfer case (helical) UAZ Hunter, Patriot, Pro with DYMOS gearbox (reduction 3.26)” is carried out to Moscow, Samara, St. Petersburg, Nizhny Novgorod, Yekaterinburg, Saratov, Krasnodar, Kazan, Perm, Orenburg, Penza and any other cities and regions of Russia.
For regular customers and wholesale buyers, cooperation with us is beneficial thanks to the existing system of discounts, the program of which you can find out from our managers.
The photo of the product card is for informational purposes only. There may be some differences in the completeness and appearance of the original product from the image shown in the photo. For detailed information on the characteristics of the product, contact the manager (Autogur73 store), the call within Russia is free.
Attention! UAZ company is not the manufacturer of this product. This trademark is used for informational purposes only to show the buyer which specific vehicles the product is suitable for.
Source