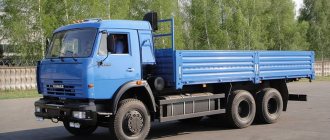
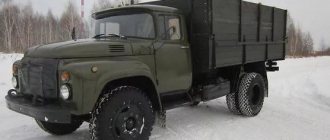
The products of the Gorky Automobile Plant are primarily associated with commercial vehicles. Well, the most important thing for buyers of such products is the optimal ratio of quality and price. Focusing on these points, the GAZ-3310 Valdai was created (but its modification GAZ-33104, which we will consider, went into production)
GAZ-33104 “Valdai” is a medium-tonnage low-bed truck belonging to the “N2” category. In fact, it is a kind of intermediate option between “light-duty commercial vehicles” and “full-fledged medium-duty trucks.”
How to detect a malfunction
There are a number of basic signs by which a vehicle owner can determine that repairs are required. Among them it is worth listing the following:
- to completely stop the vehicle, the driver has to make more effort, or, conversely, the pedal is pressed with almost no effort;
- when braking, the car pulls to the side;
- when pressed, a peculiar, clearly visible pulsation of the brake pedal occurs;
- When you press the pedal hard, the rear brakes are locked.
VEHICLE MAINTENANCE This section contains…
Page 38
- Image
- Text
9. VEHICLE MAINTENANCE
This section lists the work that needs to be done regularly.
complete in the intervals between maintenance operations specified in the service book.
9.1. CHECKING THE OIL LEVEL IN THE ENGINE CASE
The oil level must be checked when it is cold and not running.
engine, and the car must be installed on a flat horizontal platform. The oil level should be between the “P” and “O” marks of the indicator rod (closer to the “P” mark). If necessary, add oil.
Fill fresh oil through the oil filler neck, which is closed
plug 1 (Fig. 9.1).
Rice. 9.1. Checking the engine oil level:
1 – oil filler plug: 2 – oil level indicator rod
9.2. CHECKING THE OIL LEVEL IN THE TRANSMISSION
AND IN THE REAR AXLE
Checking the oil level must be done with the vehicle without a load.
ki, installed on a flat surface, on cooled units.
The oil level in the gearbox should be level with the lower edge
filler hole - fig. 9.2.
The oil level in the rear axle (Fig. 9.3) should be at the level of the lower
filler hole edges.
Rice. 9.2.
Checking the oil level
in
the gearbox:
1 – drain plug; 2 – filler plug
Valdai caliper repair: troubleshooting methods
Experts identify several main reasons.
Let's consider each of them in order. One of the most common malfunctions is jamming of the pads. It can be determined after disassembling the mechanism. Breakage occurs due to the formation of rust on the pads, which prevents them from moving freely. The problem is simple, so if necessary, it can be fixed without contacting a service center. Rust must be removed using sandpaper, a fine-grained file or a metal brush, and then treat the surface using a high-temperature type lubricant. Make sure that there are no pits on the surface from the excavation. Otherwise, components will need to be replaced.
Corrosion can also form on the piston. This happens when the car is parked for a long time or when there is a defect on the boot. In this case, the mechanism must be disassembled and the piston polished using a special paste. Then the part must be washed with WD-40 and reinstalled. If the corrosion is severe enough, the Valdai caliper may need to be replaced.
Other reasons that may cause inadequate functioning of the braking system include:
- wedging the guides (you will need to dismantle the pads and check the guides for breaks or bends, and also lubricate them);
- piston jamming.
We must not forget that the likelihood of emergency situations on the road, and, therefore, the life and health of the driver and passengers, largely depends on the reliable operation of the brakes. Therefore, regardless of whether you need to replace or overhaul the Valdai caliper, the best option would be to contact a proven and proven service center that has qualified specialists and professional equipment on staff. An important condition will be the availability of a guarantee for the repair work performed.
The cost of repair and overhaul of the Valdai caliper is from 3,000 rubles. Call and we will advise you!
Much has been said about the importance of uninterrupted operation of all elements responsible for applying the brake. This article will talk about repairing the components of the caliper: the piston (cylinder), guides and replacing their boot - with your own hands, you can also learn about this clearly from the attached video.
To fully understand how to easily repair and replace these parts, it is worth understanding the structure of the front and rear calipers and the reasons for their failure, and what repair kit may be required for this.
Energy accumulator repair
Repair of energy accumulators can be carried out by car service specialists, or, if you have a spare original repair kit, independently.
Causes of battery failure
The list of possible malfunctions is presented as follows:
- mechanical damage or “aging” of the housing, since during operation cavities form on the working surface of the cylinder, which leads to a violation of the chamber’s tightness, making it difficult to repair;
- aging or ruptures of the disk membrane, which indicates the need to sort out the assembly;
- failure of the cover connecting elements.
Important! Carrying out maintenance of the unit, periodically tightening the cover bolts, allows you to extend the service life, prevents emergency situations on the road, and eliminates the need to repair the pneumatic system of a semi-trailer or car in the field.
How to disassemble an energy accumulator
It is better to organize repair of the unit in a service center, but if a malfunction occurs on the road, it is carried out in the field, and the need for disassembly and the sequence of actions remains unchanged. After the unit is removed from the trouser installation site, the order of work is as follows:
- Remove the top part. The air supply hose is moved to the side - this makes it more convenient to remove the rear retaining ring of the pusher after dismantling the thrust bearing. It should not be muted.
- The tap opens the air supply. The pusher plunges, opening access to the retaining ring. The stopper is removed with a homemade hook (it’s convenient for hooking). The groove is cleaned of dirt.
- Close the air supply. Remove the required assembly.
- Of the eight short standard bolts, the covers are unscrewed and four are removed. In their places, long bolts with a locknut and a nut are placed (their size is from 120 mm). Unscrew the remaining four small bolts.
- Gradually releasing the long bolts smoothly releases the working spring. This operating procedure eliminates the need to use special bench devices.
- Replace or restore broken parts. You need to assemble your unit in reverse order.
Important! In a garage, instead of long bolts, a vice or a lathe is used to release the spring when it is necessary to disassemble the unit. In both cases, it is important to comply with safety measures - an incorrect sequence of actions will lead to the lid “shooting off” and injury to others.
How to release the brakes on an energy accumulator
The emergency wheel locking mode is activated due to a malfunction in the pneumatic system. But repairing or towing the car is possible after manually releasing the energy accumulators that do not work. The following order is provided:
- use a socket wrench to remove the screw;
- excess pressure equalizes atmospheric pressure;
- the thrust bearing transmits force to the piston sufficient to compress the spring and move the diaphragm;
- The rod with the support disk, moving, unlocks the wheels.
The design of this brake element
There are two types of disc calipers - front and rear, their design and repair method are slightly different, but their main elements are the same:
- The housing in which the piston (cylinder) is mounted.
- Bypass valve.
- Sealing ring.
- Piston (cylinder).
- Cylinder boot.
- Retaining ring.
- Frame.
- Pressure bar.
- Pads.
- Guide boot.
- Guides.
- 14. Fastening bolt.
- Brake hose.
The difference between the rear disc caliper is the presence of a parking brake.
Therefore, the piston (4) has a special thread through which it is screwed onto the parking brake rod (1). Thanks to this, it can operate under the influence of two drives - mechanical (parking) and hydraulic.
8.4. Cabin heating and ventilation
Heating
Rice. 8.2. Heating and ventilation control panel:
1 — regulator for air flow distribution throughout the cabin;
| — air flows to the windshield and side windows; |
| — air enters the chest area of the driver and passenger |
| — air enters the windshield and side windows, into the chest and legs of the driver and passenger; |
| — air flows only to the feet of the driver and passenger; |
2 — regulator of the amount of air entering the cabin. Has four positions:
| - switched off |
| — minimum fan performance |
| — average fan performance |
| — maximum fan performance |
3 - regulator of the amount of air entering the interior of GAZ-ZZ1063 cars . Has four positions:
| - switched off |
| — minimum fan performance |
| — average fan performance |
| — maximum fan performance |
4 — cabin air temperature regulator.
The leftmost position of the knob (the wide part of the blue symbol) corresponds to the ventilation mode. The intermediate positions and the extreme right position (the wide part of the red symbol) correspond to the heating mode.
Elimination of frost and condensation.
To quickly remove frost and condensation from the windshield and side windows, you must:
- set the air distribution regulator 1 (Fig. 8.2) to the position of air supply to the windshield and side windows;
- set the air temperature regulator 4 to the extreme right position (the wide part of the red symbol);
- Set air quantity regulator 2 to maximum fan performance.
- set the air flow distribution regulator 1 to the position you choose;
- use temperature controller 4 to set the desired air temperature (temperature of outside air or warm air from the heater);
- turn the air quantity regulator 2 from position “0” to one of three positions to obtain the desired air flow rate into the cabin.
- set regulator 4 (Fig. 8.2) to the extreme left position (wide part of the blue symbol);
- select air distribution mode 1 with the regulator;
- turn regulator 2 so as to obtain the desired air flow rate into the cabin;
- adjust the direction of air flow by turning the dampers of the ventilation grilles.
To obtain a comfortable climate you need:
The central and side ventilation grilles on the instrument panel have damper control knobs (levers), the movement of which can change the direction of air flow, increase or decrease the amount of incoming air, until the air inlet channel is completely closed.
To ensure comfortable conditions, an additional heater is installed in the cabin of GAZ-331063 vehicles, operating in the mode of using the internal air of the cabin. The amount of air supplied to the cabin is adjusted using regulator 3.
To turn on ventilation you must:
Ventilation
Cold or warm air
Rice. 8.3. Air flow distribution in the car cabin
To ensure efficient heating and ventilation, it is necessary to ensure that the air intake grille located on the hood in front of the windshield is not clogged with leaves, snow, etc.
Coolant heater (Installed on some vehicles)
To achieve comfortable conditions in the car interior and to stabilize the temperature of the engine in winter, a coolant heater is installed on the car. The heater is installed in the engine compartment on the left in the direction of travel of the car. The reheater is turned on by button 13 (see Fig. 5.1.) with the engine running and the heater on. Next, the reheater operates in automatic mode, increasing the temperature of the coolant entering the heating system to 80–85° C, thereby increasing its operating efficiency in winter. It is recommended to turn on the heater when the outside air temperature is below plus 5° C. Automatic operation of the heater occurs when the engine is running, the heater operation button is turned on, the heating is turned on (controller 4 - see Fig. 8.2) and the heater fan is turned on (controller 2 - see Figure 8.2). 8.2).
Causes of failure
The caliper as an element of disc brakes is subjected to significant temperature loads, as well as exposure to external adverse factors: dirt, dust, moisture, chemicals. All this happens due to the fact that his device does not allow him to be protected from these negative phenomena. If there is significant overheating, as well as if the boot ruptures, the lubrication of the guides may disappear.
Improper maintenance of the guides, in which some craftsmen manage to stuff inappropriate lubricant into their boots: graphite or similar, leads to their swelling and souring, after which they jam or knock when suddenly activated.
8.2. Car movement
It is recommended to start driving the car with a warm engine. If this is not possible, and the engine is warmed up while the car is moving, then at low ambient temperatures and after a long period of parking, it is recommended to drive for some time in lower gears with a low engine speed. As it warms up, you need to consistently shift to higher gears.
After overcoming fords, after washing the car, as well as when driving for a long time on a wet road, when water gets into the brake mechanisms of the wheels, it is necessary to perform several smooth braking while driving to dry the discs and brake linings.
When driving through puddles, you must reduce your speed to avoid hydroplaning, which can cause skidding or loss of control; With worn tires this danger increases.
If possible, it is necessary to drive the vehicle without sudden acceleration and deceleration, as this leads to increased tire wear and increased fuel consumption.
To ensure long-lasting operation of the gearbox when operating the vehicle, be sure to follow the following rules, which will ensure easy and silent gear shifting:
- All gear changes should be carried out by smoothly moving the lever only after the clutch is completely disengaged. Changing gears too quickly leads to premature wear of the synchronizers. To increase the durability of the gear shift synchronizers, it is recommended to change from high to low gear using double clutch disengagement with an intermediate increase in engine speed in the neutral position of the gear shift lever.
- It is not allowed to change gears with the clutch not completely disengaged, as well as to simultaneously operate the pedal and lever. It is not allowed to engage the clutch when the gear is not disengaged.
- Engage reverse gear only after the car has come to a complete stop.
8.2.1. Cruise control function
The Cruise Control function starts working when the vehicle speed exceeds 48 km/h. To turn on the function, you must press the “Cruise control/Power Take-off” switch (see Fig. 5.1, pos. 9) and the “Cruise control/Power Take-off – Increase/Return” switch (see Fig. 5.1, pos. 25) .
When the “Cruise Control/Power Take Off - Increase/Return” switch is turned to the “Return” position, the control unit remembers the vehicle speed and maintains this speed until the driver presses any of the vehicle control pedals (fuel control, brake, clutch) or turns off the switch "Cruise control/Power take-off." Turning the "Cruise Control/Power Take Off - Increase/Return" switch to the "Return" position must be duplicated by pressing the "Cruise Control" button on the windshield wiper and washer switch.
When the “Cruise control/Power Take-off” - “Increase/Return” switch is turned to the “Increase” position, the control unit sets the vehicle speed previously recorded in the unit’s memory and maintains this speed until the driver presses any of the vehicle control pedals (fuel control, brakes, clutch) or by turning off the Cruise Control/Power Take Off switch.
Repair kit
Replacing a caliper is a drastic measure; often you can limit yourself to repairing and replacing its components. Basically, the standard repair kit includes rubber elements:
- cuffs,
- anthers,
- protective rubber bands of the fitting,
- piston sealing rings.
But depending on the necessary repairs, they may include:
- retaining rings,
- clamping brackets,
- guides,
- directly the pistons themselves.
Thanks to the repair kit, you can significantly save and improve the operation of this brake system unit.
Headlights. To replace low beam and parking lamps...
Page 32
- Image
- Text
Headlights
. To replace low beam and side light bulbs in
headlamp, it is necessary to remove the rubber cover 3 (Fig. 8.4).
Rice. 8.4. Headlight block:
1 – direction indicator socket; 2 – knob for adjusting the light beam in the horizontal plane; 3 and 5 – covers; 4 – socket for adjusting the light beam in the vertical plane
To replace the high beam lamp, you must remove the rubber cover 5.
To replace the turn signal lamp, unscrew the turn signal socket 1.
Handle 2 adjusts the direction of the light beam in a horizontal plane.
sti. Adjustment of the direction of the light beam in the vertical plane is carried out through socket 4 with a special hex key or Phillips screwdriver.
Additional adjustment of the low beam in the vertical plane in
Depending on the vehicle load, it is carried out from the passenger compartment using the handwheel of the headlight range control unit.
On an unloaded vehicle, the number “0” on the handwheel must be
place with the label "
∞"on the housing of the corrector control unit.
When the car is fully loaded, you need to combine the number
“4” on the block handwheel with the mark “
∞" on the control unit housing.
The headlights must be adjusted in the following order:
–
check the air pressure in the tires. If necessary, bring
it to normal;
–
place the unloaded vehicle on a level horizontal plane
a platform at a distance of 10 m from the screen (the driver remains behind the wheel) (Fig. 8.5);
–
align the number “0” on the handwheel of the headlight range control unit with
mark on the block body;
–
turn on low beam;
–
adjust the light beams using knobs 2 (Fig. 8.4) and through socket 4
one for each headlight.
Warning
. When installing a halogen lamp in a headlight, do not touch your fingers.
the bulb in order to avoid a decrease in the luminous flux or destruction of the bulb during operation.
U
adjusted headlights horizontal section of the cut-off line
should align with the X-X line (Fig. 8.5A, 8.5B), the inclined sections of the cut-off line should correspond to Fig. 8.5A (with markings on the diffuser “AL” and Fig. 8.5B (with markings on the diffuser “OSVAR”), and the points
Signs of trouble
The breakdown of the caliper components and their impending repair can be understood by some signs that occur during braking:
- The car pulls and pulls to the side when braking.
- It feels like when braking you have to put more force on the pedal or, conversely, less.
- The brakes rattle or knock when driving over bumps or when stopping.
- The brakes are jamming, which will be indicated by possible skidding.
- The appearance of brake fluid leaks on the wheel.
- Feedback in the pedal, expressed in a strong pulsation when pressing the brake.
If these symptoms appear, you should not delay repairing faulty caliper elements. You must first figure out why this happened and make repairs immediately. You can learn more about the signs and causes in the attached videos at the end of the article.
Brake system Valdai
October 9, 2012, 7:35 pm #51
mexanik5901, October 9, 2012, 7:34 pm, #50
Nothing lasts as long as temporary
October 25, 2012, 10:18 #52
Good afternoon everyone. Anyone who needs spare parts to repair the Valdai caliper, please write to me in a personal message. All the insides and outsides are there. Who can help with repairs and tools, welcome.
October 29, 2012, 21:47 #53
Hello. Please tell me how to solve the problem: I bought Valdai a week ago. mileage 200 thousand km The pressure in the circuits is different - in the rear it does not rise above seven and in the front it is generally 4, but this pressure gauge seems to be faulty - it either drops to zero, then shows 2. But everything would be fine - the brakes are good (they checked them at the test bench during a technical inspection), but after successively pressing and releasing the brakes 4-5 times (for example, at an intersection, a crossing), the pressure drops below 6 atm. and the pads slow down, you have to stand and wait for the compressor to pump up the missing pressure. It is possible to somehow adjust the relief valve to 8 atm. Or it's the compressor, or there could be other reasons.
30 October 2012, 17:55 #54
In Valdai, air is pumped up on the handbrake, when I release the handbrake, the brake chambers converge, after a minute the air drops and the pads jam while the engine is running. The air comes out through the main brake under the hood, the main one is new, what to do
November 6, 2012, 11:08 #55
Can someone tell me how to tighten the front brake cylinder on Valdai 33104
November 29, 2012, 07:34 pm #56
mechanic 777, March 23, 2012, 21:45, #1
who knows why the rear right wheel may be stuck on the brake, caliper and new energy
You need to change the dump valve, then everything is ok, I did it myself
December 5, 2012, 15:03 #57
Tell me how to get rear brake pads in Valdai
February 7, 2013, 10:37 #58
Lha-novice, October 29, 2012, 21:47, #53
Hello. Please tell me how to solve the problem: I bought Valdai a week ago. mileage 200 thousand km The pressure in the circuits is different - in the rear it does not rise above seven and in the front it is generally 4, but this pressure gauge seems to be faulty - it either drops to zero, then shows 2.
I installed a two-circuit mechanical one from a Kamaz truck.
11 May 2013, 18:09 #59
The two-circuit one is the same as the Valdai one, I saw some in the store but it doesn’t look like it
July 9, 2013, 11:51 pm #60
Hello everyone, I read it, but I still don’t understand what the hell this is, Valdai 11 year old Kamins, you drive more than 2 tons, the rear brakes are blocked, but not always, I drive five. What could it be and how to get rid of it, THANKS in advance !
GAZ Valdai 3034BD
28 August 2013, 16:26 #61
Hello everyone, I have the same problem. The sensor caught fire 3 thousand ago today I tried to remove the pads, took off the wheels, the pads moved, took off the power cam, they jammed as if they were putting on the handbrake. I tried to separate the head of wow 2 pieces. broke and everything. What to do.
Sverdlovsk region. Kamensk-U
Daewoo Matiz 0.8 Mx
31 August 2013, 07:17 #62
963ekr45rus, August 28, 2013, 16:26, #61
Hello everyone, I have the same problem. The sensor caught fire 3 thousand ago today I tried to remove the pads, took off the wheels, the pads moved, took off the power cam, they jammed as if they were putting on the handbrake. I tried to separate the head of wow 2 pieces. broke and everything. What to do.
Loosen the handbrake cable (you can try to move it by bending the spring casing, then pour oil into the casing so that the cable moves easily).
Because of the handbrake, the rear wheels may slow down when the body is loaded differently.
The handbrake cable must run in a sheath.
Lada Vesta Lada 211440-26
September 3, 2013, 21:25 #63 + 1
Avtoshnik, August 31, 2013, 07:17, #62
Loosen the handbrake cable (you can try to move it by bending the spring casing, then pour oil into the casing so that the cable moves easily).
Because of the handbrake, the rear wheels may slow down when the body is loaded differently.
The handbrake cable must run in a sheath.
In Valdai there is no handbrake cable, there are two energy accumulators
October 27, 2013, 11:11 pm #64
good day, I recently bought myself a Valdai, I have such a problem when you take the car off the handbrake, the right wheel sticks, the car stood there, as if the pads had moved away, I drove on, then I tried again, the right wheel is stuck again, I disassembled the handbrake, everything seems to be fine, I started the car, let the air in and the pads loosened, now I drive without a handbrake please help with advice on where to look and what to do, thanks in advance
7 February 2014, 14:38 #65
Hello, in my Valdai 2006, the rear brake circuit does not pump more than 6 atmospheres, and when you press the brake twice, the pressure drops to 4 and the wheels jam, you have to wait until it pumps again to 6 because it doesn’t pump anymore. what is the reason please tell me
If the brakes rattle
This type of brake has pressure springs or floating calipers.
They are responsible for securing the pads to the caliper body. The reason for their failure is metal fatigue or poor quality. As a result, they lose their elasticity and stop pressing the pads against the body. Because of this, the pads rattle at the slightest passage of irregularities and may come into uneven contact with the disc, which will lead to the appearance of a shoulder or grooves on it. Also in this case, the staples themselves may rattle.
What should you do when your brake calipers or pads rattle? If it is not possible to replace them, then you should try to loosen them with your own hands using pliers to make them more rigid. To do this, you need to pull them out of their seats, unclench them and insert them into place, after which they will stop rattling for a while.
intersection of horizontal and inclined sections of light and shade...
Page 33
- Image
- Text
intersections of horizontal and inclined sections of the cut-off line - with lines G-G and D-D.
Rice. 8.5. Screen layout for headlight adjustment:
A - headlights marked “AL” on the lens; B — headlights with “OSVAR” marking on the lens; h is the height of the center of the low beam headlights on the car; V—V—car axis.
Direction and hazard indicators.
The car is installed
The electronic switch for the direction indicators and hazard warning lights has been updated, which also provides control over the serviceability of the signal lamps.
If, when turning on the turn signals, the turn signal lamp
blinks at double frequency, this indicates a malfunction of the lamp of one of the direction indicators on the right or left side of the car (no contact or burnt out).
If the turn signal lamp does not light up and the turn signal lamps
are in good working order, it is necessary to check the serviceability of the warning lamp.
If, when turning on the direction indicators, their lamps and the signal lamp
lights do not light up, this means that the turn signal fuse or breaker (or its circuit) is faulty.
Rear lights.
Vehicles are equipped with rear lights that include
Signal lights: brake signal, side light (side and rear), turn signal, reversing light, fog light, contour lights.
The horn kit 22.3721/221.3721 is installed under the hood on
the top panel of the radiator trim.
If necessary, adjust the signal sound. For this
You need to loosen the lock nut of the screw located on the back of the signal. Turn the screw in one direction or the other to adjust the sound. Tighten the locknut.
8.6. CIRCUIT BREAKERS
Under the hood on the right there is a BPR-4 fuse box. Fusible
the 125A insert protects the air heater circuit.
A 60A fuse link protects the vehicle's common positive circuit. A 40A fuse link protects the vehicle's light circuit. A 30A fuse link protects the engine control unit circuit. On the left under the instrument panel cover there are two fuse blocks
fuses BPR-13. Below are the maximum current values in amperes and the circuits they protect.
The piston (cylinder) is faulty
Poor quality of brake fluid, the appearance of rust on the surface when the boot of at least one piston (cylinder) ruptures or as a result of prolonged downtime of the machine entails its partial jamming.
This will initially be heard when its operation is delayed, when the pads begin to knock on the disc. In order to make the repair yourself in this case, you need to disassemble the caliper and pull out the rusty piston; this must be done after the guides have been unscrewed and the boot and retaining ring have been removed.
If the cylinder still moves even slightly, you can squeeze it out using a compressor by inserting a hose into the hole for supplying brake fluid. This can also be done without first disconnecting the housing from the brake system; you just need to press the pedal, after which the created pressure will squeeze the cylinder out of its seat. If it is tightly jammed, then a preventive measure can be soaking it in gasoline and other similar liquid.
It is worth considering that the rear caliper piston cannot be removed, but is simply unscrewed along the threads with pliers or a similar tool. After this, you need to wash the cylinder seat and clean it of dirt and rust. It is also worth doing with the piston (cylinder) itself. Next you need to insert the cylinder into place. It would be useful to replace its boot with a new one during assembly. You can see this in more detail in the attached video.
Brake pads should only be replaced at service stations...
Page 40
- Image
- Text
Brake pads should only be replaced at service stations.
skogo service.
Rice. 9.5. Checking the wear of the brake pads
9.5. CHECKING THE BRAKE FLUID LEVEL IN THE RESERVOIR
CLUTCH MASTER CYLINDER
Brake fluid level in the clutch master cylinder reservoir
should be 15-20 mm below the top edge of the tank (Fig. 9.6).
Rice. 9.6. Checking the fluid level in the clutch master cylinder reservoir:
1—working cylinder; 2 — tank; 3 — cover; 4 - capacity
9.6. CHECKING THE ELECTROLYTE LEVEL
IN BATTERY
The electrolyte level in the battery should be between met-
MIN and MAX marks (Fig. 9.7), printed on the translucent battery body, and if they are absent, along the lower edge of the filler hole.
Rice. 9.7. Accumulator battery:
1—cover; 2 — plug;
3 - filler hole
If the electrolyte level is below normal, it is necessary to remove cover 1,
return plugs 2 and through holes 3 top up the battery cells to the normal dis-
Comments
Select → I found the instructions for my car here! #manualza
- Click →
Instructions: “It is prohibited to disassemble the device. There are no parts that can be repaired by the user.” The manufacturer intrigued me. Almost provokes!
Manualza!manualza.ru
Still not with us?
Guide faulty
The main problem if the brake does not work can be jamming and souring of the caliper guides.
Repairing this malfunction with your own hands will not be difficult. By the way, in this case there is no difference when disassembling both the front and rear calipers. To do this, you need to unscrew and pull out both guides. Clean them from dirt or poor-quality lubricant, remove and replace the torn boots with new ones, after filling them with special grease for calipers.
Then put them in place, insert and screw the guides back. Then you should try how freely the pressure bar moves along them. This can be seen visually in the attached video at the end of the article.
We should not forget about the housing of this brake element. If significant rust, dents, sagging or other mechanical damage is found on it, it should be replaced completely.
Salon
Since the cabin of the Valdai is identical to the GAZ-3302, there are no differences inside. Among the features, one can only note the steering wheel from the Sobol. The instrument panel and seats, as well as the front dashboard, are similar to the GAZel one. The disadvantages of this cabin are familiar to many. First of all, it is worth noting the poor sound insulation. The sound from the engine can be heard into the cabin without any problems. The cabin is also poorly insulated. In winter it cools down quickly. On long-distance transport you cannot do without an autonomous heater. Usually owners install a Planar heater here. As for the seats, they are just as soft and without armrests. Therefore, many people exchange them for seats from foreign cars. These can be both passenger cars and seats from commercial trucks (for example, Sprinter or Ducato).
The mirrors on the GAZ Valdai truck are not informative - say the reviews. For this reason, owners often attach additional ones.
Spare parts for trucks
Full model range: GAZ-3307, 53, GAZ-3309, GAZ-66, 3308, 33081, 33086, GAZ-33104
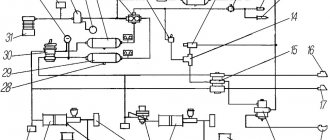
Brake system of Valdai cars GAZ-3310, GAZ-33104, 33106
The Valdai GAZ-3310, GAZ-33104, 33106 car is equipped with a braking system with a pneumatic dual-circuit drive and disc brakes on all wheels, an anti-lock brake system (ABS) and a brake pad wear limit warning system. The role of the reserve system is performed by the brakes of the front and rear axles.
The parking brake system of Valdai GAZ-3310, GAZ-33104, 33106 acts on the disc brakes of the rear wheels due to spring energy accumulators and is activated by a runic crane installed in the cabin.
The diagram of the car's working brake system is shown in Fig. 1.
Fig.1. Diagram of the working brake system of the Valdai GAZ-3310, GAZ-33104, 33106
1 - alarm indicator for emergency drop in air pressure; 2 - pressure gauges; 3 — anti-lock brake system (ABS) indicator; 4 — parking brake activation indicator; 5 - compressor; 6 — air preparation module; 7. 19- receivers; 10 — sensor for emergency drop in air pressure; 11 — pressure gauge sensor; 12 — reverse-acting brake valve; 13, 29 — noise mufflers; 14 — pedal brake valve; 15—control valves; 16 — modulator: 17 — switching sensor; 18 — two-line valve; 19 — quick release valve; 20 — brake chamber; 21 — brake chamber with spring energy accumulator; 22, 23 - ABS sensor - 24, 25 - ABS rotor; 26 — ABS electronic unit; 27 — pad wear limit sensors; 28 - pad wear indicator
Air preparation module for the brake system Valdai GAZ-3310, GAZ-33104, 33106
The Valdai brake system air preparation module GAZ-3310, GAZ-33104, 33106 is installed in pneumatic brake systems to dry and purify the air coming from the air compressor, to regulate the operating pressure in the brake system, as well as to divide the supply line into two main and two additional circuits, with automatic shutdown of the circuit, and in the event of its damage, and preservation of a supply of compressed air in undamaged circuits.
Fig.2. Desiccant cartridge
1 - cartridge, 2 - o-ring
Maintenance of the air preparation module of the Valdai GAZ-3310, GAZ-33104, 33106 brake system consists of replacing a replaceable drying cartridge, the service life of which depends only on the degree of contamination of the incoming air. The replacement cartridge must be replaced after one year.
Replacement of cartridge 1 (Fig. 2) of the dryer is carried out in the following order:
— clean the surface of the air dryer from dirt:
— the air dryer must not be under pressure. This can be achieved by filling the system with compressed air before turning off the pressure regulator or loosening the threaded connection on the air supply fitting;
— unscrew the drying cartridge 1, turning it counterclockwise;
— clean the surface of the case with a rag; under no circumstances should dirt fall into the cavity with purified air;
— when replacing, use only a new cartridge and sealing ring 2;
- lubricate the seals with a thin layer of lubricant
Wrap the new drying cartridge by hand; tightening torque approx. 15 Nm (1.5 kg/cm).
Manual reverse acting brake valve Valdai GAZ-3310, GAZ-33104, 33106
The manual brake valve Valdai GAZ-3310, GAZ-33104, 33106 is designed to control the pressure in the parking brake drive and allows you to smoothly change the pressure in the chambers of spring energy accumulators.
The manual brake valve requires no maintenance
Quick brake release valve Valdai GAZ-3310, GAZ-33104, 33106
Fig.3. Valdai quick release valve GAZ-3310, GAZ-33104, 33106
1 - cover; 2 - diaphragm; 3 o-ring
The Valdai quick release valve GAZ-3310, GAZ-33104, 33106 (Fig. 3) is designed to reduce the braking time of the parking brake system by accelerating the release of air from the actuators by shortening the path traveled by the compressed air during release.
The device does not require maintenance. Possible valve malfunctions and methods for eliminating them are listed below.
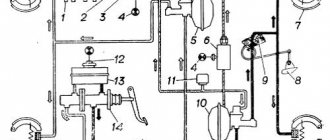
Two-section brake valve Valdai GAZ-3310, GAZ-33104, 33106
The Valdai brake valve GAZ-3310, GAZ-33104, 33106 (Fig. 4) is designed to control the actuators of the service brake with a dual-circuit brake drive.
Fig.4. Brake valve Valdai GAZ-3310, GAZ-33104, 33106
1 — exhaust window 2.7 — springs; 3.6 - housing; 4, 10,11,12, 14 - sealing rings; 5, 13 — valves; 8 - elastic element; 9 — pusher
Brake valve maintenance involves periodic inspection and checking the reliability of the valve’s attachment to the vehicle. The protective rubber cover must not be damaged and must be securely fixed to the valve body.
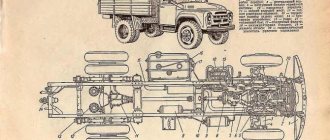
Disc brakes Valdai GAZ-3310, GAZ-33104, 33106
Figure 5 shows the design of the Valdai disc brake mechanism GAZ-3310, GAZ-33104, 33106. A section of the disc brake mechanism is shown in Fig. 6.
Fig.5. Disc brake mechanism Valdai GAZ-3310, GAZ-33104, 33106
Brake system Valdai
October 9, 2012, 19:35 #51
mexanik5901, October 9, 2012, 19:34, #50
Nothing lasts as long as temporary
October 25, 2012, 10:18 #52
Good afternoon everyone. Anyone who needs spare parts to repair the Valdai caliper, please write to me in a personal message. All the insides and outsides are there. Who can help with repairs and tools, welcome.
October 29, 2012, 21:47 #53
Hello. Please tell me how to solve the problem: I bought Valdai a week ago. mileage 200 thousand km The pressure in the circuits is different - in the rear it does not rise above seven and in the front it is generally 4, but this pressure gauge seems to be faulty - it either drops to zero, then shows 2. But everything would be fine - the brakes are good (they checked them at the test bench during a technical inspection), but after successively pressing and releasing the brakes 4-5 times (for example, at an intersection, a crossing), the pressure drops below 6 atm. and the pads slow down, you have to stand and wait for the compressor to pump up the missing pressure. It is possible to somehow adjust the relief valve to 8 atm. Or it's the compressor, or there could be other reasons.
30 October 2012, 17:55 #54
In Valdai, air is pumped up on the handbrake, when I release the handbrake, the brake chambers converge, after a minute the air drops and the pads jam while the engine is running. The air comes out through the main brake under the hood, the main one is new, what to do
November 6, 2012, 11:08 #55
Can someone tell me how to tighten the front brake cylinder on Valdai 33104
November 29, 2012, 07:34 pm #56
mechanic 777, March 23, 2012, 21:45, #1
who knows why the rear right wheel may be stuck on the brake, caliper and new energy
You need to change the dump valve, then everything is ok, I did it myself
December 5, 2012, 15:03 #57
Tell me how to get rear brake pads in Valdai
February 7, 2013, 10:37 #58
Lha-novice, October 29, 2012, 21:47, #53
Hello. Please tell me how to solve the problem: I bought Valdai a week ago. mileage 200 thousand km The pressure in the circuits is different - in the rear it does not rise above seven and in the front it is generally 4, but this pressure gauge seems to be faulty - it either drops to zero, then shows 2.
I installed a two-circuit mechanical one from a Kamaz truck.
11 May 2013, 18:09 #59
The two-circuit one is the same as the Valdai one, I saw some in the store but it doesn’t look like it
July 9, 2013, 11:51 pm #60
Hello everyone, I read it, but I still don’t understand what the hell this is, Valdai 11 year old Kamins, you drive more than 2 tons, the rear brakes are blocked, but not always, I drive five. What could it be and how to get rid of it, THANKS in advance !
GAZ Valdai 3034BD
28 August 2013, 16:26 #61
Hello everyone, I have the same problem. The sensor caught fire 3 thousand ago today I tried to remove the pads, took off the wheels, the pads moved, took off the power cam, they jammed as if they were putting on the handbrake. I tried to separate the head of wow 2 pieces. broke and everything. What to do.
Sverdlovsk region. Kamensk-U
Daewoo Matiz 0.8 Mx
31 August 2013, 07:17 #62
963ekr45rus, August 28, 2013, 16:26, #61
Hello everyone, I have the same problem. The sensor caught fire 3 thousand ago today I tried to remove the pads, took off the wheels, the pads moved, took off the power cam, they jammed as if they were putting on the handbrake. I tried to separate the head of wow 2 pieces. broke and everything. What to do.
8.10. Anti-lock brake system
The vehicles are equipped with an anti-lock braking system (ABS). ABS is effective during emergency braking on roads with different surfaces (for example, asphalt-ice) and prevents wheel locking in less favorable traction conditions (on ice), providing a minimum braking distance for the vehicle for a given road surface (ice) while maintaining its stability and controllability.
ATTENTION!
To obtain the optimal effect when emergency braking a car using ABS, you must press the brake pedal with maximum force while simultaneously pressing the clutch pedal.
The electrical part of the ABS consists of 4 ABS sensors (in the wheel units of the car), 3 modulators (on the car frame), an ABS control unit (CU) (in the cabin on the right under the instrument panel), an ABS diagnostic button (in the center of the panel devices), an ABS fault indicator (on the right in the instrument cluster) and an ABS harness connecting the sensors and modulators to the ABS control unit.
Two power circuits are connected to the ABS control unit: for the modulators through the 1st 25A fuse in the upper fuse block and directly for the ABS control unit through the 11th 5A fuse in the upper fuse block.
The instrument cluster contains an ABS fault indicator. The warning light turns on for approximately 2 seconds each time the ignition is turned on, and then turns off, which confirms the serviceability of the ABS system. A constantly switched on state of the indicator or its activation while driving indicates a malfunction of the ABS circuits (in this case, the service brake system remains in working order, but the wheels may lock, causing loss of vehicle controllability).
If an ABS malfunction is detected, the vehicle must be checked at a service station.
8.6. Circuit breakers
Under the hood on the right there is a BPR-4 fuse box. A 125A fuse link protects the air heater circuit.
A 60A fuse link protects the vehicle's common positive circuit.
A 40A fuse link protects the vehicle's light circuit.
The fuse link on the ZOA protects the circuit of the engine control unit.
On the left under the instrument panel cover there are two BPR-13 fuse blocks. Below are the maximum current values in amperes and the circuits they protect.
Upper block fuses protect circuits:
1. 25A - ABS control unit.
2. 15A - Emergency alarm.
3. 15A - Radio tape recorder. Instrument cluster.
4.15A - Windshield wiper. Windshield washer. 5.10A - Headlight relay.
5. 10A - Brake signals.
6. 20A - Sound signals. Horn relay. Cigarette lighter.
7. 20A - Main heater. Electric heater pump.
8. 15A - Additional heater.
10. 10A - Instrument cluster. Buzzer. Reversing light. Speed sensor. Windshield wiper relay.
11. 5A - ABS control unit.
12. 15A - Drier relay. Air heater relay.
13. 10A - Direction indicator. Headlight relay.
Lower block fuses protect circuits:
1. 25A - Reserve or coolant heater.
2. 15A - High beam (right headlight).
3. 15A - High beam (left headlight). High beam indicator.
4. 15A - Low beam (right headlight).
5. 10A - Low beam (left headlight). Low beam warning light.
6. 10A - Fog lights. Fog lamp indicator.
7. 20A - Reserve.
8. 20A - Reserve.
9. 15A - Engine compartment lamp. Driver's lamp. Lamp for the second row of seats.
10.10A - Backlight (instruments, switch, cigarette lighter).
11. 5A - Engine control unit.
12. 15A - Dimensions (starboard side). Headlights corrector. License plate lighting. Glove compartment lamp.
13. 10A - Dimensions (left side). Side light indicator. Contour lights on the cab roof.
If a malfunction occurs in the electrical system, first of all it is necessary to check the condition of the fuses and replace the faulty ones. Repeated tripping of the fuse indicates a malfunction in the electrical circuit.
Note. A set of spare fuses is included with the vehicle. To remove a faulty fuse, use the tweezers included in the spare fuse kit. The electrical circuits protected by fuses are also shown in the electrical circuit diagram.