4.2 out of 5 (69)
The Ural 4320 auto repair manual is a digitized copy of the paper manual. The electronic version, downloaded to a tablet or phone, will always be at hand during vehicle maintenance and repair. You can download the Ural 4320 repair book for free in rar format directly from the website.
Before using the car manual, check the year of manufacture and engine of the car.
Russian language
Format: rar
Size: 6.2 Mb
File downloaded 101 times
Repair book Ural 4320 free in rar format
Ural432010, Ural432031 and their modifications. Manual
Operation of any Ural 4320 vehicle is impossible without knowledge of its structure, maintenance and repair features. It doesn’t matter who will carry out the necessary work - every driver is simply obliged to know the basic maintenance and troubleshooting procedures.
The Ural 4320 repair book contains all the necessary information that will help the owner understand the structure of the car, teach how to properly care for the car, timely maintenance and proper repairs.
The repair manual for Ural 4320 is divided into chapters: Vehicle design (describes general information and vehicle specifications); Operating instructions (preparation for departure, recommendations for traffic safety); Malfunctions along the way (tips to help you in case of an unexpected breakdown on the road); Maintenance (detailed recommendations for all maintenance procedures); Repair instructions (engine, transmission, chassis, steering, brake system, and also includes assembly and disassembly work necessary during the repair process of the Ural 4320); Electrical equipment (detailed manual for diagnosing and troubleshooting, the main units are described separately and detailed electrical diagrams of the Ural 4320 are provided).
Any of the Ural 4320 repair procedures is given according to the principle from simple to complex: from the simplest maintenance operations, adjustments, replacement of parts, to global repairs with assembly and disassembly work.
electronic repair manual
Before using the car manual, check the year of manufacture and engine of the car.
Russian language
Format: pdf
File size: 127.2 Mb
e-book in pdf format
Please remember that your vehicle may not include all the features described in the manual. The repair manual may contain discrepancies with the description of your specific vehicle, and you may also find descriptions of options and equipment that are not on your vehicle.
To download the Ural repair book, you need to follow the Download link, confirm that you have read the terms of use and download the file to your device. We do not limit download speed. If you have any difficulties, use the feedback form. We will try to resolve the problem and respond to you as quickly as possible.
What will you find in the Ural repair book?
Detailed information about the device of the car.
Algorithm for identifying faults, a system of daily and periodic checks, reference information on self-diagnosis Ural.
Instructions for timely vehicle maintenance.
Step-by-step guide to self-repair Ural.
Operation and Maintenance
Maintenance can be of the following types:
- daily;
- during the initial period of use;
- primary;
- secondary;
- seasonal.
The driver must carry out daily maintenance before the vehicle leaves the road and upon returning to the garage.
Maintenance during the initial period of operation is carried out after 1000 km of run, seasonal - 2 times a year (spring and autumn). TO1 is carried out every 4,000 km, and TO2 - after 16,000 km.
Such work includes checking the oil level, inspecting the main components and devices, as well as adjusting the coupling mechanism and clearances.
How to start a Ural
Before starting the power unit, it is recommended to check the charge level of the batteries and the presence of a sufficient amount of fuel fluid in the tank. If the ambient temperature is below -10°C, it is necessary to start the engine heating system. The working fluid should warm up to +40°C.
In order to start the Ural engine, you must:
- Press the enter button, which is located on the back of the speedometer housing.
- Hold the button for 4 seconds until characteristic sounds appear.
- Turn the ignition key.
Maintenance of URAL-4320-10, URAL-4320-31
Maintenance is intended to keep the vehicle in working order and in proper appearance, to reduce the wear rate of parts, to prevent failures and malfunctions, as well as to identify them for the purpose of timely elimination. Maintenance is a preventive measure carried out forcibly on a scheduled basis after certain runs or periods of vehicle operation.
Compliance with frequency and high-quality maintenance in the prescribed volume ensures the constant technical readiness of the vehicle and reduces the need for repairs. To ensure quality work, it is recommended that maintenance be carried out at special stations equipped with the necessary tools and devices.
Work related to the regulation and maintenance of engine power system devices, electrical equipment, and hydraulic systems must be performed by qualified specialists.
Types of maintenance
Based on the frequency and complexity of the work performed, maintenance is divided into the following types:
— daily maintenance (EO);
— maintenance during the initial period of operation;
— first maintenance (TO-1);
— second technical maintenance (TO-2);
— seasonal maintenance (SO).
Maintenance intervals
Daily maintenance is performed before the vehicle leaves the line and upon its return.
Maintenance during the initial period of operation is performed after the first 1000 km (50 hours of engine operation).
Seasonal maintenance is performed twice a year - in spring and autumn and is combined with regular maintenance.
The frequency of technical maintenance TO-1 and TO-2 is adjusted depending on the category of vehicle operating conditions and climatic regions in accordance with GOST 21624-81 and “Regulations on the maintenance and repair of rolling stock of road transport”, Moscow, Transport 1986. For the first category of operating conditions, the first maintenance (TO-1) is performed every 4,000 km (125 engine operating hours), the second maintenance (TO-2) - every 16,000 km (500 engine operating hours).
LIST OF MAINTENANCE WORKS
| Contents of work | Technical requirements | Recommended equipment, devices and tools |
| Inspect the car and check for fuel, oil, brake and coolant leaks, and air leaks. Troubleshoot if necessary. Inspect the engine and, if necessary, clean it of dust and dirt. Check the brake fluid level and add if necessary. | ||
| Before starting the engine: — check the oil level in the engine crankcase and, if necessary, bring it to normal; | The oil level should be between the “B” and “H” marks of the indicator | Oil container, oil dispenser, cleaning material |
| — check the coolant level in the radiator, add if necessary | The coolant level must be above the ends of the cooling tubes in the upper radiator tank (see map of lubricants and working fluids) | Coolant container, measuring ruler |
| Fill the windshield washer pump reservoir | At sub-zero temperatures, the water from the tank should be drained | Capacity |
| Check the serviceability and operation of lighting devices, light and sound alarms, instrumentation and windshield wipers | Malfunctions are not allowed | |
| Check the operation of the generator using the current indicator (see section “Electrical equipment. Generator”) | The current indicator should show the charging current | Current indicator |
| Check the serviceability of: — clutch; | The clutch must ensure full and smooth engagement (do not slip), complete disengagement (should not “drive”) | |
| — steering; | The nuts of the steering rods and the power steering mechanism must be cottered, there should be no play in the connections, and loosening of the driveshaft forks is not allowed. | External inspection |
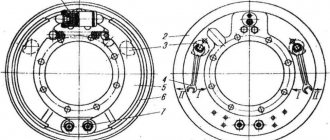
| — service brake system; | Check the serviceability of indicators 3 and 4 (see Fig. 13), to do this, press button 6, and the indicators should light up. | Car pressure gauge, brake fault warning light on instrument panel |
| Replace warning lamps if necessary. | ||
| Hydraulic and pneumatic systems | ||
| must not have any liquid or air leaks. Press the brake pedal and hold it in this position for 1-2 minutes. If after this time the indicator 3 comes on, this indicates damage to the inner seal of the brake master cylinder. In this case, replace the cuff. In this case, there should also be no noticeable movement of the arrows of the two-pointer pressure gauge. If there is noticeable movement of the arrows of the two-pointer pressure gauge or when indicator 4 on the instrument panel lights up due to large air leaks, eliminate the malfunction in the pneumatic part of the drive | ||
| - parking brake system | With the pads fully pressed to the drum, the pawl should be installed on 4-12 teeth of the sector | |
| Check the condition of the towing device (when operating a vehicle with a trailer) | The towing hook nut must be locked and the hook latch must be pinned. | External inspection |
| Check the condition of the tires and wheel fastenings | Tires must be free of damage and foreign objects in the tread. Loosening the wheel nuts is not allowed. | External inspection. If necessary, restore the tightening torque of the wheel nuts |
| Inspect the mounting of the fifth wheel and subframe of truck tractors | Loosening of the fifth wheel and subframe is not allowed. | |
| Service upon return from a flight | ||
| If necessary, wash the car and clean the cab and platform | Manual hose washing, brushes, cleaning material | |
| In winter, to prevent moisture condensation in the fuel tank, fill it with fuel to its full capacity. | Fuel station column | |
| Drain condensation from air cylinders. In winter, drain the condensate after each time you leave the warm garage. | Drain condensate when there is pressure in the air cylinders | |
| Maintenance during the initial period of operation after the first 1000 km (50 hours of engine operation) | ||
| Engine | ||
| Carry out maintenance of the power unit in accordance with the operating instructions for the YaMZ-236M2, YaMZ-238M2 engines | ||
| Check and, if necessary, tighten the fastening of the power unit at all points, all connections of the air intake and exhaust systems | Weakening is not allowed | Keys 14x17, 17x19 |
| Drain the sediment from the fuel tank | Fuel leakage through the drain plug is not allowed. | Keys 14x17, 17x19, container, cleaning material |
| Drain sediment from coarse and fine fuel filters | Fuel leakage through the drain plug is not allowed. | Same |
| Transmission | ||
| Check and, if necessary, adjust the free play of the clutch pedal (see section “Clutch release drive”) | The free play of the clutch pedal should be within 50-60 mm, in the absence of air pressure in the car’s pneumatic system | Keys 17x19, 14x17, pliers, ruler |
| Check and, if necessary, tighten the fastening of the cardan shafts | Loosening of fastenings is not allowed | Keys 14x17, 17x19, ring key 17x19 |
| Check the tightness and tighten the fastening nuts if necessary: | ||
| - lever, upper and lower knuckle caps and ball joint flanges | Loosening of fastenings is not allowed | Ring key 24x27 |
| — main gear to the axle housing | Loosening of fastenings is not allowed | Wrenches 17x19, 24x27, ring wrenches 17x19, 22x24, combination wrench 14x14, pliers, screwdriver |
| Chassis | ||
| Check the tightness and tighten the fastening nuts if necessary: | ||
| — wedges for fixing the fingers of the front springs; | Loosening of fastening is not allowed | Key 17x19 |
| — ears of the front springs; | Same | Socket wrench 30x32, mounting blade with wrench, pliers, screwdriver, bit, hammer |
| — stepladders of front springs; | Loosening of the fastening is not allowed. Tighten with the vehicle at full load. | Socket wrench 30x32 for spring ladder nuts, mounting blade with hydraulic jack handle |
| — stepladders of rear springs; | Same | Socket wrench 27x38 for wheel nuts, mounting blade with hydraulic jack knob |
| — jet rod fingers; | Loosening of fastenings is not allowed | Wrench head 50, mounting blade with hydraulic jack knob, pliers, screwdriver, bit, hammer |
| - wheels | Same | Socket wrench 27x38 for wheel nuts, mounting blade |
| Check and, if necessary, tighten the mounting bolts: | ||
| — brackets for the upper reaction rods; | — « — | Socket wrench 24, wrench |
| — the balancer axle assembly to the balancer brackets; | — « — | Socket wrench 30x32, mounting blade with hydraulic jack knob |
| — front brackets of the front springs to the lower flange of the side member; | — « — | Key 22x24 |
| — rear brackets of front springs to side member reinforcements | — « — | Wrench 22x24 (24x27), socket wrench 24, wrench |
| — fifth wheel (for truck tractors) | Loosening of fastening is not allowed | Keys 17x19, 22x24, ring key 24x27 |
| Check and, if necessary, tighten the fastening of the cross member of the towing device (when working with a trailer) | Same | Keys 17x19, 22x24 |
| Steering | ||
| Remove and wash the steering pump filter. Check the oil level, add if necessary | Oil leakage through the filter seal is not allowed. The oil level should be between the upper and lower marks on the indicator with the plug open | Wrench for bleeding hydraulic brakes, screwdriver, oil container, container for washing units, cleaning material |
| Tighten the pin fastenings: | ||
| — steering rods; | Loosening of fastenings is not allowed | Wrench 24x27, ring wrench 24x27, pliers |
| - amplifier mechanism | Same | Ring wrench 24x27, socket wrench 36, pliers, screwdriver, hammer, mounting blade with hydraulic jack handle |
| Tighten the nuts of the steering gear housing bolts | — « — | Keys 17x19, 22x24, ring key 24x27 |
| Check and, if necessary, tighten the nuts securing the steering shaft universal joint forks | — « — | Keys 14x17, 17x19 |
| Check and, if necessary, adjust the pump belt tension | See section “Steering. Booster pump" | Wrench 10x12, measuring ruler |
| Service brake system | ||
| Adjust the gap between the shoes and drums of the service brakes (see section “Service brake system”) | When adjusting the brakes, do not disturb the factory setting of the pad support pins. After adjustment, the brake drums should not heat up when the vehicle is moving. | Key 19x24, ring key 22x24 |
| Electrical equipment | ||
| Check the density and level of electrolyte in the batteries, add distilled water if necessary, recharge the battery | See section "Batteries" | Keys 11x13, 17x19, tank with distilled water, glass tube with a diameter of 3-5 mm, densimeter |
| Check and, if necessary, adjust the headlights (see section “Lighting and alarm system”) | Adjust the headlights with the vehicle unloaded and placed on a level, level surface. | Screwdriver, screen with special markings |
| Check the reliability of fastening of electrical wire bundles | Loosening of wire fastenings is not allowed | Pliers, screwdriver, knife, insulating tape |
| Check the fastening of the battery container brackets to the frame | Same | Keys 17x19, 22x24 |
| Check and, if necessary, tighten the fastening of the high voltage source of the engine preheater | — « — | Screwdriver |
| Check the condition of the rubber boots on the tail lights, side repeaters, battery switch, brake light switches, fuel level sensor, auxiliary brake switch | — « — | External inspection |
| Special equipment | ||
| Check the attachment of the power take-off housing to the transmission housing | Weakening is not allowed - repents | Key 14x17 |
| Lubrication work | ||
| Change oil: | ||
| — in the transfer case housing (see map of lubricants and working fluids) | Fill the oil up to the edge of the filler control hole on the rear wall of the crankcase. Oil leakage through plugs is not allowed | Wrench 17x19, waste oil container, oil dispensing tank model 133M, cleaning material |
| — in the steering gear housing (see map of lubricants and working fluids) | Fill the oil up to the edge of the filler hole. Oil leakage through plugs is not allowed | Wrench 22x24, waste oil container, oil dispensing tank model 133M, cleaning material |
| — in the main gears of drive axles (see map of lubricants and working fluids) | Same | Wrench 27x30, waste oil container, oil dispensing tank model 133M, wiping material |
| Carry out lubrication work on the power unit according to the lubrication table in the operating instructions for the YaMZ-236M2, YaMZ-238M2 engines | ||
| First maintenance (TO-1) | ||
| On a new car, during the first maintenance—1, wash the booster pump filter, tighten the nut of the telescopic shock absorber housing (later tighten it if a leak appears), lubricate the clutch release clutch bearing and the clutch release fork shaft bushing | ||
| Engine | ||
| Carry out maintenance of the power unit in accordance with the operating instructions for the YaMZ-236M2, YaMZ-238M2 engines | ||
| Check and, if necessary, tighten the mounting of the power unit at all points | Loosening of fastening is not allowed | Keys 17x19, 19x22 |
| Check and, if necessary, tighten all fastenings of the air intake and exhaust systems | Same | Keys 14x17, 17x19 |
| Check and, if necessary, adjust the tension of the steering pump drive belt | The permissible deflection should be 7-13 mm under a force of 4 kgf in the middle of the branch | Key 10x12 |
| Chassis | ||
| Check and tighten the nuts if necessary: — wedges for fixing the fingers of the front springs; | Loosening of fastening is not allowed | Key 17x19 |
| — front spring ears;*1 | Same | Socket wrench 30x32, mounting blade with wrench, pliers, screwdriver, bit, hammer |
| — stepladders of front springs*1; | Loosening of the fastening is not allowed. Tighten with the vehicle at full load. | Socket wrench 30x32 for spring ladder nuts, mounting blade with hydraulic jack handle |
| — rear spring ladders*1 | Same | Socket wrench 27x38 for wheel nuts, mounting blade with hydraulic jack knob |
| Steering | ||
| Check the oil level in the power steering pump reservoir, add if necessary | The oil level should be between the upper and lower marks on the indicator with the plug open | Oil level indicator, cleaning material |
| Brake systems | ||
| Adjust the gap between the shoes and drums of the service brakes (see section “Service brake system”) | After adjustment, the brake drums should not heat up when the vehicle is moving. | Key 19x22, ring key 22x24 |
| Electrical equipment | ||
| Clean the surface of the battery from dust and dirt, | The surface of the batteries must be clean, the holes | Wiping rags, wire 2 mm in diameter |
| clean the ventilation holes in the battery plugs | traffic jams cleared | |
| Check the electrolyte level in the batteries, add distilled water if necessary | The electrolyte level should be within 10-15 mm above the safety shield | Keys 11x13, 17x19, container with distilled water, glass tube with a diameter of 3-5 mm |
| Check the fastening and reliability of contact of the wire tips with the battery terminals | The fastening of the wire lugs must be secure. | Keys 14x17, 17x19 |
| Lubrication work | ||
| Lubricate according to the lubricants and working fluids chart: | ||
| — front spring pins; | Pump in grease until fresh grease emerges from the pin and spring eye joint. | Lever-plunger syringe or solid oil pump, cleaning material |
| — towing device bushings (when working with a trailer) | Pump in grease until fresh grease appears | Lever-plunger syringe, cleaning material |
| Check and, if necessary, adjust the lubricant level in the steering knuckle housings of the front drive axle to normal. | The lubricant level should be up to the edge of the inspection filler hole. Oil leakage through plugs is not allowed | Wrench 27x30, oil dispensing tank model 133M, cleaning material |
| At every second maintenance-1 | ||
| Carry out maintenance of the power unit according to the operating instructions for the YaMZ-236M2, YaMZs-238M2 engines | ||
| Second maintenance (TO-2) | ||
| Complete the scope of work TO-1 and the work indicated below | ||
| Engine | ||
| Power maintenance | ||
| unit, carry out according to the operating instructions for the YaMZ-236M2, YaMZ-238M2 engines | ||
| Check the radiator mounting | Loosening of fastenings is not allowed | Wrench 17x19, pliers |
| Check the air filter and hose connections of the air intake system. | Same | Screwdriver, wrench 10x12 |
| Check and, if necessary, tighten the mounting of the exhaust pipe muffler | — « — | Keys 14x17, 17x19 |
| Drain the sediment from the fuel tank | Fuel leakage through the drain plug is not allowed. | Keys 14x17, 17x19, container, cleaning material |
| Transmission | ||
| Check and, if necessary, adjust the free play of the clutch pedal (see section “Clutch release drive”) | The free play of the pedal should be within 5060 mm in the absence of air pressure in the car’s pneumatic system | Keys 14x17, 17x19, pliers, ruler |
| Check and, if necessary, tighten the fastening of the flanges of these shafts and the fastening of the intermediate support to the beam | Loosening of fastenings is not allowed | Keys 14x17, 17x19, 19x22, ring key 17x19 |
| Check the clearances in the cardan shaft crosspieces | When rocking the propeller shaft pipe in the radial plane and around the axis, there should be no noticeable gaps | |
| Check the tightness and tighten the fastening nuts if necessary: | ||
| - lever, upper and lower knuckle caps and ball joint flanges | Loosening of fastening is not allowed | Ring key 24x27 |
| Check and, if necessary, tighten the fastening of the main gears of the drive axles | Same | Wrench 22x24, ring wrench 22x24, pliers, screwdriver |
| Chassis | ||
| Check and, if necessary, tighten the fastening nuts: — ears of the front springs; | Loosening of fastening is not allowed | Socket wrench 30x32, mounting blade with wrench, pliers, screwdriver, bit, hammer |
| — stepladders of front springs; | Weakening is not allowed. Tighten with the vehicle at full load. | Socket wrench 30x32 for spring ladder nuts, mounting blade with hydraulic jack handle |
| — stepladders of rear springs; | Same | Socket wrench 27x38 for wheel nuts, mounting blade with hydraulic jack knob |
| - jet rod fingers | Loosening of fastenings is not allowed | Wrench head 50, mounting blade with hydraulic jack knob, pliers, screwdriver, bit, hammer |
| Check and, if necessary, tighten the bolts: | ||
| — the balancer axle assembly to the balancer brackets; | Loosening of fastening is not allowed | Socket wrench 30x32 for spring ladder nuts, mounting blade with hydraulic jack handle |
| — balancer brackets to the frame cross member; | Same | Key 17x19 |
| — brackets for the upper reaction rods; | — « — | Socket wrench 24mm, wrench |
| — couplers of the rear brackets of the front springs; | — « — | Wrenches 17x19, 22x24, hammer, chisel |
| — front brackets of the front springs to the lower flange of the side member; | — « — | Key 22x24 |
| — rear brackets of the front springs to the side member reinforcements; | — « — | Wrench 22x24 (24x27), socket wrench 24, wrench |
| — fifth wheel to the subframe and frame (for truck tractors) | — « — | Ring key 24x27, keys 17x19, 22x24 |
| Check the condition of tires, wheels and their fastenings in the “Electrical equipment” section (carry out work at least once a quarter) | See Wheels and Tires section. Loosening of fastening is not allowed charging station | Wrenches 11x13, 17x19, socket wrench 27x38 for wheel nuts, hydraulic jack, mounting paddle with a knob with a diameter of 3-5 mm, cleaning material |
| Adjust the headlights with the vehicle unloaded and placed on a level, level surface. | Screwdriver, screen with special markings | |
| Check the connection of the starter to the engine | Loose connections are not allowed | Key 22x24 |
| Check the condition of the insulation of electrical wires and their fastening | Damage to insulation and loosening of wire fastenings is not allowed. | Pliers, screwdriver, knife, insulating tape |
| Check the tightness of the devices and the cleanliness of the wire tips to the starter terminals | Loose connections and contamination of terminals are not allowed | Keys 10x12, 17x19 |
| Cabin, platform | ||
| Check and, if necessary, tighten the fastening of the cabin, platform and tail | Loosening of fastenings is not allowed | Keys 10x12, 11x13, 17x19, 22x24 |
| Special equipment | ||
| Check the power take-off mounting | Loosening of fastenings is not allowed | Key 14x17, cleaning material |
| Lubrication work | ||
| Check the oil level and top up if necessary: | ||
| — in the transfer case housing; | The oil level should reach the edge of the filler inspection hole. Oil leakage through plugs is not allowed | Keys 17x19, 22x24, 27x30, oil tank model 133M, cleaning material |
| — in the intermediate support of the cardan shaft; | Same | Same |
| — in the main gears of driving axles; | — « — | Wrench 27x30, oil dispensing tank model 133M, cleaning material |
| — in the hubs of the rear balancer suspension; | — « — | Wrench 17x19, oil dispensing tank model 133M, cleaning material |
| — in the steering gear housing Lubricating work on the power unit | — « — | Key 17x19 |
| follow the operating instructions for the YaMZ-2E6M2, YaMZ-238M2 engines according to the lubrication table | ||
| Lubricate according to the lubricants and working fluids chart: | ||
| — upper bearings of kingpins; | Fill with lubricant through oil nipples in the volume specified in the lubricants and working fluids chart | Lever-plunger syringe, cleaning material |
| — splined connection of the steering cardan shaft; | Disassemble and lubricate the spline joint | Wiping material |
| — water pump bearings; | Lubricate through the grease gun until fresh grease is squeezed out. | Lever-plunger syringe, cleaning material |
| — splined connections of the cardan shafts of the intermediate and middle axle drive; | Same | Same |
| — hinges of reaction rods; | Pump in grease until fresh grease is expelled. If the sealing ring is significantly deformed, fresh lubricant is not necessary. | —«— |
| Carry out maintenance of the power unit in accordance with the operating instructions for the YaMZ-236M2, YaMZ-238M2 engines | ||
| Check and, if necessary, adjust the rear support of the power unit (see section “Power Unit Suspension”) | Weakening is not allowed | Keys 17x19, 19x22 |
| Transmission | ||
| Check and, if necessary, adjust the tapered bearings of the primary and intermediate shafts of the transfer case (see section “Transmission. Transfer case”) | The axial movement of the primary and intermediate shafts should be 0.03-0.08 mm. | |
| Chassis | ||
| Check the condition of the frame | There should be no loosening of rivet joints, cracks in side members and cross members. | External inspection, portable lamp |
| When working with a trailer, check and, if necessary, eliminate the axial play of the towing hook (see section “Chassis. Frame”) | Allowed axial play of the towing hook is no more than 0.5 mm | Socket wrench 55, wrench for bleeding hydraulic brakes, mounting paddle with hydraulic jack knob |
| Check and, if necessary, tighten the towing device fastening to the crossbar | Loosening of fastenings is not allowed | Keys 17x19, 22x24 |
| Check for axial movement of the balancer, adjust if necessary (see section “Chassis. Vehicle suspension”) | Axial movement of the balancer is not allowed | Keys 10x12, 14x17, 17x19, bit, hammer |
| Brake system | ||
| Check the operation of the service brake system malfunction alarm (see section “Pneumatic-hydraulic drive of the service brake system”) | The alarm must be working properly | Ring wrench 17x19, pliers, screwdriver, warning light on the instrument panel |
| Check the outlet pressure from both sections of the brake valve and the operation of the triple | The air pressure on the control pressure gauges must be equal to the pressure in the system | Wrench 11x13, control pressure gauges |
| safety valve (see section “Pneumatic-hydraulic drive of the service brake system”) | two-pointer pressure gauge | |
| Check the operation of the single safety valve (see section “Pneumatic-hydraulic drive of the service brake system”) | Air must enter the trailer brake cylinder after the air pressure in the remaining cylinders reaches 550 kPa (5.5 kgf/cm2) | Wrench 17x19, control pressure gauges |
| Check the pressure on the connecting head of the single-line drive (black) (see section “Pneumatic-hydraulic drive of the service brake system”) | The air pressure on the control pressure gauge should be 480-530 kPa (4.8-5.3 kgf/cm2). When the service or parking brake is applied, the control pressure gauge should show pressure (0) | Control pressure gauge |
| Check the pressure on the connecting supply head (red) (see section Pneumatic-hydraulic drive of the service brake system") | The air pressure on the control gauge should be 0. When the service or parking brake is applied, the control gauge should indicate system pressure | Same |
| Check the free play of the brake pedal and adjust if necessary (see section “Pneumatic-hydraulic drive of the service brake system”) | The free play of the brake pedal should be 20-30 mm | Keys 17x19, 22x24, screwdriver, pliers |
| Check the operation of the RTS (see section “Pneumatic-hydraulic drive of the service brake system”) | The pressure on the control pressure gauges must correspond to the value according to the RTS table | Wrench 17x19, control pressure gauge |
| Lubrication work | ||
| Carry out lubrication work on the power unit according to the lubrication table in the operating instructions for the YaMZ-236M2, YaMZ-238M2 engines | ||
| Lubricate the parking brake expansion cam shaft (see lubricants and fluids chart) | When turning the parking brake adjusting lever, the pads should not jam | Oiler-dropper |
| move apart and return to its original position under the action of springs | ||
| Remove the service brake pads, clean and lubricate the axles and pad bushings (see lubricants and fluids chart) | The service brake shoe must rotate freely on the axle | Screwdriver, hammer, pliers, cleaning material, assembly tool |
| Remove the wheel hubs, remove the old grease and apply new one. Wash, lubricate and adjust the hub bearings during installation (see the “Drive Axles” section and the map of lubricants and working fluids) | Apply grease to the rollers and bearing cage evenly over the entire outer surface. After a short run, with the bearings adjusted correctly, the hub should be cold or slightly warm | Socket wrench 140, mounting blade with hydraulic jack knob, screwdriver, jack, GARO trolley for removing hubs, container for lubricant, cleaning material, keys 10x12, 17x19, axle puller |
| Disassemble and lubricate the splined joints of the drive shafts of the front and rear axles (see the map of lubricants and working fluids) | Apply a thin layer of lubricant over the entire surface of the splines. When assembling, make sure that the arrows stamped on the tubular shaft and sliding fork are positioned opposite one another. | Wrenches 17x19, 22x24, container for lubricant, cleaning material |
| Lubricate the steering rod and power steering joints (see the map of lubricants and working fluids); | Pump lubricant until the tip guard begins to expand. The hinges must be sealed | Lever-plunger syringe, cleaning material |
| Replace lubricant: — in the housings of the steering knuckles of the front drive axle (see the map of lubricants and working fluids); | Fill lubricant up to the edge of the filler hole | Wrenches 10x12, 17x19, 24x27, socket wrench 140, mounting blade with hydraulic jack handle, screwdriver, hammer, GARO trolley for removing wheels assembled with hub and drum, waste oil container, cleaning material |
| - in the wheel cylinders of the service brake (remove and disassemble them) | Wash parts in alcohol or brake fluid | Washing container |
| Wash and lubricate parts, replace damaged and worn parts; — in the hubs of the rear balancer suspension (see map of lubricants and working fluids); | Fill the oil up to the edge of the control filler hole in the cap. Oil leakage through the cap seals and plug is not allowed | Wrench for bleeding hydraulic brakes, wrench 17x19, waste oil container, oil dispensing tank model 133M, cleaning material |
| — in the tire inflation cuffs (see the section “Centralized system for regulating air pressure in tires” and the map of lubricants and working fluids); | The air supply hole must be free of grease | Wrenches 17x19, 22x24, key for bleeding hydraulic brakes, axle puller, cleaning material |
| When working with a trailer, check the condition of the threads on the hook and nut of the towing device. If there is deformation of the thread, replace the hook and nut with new ones. | Thread deformation is not allowed | Wrench 22x24, ring wrench 24x27, socket wrench 55, wrench for bleeding hydraulic brakes, mounting blade |
| Lubrication work | ||
| Replace lubricant:* — in the transfer case housing (see section “Transmission. Transfer case” and the map of lubricants and working fluids) | Fill the oil up to the edge of the filler control hole on the rear wall of the crankcase. Oil leakage through plugs is not allowed | Wrench 27x30, waste oil container, oil dispensing tank model 133M, cleaning material |
| — in the main gears of drive axles (see map of lubricants and working fluids) | Same | Wrench 27x30, waste oil container, oil dispensing tank model 133M |
| Lubricate the clutch and brake valve intermediate bracket shaft | Lubricate through the oiler until fresh grease appears. | Lever-plunger syringe, cleaning material |
| At every fourth, do the following: | ||
| Brake system | ||
| Remove and disassemble | Air booster parts | Keys 10x12, 11x13 |
| pneumatic boosters with main cylinders, wash the parts and lubricate them before assembly. Replace the cuffs with marks and hooks (see the map of lubricants and working fluids) | Wash the lei in kerosene, the parts of the master cylinder in alcohol or brake fluid | 14x17, 17x19, 27x30, hammer, pliers, screwdriver, bathtub, napkins, wrench for bleeding hydraulic brakes |
| Replace the brake fluid | After pumping, add fluid to the reservoirs of the main brake cylinders to a level of 15-20 mm below the upper edge of the filler neck | Key for bleeding hydraulic brakes, portable lamp, container, hose, cleaning material |
| Lubricate the threads of the parking brake adjuster (see lubricants and fluids chart) | Remove the rubber plug on the brake shield, lubricate | |
| Transmission | ||
| Adjust the bearings of the steering knuckle pins (see section “Drive Axles”) | The thickness of the removed straps from under the lever and covers should be the same 0.15 mm (0.05 + 0.1) mm | Ring wrench 24x27, stops for the lower covers of the steering knuckles, jack, mounting spade |
| Adjust the main gears of the drive axles | For technical requirements and adjustment procedures, see the “Drive Axles” section | Equipment for removing and installing gearboxes, dynamometer, indicator, wrenches 12x13, 17x19, 22x24, 24x27, pliers, screwdriver, hammer, mounting blade, axle puller, cleaning material |
| Lubrication work | ||
| Carry out lubrication work on the power unit according to the lubrication table in the operating instructions for the YaMZ-236M2, YaMZ-238M2 engines | ||
| Seasonal Maintenance | ||
| Engine | ||
| Power maintenance | ||
| unit, carry out according to the operating instructions for the YaMZ-236M2, YaMZ-238M2 engines | ||
| Electrical equipment | ||
| Check the regulated voltage on the car Carry out starter maintenance according to the operating instructions for the YaMZ-236M2, YaMZ-238M2 engine | See Voltage Regulator section | Voltmeter of accuracy class not lower than 1.0 with a scale of 0-30 V, screwdriver |
| Lubrication work | ||
| In autumn and spring, replace fuel and oils appropriate to the season. | Leakage of fuel and oil is not allowed | |
| Check the oil level in the winch gearbox and add if necessary (see lubricants and working fluids chart | The oil level should be up to the edge of the inspection hole. Oil leakage through plugs is not allowed | Wrench 24x27, oil dispensing tank model 133M, cleaning material |
| Lubricate the winch cable chain drive | Lubricate the entire length of the chain | Wiping material |
| Engine | ||
| Prepare the pre-heater for winter operation (see section “Engine pre-heating system”) | Leakage of coolant and fuel is not allowed. Operation of the heater with an open flame at the outlet is unacceptable | Wrenches 10x12, 11x13, 14x17, 17x19, screwdriver, bath for washing units, cleaning material |
| Disassemble and lubricate the fuel control drive joints (see lubricants and working fluids map) Lubricate the terminal connections according to the lubricants and working fluids chart | Apply lubricant to the joint housing. After assembling the joints, the ball pins should move freely without jamming | Keys 8x10, 11x13, pliers, screwdriver |
| Special equipment | ||
| Remove and disassemble the auxiliary power take-off box, wash and lubricate the parts | Wash parts in kerosene or diesel fuel. Lubricate with gear oil | Wrenches 12x13, 17x19, combination wrench 14x14, ring wrench 17x19, socket wrench 27x38 for nuts |
| Disconnect and blow with compressed air the pipelines and hoses of the sealing system | Clogging of pipelines and hoses is not allowed | Wrenches 12x13, 17x19, 22x24, combination wrench 14x14, socket wrench 10, air hose from the compressor |
| Inspect painted surfaces and repaint if necessary. Fill and paint any cracks found. | Rust, paint peeling, cracks are not allowed | portable lamp |
| Lubrication work | ||
| Disassemble the pneumatic cylinders of the auxiliary brake and pneumatic clutch booster, lubricate the pistons and the inner surface of the cylinders (see the map of lubricants and working fluids) | Apply lubricant evenly in a thin layer over the entire surface of the cylinders and pistons | Wrench 17x19, combination wrench 14x14, screwdriver, bit, pliers |
| Lubricate the winch drum shaft bearing (see lubricants and fluids chart) | Pump in grease until fresh grease appears | Lever-plunger syringe, cleaning rags |
| Lubricate the splined joints of the drive shafts of the winch drive (see the map of lubricants and working fluids) | Lubricate through grease nipples until fresh grease appears. | Wrench 17x19, ring wrench 22x24, cleaning cloth |
Malfunctions and repairs
Main faults and repairs of the Ural-4320:
- The heating device does not start. The cause of the breakdown may be due to a violation of the temperature regime in the fan housing. It is necessary to warm up the housing and the liquid pump. In some cases, disassembly of the engine system may be necessary.
- Faulty steering is the result of worn steering rods, loose fastenings, or the presence of air in the system. In this case, you should replace all worn parts, eliminate leaks and tighten the fasteners.
- If extraneous noise is heard during operation of the transfer case, it is necessary to adjust the bearings, replace damaged elements, and clean the surface of the splines.
URAL-4320-60/61, URAL-43206-61, URAL-5557-60. Instruction Manual - Part 1
The manual is intended for drivers and workers of automobile transport
port related to the operation of Ural vehicles. The manual provides technical characteristics of the vehicles, a brief description of the design and operation of the vehicle’s components, their regulation and maintenance, and reference data.
Due to constant work to improve the product, increasing its
reliability and improving operating conditions, certain changes may be made to the design that are not reflected in this manual.
When operating vehicles, you should use this manual according to
operation manual, operating manual for the power unit of the Yaroslavl Motor Engine and the addition “YaMZ-6565, YaMZ-65651, YaMZ-65652, YaMZ-65653, YaMZ-65654 engines and their configurations” to the operating manual “YaMZ-236NE2, YaMZ- power units” 236NE, YaMZ-236N, YaMZ-236BE2, YaMZ-236BE, YaMZ-236B”, technical description and installation instructions “Air heater”, operating manual (instructions) for batteries, operating manual for pre-heater, manual for the gearbox, installation and operating instructions “Trailer hitch (TCU) 21-202”, manual (instructions) for the operation of the tachograph.
Compiled by: Tebenkova N.S. Responsible editor: Trofimov V.A.
Source