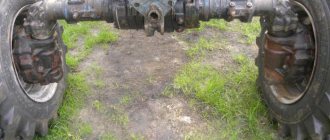
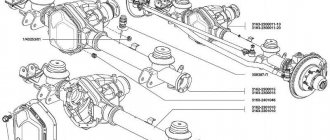
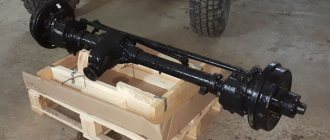
The design of the front axle of the UAZ 469 differs from its rear counterpart in some design features. In addition to the bridge beam and differential, the assembly includes universal joints of equal speeds at the corners and a gearbox. The axle housing is connected to the ball joint using a flange. The hinge body is secured by a pair of pins. The gearbox cover with axle and brake shield is bolted to the frame.
Description
To reduce the degree of wear of the assembly parts, it is recommended to turn off the front axle of the UAZ 469 when moving on a hard surface, the design of which will be discussed below. The hubs on the front wheels should also be deactivated. To do this, you need to remove the caps and unscrew the bolts from the shaft socket. As a result, the coupling is installed in a position corresponding to the annular groove and the end of the coupling. After installing this element in the required position, begin to tighten the protective cap.
The front wheel is activated by securely fixing the bolts. The bridge design scheme is focused on synchronously turning on and off the drive of both wheels.
Removal, disassembly and assembly of UAZ hubs
Remove the hubs in the following order:
- Remove the wheel from the hub (see section “Removing wheels, disassembling and assembling tires”)
- Unscrew the axle mounting bolts and remove the rear axle axle shaft (hub protective cap, wheel release clutch and front axle drive flange)
- Bend the lock washer tab, unscrew the lock nut and remove the lock washer
- Unscrew the bearing adjustment nut and remove the thrust washer
- Remove the hub with the drum, bearings, cuff and cuff thrust washer from the axle.
To replace worn or damaged bearings, disassemble the hub in the following order:
- Press out the outer ring of the inner bearing using a tool (Fig. 207). Simultaneously with the outer ring, a cuff with a thrust washer and the inner ring of this bearing will be pressed out. Perform this operation carefully so as not to damage the cuff.
Rice.
207. Pressing out the outer ring of the inner bearing of the hub Remove the thrust ring of the inner bearing using pliers (Fig. 208)
Rice. 208. Removing the wheel bearing thrust ring
- Slide the outer bearing outer race all the way into the hub lug to release the thrust ring.
- Remove the outer bearing thrust race using pliers.
- Press out the outer ring of the outer bearing using a tool (Fig. 209)
Pec.
209. Pressing out the outer ring of the outer bearing of the hub. Assemble the hub in the reverse order, taking into account the following:- When replacing bearings, also replace the outer rings. Newly installed wheel bearing outer races must be pressed tightly against their thrust rings, otherwise there will be play after the bearings are adjusted. Perform this operation by tightly tightening the bearings with nuts after installing the assembled hubs on the axle (before adjustment). Be sure to install a thrust washer between the cuff and the inner bearing, otherwise the cuff may be damaged when removing the hub from the axle. When assembling the hub, the cuff must be pressed all the way into the thrust washer.
Press in the cuff and outer rings of bearings using an annular mandrel (Fig. 210)
- Before installing the hub on the axle, lubricate the bearings according to the lubrication chart.
- When assembling, remember to install a heat treated thrust washer between the outer bearing and the bearing adjustment nut. If the washer is missing, the adjusting nut may fail.
- If there are even minor cracks on the lock washer's whiskers, replace it, otherwise the washer's whiskers may break and the nuts may self-loose (or self-tighten), which will damage the bearings.
- After installing the hub and drum onto the axle, adjust the tightness of the bearings.
Rice. 210. Pressing in the cuff and outer rings of the hub bearings
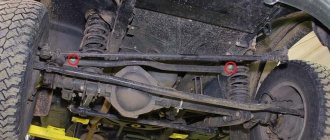
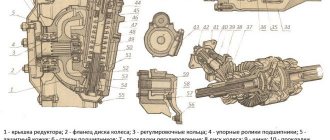
Front axle structure of UAZ 469
The crankcase, main gear and differential correspond to the elements of the rear counterpart. The 469B modification is equipped with an oil deflector ring and a right-hand thread with the “P” stamp. A ball joint is attached to the axle housing. It is secured with five bolts. Bushings and pins are pressed into it. In addition, the support contains the wheel gear housing cover and the steering knuckle housing. The trunnion and brake shield are attached to the locking element using six bolts.
The pivot appendage of the rotary cam is mounted with an interference fit, the value of which is adjustable from 0.02 to 0.10 mm. To prevent rotation of this element, locking pins are provided in the design. The position is adjusted using shims installed in the upper part, between the knuckle lever. In addition, the position can be corrected by installing spacers in the side and bottom of the part.
Steering knuckle design
The most common design of the steering knuckle is the so-called “straight cross”. Although most of them look almost the same, there are differences in size. One may be a little more, the other a little less.
The steering knuckle is usually made of steel. Thanks to this material, such an important part can withstand enormous loads. But with all this, the lighter the knuckle part is, the better the shock absorption and controllability will be. Therefore, designers try to obtain an optimal weight-to-strength ratio.
Seats on auto parts are specially designed for attaching mud rings, which prevent all kinds of debris from penetrating the wheel bearing. The housing is designed in such a way that it is convenient to screw suspension elements onto it.
Peculiarities
The design of the front axle of the UAZ 469, the photo of which is presented above, assumes the presence of an oil seal, which is responsible for retaining lubricant in the housing and protecting the steering cam from contamination. The element consists of an inner race, a rubber sealing ring, a partition, a felt gasket and an outer block. The oil seal is secured to the steering knuckle frame using bolts.
Prevention of the lubricant mixture from flowing from the main gear housing into the rotary cam is provided by an internal self-clamping rubber seal in a metal casing. The upper pivot elements and the ball joint are lubricated through special grease fittings. The lower elements are lubricated with a substance coming from the support by gravity.
Possible damage
Despite the fact that the steering knuckle is one of the most “long-lasting” parts of a car, its damage is just a matter of time. Sometimes the protective casing may crack, allowing dust and sand access inside, so it is worth periodically monitoring its integrity.
If it fails, the best solution is to replace it. You can often see oil streaks on the steering knuckle, indicating that the oil seal/axle shaft joint is not tight. Here you should simply change the oil seal to a better one. Such problems are often found in cars that have been involved in an accident.
Hinge
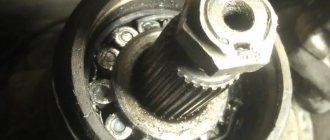
The front axle of the UAZ 469 includes a hinged angular velocity stabilization system. Its design guarantees stability of the angular velocities of the drive and follower shafts. In this case, the distance and deviation between them do not play a role. The hinge itself consists of a pair of forks, in the curved sockets of which four balls are placed. In the central compartments of these parts there is a fifth alignment ball that serves to center the forks.
Longitudinal movement of the hinge is prevented by a ball bearing and a safety washer. The driving inner fork interacts with the differential gear axle shaft. The main gear of the wheel reduction gear and a roller-type bearing with a lock nut are mounted on the edge of the outer driven fork. The internal engagement of the element occurs through a bolted connection. The driven part is assembled with a shaft on a roller bearing and a bronze bushing located in the middle of the axle. At the end of the shaft there is a device for deactivating the front wheels of the machine. It consists of a movable coupling, spring, balls and bolts. The external protrusions connect the part to the internal splines of the flange, fixed with bolts on the hub.
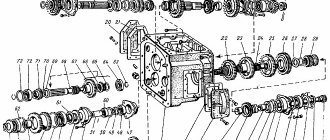
Gearbox device
The front axle of the UAZ 469 has a gearbox almost identical to the wheel gearbox of the rear axle. Among the differences between these elements is the method of installation and fastening of the drive gear, as well as the design of the ball bearing placed in a special glass socket. The drive gear is mounted on the splines of the driven articulated fork. It is fixed with the bearings by means of a special nut, which is opened into the groove of the shaft after tightening.
The support washer is located between the roller bearing and the gear. These parts are not interchangeable with analogue rear gearboxes. Maintenance is the same for both units.
Advantages
So, the first plus is ground clearance. It, unlike civilian models, is 30 centimeters. “Collective farm” UAZs have a ground clearance of 22 centimeters. The second plus is increased torque. This is a huge plus if you plan to transport large loads or tow a trailer. Due to the large size of the teeth, they do not wear out as often as on civilian ones (applies to the main pair).
Front axle structure of UAZ 469: connection diagram
Assembly and connection of the part in question is carried out in the following order:
- The bushing is inserted into the knuckle axle using the pressing method. It should be flush with the end of the seat. The sleeve is then rotated and adjusted with a special brooch to the required diameter.
- Limitation of the movement of the hinge at identical angular longitudinal velocities is ensured by washers installed in the trunnion and ball joint. Their location should be directed with the lubrication grooves towards the hinge. The fixing washer is attached by punching in several places at points evenly distributed around the circumference.
- Replacing the pin bushings involves pressing and screwing them to a diameter of 25 mm, with the ability to pass through each bushing.
- When installing the hinge, lubricant is poured into the support.
- The design of the front axle on the UAZ 469 involves adjusting the required axial tensions using adjusting inserts, which determine the location of the bushings and the ball joint itself. A minimum of five gaskets are used. The total thickness indicators at the top and bottom should not have a difference of more than 0.1 mm.
- Before assembling the oil seal, the felt ring is soaked in warm engine oil.
After assembling the front axle, it is tested on a stand in a static state and under load. This position is created by synchronously braking the axle shafts. If the unit is assembled correctly, there will be no increased noise of the unit, no oil leakage in the oil seals and cuffs, as well as joints.
The right choice when purchasing
Inspection of UAZ cars with military bridges in the parking lot when making a choice to purchase a used car.
A large number of faults can be eliminated without any effort or consequences - spare parts for such vehicles can always be found at dismantling yards, in car shops and markets. When checking, the engine should start and there should be no blue or black exhaust from the pipe. Listening to the engine in different operating modes, paying attention to noises and squeaks is a must. You need to look for oil leaks under the engine - it should be dry under the car.
A thorough diagnosis is required before purchasing
The lubrication system is checked using a dipstick; the oil cannot contain additives or formations. The top-up level is maximum.
The cooling system is checked by fixing the liquid in the conservator. The appearance of the radiator and engine must be free of smudges and stains. The temperature of the motor is kept at a constant level.
To evaluate the generator, you need to press the gas pedal at idle. Based on the indicators, you can judge the mileage of the car. If the mileage is long, more than 80,000 km, then it is simply necessary to check the compression. It is advisable to perform this procedure when the engine is shaking or pulling poorly. You can compare readings using the operating instructions.
The corrosiveness of the body plays a huge role for the driver who has decided to purchase a UAZ with military axles.
Connections to the floor, swivel brackets, windshield frames, plastic suspension, space under the pedals, sills where small debris and condensation accumulate, rear light body skirt - all this can be found when purchasing a used UAZ car.
Steering device – check for play and jamming on site. There can be no noise or squeaks when changing gears; the gearbox must allow you to engage gears without them falling out.
The pivots should be without play; to check, you need to rock the front wheels by the top.
Checking the brakes is to ensure that when you press the pedal they work in a certain mode; the car should not skid to the side.
Cardan play may appear when it rotates. Otherwise there can be no play. Anyone can buy a UAZ, but not everyone will understand how to repair it and what spare parts are needed for this.
Maintenance
The design of the front axle of the UAZ 469, the diagram of which is given above, provides for a number of preventive and adjustment operations during operation. Among them:
- Periodic tightening of threaded connections.
- Checking the kingpins for gaps.
- Bearing adjustments.
- Repairing gear clutch points.
- Checking alignment.
- Regular lubrication of rubbing parts according to the table of instructions for the use of lubricants.
A visual check of the front axle structure of the UAZ 469 involves inspecting the steering knuckles for the integrity and suitability of the adjusting screws, limiting rotary stops, as well as the reliability of the stopper of these elements.
The design diagram of the unit under consideration is designed for a maximum angle of rotation of both wheels in the corresponding positions of about 27 degrees. An increase in this indicator indicates deformation of the articulated rotary cams, and this significantly complicates repairs.
How to protect against wear
Those car owners who recently bought a UAZ often hear unpleasant sounds when turning the steering wheel, as if metal was rubbing against metal without any lubrication. This is often the case. How can you protect the fists on a domestic car? This is where the ubiquitous lithol comes to the rescue.
If you have no experience in car repairs, then you can coat the left steering knuckle, like the right one, only on the outside. For people more knowledgeable in auto mechanics, this method is suitable: unscrew the circular oil seal, move it to the center of the car and add more lithol into the resulting gap.
These operations are performed after cleaning the car from shipping paint or polyethylene. You should also check for the presence of a seal.
Adjustment
The design of the front axle of the UAZ 469, the photo of which is shown above, in factory conditions involves adjusting the steering pin with pre-tension. In this case, the same number of corrective shims are installed in the upper and lower parts of the assembly.
The design of the UAZ 469 front axle pivot is different in that special attention must be paid to the tightening mode of these elements. The fixation weakens as a result of gradual wear of the rubbing parts. Gaps appear along the axes between the pivot ends and the support rings.
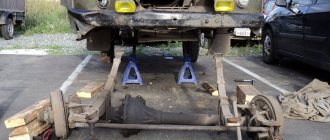
Repair
The front axle of the military UAZ 469, the design of which is discussed above, may sometimes require repair. To repair, you will need to remove the part and disassemble it. This process works as follows:
- The brake pads are placed on the rear wheels of the car.
- The nuts and other fastening systems of the block are unscrewed.
- The rod is unhooked from the bipod, after which the nuts on the shock absorbers and the ball pin are removed.
- The fastening of the front springs with pads is dismantled.
- The front part of the car is lifted over the frame, after which the unit is dismantled.
The front axle of the UAZ 469, the device described above, requires professional maintenance. But if you have the appropriate skills, you can manipulate this block on your own.
see also
Comments 96
While you've been fucking around here for two years, I continue to use the warriors for their intended purpose, At competitions, On outings, driving around your 80s and patrols! What a kindergarten!
I bought a UAZ, there are collective farms, I’ll use them, then I’ll cross military bridges, I’ll use them and see if you’re lying or not. On the topic, the UAZ is not your “friend”
+1000. Whoever rides on warriors does not exchange them for collective farms or spicers. I know people who love off-road, they change civilian and spicers on their UAZ to military ones. On the contrary, I don’t know a single one. I ride warriors myself, and if I change them, it will only be for Laplanders or Unimogs.
Many of us exchange warriors for spicers, even athletes. The other day I broke the warriors myself, I’m thinking of installing a spicer or looking for one from a patrol or surf, for an adequate price tag.
If you broke the warriors, then you will break the spicers like matches. Also, build bridges from the Niva or Luaz)) And for athletes to exchange warriors for spicers - don’t tell a fairy tale.
Well, I have direct contact with the athletes, they said that they don’t need warriors now. For some reason, my backlash is horse-sized, in the planetary gear it’s just minuscule, and the cardan has free play for half a turn of the cardan. On collective farms this play was 5mm
Some of your athletes are strange.)) I also have direct contact with trophists. The Tolmakov brothers, for example. Have you heard of these? These guys take prizes. And other guys who don’t just skate, but win. All are warriors, many on homemade airborne ones. And if you communicate with sausage rollers, for whom the main thing is to get into a puddle and then the more prepared ones will pull you out - then it’s all clear what kind of athletes are communicating with you.
Mine also take 1st place))))
In the category of yard rides?)) Perhaps)) And on the bridges from the ATV you probably have UAZs flying?))
What nonsense are you talking about?
Am I talking nonsense? I just redirected your own nonsense back to you. Which of us, having broken the warriors, was going to install spicers? Am I really? And since you have broken the bridge and put up a weaker one, I suggested that you put it right away from the quadric. With your logic))
And you think that your proposal is not nonsense? And everything is fine with logic. If you are a rare follower of warriors, then you don’t need to trash other units.
Nonsense. Exactly the same as yours, put spicers instead of warriors. And judging by the fact that you still don’t realize that you see in my proposal a mirror image of yours, it’s not surprising that you put spicers instead of warriors. I don’t smear other units, they are a figment of your unhealthy imagination. I just said that warriors are stronger, because... I have experience both driving and busting both. If this is swearing for you, then it’s really bad. But no wonder, judging by you...