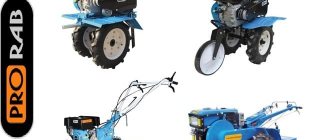
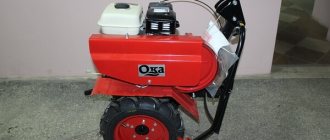
When the Mole motor cultivator was released at Moskovsky in 1983, the work of summer residents became noticeably easier. Thanks to this device, labor costs for plowing the site have been reduced and the efficiency of processing clay and virgin soils has increased. Over the course of 35 years, Krot has been modernized and its functionality expanded with the help of additional attachments. The cultivator, as before, is designed to cultivate a plot of 10 acres, but despite this, it does not lose its relevance for small agricultural farms.
Using the Mole cultivator
Owners of vegetable gardens, small farms, and summer cottages who are planning to purchase a domestic motorized cultivator “Mole” (tested not only by time) are often interested in what attachments for this motor cultivator are sold on the domestic market.
Their interest is understandable and valid, because it is thanks to all kinds of trailed and mounted attachments that this unit becomes indispensable, one might say, a universal assistant on the site.
Using attachments on the “Mole” motor cultivator, you can perform the following agricultural work:
- Plowing the soil.
- Cutting soil for planting.
- Weeding plants from weeds.
- Hilling.
- Planting and harvesting potatoes.
- Using a pump to water a garden.
- Mowing the grass.
- Transportation of harvested crops and other cargo (bulk, piece, etc.) not exceeding a weight of 200 kg.
- Snow removal in winter.
Attachments
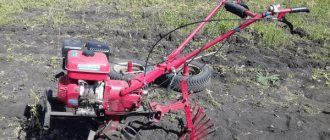
Let's figure out which attachments for the “Mole” cultivator are used for these purposes. Plowing a garden can be done in two ways:
- using one or two (in rare cases three) sets of cutters;
- mounted reversible plow.
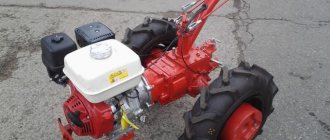
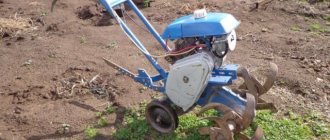
Milling cutter
In this case, cutters with a diameter of up to 33 cm are put on the gearbox shaft. In this case, the diameter of the cutter shaft of the Krot motor cultivator is 25 cm. For light soils, it is enough to attach one or two sets of cutters, for virgin soils - even three (on each side of the cultivator three pieces each, six in total).
Before starting plowing, you need to slightly rebuild the cultivator:
- The pneumatic support wheels must be raised. The movement of the cultivator will be carried out due to cutters rotating on the shaft. This will perform a double action: moving forward and plowing the soil.
- The coulter is attached to a tow bracket located at the rear of the cultivator, which will act as a brake. In fact, the coulter for the “Mole” cultivator is designed to limit the depth of immersion of the cutters into the soil.
- Having completed all these steps, you can safely get to work.
Types of cutters
The quality of plowing depends on the quality of this trailed equipment, so the choice of cutter must be approached very responsibly.
There are several types of cutters for this motor cultivator:
- “Crow's feet.”
- Saber-shaped knives (they are also called active).
You are probably wondering when it is better to attach crow’s feet to the “Mole” motor cultivator, and when to use saber knives? The ideal solution for hard soils is crow's feet.
Triangular cutters easily cut through the soil, and there is no sticking of soil or plants. The “Mole” cultivator confidently moves forward without slipping in the most difficult areas. For lighter soils, active tillers are used.
Nozzles on the cultivator shaft can be: three-lobe and four-lobe. Both are effective in the operation of the unit.
The manufacturer produces cutters only with a diameter of 33 cm.
Some craftsmen often improve cutters, increasing the diameter to 50 cm. According to experts, it is impractical to produce equipment of large sizes.
To plow with attachments, such as a reversible plow, it is necessary to rebuild the cultivator again:
- Remove the cutters from the gearbox shaft;
- Remove the coulter at the rear of the cultivator;
- Place metal wheels with lugs on the gearbox shaft;
- Secure the reversible plow to the rear of the machine using a special hitch.
When the metal wheels with lugs rotate, they fluff up the ground, the plow cuts it to a depth of 15, 25 or 30 cm (depending on the “Mole” model).
Coupling equipment
The hitch is one of the most important components of the unit, because thanks to it, any attachment can be attached to this unit, be it a plow, cart, potato digger, etc.
There are two types of couplings:
Adjustable models allow you to set the angle of attack and horizontal. Non-adjustable devices are more affordable, but less in demand.
Schemes of couplings of the cultivator “Mole” for a trolley
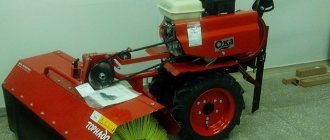
Mower
Listing all the existing attachments for the “Mole” motor-cultivator, we simply cannot fail to mention the mower. With the help of this device, the motor-cultivator turns into a full-fledged lawn mower, which can be used to prepare hay for cattle, maintain the beauty of lawns in the yard, trim the grass in the garden and much more. The cutting height produced by such a mower will be only 4 cm.
Mowers are sold separately from the cultivator.
Many owners of the unit are interested in how to make a mower for the “Mole” cultivator themselves. There are many interesting reviews on the Internet talking about such upgrades.
Habitat
Moles live almost all over the world, with the exception of those areas where the ground is unsuitable for digging and cold areas where the soil freezes to great depths. Representatives of the underground world can be found in Europe and Asia. On the Asian part of the mainland, animals are found in the Caucasus, Turkey, China, Mongolia and Indochina. The only exceptions are the southern regions. On the American continents, mole populations are found in southeastern Canada, Mexico, and almost all central and eastern regions.
Mole populations are found only in areas suitable for their existence.
Animals prefer loose soils. They never settle in wetlands. The main condition is the availability of food supply; the more food, the more animals can gather in one area. Populations usually inhabit clearings, forest edges, non-water meadows and agricultural fields.
Owner reviews
Dmitry, 46 years old
“Mole” is my breadwinner, since for the past six years I have been earning money by performing various agricultural works with this cultivator. Yes, the work is mostly seasonal, but I manage to earn money in the winter by clearing snow debris with a snow blower of my own making. My neighbors and acquaintances do not give me rest, I am constantly at work: plow for one, mow for another, relatives demand mechanized planting and digging of potatoes - progress, what can you take?! On my site I do all the work with a cultivator - I forgot about the back pain, I freed up time for part-time work, and now everything is in complete order, which is important. I acquired the equipment gradually, as my capabilities increased, some (milling cutters, snow blower, mower) I made myself from scrap materials.”
Oleg, 63 years old
“I’ve been working with a motorized cultivator for several years now. For 16 years, everything happened - minor breakdowns, problems with cutters, carburetor. But overall I can say that the unit is reliable and functional. I do almost all the work in my yard and garden with its help. I need to plow - plow, mow - mow, now I haven’t had any problems with planting and harvesting potatoes for a long time. I bought a full arsenal of equipment - all these hillers, diggers and planters... I bought a pump for watering the plants, there is a river nearby, why not use it. But I haven’t mastered the snow blower yet, I’m studying the drawings, selecting materials, so I’ll soon get one too.”
Nutrition
These creatures belong to the order of insectivores, therefore, their diet corresponds to this. A soil animal, the mole mainly obtains food for itself in feeding passages, that is, underground tunnels dug by it, with the help of its nose, which perfectly distinguishes odors.
It eats slugs, beetle larvae, and earthworms. But these underground inhabitants also hunt when they come to the surface. There they catch beetles, ants, frogs, and small rodents. These animals, contrary to some unreliable rumors, do not consume plant food at all. The food metabolism of moles is quite intense, and they require approximately 150 g of animal food per day.
By the end of autumn, in preparation for the cold, such animals begin to make winter supplies for themselves, immobilizing their prey through a bite. Such pantries, usually located in close proximity to the nest, contain more than 2 kg of food.
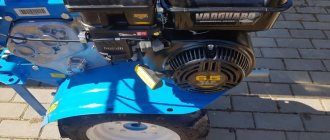
Description
Mole cultivators are multifunctional equipment; with connected additional implements, they are capable of effectively performing agricultural work in a dacha or garden plot. In addition, cultivators can do some household and transportation work.
When combined with attachments, the Mole motor cultivator is capable of:
- cultivation and plowing of soil
- weeding between rows to remove weeds
- preparing beds and furrows for planting seedlings and sowing various crops
- hilling of plants
- pumping water and watering plantings
- mowing wild and cultivated grasses
- transportation of harvested crops and other cargo
- clearing the area of snow.
In order to expand the capabilities of the cultivator, depending on the type of attachment, the design of the cultivator provides various options for attaching attachments. Additional implements are not included in the package of the Mole motor-cultivator; they are purchased separately depending on the needs of the owner.
Interesting Facts
- Moles are capable of creating food reserves: the animal immobilizes the animals caught in excess of worms by biting off their heads and takes them to specially dug chambers.
- One of the forms of adaptation of moles to living underground is intersexuality of females. It has been established that they form so-called ovotesticles: ovaries containing testicular tissue. As a result, an increased amount of male hormones enters the blood of females, which make them stronger, more aggressive and capable of not only digging holes, but also defending their territory.
- The duration of gestation of offspring by a female Siberian mole is 289 days.
- Moles secrete a musky-smelling secretion to mark their territory and alert other members of their species to their presence. As soon as the mole dies and its smell weakens, the empty hole is occupied by one of its relatives.
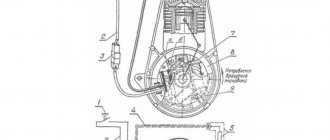
The procedure for connecting additional attachments
For rational installation of attachments, special accessories are used: suspensions, wheels, brackets. Before installing additional attachments, you must first remove the engine from the cultivator. To do this, remove the casing, unscrew the nuts and bolts of the fastenings, and remove the V-belt. Next, remove the throttle lever, then remove the engine and install the bracket and suspension.
Hitch
To connect various additional attachments, the cultivator uses two types of coupling mechanisms: adjustable and non-adjustable. Non-adjustable hitches fix the hitch without the possibility of adjusting the angle of movement, and are cheaper in cost. Adjustable devices provide the required angle of attack.
Trailer
The trolley is attached to the suspension by means of a kingpin, and instead of rotors, drive wheels are installed, after first removing or lifting the transport wheels. In this case, the vomer is removed.
Pumping unit
The pump is connected to the bracket; in this case, the drive is a belt. As when connecting a trailer, it is necessary to install wheels instead of cutters, and remove the transport wheels or fix them in the uppermost position.
Milling cutters
Soil cutters plow the soil without turning over the soil layer. The standard diameter is 33 cm, they are installed on the cultivator shaft.
For processing light and medium soils, one or two pairs of cutters are used; for processing virgin soil, 3 attachments can be installed on each side.
Some owners create their own tillers to increase the depth of tillage. There are unique homemade products with a diameter of almost 0.5 m. However, as experience shows, such improvements are not advisable both from the point of view of the technical capabilities of the Krot motor-cultivator, and based on the peculiarities of agricultural technology for cultivating the soil.
Before plowing, the transport wheels are raised and the coulter is mounted on a trailed bracket. Thus, the nozzles will ensure forward movement while cultivating the soil, and the coulter will regulate the level of immersion into the soil.
Depending on the quality of the soil, different types of cutters are used. For heavy, dense soil, the best option is the “crow’s feet” model; for less hard soils, conventional saber cutters are suitable. They can be made in different shapes - three-petal and four-petal.
Plowing a vegetable garden can also be done with a plow; to install it, the following manipulations are carried out: remove the cutters and install metal lugs in their place, remove the coulter. At the rear, the reversible plow is connected using a special coupling device.
Hiller
Similarly, to carry out hilling of crops, metal lugs are installed, and in the rear part of the Mole motor-cultivator there is a hiller.
Rotary mower
To mow grass on lawns or for making hay, the transport wheels are reinstalled on the gearbox shaft, and the mower and cultivator pulleys are connected by a belt drive.
All attachments are equipped with passports with technical documentation, so it will not be difficult for owners to carefully familiarize themselves with the features of connecting various types of additional attachments.
Owner reviews
Denis:
“The Mole cultivator was inherited, so to speak. I myself worked on it almost from childhood. Now I also have a mini tractor on my farm, but Mole is Mole. On the farm I work with a tractor, but on the estate near the house it’s more convenient to use a cultivator. In the garden, in the beds, in the greenhouse - I do everything with different attachments. Over the years of operation, I changed the engine and bought a new Sadko. The opener also had to be replaced; it was cracked. I made some improvements to the bracket. In general, the assistant is reliable.”
Advantages and disadvantages
Over the years of its existence, the walk-behind tractor has undergone a number of changes, but farmers still highlight the common advantages of all models:
- reliability of the main parts, regardless of the quality of the treated soil;
- simple controls that even a pensioner can master;
- ergonomic grip with handles for squeezing the clutch;
- high performance of modernized units;
- the ability to install additional equipment, which expands the capabilities of the device.
Despite the unpretentiousness of the cultivator, it still has disadvantages:
- The technique is designed for processing small areas. During long-term continuous operation there is a high risk of motor overheating;
- the weak point of the “Mole” is the belt drive;
- The lack of reverse gear on most models makes it difficult to cultivate soil in confined spaces.
Cultivator as a traction unit for a plow
The main condition for such a combination of mechanisms is the creation of sufficient traction force for the operation of the plow share.
- Lightweight garden cultivators with engine power up to 3 HP. With. and weighing 15-40 kg can easily cope with loosening a garden of up to 60 acres, but will not ensure the effective operation of trailed implements.
- Medium and heavy cultivators with weight parameters from 40 kg and a power unit from 4.5 liters. With. power will successfully process up to 2 hectares of dense soil on a land plot.
On such machines it is advisable to install additional trailed equipment to expand their functionality.
What should you consider?
To correctly select materials, manufacture the plow itself, and the elements of its attachment to the cultivator, it is necessary to understand the operating principles of the devices and know their basic parameters.
When applied to a landmass, it turns over the top layer of soil. Plowing removes weeds from the soil and damages their root system. The soil is loosened, making sowing of cultivated plants effective and increasing germination.
Mover
The motor cultivator moves around the area due to the rotation of circular cutters. This method is not suitable for towing a plow. The cutters are replaced with metal wheels with lugs. To increase the traction of the wheels with the ground, additional weights can be placed inside the wheels.
Cultivator transmission
It does not require any special modifications, but the unit was originally designed to work with a cutter. The feed speed may be excessive for the plow, and the wheels may spin (slip). In this case, it is useful to install a creeper - a pulley of a larger diameter on the engine crankshaft.
Mounting elements
The hitch is used to connect the cultivator platform with a plow, hiller, and potato digger. Products are unified for different models of the same manufacturer.
To increase the stability of the machine and take into account the characteristics of the land, sometimes it is necessary to increase the lug track, which is solved by installing axle extensions.
Video
Mole 2 is not designed for autonomous operation. To prevent special equipment from rising up or getting stuck in place, the operator needs to adjust the depth during operation using the handle, lifting or pressing the walk-behind tractor into the ground.
The model is very popular among summer residents and gardeners. There are several reasons for this:
- high performance characteristics;
- powerful gasoline unit with significant engine life and lined piston;
- reliable and powerful chain gearbox;
- compactness;
- multifunctionality;
- Convenience of adjusting the operation of equipment horizontally and vertically.
The latest modification of the walk-behind tractor is intended for use on solid lands and heavy soils.
Mole 2 was developed on the basis of the previous model Mole 1. The design of the equipment retained some elements of its predecessor. At the same time, a reverse gear appeared on the walk-behind tractor, which significantly simplified field work. special equipment has one forward and one reverse gear. Among the design features of the model, the presence of an improved carburetor, a centrifugal crankshaft speed controller and a new air filter should again be highlighted.
The mole is very easy to handle and does not require a large storage area. Small dimensions make it as easy as possible to move. The walk-behind tractor can even be placed in the trunk of a car.
Many will like the model for its ergonomic design and convenient location of control components.
Do-it-yourself plow for a cultivator
A home craftsman, possessing skills in working with metal-cutting and welding equipment, can independently make a plow and its suspension parts using used metal products.
How to make a plow?
Parameters of the manufactured unit:
- trailed type;
- plowing depth – 0.25 m;
- strip width 0.25 m;
- travel speed – up to 4 km/h;
- productivity – up to 0.06 ha per hour.
General diagram of the device
The ploughshare is made of removable steel 9ХС with a thickness of 3 mm. The fastening bolts are installed in a “concealed” manner. The blade blank is cut from steel 3 with a thickness of 3 mm. The part is fed onto the rollers of the sheet bending machine at an angle of 20°.
Sketches of the share and blade
The stand, heel, and other elements are made of steel strip and corner profile. The dimensions are specified during the trial assembly, the joining angles of the elements are shown in the sketch:
After complete adjustment of the component parts of the product, the seams are finally connected by electric welding, cleaned and polished with a grinder.
Figure 3 shows an option for installing a second plow on a stand, which makes it possible to eliminate idle runs of the unit to the beginning of the strip when plowing in parallel rows.
Lifestyle
Moles lead a solitary lifestyle and can briefly interact with individuals of their own species only during the breeding season. The rest of the time they are characterized by quite aggressive behavior towards their relatives.
In order for his body temperature to be stable, he has to search for food almost all the time, taking short breaks to rest. This is due to the intense metabolism characteristic of all small warm-blooded animals. Digestion of food takes 3-4 hours, after which the animal is forced to go back in search of food. A long break in feeding (14-15 hours) can lead to the death of the animal.
How do they winter
There is a misconception that moles hibernate in winter. In fact, they continue to live their normal lives, showing relatively less activity than in the warm season.
How to install a plow?
The procedure for installing the plow on the cultivator is as follows:
- The cutters on the shaft of the executive body are dismantled.
- Wheel lugs are installed, and if necessary, extensions are mounted on the shaft.
- Plow assembly:
- align the hole in the hitch with the middle hole in the plow stand and connect with a bolt;
- install the adjustment device assembly on the rack and hitch;
- connect the hitch and the cultivator platform with pins.
- Plow adjustment:
- install the cultivator and plow on stands;
- Rotate the adjusting screw to set the angle of inclination from the heel to the toe of the ploughshare. Raising the heel up increases the plowing depth, lowering it decreases it;
- the distance from the heel to the ground is regulated by rearranging the bolt securing the hitch to the plow stand - it should not be more than 3–5 cm, otherwise the plow will “burrow”;
- We finally fix the fastening connections.
A motor cultivator and a homemade plow are ready for work.
The garden machinery market offers not only plows for factory-made motor cultivators, but also sets of trailed equipment. This set includes:
- lugs, with selection according to diameter and width;
- axle extensions;
- hillers, potato diggers;
- plows with different stand heights, plowing depths and widths;
- coupling devices.
The cost of a plow in the online trading system starts from 600 rubles, a set from 4 thousand rubles (February 2016).
How to install and configure (adjust) a plow for a walk-behind tractor: educational program
The editors express gratitude for their assistance in preparing the article
One of the most common tasks solved using a walk-behind tractor and a cultivator is plowing the soil. The plow can be purchased for almost any model that is presented on the Russian market. In theory, everything seems elementary - grab it and go. But in reality it is not so simple - it is not enough just to attach the plow, it also needs to be adjusted correctly. Our advice will help with this.
Connection "hitch-walk-behind tractor"
Let's start with the connection farthest from the plow itself - the hitch and walk-behind tractor. The hitch must be secured with one pin, and it must maintain play in the horizontal plane within 5–6 degrees. If you fix the hitch with two pins or remove the play completely, you will get a rigid connection - this is one of the most common mistakes.
Does the engine of a walk-behind tractor or cultivator need running-in? Advice, expert reviews
When a buried plow moves forward, it is subject to resistance from the soil. Under the influence of this force, the plow tends to deviate to the side. If the hitch does not have the possibility of play, then not only the plow with the hitch will deviate, but the entire walk-behind tractor as a whole. That is, the worker will have to constantly apply force to the handles to compensate for this pressure. If play is possible, then only the coupling with the plow is deflected, and the pressure on the plow compensates for the pressure from the unplowed soil on the side of the field board. Simply put, when the hitch is loose, it's much easier to work with. And if you think that a rigid connection between the hitch and the walk-behind tractor will ensure straightness of the furrow, then you are very mistaken.
An example of incorrect installation of the hitch - on two king pins
And the correct option is for one kingpin while maintaining the possibility of play at a small angle
The screw in the front serves to adjust the maximum rotation angle of the hitch. There is a similar one on the other side of the kingpin
There can be many options. The photo shows one of them. You will have a hard time with this plow - it is basically impossible to adjust it, because one of the main parts - the field board - is made incorrectly. Normally, it looks like a corner: it has not only a lower supporting surface that slides along the ground, but also a side one. It is the presence of the lateral surface that helps compensate for the pressure from the plowed soil - when the hitch is deviated to the side, the plow rests against the edge of the furrow. And here there is practically nothing to resist - the manufacturer of this plow was clearly not aware of all the nuances.
What does the “wrong” plow look like?
Wrong plow - there is a field board, but its vertical part is still missing. With this plow you will have to constantly keep the walk-behind tractor from turning, as if the hitch was installed on two kingpins
A properly made plow at work. The soil pressure on the ploughshare (1), which pulls the plow to the side, is compensated by the vertical flange of the field board (2)
Setting the plowing depth
The next step is to set the desired plowing depth. This is done by rearranging the plow stand relative to the lock. To do this, the rack must have several holes; fixation is carried out using a bolted connection. If there is only one hole, then we can draw an obvious conclusion - at least there is no provision for adjusting the plowing depth here.
The depth itself should not be very large - 5–7 cm. In this case, when turning the layer over, the effect is similar to plowing with a shovel. There is no need to go deeper - firstly, you can mix clay or sand with the fertile layer, and secondly, with a large plowing depth, the roots will be upside down, but reliably covered with a thick layer of soil on top and will safely overwinter. But we need them to freeze out, otherwise the weeds are guaranteed to grow vigorously in the spring.
A number of holes in the plow stand are needed to adjust the plowing depth
Adjusting the plowing plane level
The angle between the “tip” of the plow and the soil surface, that is, the angle of attack, can be changed either using an adjusting screw or by rearranging the bolted connections. The screw is naturally more convenient, because it is much faster, and the adjustment is carried out smoothly, and not in steps. The procedure for setting the correct angle looks like this:
Screw adjustment of angle of attack
- place the walk-behind tractor with the attached plow on a flat surface;
- unscrew the adjustment screw so that the plow touches the soil with the entire lower surface;
- Unscrew the screw in the opposite direction so that the rear part of the plow is raised above the soil by about 2.5 cm.
If the angle of attack is too large, the walk-behind tractor will slip - the plow in this case does not plow, but serves as an anchor. Too small an angle of attack means a small plowing depth - as if the walk-behind tractor is running forward without effort, plowing too easily.
For those who have at least a little experience in arable work, such subtleties do not need to be explained; they are understandable on an intuitive level. But at first, many people make mistakes.
Second and subsequent furrows
Try to make the first furrow as straight as possible. A landmark at the end of the run (at the edge of the field) may be useful for this purpose. Next, the walk-behind tractor is placed with one wheel in the furrow, and it ends up in an inclined position. The plow also tilts accordingly, but this is not necessary. To compensate for this tilt, it is possible to rotate the hitch at a small angle. In fact, this is tilting the plow in such a way that it is in a vertical position on an inclined walk-behind tractor.
The plow is already tilted at a small angle - the second and subsequent furrows can be made
How to work properly with a cultivator using the example of Husqvarna
Useful tips
It is also important to choose the correct size of lug wheels. You should not chase the diameter, otherwise the linear speed will be too high. The optimal diameter is 460–500 mm.
The size of the plow depends on the weight of the walk-behind tractor; this parameter also needs to be taken into account. The largest plows with a 23 cm grip are used on walk-behind tractors weighing about 100 kg. For walk-behind tractors weighing up to 75 kg, plows with a grip of 18 cm are recommended. A plow with a 13 cm grip is suitable for lighter cultivators. Here, too, sometimes they make a mistake - they buy a relatively light walk-behind tractor and they put a big plow on it. If we also try to use this “tandem” on “oak” soil, the result will be absolutely predictable - “it doesn’t plow.” But the problem is not in the quality of the plow, but in its incorrect choice and/or settings.