DIY band sawmill drawings
Dear visitors of the site “ Samodelkin Friend”, from the presented material you will learn how to make your own band sawmill yourself. Every craftsman dreams of having his own sawmill on his farm, because its presence will reduce the cost of lumber tenfold. Using this machine, you can cut the logs into boards and bars yourself; it is also an excellent option for those who are building , that is, the boards can be produced directly at the construction site of the future house.
It is also possible to open your own private sawmill and cut boards for money and replenish the family treasury with additional income. In general, the machine is very good from all sides, and its independent assembly will again cost much less than a factory analogue, because many spare parts can be used second-hand and available to the car enthusiast, for example: wheels from a passenger car, hubs, bearings, bolts and other things that you can get in the garage) The design of a band sawmill consists of 1. a rail track 2. a frame with a power unit 3. a blade 4 adjustment and tension mechanisms 5. a carriage 6. a flat surface (preferably a foundation slab)
And so, let's take a look at the list of necessary components for assembling the machine. We will also analyze the whole process step by step.
Materials
- corner 100x100, channel, narrow-gauge rail (for the manufacture of rail beds)
- car wheels
- hubs
- bearings
- square corrugated pipe
- threaded stud
- chain
- jack
- IV
- power unit (gasoline or electric motor)
- fittings
- bolts, nuts, washers, engravers
- sheet metal 1 mm
- pulley
- belt
Tools
- welding machine
- drill
- emery
- Bulgarian
- hammer
- roulette
- set of wrenches
- Laser level)
- ruler
- corner
The process of assembling a band sawmill with your own hands.
And so, the first thing you should do is get acquainted with the drawings, because any business begins with markings, as they say, “Measure twice, cut once.” So we got acquainted with the drawings, and now I would also like to note that homemade sawmills come in several types
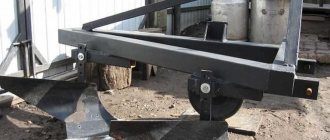
1 Band sawmill with electric motor. 2. Band sawmill with gasoline engine. 3 Tire sawmill. The operating principle of a band saw for sawing wood. The blade is tensioned on 2 horizontally located pulleys, in this case these are ordinary car wheels with a tire and a tube. The undeniable advantage of this design is that the saw can be tensioned by inflating the tires. The limiter and support rollers are located directly at the bottom. Well, I hope the principle of operation is clear, then you should take care of placing a rail track along which a carriage with a saw blade will walk and cut the logs into boards. The area must be at least 3 x 6 m in size, and most importantly, level! Therefore, it is necessary to pour a foundation slab under the sawmill and level it to a perfectly flat surface. A recess is dug, a sand cushion is laid and a reinforced concrete slab is poured. Next comes the installation of the rail track itself; at best, it can be made from rails from a narrow-gauge railway, but it is difficult to obtain, so you will have to make it from a channel or corner. Note. In the photo the corner is positioned edge up. You can connect the corners to each other by welding, but when the metal heats up, it can lead, and we need a perfectly flat road. You can also attach the rail directly to the concrete base using anchor bolts. Support rollers can be made from ordinary bearings, or ordered from a familiar turner. After this, the saw frame itself is manufactured, using pipes of different diameters that can be inserted into one another. due to which the slider can rise up and down. The frame is welded from a square-section corrugated pipe. Support rollers are installed at the bottom. they must match the width of the rail track. Next, the lifting mechanism is manufactured. Then the pulleys and hubs are installed. Connection to the power unit. The saw blade is leveled and supported by bearings. A protective metal casing must be installed on top. Safety precautions are paramount here, because the canvas can fly out. The tension mechanism can be made from a small jack. After the sawmill is fully assembled, a test run is carried out; if everything is in order, the engine is turned off and the log is laid and secured. The log unfolds into planks. You can also watch the work of the sawmill visually on video.
In general, this is such a wonderful sawmill, now lay out the boards and bars for construction and repair as much as you like, just have time to throw the logs)
Source: www.samodelkindrug.ru
Self-connection of parts
After a thorough preparatory process, the assembly of the device begins. It is important to take your time and carefully check the quality of the connections of the parts.
The assembly of a homemade band saw begins with the manufacture of a table with a cabinet. The mechanism will be located on this table. To assemble it you will need wooden blocks and a furniture panel. The convenient height of the table and the diameter of the pulleys are calculated in advance. The table should be comfortable and accommodate the pulleys and motor.
The table should accommodate the necessary tools and have a place to collect chips. It is advisable to immediately think about a waste tray. Cleaning the saw will be easier and more convenient.
If there are no ready-made ones, then you need to make homemade pulleys. They can be cut from plywood. Then the blanks are sanded and coated with epoxy resin. A hole for the roller bearings is drilled in the center of the pulley. For stability, the bearing itself is fixed in a textolite coupling. After this, the wheels are covered with tape rubber. The diameter of the pulleys can be arbitrary. However, the larger the pulley diameter, the longer the life of the saw.
The blade depends on the size of the pulley. A very good ratio is 1/1000 of the saw blade to the pulley diameter. In other words, if you have a pulley with a diameter of forty centimeters, then a four-millimeter tape will do. When installing the pulley, it is necessary to ensure that the bearing shaft is perpendicular. Even with a slight deviation, the wheel will run out, causing the belt to jump off.
The next step is assembling the support frame. The entire device will be mounted on it. The frame is made from a corner channel and can be C-shaped. This shape holds the tape perfectly. A metal axle is put on the channel. The frame or bed is the most important part of the structure.
Pulleys are mounted on the axle using bushings. After which, they achieve their balance. A damper is used against belt vibration. Attach moving parts to the engine. It must be borne in mind that the average speed of rotation of a band saw is from 700 to 900 revolutions per minute. This parameter must be taken into account when calculating the diameter of the drive pulleys.
It is best to put a protective cover on the engine. It will protect the drive mechanism from fine dust and chips.
To make it easier to feed the material being processed, metal corners are attached. They create a guiding mechanism.
Wooden parts must be planed, painted or varnished. On the one hand, this is aesthetically pleasing and extends the service life of the product, and on the other hand, it protects the hands of the worker from splinters made from untreated wood. Before painting, the wood is cleaned with fine sandpaper and treated with liquids that prevent the wood from rotting.
Setting, checking and sharpening
Before starting work, be sure to check and configure the device. You need to make sure that the tape forms a right angle. The slightest deviation can damage the machine and even cause injury. Using a driven pulley, the belt is tensioned. Achieve maximum tension on the cutting tape.
Sharpening of band blades is simple and affordable. The technology has been tested by many masters. You need a special machine and a little patience. First, the initial sharpening is carried out, that is, the symmetry is restored, the saw teeth are aligned, and small cracks on the edges are removed. Then the saw is cleaned of dust and metal filings and the saw is set, restoring the rear and front angles.
The final step is the final sharpening. It is this that gives the teeth the necessary sharpness and eliminates various distortions.
Mini sawmill
A mini sawmill will be an excellent device for starting a woodworking production or independently constructing a wooden cottage. Today, many people build and repair wooden buildings with their own hands. In order to quickly and efficiently process a tree trunk, you need to use a sawmill. In this article we will talk about how to make a mini sawmill.
DIY mini sawmill
For domestic purposes, it is much more profitable to make a small sawmill with your own hands.
Pros of making it yourself:
- low material costs
- creating a design that fully meets your requirements and operating features
- The components needed for such a device can be found in any specialized store.
Of course, it will not be possible to create a device at the level of factory devices, for example, Murka, Kostroma, or Logosol, at home. But a simple sawmill, both mobile and stationary, can be created by any craftsman.
When creating a mini sawmill, be sure to consider the following points:
- you need to decide on the performance of your device. Unfortunately, homemade devices have poor performance. In order to calculate productivity you need to determine the volume of wood that you need to process
- dimensions of workpieces to be processed
- transportation. A mobile sawmill is more convenient because it can be easily moved for use in different areas of the home
- battery. Factory machines require power from a three-phase network of 380 V. However, for a homemade tool, 220 V is enough. For a sawmill, it is worth selecting a separate machine for 220 V. Thus, there will be no problems with other 220 V sockets. It is better to avoid using extension cords
- the type of compact sawmill being created - disk, belt or tire.
Mini disc sawmill
As an example, take a closer look at Murka and PD 2000. Such devices are in great demand in woodworking industries.
They are simple, have high productivity, and also do not cause problems when creating them yourself. The design is based on a circular saw, which can be mounted on the motor axis or the spindle shaft. To create the simplest model, you will need a shaft, a table, a motor and a circular saw. The main element of the design can be called a table. It is created from a metal frame, which is connected by welding and fastening bolts. There is a steel plate on top of the table. Such a plate must have holes that firmly fix the circular saw. It is into them that the cutting element is inserted. When installing the saw, you need to make sure that it is located in the middle of the saw.
Making a homemade chainsaw machine
The main structural elements required for assembly are a chainsaw, a pair of channels, metal angles and rails.
First, a frame is assembled, in which holes are drilled for installing ties from metal pipes. During assembly work, it is imperative to ensure the accuracy of dimensions and observance of right angles. To strengthen the frame, it is recommended to weld several stiffeners.
At the next stage, the movable cart is assembled. Its basis is a steel plate, to which corners are welded from below and rollers are mounted. Fasteners for gas-powered tools are installed in the upper part.
At the last stage, a structure with fastenings for logs is installed on the frame.
Tire mini sawmill
The design is based on the following main elements:
- machine frame. It is the most important because it holds all the equipment equipment. Reliability, durability and safety directly depend on the frame. Dimensions are selected individually, according to the needs of woodworking
- power unit. Without a drive, of course, the sawmill will not work. For domestic use, a three-phase motor is suitable; it requires a power supply of 380 Volts. However, you can also use a gasoline engine. Power supply from 220 V is not suitable in this case, because the power parameters are very low. The minimum power parameter is 3 kW
- fastening elements. Using stationary components, you can make a cut by securing the workpiece to them. Dimensions of hardware are selected according to the parameters of the workpieces being processed
- tire. Usually the tire is 50 centimeters. The best option is to purchase it together with the chain. Thus, the thickness of the cut is minimized, and, consequently, the volume of waste is reduced
- cutting element.
The metal frame must be connected to the sawmill bar. The gap between the frame and the tire is the size of the workpieces being processed, so the drawing of the mini sawmill must include this point. If you wish, you can make it possible to adjust this gap. This useful addition will make it possible to process a wide variety of workpieces.
On the base you need to create guides along which the workpiece will move. To mount the base to the racks, you need to weld plates with drilled holes. After installation is complete, secure the position with nuts and bolts.
When making a homemade sawmill, be sure to remember to follow safety precautions. See how a mini sawmill is made correctly; a video of this process is presented below.
Installation of the structure on the base
After assembling the working unit, it needs to be secured to a metal frame, the manufacture of which with your own hands consists of simple steps.
- Two blanks are welded from durable steel tubes, shaped like the letter “P”. The upper parts of the resulting blanks are fixed to each other by electric welding or bolts.
- Four pipes placed vertically are welded in the center of the frame. On each element, several small recesses are made on the outer side at a distance of 20 mm relative to each other to a depth of up to half the diameter of the tube.
- Four tubes are also welded onto the working unit, the internal cross-section of which must correspond to the outer diameter of the pipes located on the base. The placement of elements must be done in such a way that the pipes on the working unit fit onto the tubes of the supporting base.
Important TOP 16 best household and professional chainsaw models Champion
This design is necessary to ensure free movement of the sawing unit in a vertical position. Fixation of the working unit in the required vertical position is ensured using bolts.
Band mini sawmill
Band sawmills do the best job of cutting boards. There are several methods for creating such a device. The driving force of such devices can be either electric or gasoline engines. There is no point in describing in detail a certain home-made design indicating specific parameters, because each master takes into account both the “scale” of such production and the availability of free space.
We will describe the general manufacturing procedure:
- room. Experienced craftsmen advise that for comfortable work with logs, choose a workshop space of at least 18 m2, for example 6 x 3 m
- the saw is positioned motionless during operation. The workpiece is placed on a special movable frame (trolley) and moved by hand. For this reason, you need to mount a metal frame to secure the saw. “Rails” from the corner are placed under it, along which the cart with the workpiece moves. The cutting is carried out in a horizontal plane. It is necessary to provide for a change in the height of the saw during the “dissolution” of the workpiece into boards. To do this, the frame is equipped with a special system that operates on the principle of a clamp, for example, a “lead” screw or something similar
- as a base you can take a metal corner or more serious structures, such as an I-beam or channel. Care must be taken to rigidly fix this frame to the installation site, because during operation it will be subject to high dynamic loads. Pay main attention to the evenness and horizontality of the upper beams - guides. The gap between the guides should be approximately 50 - 70 cm larger than the diameter of the largest log you are going to work with.
- Regardless of the thickness of the workpiece, it must be firmly fixed on the trolley. Wheels need to be attached to the bottom.
These are perhaps the most significant stages of creating a sawmill that you will encounter during its installation.
The disadvantages of homemade sawmills include:
- setup difficulties. Adjustment must be carried out continuously
- wide cut, which means a high percentage of waste
- The radius of waste scattering is quite significant
- The capabilities of the equipment are not high, both in terms of the dimensions of the logs and the time of continuous operation of the mechanisms.
Source: wood-prom.ru
How to make a band sawmill with your own hands?
[Do-it-yourself band sawmill] allows you to save significantly if there is a need for constant wood processing during the construction of houses, on the farm, or if you have your own small production.
Of course, you don’t have to rack your brains and buy a tool, but making it yourself, as mentioned above, will cost much less.
The band sawmill is better known to many as a band saw. Depending on the scope of work, the type of tool is selected.
The sawmill can be belt type, chain or disk type. We are considering tape type manufacturing.
How does a sawmill work?
The principle of operation of a band sawmill is very easy to explain using the example of spools of thread.
The whole design resembles the rotation of two spools, between which a thread is stretched. This thread plays the role of a saw, and the distance between the coils is the maximum size of the log.
What a band sawmill allows you to do:
- Prepare logs, that is, adjust them to the same size and shape;
- Sawing logs according to a given pattern after setting up the equipment;
- After sawing, small defects remain that cannot be eliminated using homemade sawmills, so further processing of the wood is done manually.
The band sawmill works as follows: the log is fixed on the platform and remains motionless, the mobile cart begins its movement and cuts the tree, the saw is in a horizontal position.
In order to ultimately get a board of the desired size, it is necessary to initially set the parameters by the operator. The saw acts as a saw blade, which must be well tensioned.
How a homemade sawmill works, see the video.
Before work, you need to prepare the equipment: to do this, sharpen the saw and set the teeth.
Option for making a simple sawmill based on a chainsaw
The first version of a homemade sawmill is quite simple, so anyone can implement it, spending no more than a couple of hours on it. To implement this method you don’t even need a welding machine, so let’s get started. Initially, we prepare the necessary materials:
- Hollow steel beams measuring 5x5 cm and 1 meter long. The number of such bars is 6 meters (it all depends on the length of the tool tire)
- Connecting elements in the form of fastening bolts with a diameter of 8-10 mm in the amount of 10 pieces
When all the components for manufacturing the device are ready, you can begin.
- First you need to make a lattice base from steel bars
- The size of the base is equal to the length of the tool bar
- This base is a guide when sawing logs
- To secure the tool and adjust it, two bars are fixed perpendicular to the base
- At the ends of the bars that are attached to the base, you need to make clamps to secure the chainsaw bar with eyes through which the chain will move freely
As a result, we get the following device, as shown in the photo below.
Specifically for the manufacture of this sawmill, a welding machine was used, due to which the costs of connecting elements were reduced. However, it can be done without welding, but using a drill. You can decide for yourself which is better, but in the end we get an expansion of the functionality of a useful tool in the household - a chainsaw. How this type of sawing equipment is made is described in detail in the video.
https://youtube.com/watch?v=zlXXiBWi3M8%3F
What materials are needed to create a sawmill?
It should be noted that materials are selected depending on whether drawings are made or not, because it is the correct drawing that is the basis of a quality product, thanks to which the calculation of materials is made:
- Pulleys can be taken new or old in good condition;
- Pipes of different diameters;
- Rails - you can make it yourself from corners. It is better to place the corners edge up, this is necessary in order to extend the “life” of the wheels;
- Profile pipes for creating sleepers;
- Channel.
In addition to materials, you will need the following tools:
- welding machine;
- milling machine;
- Bulgarian;
- drill, it is more convenient to use an electric one;
- hammer;
- pliers;
- sets of screwdrivers and wrenches;
- clamp;
- bolts, nuts and other fasteners;
- rulers, tape measure, squares, etc.;
- hacksaw.
Sawmill design
The organization of work is based on the block principle.
It involves various variations of the device, starting from the basic one, where the saw is fed manually, to the most complex units, when the saw is fed automatically, the cutting thickness is set, the electronic system is programmed, etc.
Components of the structure:
- to organize the movement of the saw blade, a frame with two guides is used;
- screw mechanism for lifting the belt;
- hydraulic or spring unit for tensioning the tape;
- driving and driven wheels (pulleys);
- wheel guard casing;
- tape holder;
- V-belt transmission;
- electric motor;
- rail for carrying out the movement of the band saw;
- eccentric clamps for holding the block (log);
- emphasis;
- tank with liquid for wetting.
To create a smooth, reliable product, it is necessary to make drawings according to which the entire structure will be assembled.
At the same time, the drawing must be studied and understood, otherwise you can simply lose not only time, but also money.
First, the bed (fixed part) of the machine is made, which has a U-shape.
It can be made from two channels, which can be replaced with two rails (in the absence of the first materials). If you use rails, they need to be installed so that the sole is on top.
Choosing a suitable location for the structure
The location for installing the future structure must be chosen very carefully. This can be either an enclosed space (for example, an empty hangar, garage, etc.) or an open area under a canopy. Everything will depend on the purpose of the sawmill and the requirements for it.
The site for the base of the sawmill must be chosen such that the structure is stable and therefore safe to operate.
If wood after treatment will be stored in the same room where it was treated, the humidity level of the area should be taken into account. If the treated wood is used for its intended purpose immediately after treatment, the question regarding the level of humidity in the room immediately disappears.
Manufacturing recommendations
To make a homemade sawmill work more efficiently, you should pay attention to some recommendations:
- The structure must be stable and strong, since you have to work with logs of different weights and sizes;
- Equipment assembly work must be carried out directly at the site where it is planned to be located. This is due to the massiveness and heavy weight of the structure;
- It is necessary to constantly monitor the operation of the equipment and adjust the settings, since the design is done by hand, without the use of precise programs and computerization;
- Homemade sawmills are “scattered” with shavings, so you need to either build additional structures or clean up after the work is completed;
- A wide band cut affects the generation of a large amount of waste;
- To ensure efficient operation of the mobile cart, it is necessary to use gaskets and plates, and the gaskets must be 0.5 mm thicker than the channel;
- The electric motor can be easily replaced with a gasoline engine. This option will be simpler, because you can use a chainsaw, or rather its engine. The chainsaw blade will serve as a tape. How to make a gasoline band sawmill, see the video;
- All fastening elements must be securely fixed to ensure safe operation of the entire structure;
- To ensure efficient operation, the saw must be sharpened and the teeth set apart.
Mobile chainsaw design
Complex structures are more often used in those cases when the harvesting of lumber reaches an industrial scale. In particular cases, simpler and smaller mobile devices are required, which can be made independently.
One of the best options for such a mini-machine is considered to be a homemade sawmill made from a chainsaw, which plays a major role in the design. The product is light in weight and compact in size, allowing it to be moved from one place to another.
Disc sawmill
Let's look at a simpler type of homemade sawmill.
In order to make a circular sawmill, you will need to find a circular saw. An electric motor will be used as a motor.
First you need to make a welded frame, on which you will need to place a metal plate with a slot for the disk. From below to the plate you need to attach the plate shaft on bearings and pulleys.
The electric motor wheel is connected to the saw by a belt.
To ensure good belt tension, it is necessary to use the weight of the engine itself, and you can also use weights. The circular sawmill is ready.
Source: rezhemmetall.ru
Snowmobile
For such a homemade product to move easily in the snow, one Ural chainsaw is not enough. You need more power - at least 2 chainsaws.
The manufacture of snowmobiles begins with the frame.
The shape of the frame is an isosceles, elongated triangle. At each corner there is a vertical post pointing downwards. Skis are placed on the free ends:
- front with the ability to turn a bicycle handlebar;
- at the rear - irrevocable, parallel to the longitudinal axis of the sled.
The motor from the chainsaw is attached to the base of the triangular frame - the gearbox has an output shaft directed back parallel to the axis of the frame. A propeller is also placed on it. The transmission of rotation to the latter from the gearbox is provided by a chain transmission.
The lever for regulating the fuel supply is placed on the steering wheel of the snowmobile. To accommodate the athlete, a lightweight seat is provided within the front part of the frame.
Making a sawmill at home with your own hands
When it is necessary to process a large number of boards and wood, it is best to use a self-made sawmill. Many people believe that it is best to purchase a ready-made unit, but making it yourself will not be difficult. The main thing is to decide what the volume of work ahead will be, as well as the wood, after which you need to choose the type of sawmill to successfully complete the task.
When assembling the unit with your own hands, special attention should be paid to safety issues , because such a device is considered a high-risk object. The manufacture of various types of sawmills is presented further in the video.
Decorative coating and its components
How to dilute acrylic paint - this question may arise for any master
Another pressing question is how to dilute dried acrylic paint. Here everything is as follows: before using this or that composition, you need to understand what specific substances are included in the paint. After this, choosing is much easier; a number of questions will simply disappear.
So, all acrylic paint mixtures have three basic components, as any master knows:
- There is a coloring pigment here;
- Water;
- Binders.
It all depends on the specific composition and its components
Acrylic paint also contains a polymer emulsion - it is the acrylic itself that is part of it. The decorative material in question got its name precisely because of this component.
Should acrylic paints be thinned? Yes, this needs to be done. Moreover, in certain cases you cannot do without dilution at all - the result simply will not be of high quality.
Acrylic compositions are used everywhere today:
It is very convenient to use for facade work; Perfect for painting inside; What kind of material is painted is not so important; Among the important features of the coloring composition, which contains acrylic, the following can be noted: the material is very resistant to exposure to UV rays; Since ultraviolet radiation is not harmful, the surface remains attractive and bright for a very long time, which is what any owner wants; Another important advantage: reasonable cost. Acrylic paint on the market is one of the most affordable - even for budget-conscious people. Using this material is also very simple, any beginner can handle it
This aspect is important if you plan to carry out repairs yourself, rather than attracting a hired team of specialists.
Using this material is also very simple; any beginner can do it. This aspect is important if you plan to carry out repairs yourself, rather than attracting a hired team of specialists.
The principle of operation of the sawmill
explain how a sawmill works using the example of spools of thread. This device resembles the rotation of two spools with a thread stretched between them. It is this that acts as a saw, and the distance between the coils will be the optimal size of the log.
A DIY sawmill allows you to:
- adjust logs to one shape and size;
- saw logs according to a specific pattern after the equipment is set up;
- After sawing, small defects often form that cannot be eliminated, so the wood has to be processed manually.
The work of the sawmill is carried out as follows : a log is fixed on the platform, which remains motionless, and at this time the mobile cart starts moving and cuts the tree. The saw must be in a horizontal position.
In order to obtain boards of the required size, the operator initially sets the necessary parameters. The saw blade acts as a saw, and it must be well tensioned.
Tools
0 votes
+
Vote for!
—
Vote against!
Today, more and more manufacturers of high-quality lumber give preference to the angular sawing method, appreciating the economic advantages and new opportunities from the use of angular circular sawmills and machines.
Content:
- The purpose of the corner sawmill
- Corner disc sawmill: equipment and specifics of operation
- Features of the miter sawing method
- Radial and tangential cutting methods
- Cutting cycle
- Corner sawmills: lumber cutting diagram
- DIY corner sawmill assembly
The purpose of the corner sawmill
Modern corner circular sawmills, being convenient and multifunctional equipment, allow you to quickly and, most importantly, efficiently produce radial sawing of boards. Thanks to the innovative technology underlying the operation of the corner sawmill, the capabilities of this type of equipment compared to the traditional method of manufacturing lumber have been significantly expanded, which has a beneficial effect on the range of finished wood products.
Radial cut boards obtained as a result of the sawmill's angular disk saw are distinguished by a smooth, beautiful texture, increased strength and high cost, which in no way reduces the demand for them. The excellent quality characteristics of radial cut boards allow them to be successfully used for the formation of laminated veneer lumber and the manufacture of cabinet furniture, luxury wooden windows and doors.
Returning to the issue of the cost of radial cut boards, it should be noted that the manufacture or purchase of a corner sawmill is the beginning of a stable and profitable business: high-quality wood, being a fundamental building material, is always in demand, and this will provide you with a constant flow of orders and considerable profit.
In addition, organizing the production of lumber using angle saws will be much cheaper than if you opt for the traditional approach.
It should be taken into account that a self-made circular sawmill is in many ways inferior to a reliable and high-quality factory-assembled sawmill. Having extensive experience in the manufacture of angle machines and the ability to use the latest components and assemblies, manufacturing plants regularly improve technical characteristics, increase the functional load and level of safety. This means that the risk of doing business based on the use of handicraft products may not be justified.
Corner disc sawmill: equipment and specifics of operation
The corner sawmill is used for the manufacture of:
- edged lumber, including radial;
- all kinds of blanks for molded products;
- multilayer timber;
- parquet;
- individual cutting of logs with waste rejection.
The standard equipment of the corner circular sawmill includes an electric winch with adjustable speed, which, using special buttons on the control panel, ensures vertical positioning.
Thanks to the use of a circular sawmill, the diagram of which can be easily downloaded on the Internet, you can achieve higher accuracy compared to a fly saw or band sawmill. The design of the angular disk machine provides an optimal solution for the log cutting scheme, rational output of the edged board and eliminates idling of the sawmill.
Compared to band sawmills, corner disc saws have the following advantages:
- Higher reliability: the saw blade, acting as a cutting tool, has a long service life, does not tear, “waves” and microcracks are excluded, the working tool does not require “rest”;
- As a result of sawing, a high-quality edged board is formed with a minimum percentage of waste;
- The log is cut from one installation, eliminating the need for turning and turning over;
- High-quality sharpening of discs ensures high cleanliness of processing.
To control the cutting process, the condition of the equipment, and most importantly, the convenience of working on the angular disk machine, the operator is placed in a special movable cabin. Fixing logs when working on a circular sawmill is done through the use of reliable clamps that firmly hold the logs, preventing them from changing their position during cutting.
Experts distinguish between single-disc and double-disc corner disc sawmills.
The main feature of double-disc machines is the presence of two circular saws located vertically and horizontally relative to each other, which provides the sawmill with greater productivity and efficiency. Thus, during the cutting process, saw blades transform a solid log into finished products with a radial arrangement of fibers.
A distinctive feature of single-disc angle saws is the ability to cut logs in any direction: forward and reverse, changing their horizontal position to a vertical one.
Features of the miter sawing method
Angle sawing, being a new direction in the field of primary woodworking, is carried out on circular log sawing equipment with orthogonal feed of saw blades or using mechanisms for automatic rotation of the working unit. The technological process is quite simple: orthogonally located circular saws sequentially cut logs into planks with radially arranged annual rings, that is, at an angle of 45 ° to the largest plane of the lamella profile.
Using two saw blades located in the horizontal and vertical planes, logs are sawed, which are fixed on a stationary equipment frame, along the guides of which the portal with the saw tool moves.
Using a multi-disc machine and equipment with a rotating saw spindle, you can obtain high-quality lumber of a given section directly from a log, eliminating the stage of processing unedged wood material. The design of rotary angle saw equipment is based on a special rotary cutting mechanism.
A special feature of this machine is that it performs sawing using a movable carriage along a fixed log with a set of saw blades. The operator independently determines the log sawing scheme, taking into account the optimal log cutting model and the shift task. It should be noted that modern models of angle saw equipment are equipped with automatic cutting optimization programs that set the main operating parameters of the angle sawmill - speed, width and depth of the cut, and the ability to shift the working tool along the orthogonal axes of the cut.
Often, the drives of such installations have motors with a controlled rotation speed using a frequency converter to determine the angular speed of the working engine and automatically control the feed speed of the saw spindle. Due to this, it is possible to obtain the most suitable cutting speed ratio, taking into account the hardness of the wood and the choice of circular saw.
Radial and tangential cutting methods
A cut is considered radial if the plane of the cut runs parallel to or through the core of the trunk. The resulting radial cut boards are characterized by the presence of a uniform texture and color, and minimal inter-ring dimensions. Finished lumber has high wear resistance because it is resistant to external influences and is not subject to deformation. The shrinkage coefficient of radial cut boards is 0.19%, and the swelling coefficient is 0.2%. It should be noted that these indicators for radial cut boards are two times better than similar indicators for tangentially cut lumber.
As for the cost indicator, it is quite high, since the yield of radial sawn timber reaches only 10-15% of the total volume.
In order to obtain high-strength laminated veneer lumber, it is necessary to glue lamellas along the face, obtained by splicing blanks “on the miter” from dies of semi-radial and radial cutting. Arising from the gluing of layers with annual rings at an angle of up to 45°, the so-called “fiber resistance” effect largely determines the strength characteristics of laminated veneer lumber, its rigidity and stability of geometric parameters.
Thus, for the production of knot-free and laminated wood, dies and lumber obtained by radial or semi-radial cutting are used.
The cut is considered tangential if the plane of the cut lies at a distance from the core of the trunk, tangential to the annual layer. The resulting lumber has a pronounced texture and a rich wave-like pattern of annual rings. The coefficient of shrinkage and swelling of tangentially cut boards is much higher; the possibility of warping cannot be ruled out, as a result of which the cost of finished lumber is an order of magnitude lower.
The use of circular miter saws, the cost of which is quite high, nevertheless significantly simplifies the technology for the production of finished lumber. The unique design of the machines makes it possible to obtain a good yield of high-grade boards and ideal geometry of lumber, and in combination with the lowest initial investment and unit maintenance costs, it is quite effective for implementation in small and medium-sized enterprises.
It is commonly read that the purpose of circular sawmills for radial cutting is exclusively for the production of radial lumber. This judgment is incorrect due to the technological features of the angle sawing method. It would be more logical to say that the method of miter sawing, together with the production of traditional edged lumber, also allows for radial boards from one log.
Using individual cutting of a log through angular sawing, it is possible to simultaneously obtain radial boards from defect-free zones of the log, as well as traditional edged boards from the area where defects are located. In this case, the width and thickness of lumber cut in sequential order is limited solely by the diameter of the working disk.
Having received 15-20% of radial boards from ordinary raw materials from the total volume of manufactured lumber, you can increase your profit several times at the same level of expenses. If this rule is not followed, the woodworker will experience low efficiency overall.
Cutting cycle
The saw blade is in a horizontal position at the beginning of the cutting process. Moving forward, the disc makes a horizontal cut along the entire length of the log. Having reached the end of the log, it changes its position and becomes vertical. When performing a reverse stroke, the notched area is separated by vertical cutting. Then the saw blade changes its position to horizontal and the cycle repeats. This technology allows you to obtain edged lumber of a given section. Multi-saw machines with orthogonal placement of circular saws, the cutting cycle is similar, although somewhat more complicated, since instead of turning, the method of bringing circular saws in one plane and retracting in another is used, then vice versa.
So, the key to successful work as a woodworker is the ability to rationally cut high-quality logs into lumber. At the same time, we should not forget that any equipment, no matter how modern and “smart” it is, is just a means of labor with a specific set of technological operations. And only many years of experience, professionalism and imagination of the operator determine the number of sawing cycles in the sequence of sawing boards on sawing machines equipped, for example, with an automatic rotation mechanism for the working saw unit.
YouTube video
The video clearly shows the production of an edged board with dimensions of 50x100 on a basic sawing machine.
Corner sawmills: lumber cutting diagram
Circular corner sawmills, in particular with the use of mechanisms for automatic rotation of the saw blade, are considered the most acceptable and suitable equipment for small and medium-sized sawmills.
Not every manufacturer can provide itself with high-quality raw materials for the production of radial lumber. For example, for the simple reason that you basically have to deal with low-quality sawlogs with a diameter of 24-26 cm. However, in practice, it is possible to make radial boards of good quality from a diameter of at least 32 cm, without taking into account the core, knots and other defects. Ideally, high-quality radial lumber of high quality is obtained only by using high-quality raw materials with a diameter of 38-40 cm. Only in this case it is advisable to use the entire log on radial boards of a certain section.
Otherwise, you risk becoming the owner of a lot of short-length blanks and waste, as a result, the cost of production will become high, and production will be too labor-intensive and unprofitable. Since the majority of manufacturers deal not with their own raw materials, but with purchased ones, they are familiar first-hand with all sorts of difficulties associated with the supply of raw materials for the production of high-quality lumber. Only by optimizing the productivity of miter sawing machines will a woodworker be able to process the volume of material that can be supplied and not worry that the sawmill will stop working due to the lack of high-quality raw materials in the required volume.
DIY corner sawmill assembly
There is no doubt that the corner circular sawmill is an indispensable equipment for those who have connected their lives with wood processing and for those who plan to build a wooden house with their own hands in the near future.
Manufacturing equipment for corner sawing in a factory is not a cheap pleasure, which means that buying a corner sawmill at a factory price is advisable for those for whom professional procurement of timber is the main source of income.
However, if you are not a businessman, but nevertheless need a sawmill, then the best choice would be to make a corner circular sawmill with your own hands. At the same time, the manufacturing process will not require large investments from you, but you will have to show ingenuity and patience to develop a drawing of a corner sawmill, design and prepare the device for a corner sawmill, individual parts and assemblies, and assemble the finished structure.
Key points for assembling a homemade circular sawmill
- So, to make a circular sawmill with your own hands, first of all you will need a durable metal frame, which can be made from any metal pipes or guides.
- To securely connect the pipes, use the welding method.
- To develop and create guides for the carriage, experts recommend choosing high-quality rails without external defects, otherwise the carriage wheels will constantly jump off or get stuck, however, the rollers or wheels must ideally fit the finished rails.
- The carriage itself can be assembled from metal parts and pieces.
- When manufacturing a sawmill, it is necessary to pay attention to the fact that the geometric parameters of the frame with rollers or wheels attached to it must correspond to the distance between the finished rails, which will ensure smooth and free movement of the carriage during operation of the corner sawmill.
- The circular saw can be driven by any gasoline engine. When creating a circular sawmill, it is necessary to install a higher power motor, since the work will be carried out by two saw blades.
- And finally, it should be recalled that in order to eliminate the possibility of overheating of the drive, it is necessary to replace the chain drive with a more reliable and durable analogue. This will protect the machine and significantly extend its service life.
How to make sawmills with your own hands
The most common types of sawmills are corner, band and chain , as well as devices assembled using a chainsaw.
Band sawmill
to assemble a band sawmill with your own hands at home. This is explained by the fact that it is difficult to achieve maximum coherence of all its constituent elements in the process of work. In addition, you will need the necessary components and special tools, but the main thing is that you have the necessary drawings at hand. The finished structure must work with material whose weight is about three hundred kilograms. In addition, it is necessary to adjust the adjustment of the threaded thickness and observe safety precautions.
Assembling the sawmill with your own hands is carried out on a site of the required size , which should be prepared in advance. The device will require special wheels and band saws. Then, in accordance with the drawings, the frame of the future unit is assembled. Work on the frame begins with the manufacture of special rails. To do this, you can pick up a corner and install one of the sides up. Then the wheels are installed, maintaining maximum strength.
Between two corners, set parallel, sleepers are made from a profile pipe, which are designed to ensure their reliable fastening to each other. Fasteners for logs that move freely in all directions are welded to this profile pipe. Then, according to the drawing, the cart is assembled and the wheels are attached to it.
Main types of sawmills
There are the following types of sawmills:
- Frame. It is a structure with flat saw blades mounted on a frame. Frame sawmills are most often installed in large woodworking shops. This device is distinguished by its high power and robust design. The frame sawmill does not require additional maintenance. Its disadvantage is the large thickness of the cut, which increases the amount of chips produced.
- Tape. Processing of workpieces is carried out using a saw band, regulated by stabilizing rollers. The cutting element makes only translational movements obtained from the rollers. Band sawmills are used in small woodworking shops.
- Disk. It is one of the most common types of manual sawmills. It is equipped with a disc with teeth. Each tooth cuts a small part of the log. To improve productivity, these machines are equipped with several cutting discs.
- Chain. Sawing of logs is carried out using a chain saw mounted on a frame with a metal profile. The chain sawmill is lightweight and small in size. Therefore, this mini-machine is most often used in domestic conditions.
When choosing a sawmill, it is necessary to determine the volume of workpieces processed and the operating conditions of the equipment. You also need to take into account the technical characteristics and materials from which the cutting elements are made. One of the main selection criteria is the strength of the structure. The woodworking machine must be able to support the weight of the logs being processed.
Essential tips and tricks
Since the sawmill is considered a rather dangerous unit of impressive size, before assembling it with your own hands, you need to carefully consider where it will be used. Good for this:
- barn;
- garage;
- an ordinary utility room with a concrete base.
Such a place should be well ventilated, spacious and have sufficient lighting. A place for this device can also be found on the street, but a canopy must be equipped for it.
If the sawmill has an electric motor , then you need to carefully consider the installation of wiring and installation of the necessary switches and machines. If there is a warehouse for finished boards near the place of work, this greatly simplifies the whole process.
When assembling the unit with your own hands, special attention must be paid to its cutting and moving parts, which are considered the most dangerous elements. In general, safety precautions should be observed when operating the device.
After assembling the sawmill and before starting work, be sure to check all fastenings and components, as well as the stability of the structure. The first start of the device is carried out after following all the necessary recommendations.
Thus, making a sawmill with your own hands is not difficult . These devices come in different types and the process of their assembly is presented in the video. You should also definitely use the drawings so as not to make any mistakes. When operating a sawmill, it is necessary to observe safety precautions, because this is a rather dangerous device.
Source: nashgazon.com
Introduction
The crisis forces us to look at old processes with new eyes.
Somewhere sawmills are closing, and somewhere, on the contrary, they decide to open a sawmill. As a rule, private owners have recently opened sawmills; their costs are lower and efficiency is higher. Here you don’t need a business plan for a sawmill, but if it comes in handy, come here! When opening your own sawmill, there are several options on how best to do this:
- Buy inexpensive equipment;
- Do it yourself.
Again, to build a house and get 3 - 5 cubic meters of boards, buying a sawmill for 50 - 150 thousand is just some kind of waste. After all, our boards will cost several times less: 18 - 30 thousand rubles.
There is a way out, make a sawmill from a chainsaw. This will not take you much time if you have hands that grow from the right place. In addition, it will serve you faithfully for a long time, because having your own sawmill is a fairly profitable business today.