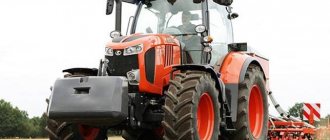
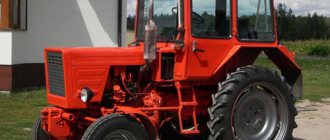
Belarus tractors are combined with a number of specialized mounted, semi-trailered and potato harvesting machines. The main series of models were designed back in the Soviet period and today are produced in improved versions. The machines described below in a unit with universal tractors of traction class 1.4 - MTZ 80(82) operate in traction-drive mode with the drive of working parts from the rear take-off shaft operating in an independent mode.
Classification of potato harvesting machine models
In a number of devices for digging up potatoes with an MTZ tractor, two types of machines can be distinguished by the nature of the mechanisms:
- Non-wheel drive
- Driven
Non-drive - primitive mounted devices in the form of a single-row or double-row digging plowshare. The work of the digger is to dig up the tuber-bearing layer, after which the tubers are selected from the soil manually.
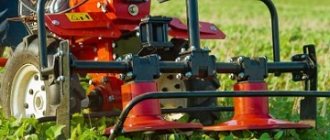
Driven machines involve not only digging up tubers, but also simultaneously separating them from soil, tops and other impurities. The working parts of such machines operate not only due to the movement of the unit, but also with the help of the drive of the working parts from the tractor PTO.
According to the method of aggregation for the MTZ tractor, there are models of potato harvesters:
- Mounted
- Semi-trailer
According to the functionality of drive devices, machines are divided into:
- Diggers
- Harvesters
Mounted and semi-mounted potato diggers
Machines that perform the function of digging and separating tubers from the soil and tops and placing them in a windrow. Machines of this type are used in a two-phase harvesting method, where these machines perform only the first stage - digging up tubers. After, in the second stage, the collection of dug up potatoes, cleared of soil and tops, is carried out manually, or a trailed potato harvester is used for mechanized selection formed by a tuber roller digger.
To carry out the stage of digging up potatoes using a two-phase harvesting method, there are the following models of mounted and semi-trailer machines mounted on the Belarus MTZ 82(80) tractor:
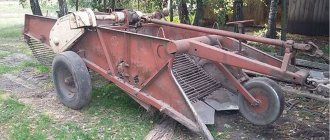
- KTN 2 – double-row mounted potato digger
- UKV 2 – semi-trailer universal potato digger, double-row windrower
KTN-2
Universal potato digger UKV-2
These models are the most common on the agricultural market. techniques and have a lot of analogues of similar design.
Trailed potato harvesters
Such machines perform a full harvesting cycle, including: digging, separating tubers from soil and tops, collecting potatoes into a bunker, unloading the harvested crop into transport. This type of machine can be used for harvesting in one stage, or as a pick-up of previously dug potatoes with a digger. A representative of this type of harvesting machine is the two-row universal potato harvester KKU 2.
KKU-2
Digging organ of potato diggers
All harvesting machines have a ploughshare type of digging apparatus, which is a flat ploughshare that undermines the soil layer along with the tubers. Depending on the design and functionality, potato harvesters have both passive and active dripping organs.
A passive digger works only due to the movement of the unit. The work of an active digging knife-ploughshare consists of its additional low-amplitude reciprocating vibration, which facilitates digging up a layer of soil with tubers. The vibration of the digging apparatus can be provided by a crank included in the design, which, like all active mechanisms of the equipment, receives drive from the general power flow from the tractor PTO.
How to choose?
The criteria for choosing a potato digger should be related to the design of the mini-tractor you have
For example, if the power of the unit is not enough, it is better to pay attention to simple models. However, one should not expect high performance results from such a tool.
However, spending money on purchasing a device will be rational. Having a powerful motor tractor at your disposal, you can think about purchasing a vibrating type digger with additional accessories. This technique will simplify the work associated with harvesting root crops, but will require large investments.
You should also compare the size of the area. Vibrating diggers are bulky. They are often not suitable for processing 5–6 acres of a regular garden. Controlling a mini-tractor with a connected vibrating digger is more difficult. The vibrations will be released and felt well.
In addition to the main selection criteria, you can take into account additional ones:
- soil properties;
- amount of cultivated land;
- availability of finance.
Mounted potato digger KTN-2
The machine is a two-row mounted digger rigidly connected to the three-point hitch of the tractor. KTN-2 is equipped with: passive digging organs; two rod conveyors driven by the tractor PTO.
Scheme of KTN 2
The plowshares of the digging organ of the machine, installed at an angle, due to the movement of the unit, cut the tuber layer and feed it to the shaking conveyor. Vibration of the conveyor receiving soil with tubers and active separation of tubers from the soil is carried out due to the rotation of elliptical stars supporting the rod web. The second cascade conveyor finally clears the tubers from the soil and places the potatoes on the surface of the soil in a narrowed windrow.
Scheme of operation of KTN-2
The depth level of the digging plowshares and the adjustment of the thickness of the layer being opened is carried out by changing the length of the central link of the tractor hitch, where when it is shortened, the angle of attack of the plowshares and the depth of the dug soil layer increase.
Characteristics
| Productivity, ha per hour | 0,25-0,47 |
| Operating speed, km per hour | 1,8-3,4 |
| Working width, m | 1,4 |
| Digging depth, cm | 22 |
| Transport speed, km per hour | Up to 16 |
| Maximum hardness of excavated soil, kg/cm² | Up to 20 |
| Humidity of the excavated soil, % | No more than 27 |
| Turning radius of the unit at the outermost point, m | 6,2 |
| Dimensions, mm Length Width Height | 3220 1725 1250 |
| Ground clearance, cm | 25 |
| Weight, kg | 710 |
Advantages and disadvantages
The advantage of the machine is its simplicity of design and its low cost. The digger is actively used in the first stage of the two-phase harvesting method.
The disadvantage of the machine is its low ability to work on heavy soils in moist conditions (no more than 27%), where the resistance of the soil during digging increases significantly, and the vibration of the machine’s conveyor belt is not enough to completely break up lumps of soil and extract tubers from them. Another disadvantage is that the weight of the machine in the transport position creates negative loads on the hitch and creates control problems when the total weight of the unit is redistributed to the rear of the tractor.
Peculiarities
Any potato digger is designed to pull potatoes to the surface of the soil. The characteristics of all devices are identical and are not related to either brand or model. Despite the numerous number of variations, devices are divided into vibration and simple.
Simple diggers are passive devices that work like a shovel or plow. Teeth or rods are simply welded to the parts. The plow goes deep into the soil, loosens it and turns it over. The potatoes rise on the rods, remaining on the surface.
On the conveyor, the potatoes are cleared of soil - clean vegetables are easier to collect. The drum mechanism is a rotating fan that throws the tubers to the sides. The drive of this fan is connected to lug wheels. Every farmer comes up with new and more convenient devices for his farm.
Universal potato digger windrower UKV-2
The machine is an improved version of the high-speed semi-trailer potato digger of the Soviet design KTS-1.4 and differs from the KTN-2 in that it has:
semi-trailer type of aggregation with a pair of wheels in the chassis; the machine is equipped with active digging shares; a beater is installed between the plowshares and the receiving rod conveyor for active, gentle crushing of soil clods; the extended frame design made it possible to install conveyors with longer blades, which improves the quality of cleaning; between two conveyor belts (receiving and cascade) a lump crusher made of two rubber rolls is installed; potatoes coming out of the cascade conveyor are separated from the tops by a top separator consisting of two belt conveyor blades; for laying 4 rows of tubers dug in pairs into one windrow, the UKV-2 can be additionally equipped with a transverse conveyor for side unloading driven by a hydraulic motor included in the machine; to prevent emergency situations when foreign objects enter the active mechanisms of the machine, the drives are protected by safety clutches; The digging depth is regulated by the height of the position of the support-gear wheel installed in front of the dripping apparatus.
Design and operating diagram of VHF-2
Specifications
UKV-2
| Length, mm | 5800 |
| Width, mm | 2700 |
| Height, mm | 1400 |
| Weight, kg | 1800 |
| Track, mm | 1500 |
| Ground clearance, mm | 300 |
| Working width, m | 1,5 |
| Digging row spacing, cm | 70-75 (90 on order) |
| Productivity, ha per hour | 0,27-1,17 |
| Operating speed, km per hour | 1,9-6,5 |
| Digging depth, cm | 25 |
| Weight, kg | 1650 |
| Transport speed, km per hour | 25 |
| Required power of the tractor used, hp. | 75-90 |
| Soil moisture, % | Up to 27 |
| Soil contamination with stones, tons per hectare | Until 6 |
| Size of stones, mm | Up to 150 |
| Field slope,° | 4 |
Advantages of VHF-2
The semi-trailer nature of the aggregation ensures a uniform load on the tractor chassis. Equipping the UKV-2 with active plowshares, a crushing beater and extended rod conveyors ensures the efficiency of digging and separating tubers from the soil and tops in conditions of high humidity and soil density. The functional ability of lateral unloading of tubers when forming one swath of potatoes from four dug rows provides increased productivity during two-phase and combined potato harvesting. The belt drive, protected from soil, is less susceptible to wear and is easy to maintain.
Homemade potato digger for tractor T-40 video
Homemade Wood splitter “Dragon” on T40 | Topic author: Maxim
Questions/answers about the wood splitter.
Alexander (Tuponile) Hello max! How are you? Haven't you posted a new video yet? The other day you looked at your wood splitter and was it covered? Is it worth Nsh 50? Is the belt slipping? Can you explain what and how I will be very grateful!!!
Alexander (Tuponile) ANSWER: Hello.
Videos are released on Sundays). Yes it costs 50. The load is very large, any belts will slip.
Roman (Karniella) Hi Maxim, I wanted to know what gear ratio is on the NSh 50, what the pump speed is, and the parameters of the hydraulic cylinder. Michael.
Maxim (Rupchand) Roman, at the pump about 2160 rpm. The thickness of the cylinder rod is 50mm, the stroke is about 600mm. But for absolute accuracy of the stroke of the rod, I need to measure it, but unfortunately I can’t do this now. I will provide exact data soon.
Roman (Karniella) Maxim, correct
Roman (Karniella) Installed an electric engine 7.5 kW 1440 rpm, pump NSh50 (new), distributor 346Zh (from the Ivanovets crane on the KRAZ base, for lowering the legs) the problem is the following: at idle the engine turns, but only once you supply oil to the cylinder the engine comes to a standstill.
Before that, I installed a 6 kW engine with 960 rpm on a belt drive + an old nsh50 (pump rpm was 500-600) everything worked, but quietly, I think it’s because of the distributor. Am I thinking correctly?
Maxim (Rupchand) Roman, there is not enough power to turn the NS at high speeds. It’s difficult to answer why it doesn’t work with changing speed, but the NSh-50 requires significant engine power for the wood splitter.
Mikhail (Raghuvir) Hi Maxim, if you put 3 or 4 knives on a wood splitter, will it work or not?
Maxim (Rupchand) Mikhail, greetings! It will pull if the knives stand across the gap.
Mikhail (Raghuvir) Thank you very much
Ruslan (Gana) Maxim, good evening, Max, I want to create such a miracle for myself on the TZ-4k-14 minitractor, because of this, a couple of questions, 1 why didn’t they make the drive to the NSh directly from the tractor..2 which one can be installed NSh 32 or 503 did you weld the main riser from sheets of iron or use a square4 what is the height, width and approximate weight of the main frame, without the conveyor and firewood lifter.5 what channel did you use 10 or 12 on the conveyor and what is the length of the conveyor6 does the oil heat up in hot weather thanks in advance
Maxim (Rupchand) Ruslan, greetings! 1) The drive must be installed through a gearbox because for normal operation of the unit you need at least 2 thousand rpm. 2) Better than nsh50 because it is more productive, but requires a powerful engine. 3) a profile was welded from two corners. 4) the width and height were made arbitrarily to suit the required size of firewood and the length of the hydraulic cylinder. 5) 10, length about 1.3 - 1.4 m. 6) did not notice that it was warming up.
Vasily (Sanandana) Maxim, good day. I have a question, I looked at the review of your cleaver, and the idea came up to do something like that, but there are doubts, for example, if you install nsh 32, the r-80 distributor into 3 sections, put the cylinder in a lying state, and without any conveyor and other things, just to prick, and I almost forgot the main thing that this whole thing can only be done on a Chinese mini tractor from a PTO, we have 540 rpm
Maxim (Rupchand) Vasily, this is basically how everyone does it, but it will probably work a little slowly. For nsh you need 2000 rpm minimum
Vasily (Sanandana) Maxim, thank you.
Ruslan (Gana) Maxim, hello max, another question about the wood splitter, do you have guides on rollers on the knives? What are they for so that the knife does not spin? and is it possible without them, thanks
Maxim (Rupchand) Ruslan, yes, so that the knife does not spin and does not break off, because without guides the knife will behave freely and its fastening will break off. It won't work without guides.
Ruslan (Gana) Maxim, I will assemble according to your makar, only the knives will stand at the bottom, and the cylinder will press from above with a straight sheet, at the bottom there will be a conveyor to take away, such are my dreams and plans, I have collected the material, but I’m not good at welding
Maxim (Rupchand) [post419|Ruslan, then it’s better to immediately attach the knives to the Hz, it will be more convenient and much faster to stab.
Tags: Homemade potato digger for tractor T-40 video
YuMZ, MTZ.K700.T150.T25.T40.DT and other tractors | Topic author: Tanya
We have been cultivating Tanya (Abhipri) Sasha since April, when we sowed and to this day there is no rain, three drops will fall and that’s it, the corn has already twisted in places, and even a strong wind
Sasha (Maro) the rains have helped a little for winter crops, that’s all waist-deep and there is no rain for the corn, we also supply frigates for watering
Tanya (Abhipri) The wheat is weak this year, and we only water cucumbers and tomatoes
swistun.info
Potato harvester KKU-2
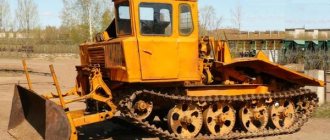
This machine was developed by the Soviet agro-industrial complex, the predecessor of which was the KPG-2 semi-trailer potato harvester. Today KKU-2 is produced in improved, modernized versions. The combine is aggregated with wheeled universal tractors MTZ 80 (82) and tracked tractors of the DT-75 type with narrow tracks. During the harvesting process, the unit is serviced by: a tractor driver, a combine operator and 2 to 4 workers on the machine’s bulkhead table.
KKU-2
Methods of application
Under conditions of normal soil moisture, the KKU-2 combine is used for direct harvesting of potato crops with harvesting in one stage. In the picking mode, with a two-phase separate harvesting method, the combine is used after preliminary digging and laying the tubers in a windrow. The machine is also used in a combined harvesting method, which involves harvesting potatoes by direct combining with the simultaneous selection of dug up and placed tubers in a windrow between two unharvested rows of potatoes.
Design and operation scheme
The semi-trailer machine is mounted on a welded tubular frame with a pair of running wheels. The double-row digging apparatus is equipped with active shares with a crank drive. The separation of tubers from soil and tops is carried out by passing the tuber-bearing layer through two conveyors and through a clod breaker made of two rubber rollers with pressure that prevents damage to the tubers. Additional separation of potatoes from soil residues is carried out by a conveyor - a top remover located at the rear of the combine. Subsequent cleaning of potatoes from small impurities is carried out on a rotating vertical lifting drum located at the rear of the machine. From a vertical drum, the tubers fall onto a rolling hill in the form of a short conveyor with a rubber coating. From the rolling hill, the tubers fall onto the bulkhead table, where the potatoes are additionally manually separated from impurities. Finally, with the help of a loading conveyor, the crop enters the combine hopper, from where it is unloaded into the vehicle by an installed unloading conveyor.
Scheme of operation of KKU-2
The drive of the combine mechanisms is carried out from the tractor PTO through a set of gearboxes, drive shafts, transmissions from roller chains and V-belts. To prevent mechanisms from overloading, the drives include adjustable safety clutches.
Characteristics
| Productivity, ha per hour | 0,32-0,43 |
| Working width, m | 1,4 |
| Row spacing, cm | 70 |
| Operating speed, km per hour | 1,8-4 |
| Transport speed, km per hour | Up to 16 |
| Hopper capacity, kg | 800 |
| Required tractor power, kW | 44-74 |
| Length, mm | 7630 |
| Width, mm | 4750 |
| Height, mm | 2570 |
| Weight, kg | 4440 |
| Ground clearance, mm | 300 |
Technological adjustments
To configure the combine for specific field conditions based on the depth of the tubers, the physical condition of the soil, and the ability to separate tubers from the stems, a number of adjustments are made:
- The depth of travel of the digging apparatus is adjusted by rotating the screw steering wheel, which changes the position of the support gauge wheels of the combine in its front part.
- Depending on the condition and thickness of the tuber-bearing layer, the amplitude of shaking of the receiving conveyor is adjusted by changing the arm of the shaking crank. (on heavy soils, the maximum amplitude is set to 65 mm, so that, taking into account the selected speed of movement of the unit, the conveyor separates up to 60-70% of the incoming soil.)
- To effectively crush soil clods, adjust the gap between the rubber rollers of the clod crusher and the pressure in them. (When working on soils with a light composition, a gap of 6-4 mm is sufficient; on heavy soils, the gap is increased. If the effect of crushing lumps is insufficient, you can increase the pressure in the rubber cylinders of the rolls.)
- Shaking on the second conveyor is activated by eccentric rollers when moving a separate control lever.
- If the tubers are not completely separated from the tops and thrown onto the field, the top remover is adjusted. The adjustment is carried out by changing the tension of the retaining springs, at which the pressing force of the leaf topper increases.
- If tubers get on the rolling hill with impurities, change the tilt of the rolling hill using a lever.
- When tubers along with impurities enter the “impurity ejection” conveyor, the direction of operation of the conveyor is changed by turning on the reverse, the operation of which sends the mass for repeated separation.
- The actuation force of safety clutches is regulated by changing the force of the springs, where the total gap between their turns should be at least 7-8 mm.
Making your own potato digger
The most convenient high-quality model would be a vibrating potato digger for a mini tractor. This section provides instructions for its manufacture. In the process of creating this unit yourself, you need to take into account that the durability of the mechanism is ensured by the quality of the steel used and the strength of the connections. The latter can be achieved by bolted connections or welding.
Frame
The basis on which the entire structure in this device will need to be secured is a rectangular frame. It is made from a square pipe 4 by 4 cm. It is welded in such a way as to form a rectangle measuring 80 by 100 cm.
On this frame you need to install fasteners going down. A ploughshare, a vibrating grid and wheel holders will be attached to them. A mechanism will be installed on top of it, which will ensure the vibration of the basket.
Homemade potato digger
ploughshare
This knife will lift potatoes mixed with soil into a basket, intended for processing. The fastenings for it are located on the sides in the front of the frame. The share is usually a strip of strong steel that must be bent accordingly. In this case, the middle should be located horizontally, the edges should look up. The front edge of the share should be well sharpened.
Wheels
Here they are not only a means of transportation, but also allow you to adjust the depth of the ploughshare. The hubs are connected to vertical metal pipes with a cross-section of 3 by 3 cm.
Two square pieces of pipe located vertically are welded to the rear of the frame from the sides. Their cross-section should be 4 by 4 cm. The vertical posts from the wheels are threaded into these pipes and secured with bolts. The wheels are on an axle that, apart from them, is not connected to anything else.
If the owner wants to increase the depth at which the plowshare works, then to do this it is enough to move the vertical wheels of the wheels up a little. If this depth needs to be reduced, the wheel height will need to be adjusted in the opposite direction.
Note! It is advisable to prepare at least two pairs of wheels for work. The first of them should be on a rubber run
It is suitable if you have to work on soft or wet soil. The second is wheels with a steel rim. They will be convenient if the soil is hard.
Net
It consists of metal rods located parallel to each other. The distance between them is such that potatoes cannot fall between them. In the mesh, the rods are located parallel to the direction of movement. In the transverse direction they are fastened with narrow steel strips, to which the rods must be welded. Their edges are curved upward and are attached to special holders, which are attached to a mechanism that vibrates the basket.
Net for potato digger
Mini tractor clutch
A mechanism is attached to the front of the frame by welding and is designed to be attached to a mini tractor as a suspension.
Vibration mechanism
A basket is connected to it. Vibration is provided by the rotation of a small disk with a rod mounted perpendicularly to it. The disk rotates, the rod allows the basket to move up and down. The higher the rotation speed, the more intense the vibration.
This disk, as the drawing suggests, is connected through an adapter mechanism to a large wheel, which is located on the side of the frame. It is connected by a rubber pulley to the mini tractor motor, which thus provides vibration.
Important to note! If additional fasteners are installed to increase the strength of the potato digger mechanism, this will make this device more reliable and durable. Using a potato digger allows you to turn digging up potatoes into a stress-free job
In addition, the quality of work will be higher compared to using a conventional shovel.
Using a potato digger allows you to turn digging up potatoes into a stress-free job. In addition, the quality of work will be higher than using a conventional shovel.
vote
Article Rating
Making a fan potato digger for a mini tractor
The idea of making your own fan potato digger for a mini tractor is quite feasible even for beginners. No skills in working with special tools are required here, and for those who have never worked with electric welding, it’s worth trying to learn.
First you need to understand the design, any information will help here. You can look on the Internet, fortunately there are plenty of home-made workers, or you can visit exhibitions or salons selling agricultural machinery. In Moscow, for example, there are permanent stands at VDNKh dedicated to small-scale mechanization of agricultural production
Here it is worth paying attention to two points - the dimensions of the elements and manufacturing options. As manufacturing options, we can recommend using separate ready-made elements, for example, a rack with a tow hitch
Materials and tools
When working you will definitely need:
- Bulgarian;
- Welding inverter or any other welding machine, even gas welding;
- Roulette;
- Kern;
- Hammer;
- Pliers;
- File;
- Metal brush.
To make a potato digger with your own hands, you will need a welding machine. You may need:
- Hacksaw for metal;
- Drill;
- Clamps for ease of welding work;
Materials you will need:
- Profile pipe 60x60 mm;
- Sheet metal 4-5 mm thick;
- Steel plate 4-5 mm thick;
- Round rod, 8 mm in diameter or steel reinforcement of the same diameter;
- If the support wheel is provided for in the design, it is better to take it on bearings with a shaft;
- Channel for coupling.
Blueprints
It is not difficult to find drawings on the Internet. And when working, you can use ready-made drawings; you just need to download and print them. But before cutting the metal, it is recommended to simply draw on a sheet of paper what the individual components and parts will look like, how and where they will be attached.
For beginning DIYers, it is recommended that before starting to cut metal, transfer all dimensions onto cardboard and assemble a cardboard model. This technique will help you clearly see all the problem areas of the structure.
Manufacturing stages
It is recommended to start the assembly process with the manufacture of the plow body. The frame and tow hitch are welded from a profile pipe. In the work, it is imperative that after all the elements are cut, they should be assembled into a single structure using several welding points. It is recommended that final welding be done after all defects have been corrected.
It is better to make a plowshare from two body parts and a cutting plate. The body is assembled from sheet iron, but the cutting plate is attached with bolts or rivets.
At the final stage, fan rods are welded to the plow body with plowshares. At the welding point, seams are made on both sides. The length of the seam is at least 5 cm. A template made of a wooden wedge will help speed up this process; with its help, another rod is fixed to the fixed rod and secured with several welding points.
After assembly, it is recommended to try the potato digger in practice, not necessarily in the garden; you can simply go through one or two furrows to make sure the assembly is correct and to detect weak points in the design.
How to make a potato digger with your own hands
If you don’t want to spend money on buying attachments, you should try to assemble it yourself from scrap materials. The following are instructions for making a simple potato digger.
Required materials and tools
To create a homemade potato digger you will need:
- frame;
- lattice;
- a pipe with a diameter of 20 cm for making a ploughshare;
- ready-made chain mechanism for fastening;
- steel or rubber wheels;
- welding;
- Bulgarian;
- sharpener;
- bolts.
Drawings, diagrams
There are a large number of schemes for the manufacture of attachments, but it is better to choose a scheme for assembling a vibrating potato digger. This simple design does not require a high level of skill. Only minimal knowledge of welding is required.
Step-by-step instruction
The following diagram will allow you to assemble a reliable potato digger from simple materials:
- For the frame you need a corner with a section of 60x40 mm. Gussets that strengthen the corners of the frame and other components are cut out of a steel sheet 6-8 mm thick. All parts are fixed by welding or bolts. It’s good if fastening methods are combined.
- A grate is made from rods and steel strips with a diameter of about 10 mm. The finished structure is connected to the shaft, and the fixation points are secured with bolts.
- A pipe with a diameter of 20 mm is cut with a grinder and a ring is made from it. The resulting product is processed with a sharpener. The sharp ploughshare is fixed to the frame and elevator using bolts. The diameter of the fastening elements is 10 mm.
- Install the hubs on the sides of the hitch.
- Fix the finished trailer mechanism.
- Mount wide wheels. Better than 2 pairs.
Assembly of equipment is carried out only on a flat surface. Use a serviceable tool, without burrs or chips.