Belarus tractors are combined with a number of specialized mounted, semi-trailered and potato harvesting machines. The main series of models were designed back in the Soviet period and today are produced in improved versions. The machines described below in a unit with universal tractors of traction class 1.4 - MTZ 80(82) operate in traction-drive mode with the drive of working parts from the rear take-off shaft operating in an independent mode.
Making a fan potato digger for a mini tractor
The idea of making your own fan potato digger for a mini tractor is quite feasible even for beginners. No skills in working with special tools are required here, and for those who have never worked with electric welding, it’s worth trying to learn.
First you need to understand the design, any information will help here. You can look on the Internet, fortunately there are plenty of home-made workers, or you can visit exhibitions or salons selling agricultural machinery. In Moscow, for example, there are permanent stands at VDNKh dedicated to small-scale mechanization of agricultural production
Here it is worth paying attention to two points - the dimensions of the elements and manufacturing options. As manufacturing options, we can recommend using separate ready-made elements, for example, a rack with a tow hitch
Materials and tools
When working you will definitely need:
- Bulgarian;
- Welding inverter or any other welding machine, even gas welding;
- Roulette;
- Kern;
- Hammer;
- Pliers;
- File;
- Metal brush.
To make a potato digger with your own hands, you will need a welding machine.
- Hacksaw for metal;
- Drill;
- Clamps for ease of welding work;
Materials you will need:
- Profile pipe 60x60 mm;
- Sheet metal 4-5 mm thick;
- Steel plate 4-5 mm thick;
- Round rod, 8 mm in diameter or steel reinforcement of the same diameter;
- If the support wheel is provided for in the design, it is better to take it on bearings with a shaft;
- Channel for coupling.
Blueprints
It is not difficult to find drawings on the Internet. And when working, you can use ready-made drawings; you just need to download and print them. But before cutting the metal, it is recommended to simply draw on a sheet of paper what the individual components and parts will look like, how and where they will be attached.
Manufacturing stages
It is recommended to start the assembly process with the manufacture of the plow body. The frame and tow hitch are welded from a profile pipe. In the work, it is imperative that after all the elements are cut, they should be assembled into a single structure using several welding points. It is recommended that final welding be done after all defects have been corrected.
It is better to make a plowshare from two body parts and a cutting plate. The body is assembled from sheet iron, but the cutting plate is attached with bolts or rivets.
At the final stage, fan rods are welded to the plow body with plowshares. At the welding point, seams are made on both sides. The length of the seam is at least 5 cm. A template made of a wooden wedge will help speed up this process; with its help, another rod is fixed to the fixed rod and secured with several welding points.
After assembly, it is recommended to try the potato digger in practice, not necessarily in the garden; you can simply go through one or two furrows to make sure the assembly is correct and to detect weak points in the design.
How to make a potato digger with your own hands
This home device can save a lot of time and labor when digging up potatoes. It should be taken into account that it is possible to make a potato digger with your own hands. The following will explain how this can be done.
To work on a summer cottage there is no need to make a large unit. In this situation, it is more beneficial if it is small in size.
A do-it-yourself potato digger for a mini-tractor of the screening type is made as follows.
In order to start making the mechanism, you need to prepare in advance:
- metal channel;
- a ploughshare (also called a coulter), with the help of which root crops are directly dug up;
- you will need a metal plate with which you will need to connect the opener to the grate;
- iron corners measuring 63 x 40 mm;
- you need several iron rods (usually 8 pieces are used for this purpose)
A small potato digger is more suitable for home use.
The basis for the design is a homemade frame. It consists of the following parts:
- A base that serves as the base for a potato digger.
- Wheels.
- Vertical rods with fastenings. They are needed in order to regulate the depth of ploughshare immersion.
- Suspension - it includes components located below the frame.
Tools needed for manufacturing:
- welding machine;
- drill;
- Bulgarian.
Work progress
The frame must be made from a pipe that has a square cross-section. Its dimensions are: length – 4 m, cross-section – 40 x 40 mm.
Potato digger drawing
From this section of pipe, sawing it with a grinder, you need to get four parts:
- two 120 cm long;
- two more, having a length of 80 cm.
After this, you need to weld these pieces so that you get a rectangle of 120 x 80 cm.
Transverse parts are welded to the frame:
- The first pair of them is at a distance of a quarter of the length from the rear edge - the slats are directed downwards. A metal strip will be welded to them, which will become the base on which the rods should be held.
- A horizontal section of pipe is welded in the middle part of the frame. A structure will be attached to it, which will be used to create vibration. A narrow metal strip is also attached to them, on which metal rods will be mounted.
- At the rear of the very edge, on the outer side, you need to install vertically sections of square pipe with a cross-section of 40 x 40 mm. Here you need to make holes with a welding machine in order to fix the vertical wheel stands with a bolt.
Now you need to install the wheels. They must have an axis, which is equipped with vertical posts of square section (30 x 30 mm), which are welded to it. They can be set to the desired height, which will allow you to adjust the depth of immersion of the plowshare.
Wheels:
- May be metal. They will make the structure heavier and improve the quality of its work.
- Sometimes simple rubber wheels are installed. They are not suitable for all soils.
- If you take rubber tractor wheels, they will be heavy and can be used for working on loose or wet soil.
Wheels for potato diggers can be different
The ploughshare is made from a wide metal strip bent in the shape of the letter “P”. Holes are drilled in its wings, and the same must be made in the slats. Screws are placed in them and then tightened tightly. To ensure strength, you can use not one vertical bar, but two, made in a triangle.
The rods are welded to the iron strip, which is the basis for them, and to the edge of the ploughshare.
The vibration mechanism is based on the operation of a walk-behind tractor motor, which is connected by a pulley to a wheel on a potato digger located above the frame. When it works, the transfer pulley rotates a small wheel, on the edge of which, perpendicular to it, a horizontal metal pin is welded. It is rigidly attached to the crossbar, which is located in the middle part of the frame. The rotation creates small, frequent movements up and down. Vibration can be controlled by adjusting the speed of the motor.
To attach it to the walk-behind tractor at the front, a corresponding adapter is welded.
Due to its low cost of production and ease of use, a potato grating digger allows you to harvest potatoes with significantly less time and labor, compared to the usual method, when a shovel is used for this purpose.
Characteristics, description and prices
The price for any potato planter depends on how much you plan to spend on this equipment, and a few more points:
- estimate the area that you need to plant, because there are many models of potato planters, some are suitable for sowing small plantations. And others are designed for large sowings;
- before purchasing attachments, you should carefully look at what kind of mount your tractor has, because the mounts on the canopy and the tractor may differ;
- It is worth assessing the performance of the selected potato planter, at what pace it can work; endurance is very important, especially with large volumes.
Additional functions
The cost of potato planters varies and depends on the number of built-in additional functions. It starts with budget options and ends with expensive models with built-in distributors of fertilizers and other vitamin and mineral supplements.
Try to buy special equipment directly from manufacturers, then there will be no price increases on the equipment.
Models of potato planters that are offered to us by manufacturers of agricultural machinery:
- An inexpensive option for the mini tractor 2 MBS-1, this unit has quite good technical data for working on small farms, the cost is 17,000 - 19,000 rubles.
- Model L - 201 (more details here), expensive, but equipped with a large capacity for potatoes and additional automatic adjustments, for convenient operation of the equipment, the cost of such equipment is 79,500 - 81,000 rubles.
- If the arable area is large, then a potato planter is needed for at least 400,000 rubles.
- Well, if you have an industrial enterprise, then only a four-row model of the S-super class is suitable, with hydraulics when lifting a bunker with potatoes; it costs starting from 550,000 rubles.
S-super
When choosing a potato planter, pay attention to the power of the tractor for which you are purchasing the attachment. If the power is low, then with a large weight of the unit, the tractor simply will not pull it
In this case, there are options for compact and lightweight models:
- Ukrainian-made model KSC - 3, the main advantage of this potato planter is its weight - 73 kg, and even a walk-behind tractor can pull it.
- Model Xingtai 2 SM-1, heavy and equipped with additional options, capable of cultivating fairly large areas of land.
Xingtai 2 CM – 2 weight of this potato planter from 200 kg.
Additional equipment includes:
- plowing the land and compacting it;
- loosening the soil;
- distribution of fertilizers in rads.
Model ASK – 2, the automatic planting system is additionally equipped with a Tehnos hiller, which levels the rows after planting. Model 2SM-1, due to its low weight, is suitable for swampy and viscous land areas.
ASK-2
Model GL 30-ECO, a good solution if the ground is rocky and hard, due to its large weight, the unit will be processed without problems. Model SK 2-130, heavy and equipped with forged wheels, is suitable for dense, dry soil. Before choosing a potato planter, look not only at its weight and characteristics, but also at the wheelbase and ground clearance, because the soil also has its own properties, it can be:
- soft;
- loose;
- swampy;
- dry;
- hard;
- rocky.
Some landowners are wondering which potato planter is better: an automatic or semi-automatic one.
Well, let's look at both options.
Semi-automatic potato planter
The semi-automatic model requires the mandatory presence of an assistant tractor driver, as it gently regulates the process of distributing potatoes and mineral fertilizers.
The work, of course, goes faster, since the driver does not need to be distracted and regulate the process, but the mandatory presence of an operator is a minus. The unit is suitable for small farms where your family members can help. The automatic model is suitable for large farms, where one person is allocated for each unit of equipment.
You only need to connect and adjust the settings. The main thing is not to forget to add potato seeds in time.
Potato Digger
DIY potato digger for walk-behind tractor
The T 25 ratchet potato digger, also known as a vibration digger, is a homemade or shaking digger. It consists of a knife, a grid that is constantly in motion, and a metal frame.
Potato Digger
It takes a couple of hours to make. But this requires experience and skill in working with agricultural machinery. Have to take:
- grinder;
- welding machine;
- metal drill and corresponding drill bits;
- metal profile with a side of 2.5 cm;
- steel sheet with a thickness of up to 5 mm;
- steel wire with a diameter of 8 mm can be used as non-corrugated reinforcement;
- wheels;
- hinges, bolts, eccentric, levers, consumables and measuring tape.
You also need to have a ruler and pencil on hand. Now you can get started by doing the following:
- Make a drawing, transfer it to a metal profile, cut out the frame for the frame.
- Weld the frame.
- Weld the racks at the bottom where the wheels will be attached.
- Inside you need to weld holders onto which the hinges cling in order to hang the screen there.
- Brackets are welded to the frame to install the gearbox and mechanisms that will create vibration.
- A screen is welded from the rods. It is hung on the frame using hinges.
- Now the gearbox and vibration equipment are attached to the bracket, which is connected to the screen. When the walk-behind tractor shaft is working, vibration will be transmitted through the lever and connecting rod to the sifter, which will create rotation of the eccentric.
- You need to take a sheet of steel and cut it, and then bend it into the desired shape for the knife.
- The share is attached using hinges to the bottom of the frame and the sifter.
- Now all that remains is to put on and secure the wheels.
The T 25 potato digger with your own hands has large dimensions
. Important! A ploughshare or knife can be of any shape: pointed and bent, concave and convex. How does the digging process work:
How does the digging process work:
- The ploughshare needs to be stuck into the ground, from where it will take out the tubers along with it.
- The knife is constantly in motion, repeating noise after noise. When cutting off the soil, he throws it up so that the tubers fall into the sifter. Thanks to vibration, unnecessary soil is removed.
- Given how the unit was assembled, the peeled potatoes fall to the ground behind or to the side of the unit.
Important! The harvesting area is small. The advantages include:
The advantages include:
- large grip up to 40 cm;
- the knife penetrates the ground 25 cm;
- Up to 10% harvest loss.
The disadvantages include:
- vibration that is transmitted to the farmer’s hands, which is very tiring;
- You need to harvest potatoes only in an area cleared of weeds and tops.
The T 25 potato digger with your own hands has large dimensions.
Specifications
If you take any potato planter, the design will be basically similar:
- main frame with some drive wheels;
- container for loading potato seeds for planting;
- coulters necessary for making furrows for planting seeds;
- one or more planting brackets, with cups or spoons;
- furrow buryers.
Openers
Otherwise, the only differences between the models are the presence of additional adjustments and functions of the potato planter. The operating principle is the same for all models.
From the bucket, the seeds fall onto the cup, then are carefully placed in the furrows, and then buried, forming a row. The distance between tubers is adjustable, from 20-40 cm, and the distance between rows is most often 60 cm.
2 MBS
Potato planter 2 MBS – 1, suitable for mini tractor, power – 4.8 km/h,
- single-row plants to a depth of 80-120 mm,
- There are two tanks for seeds and fertilizers,
- seed tank volume – 40 kg,
- distance between tubers – 25-27 cm,
- working productivity – 0.1-0.3 hectares,
- tractor power required - 12-18 horses, weight - 102 kg
2 MBS
KS – 2MT
The KS-2MT unit is suitable for a standard MTZ-132N tractor. The MTZ model range can be studied here.
- two tanks for sowing seeds and fertilizers;
- double-row, width adjustable from 65-75 cm;
- potato planter weight – 115 kg.
KSM-1
Model KSM-1 - suitable for tractors with a power of 10-20 horses, potato planter output - 0.1 - 0.14 hectares per hour.
S-239, S-239-1
- double-row weighing 205 -223 kg;
- depth of planting potato seeds – from 6 to 12 cm;
- adjustment of the distance between tubers – 29-32 cm;
- maximum potato load up to 180 kg;
- working productivity – 0.3 – 0.45 hectares;
- operating speed – for S-239 is 4-6 mph, for S-239-1 is 12 mph.
L – 201
- width between rows to choose from – 62.5, 70, 75 cm;
- tank capacity – 250 kg;
- operating speed – 10 mph;
- working productivity – 0.57 – 1.14 hectares per hour;
- unit weight 380 kg.
Make the right choice by studying all the characteristics of potato planters.
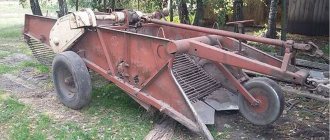
Universal potato digger windrower UKV-2
The machine is an improved version of the high-speed semi-trailer potato digger of the Soviet design KTS-1.4 and differs from the KTN-2 in that it has:
semi-trailer type of aggregation with a pair of wheels in the chassis; the machine is equipped with active digging shares; a beater is installed between the plowshares and the receiving rod conveyor for active, gentle crushing of soil clods; the extended frame design made it possible to install conveyors with longer blades, which improves the quality of cleaning; between two conveyor belts (receiving and cascade) a lump crusher made of two rubber rolls is installed; potatoes coming out of the cascade conveyor are separated from the tops by a top separator consisting of two belt conveyor blades; for laying 4 rows of tubers dug in pairs into one windrow, the UKV-2 can be additionally equipped with a transverse conveyor for side unloading driven by a hydraulic motor included in the machine; to prevent emergency situations when foreign objects enter the active mechanisms of the machine, the drives are protected by safety clutches; The digging depth is regulated by the height of the position of the support-gear wheel installed in front of the dripping apparatus.
Design and operating diagram of VHF-2
Specifications
UKV-2
| Length, mm | 5800 |
| Width, mm | 2700 |
| Height, mm | 1400 |
| Weight, kg | 1800 |
| Track, mm | 1500 |
| Ground clearance, mm | 300 |
| Working width, m | 1,5 |
| Digging row spacing, cm | 70-75 (90 on order) |
| Productivity, ha per hour | 0,27-1,17 |
| Operating speed, km per hour | 1,9-6,5 |
| Digging depth, cm | 25 |
| Weight, kg | 1650 |
| Transport speed, km per hour | 25 |
| Required power of the tractor used, hp. | 75-90 |
| Soil moisture, % | Up to 27 |
| Soil contamination with stones, tons per hectare | Until 6 |
| Size of stones, mm | Up to 150 |
| Field slope,° | 4 |
Advantages of VHF-2
The semi-trailer nature of the aggregation ensures a uniform load on the tractor chassis. Equipping the UKV-2 with active plowshares, a crushing beater and extended rod conveyors ensures the efficiency of digging and separating tubers from the soil and tops in conditions of high humidity and soil density. The functional ability of lateral unloading of tubers when forming one swath of potatoes from four dug rows provides increased productivity during two-phase and combined potato harvesting. The belt drive, protected from soil, is less susceptible to wear and is easy to maintain.
Making your own potato digger
The most convenient high-quality model would be a vibrating potato digger for a mini tractor. This section provides instructions for its manufacture. In the process of creating this unit yourself, you need to take into account that the durability of the mechanism is ensured by the quality of the steel used and the strength of the connections. The latter can be achieved by bolted connections or welding.
Frame
The basis on which the entire structure in this device will need to be secured is a rectangular frame. It is made from a square pipe 4 by 4 cm. It is welded in such a way as to form a rectangle measuring 80 by 100 cm.
On this frame you need to install fasteners going down. A ploughshare, a vibrating grid and wheel holders will be attached to them. A mechanism will be installed on top of it, which will ensure the vibration of the basket.
Homemade potato digger
ploughshare
This knife will lift potatoes mixed with soil into a basket, intended for processing. The fastenings for it are located on the sides in the front of the frame. The share is usually a strip of strong steel that must be bent accordingly. In this case, the middle should be located horizontally, the edges should look up. The front edge of the share should be well sharpened.
Wheels
Here they are not only a means of transportation, but also allow you to adjust the depth of the ploughshare. The hubs are connected to vertical metal pipes with a cross-section of 3 by 3 cm.
Two square pieces of pipe located vertically are welded to the rear of the frame from the sides. Their cross-section should be 4 by 4 cm. The vertical posts from the wheels are threaded into these pipes and secured with bolts. The wheels are on an axle that, apart from them, is not connected to anything else.
If the owner wants to increase the depth at which the plowshare works, then to do this it is enough to move the vertical wheels of the wheels up a little. If this depth needs to be reduced, the wheel height will need to be adjusted in the opposite direction.
Note! It is advisable to prepare at least two pairs of wheels for work. The first of them should be on a rubber run. It is suitable if you have to work on soft or wet soil
The second is wheels with a steel rim. They will be convenient if the soil is hard
It is suitable if you have to work on soft or wet soil. The second is wheels with a steel rim. They will be convenient if the soil is hard.
Net
It consists of metal rods located parallel to each other. The distance between them is such that potatoes cannot fall between them. In the mesh, the rods are located parallel to the direction of movement. In the transverse direction they are fastened with narrow steel strips, to which the rods must be welded. Their edges are curved upward and are attached to special holders, which are attached to a mechanism that vibrates the basket.
Net for potato digger
Mini tractor clutch
A mechanism is attached to the front of the frame by welding and is designed to be attached to a mini tractor as a suspension.
Vibration mechanism
A basket is connected to it. Vibration is provided by the rotation of a small disk with a rod mounted perpendicularly to it. The disk rotates, the rod allows the basket to move up and down. The higher the rotation speed, the more intense the vibration.
This disk, as the drawing suggests, is connected through an adapter mechanism to a large wheel, which is located on the side of the frame. It is connected by a rubber pulley to the mini tractor motor, which thus provides vibration.
Important to note! If additional fasteners are installed to increase the strength of the potato digger mechanism, this will make this device more reliable and durable. Using a potato digger allows you to turn digging up potatoes into a stress-free job. In addition, the quality of work will be higher compared to using a conventional shovel.
In addition, the quality of work will be higher compared to using a conventional shovel.
Using a potato digger allows you to turn digging up potatoes into a stress-free job. In addition, the quality of work will be higher than using a conventional shovel.
Review of the best potato planter models
KS 1A is a domestic model that helps simplify planting tubers and reduce time. The unit weighs 33 kg. The width of the wheels is 60 cm. The machine plants five tubers per 1 m. The tubers are lowered into the ground one at a time, and special discs bury them and level the soil. This model is suitable for walk-behind tractors: Neva, Oka, Kadvi, Salyut and Favorit. The cost of KS-1A varies between 14,500 and 15,500 rubles. The unit can be purchased at any specialized agricultural equipment store.
KS 1 is a Russian model that is suitable for both domestic and imported walk-behind tractors. In an hour it sows 0.2 hectares of land. The distance between the wheels is 70 cm. Plants 5-6 potatoes per 1 m. The price of this model is from 12,000 rubles to 14,000 rubles.
When choosing a potato planter, pay attention to the volume of the bunker, dimensions, and the ability to work with other equipment. For a small area, a device with a small bowl volume is suitable, and it will cost less. The only inconvenience of such a device is the frequent stoppage of work to fill the bowl with planting tubers
The only inconvenience of such a device is the frequent stoppage of work to fill the bowl with planting tubers.
To combine with other walk-behind tractors, there are all kinds of adapters that, if necessary, adapt to any existing equipment. Lightweight models are suitable for small areas. Heavy equipment is suitable for cultivating large areas.
Unit design characteristics
What is a potato digger for a tractor? This is a functional device that allows you to separate vegetable tubers from the soil. As a result of the action of the mechanism, the root crop reaches the soil surface. The cost of ready-made mechanisms is very high. When planning to make a device with your own hands, you must take into account that all designs can be divided into the following types:
- conveyor;
- screen;
- universal.
The screen digger includes a share, a drive and a barrel. The productivity of such mechanisms is considered high. The operation of a vibration potato digger for a walk-behind tractor occurs in the following order:
- picking up the earth and feeding it to a special table;
- spillage of soil through cracks under the influence of a vibrating table;
- pouring tubers from the opposite side onto the soil.
A universal digger, which is a single-row fan-type mechanism, must be attached to a walk-behind tractor. Various attachments can be attached to it, which allow for certain types of agricultural work:
- planting tubers;
- virgin soil rising;
- hilling of plants;
- sorting and harvesting vegetables in the fall.
A homemade potato digger for a walk-behind tractor provides automation of the entire potato harvesting process. This greatly facilitates agricultural work.
What types of potato diggers are there?
With the onset of autumn, gardeners begin to harvest potatoes. This takes quite a lot of time, as it is collected by hand. To make work easier, potato diggers were invented. The principle of operation of the device is to separate potatoes from the ground and collect them, throwing them on top of the garden.
Potato digger
Often such devices are equipped with T 25 vehicles, which belong to the traction class number 0.6. This means that you cannot load the hydraulics in excess of 600 kg. In this regard, a homemade potato digger is perfect. In total, there are 3 main types of homemade potato diggers for the T 25 tractor:
- Screening machines consist of a drive, a table and a ploughshare. The device is highly efficient. The principle of operation is as follows: pick up the soil with potatoes, put everything on a table that vibrates all the time, as a result of which the soil passes through the cracks and spills out onto the garden, and the root crop remains on the surface.
- Conveyor ones are a more complex design. It includes a drum to clean the contents, a conveyor that moves the potatoes inside the device, and a shovel-shaped plowshare.
- Fans, which are lancet devices that are good at extracting potatoes from the soil.
Below we will discuss how to make a potato digger with your own hands for the T 25.
User manual
Before you start working with the unit, read the instructions that come with the special equipment. Check the places where the fasteners are located; if they are loose, be sure to tighten them. This way, the performance of the potato digger will not decrease.
Carry out all repairs and mandatory maintenance in advance. If any problems arise during work, turn off the tractor engine, and only after that proceed to repair the equipment.
Instructions for use
Keep strangers away from the unit in order to protect them from injury in the first place. Do not exceed the permissible operating power of the potato digger if you do not want premature failure.
Observe the temporary operating mode, because for some units you can only work for a certain time, after which you need to give the potato digger a break.
If you work in mountainous areas, you need to reduce the speed of movement while working, otherwise the engine will overheat.
Types of potato diggers
There are many types of potato diggers on the market, which have both similarities and differences from each other. Basically, they are divided into three types.
There are these types of potato diggers:
- Vibrating or rattling. Their design includes a drive, a table and a ploughshare. This unit is quite productive. It works according to the following algorithm: it picks up the soil with potatoes, then everything along with the soil falls onto the vibrating table, the soil goes down through the cracks, and the remaining potatoes are thrown onto the soil from the back of the device.
- Transporter. Such designs are more complex. The unit consists of a drum for cleaning the contents, a conveyor for moving potatoes inside and a shovel-shaped ploughshare.
- Universal. Single-row potato digger, which is attached to the walk-behind tractor with a single hitch.
Additionally, you can attach attachments to the potato digger that allow you to hill up potatoes and plant them. There are models that allow you to sort plants by size, but they are very expensive.
Potato digger: description, principle of operation
A homemade or factory-made potato digger is a mechanism with a movable or vibrating lift for extracting potato root crops from the ground and preparing them for subsequent harvest.
There are different types of diggers:
- single-row;
- multi-row (double-row).
Single-row devices provide processing of one row of plantings and are designed for collecting tubers from small areas. Multi-row canopies are used to cover several rows of plantings at once and can be used on plots of any area.
According to the type of work, potato diggers are divided into:
- conveyor;
- vibrating (screening).
Conveyor models consist of a passive ploughshare and a movable chain-bar elevator. While the conveyor digger is operating, the plowshare buries itself into the ground and brings potato tubers to the surface. Then they move up and, moving along the conveyor belt, get rid of the remaining soil.
Vibrating potato diggers (screen type) include in their design two movable gratings that form a vibrating sieve. Plowshares are attached to the first lattice, which dig into the soil at high speed, cut and crush it, and then eject the root crops to the surface.
As you can see, the operating principle of conveyor and vibration type potato diggers is similar and consists in:
- cutting a layer of earth with a cutting element;
- loosening and lifting soil with root crops to the surface;
- separating tubers from tops and soil using a sifting mechanism;
- placing root crops in a storage bin or laying them on the field surface for subsequent manual assembly.
Conveyor and vibrating diggers can be used not only for digging up potatoes, but also to simplify the collection of beets, turnips, carrots, and other vegetable crops.
How to do it yourself
It is not always possible to buy a ready-made potato planter. That's why some farmers make homemade potato planters for homemade tractors. It is quite possible to do this from scrap materials.
Potato planter drawing
First of all, draw a drawing of the future potato planter; it will help you not get confused during construction.
Now you can find a lot of specialized literature on this topic. If you have time and patience, then this activity is just for you.
How to make a potato planter with your own hands for a tractor. First you need a frame, the remaining parts will be attached directly to it. You can weld a homemade frame from several pieces of channel No. 8. The frame will consist of two spars, which are connected to each other by three transverse steel rods.
In front of the side members, weld an arch that is attached with a fork to the central link; you also need to weld two additional fastening pins to the lower link.
To strengthen the sides of the frame, weld steel inclined beams and attach supports to the central arches. You also need to independently attach the seatpost support to the spar. For this you can use a metal corner 50/50/5 cm.
DIY potato planter
Then use welding to attach the plastic bracket to the inclined oblique arches. And after that, a potato tank with a volume of 0.17 m3 is attached to these slants.
The seed tank itself can be made from sheets of ordinary plywood, they can be taken 12 mm thick. To ensure that the tank lasts for quite a long time, saturate it with drying oil on top, and then, after drying, cover it with a layer of water-based paint.
Cut the finished painted plywood into the required dimensions of the future tank and fasten the parts using steel corners.
The next thing you need on the frame is an axle. It can be made from steel or cast iron pipe. At the ends of the pipe, spikes and pins are installed, which are pre-turned on a lathe.
After this, you will need to drill holes where pins will be installed to hold the tenons. The DIY potato planter for the T 40 tractor is also similar in design, only here you should pay attention to attaching the canopy to the tractor. DIY potato planter
DIY potato planter
In order not to be distracted, if something goes wrong, you will also need an assistant to monitor the process of sowing potatoes.
Before you decide to start working on a potato planter yourself, it is worth assessing the costs, both monetary and physical, and besides, the work requires a lot of time. And if you are making such a unit for the first time, then you can make mistakes in the design that can delay the work process.
In terms of cost, you will not see much difference between a homemade and purchased potato digger.
Classification of potato harvesting machine models
In a number of devices for digging up potatoes with an MTZ tractor, two types of machines can be distinguished by the nature of the mechanisms:
- Non-wheel drive
- Driven
Non-drive - primitive mounted devices in the form of a single-row or double-row digging plowshare. The work of the digger is to dig up the tuber-bearing layer, after which the tubers are selected from the soil manually.
Driven machines involve not only digging up tubers, but also simultaneously separating them from soil, tops and other impurities. The working parts of such machines operate not only due to the movement of the unit, but also with the help of the drive of the working parts from the tractor PTO.
According to the method of aggregation for the MTZ tractor, there are models of potato harvesters:
- Mounted
- Semi-trailer
According to the functionality of drive devices, machines are divided into:
- Diggers
- Harvesters
Mounted and semi-mounted potato diggers
Machines that perform the function of digging and separating tubers from the soil and tops and placing them in a windrow. Machines of this type are used in a two-phase harvesting method, where these machines perform only the first stage - digging up tubers. After, in the second stage, the collection of dug up potatoes, cleared of soil and tops, is carried out manually, or a trailed potato harvester is used for mechanized selection formed by a tuber roller digger.
To carry out the stage of digging up potatoes using a two-phase harvesting method, there are the following models of mounted and semi-trailer machines mounted on the Belarus MTZ 82(80) tractor:
- KTN 2 – double-row mounted potato digger
- UKV 2 – semi-trailer universal potato digger, double-row windrower
KTN-2
Universal potato digger UKV-2
These models are the most common on the agricultural market. techniques and have a lot of analogues of similar design.
Trailed potato harvesters
Such machines perform a full harvesting cycle, including: digging, separating tubers from soil and tops, collecting potatoes into a bunker, unloading the harvested crop into transport. This type of machine can be used for harvesting in one stage, or as a pick-up of previously dug potatoes with a digger. A representative of this type of harvesting machine is the two-row universal potato harvester KKU 2.
KKU-2
Digging organ of potato diggers
All harvesting machines have a ploughshare type of digging apparatus, which is a flat ploughshare that undermines the soil layer along with the tubers. Depending on the design and functionality, potato harvesters have both passive and active dripping organs.
A passive digger works only due to the movement of the unit. The work of an active digging knife-ploughshare consists of its additional low-amplitude reciprocating vibration, which facilitates digging up a layer of soil with tubers. The vibration of the digging apparatus can be provided by a crank included in the design, which, like all active mechanisms of the equipment, receives drive from the general power flow from the tractor PTO.
Wheels for digging
three types
- rubber with regular tread;
- rubber with tractor tread;
- metal.
It is recommended to choose wide wheels, then moving the digger in the garden will be easier.
Each type of wheel has its own advantages and disadvantages over others:
- For loose soil, rubber wheels with regular tread are ideal, but they will be useless on damp and wet ground.
- Rubber wheels with tractor tread are suitable for wet surfaces. They get out of stuck mud perfectly and don’t slip. The disadvantages of such wheels are their large size and impressive weight (not maneuverable).
- Metal wheels perform well on hard ground. They make the digger heavier, which prevents it from going astray and makes it easier for the ploughshare to work.
If possible, choose a large tractor tread.
To learn how to make a potato digger for a walk-behind tractor with your own hands, about its dimensions and manufacturing nuances, watch the video:
How to choose?
Efficiency assessment is carried out according to the following criteria:
- for walk-behind tractors and motor-tractors. In some cases, the choice is obvious due to the power of the walk-behind tractor. If the walk-behind tractor has an air-cooled engine with a rear power take-off shaft, only a vibrating potato digger with a rumble is suitable for it. For the Neva walk-behind tractor, only the “shaking” option is suitable. Conveyor models are not available for them. But for motorized tractors based on them, it is easier to choose a potato digger - both transport and screening options are suitable for them. If the motor tractor is in serial production, then preference should be given to transporter models;
- depending on the soil. The potato digger has proven itself well when working with light and medium-heavy soil. But if the summer was dry or the soil was overgrown, then the screen models are not up to the task. If the choice is between screening and conveyor, then preference should be given to the second;
Note! The difficulty lies in the fact that it is not always possible to accurately assess the type and condition of the soil. In this case, it will not hurt to collect information from other farmers about what equipment they use.
- quality and productivity. This is where conveyor models stand out. They know how to quickly, efficiently and carefully extract crops from the soil. Screen models are inferior in this regard;
- price. The best option is conveyor models, but they are much more expensive. But if there is a need to fit within a limited budget, then you can buy a vibration model. But let it be with two eccentrics.
Video - Which potato digger is better, screen or conveyor
Design features and types
Very often, villagers purchase or make a potato digger themselves, which works in conjunction with a walk-behind tractor, using its mechanism as a drive. This tandem is used both in the field and at home with the same performance.
There is also a manual potato digger. Many are happy with it, but it cannot be used on a large field: it will take 5-10 times longer to cultivate the soil or remove tubers than with mechanized work.
A DIY potato digger connected to a petrol unit comes in 3 types:
- Vibrating (screening) installation.
- Transport option.
- Lancet view.
Many people have no idea how to make a potato digger and what parts it consists of.
Vibrating (screening) installation. The main parts are a vibrating sieve and a ploughshare. The principle of its operation is simple:
- the earth along with the harvest is picked up by a ploughshare and thrown onto a sieve - a vibrating grid;
- the tubers do not fit into the cells and remain, and the soil falls down.
This vibrating potato digger for a walk-behind tractor is very productive, but the manufacturing process is quite complicated.
The transporter version can be freely connected to any walk-behind tractor. The conveyor potato digger consists of:
- driving belt - a conveyor with a special device for engaging, holding on the platform, and cleaning tubers from soil;
- plowshares.
This type is much more practical than the screening (vibrating) type, but on loose soils it works much worse, and its effectiveness is low. It is not advisable to use it on such soils.
The pointed type is the simplest potato digger for a mini-tractor, because it has no moving elements or components. It is freely attached to any motor unit. The main working devices are a fixed ploughshare and several welded rods.
It works like this:
- the soil with the harvest is cut with a ploughshare;
- all this falls on special splayed inclined rods;
- the potatoes do not pass between the rods and roll down along them to the surface of the soil, and the earth falls down.
This digger is effective on not very dense soils, where it is inappropriate to use other options for such devices.
Advantages and disadvantages
Advantages of the mechanism:
- selects up to 98% of tubers from the soil;
- able to dig on heavy soils;
- You don’t have to look for dug potatoes in the ground, since they remain on the surface;
- speeds up work and saves time and effort;
- qualitatively cleans tubers from the soil without damaging them;
- convenient for large areas;
- reduces fuel consumption.
Flaws:
- high price;
- not suitable for use in small areas;
- vibrations are transmitted to the walk-behind tractor, which is felt when operating the unit.
When purchasing a device, the farmer must be sure that the walk-behind tractor has a PTO (power take-off shaft) or the ability to connect the mechanism with a pulley.
It is recommended to check in advance whether the potato digger and walk-behind tractor are compatible.
Typical malfunctions characteristic of vibration models
Like any equipment, a potato digger can break. Some damages include:
- bearing failure;
- breakdown of conveyor elements;
- breakdown of the conveyor belt.
When using the device, it is recommended to periodically align the rods welded to the knife, check the fixation of the hexagons and the condition of the gearbox.
This is interesting:
Advantages of a manual potato digger and how to make it yourself Potato cultivation machines - features of agricultural machinery
Review of devices for planting and harvesting potatoes
The T-25 tractor belongs to the 0.6 traction class. This means that the maximum load on the hydraulic attachment system should not exceed 600 kilograms. Therefore, a single-row potato planter is best suited for this model. The most popular attachments include the following models:
Potato planter Bulwa-1
Bulwa-1
This is a single row potato digger that is best suited for the T-25. Due to its design features, it is suitable for working on light and medium soils.
The main working tool is a ploughshare, consisting of three segments. The tillage depth is 25 centimeters, which is quite enough for digging up root crops. To minimize damage to tubers, the conveyor is equipped with a protective shell.
KTN-1B
The simplest hiller for potatoes from domestic manufacturers. The whole design consists of the work of the rotor and ploughshare. With the help of a ploughshare, the root crops are removed to the surface, and the rotary mechanism throws them to the side.
Reviews about potato digger
Comments and opinions of farmers regarding the use of a vibrating potato digger on the farm vary.
Konstantin, Saratov region. : “The potato digger is very easy to adjust. It’s convenient that you can change the coverage width depending on the ground. I haven't found any shortcomings yet. I hope that the impression of the purchased device will not spoil.”
Dmitry, Penza: “The digger is heavy, all the welding is on clamps, the nuts flew off due to strong vibration, the plates are thin, the drive belt soon cracked.”