Where is the charging relay located?
The charging relay consists of a reverse current relay, a regulator and a limiter. The reverse current relay turns the generator on when its voltage increases, and turns it off when the battery voltage increases.
The regulator controls and limits the current within 13.8 - 14.8 V , and regulates the charging current. The limiter protects the generator from overloads, working on a similar principle to the voltage regulator - it includes additional resistance in the winding circuit as the current increases.
The charging relay works in conjunction with the alternator under the engine hood on the right side.
Where is the starter relay located?
There are two types of starters in UAZ - 42.3708 and 4211.3708–01 . They themselves are installed on the left side of the engine (in the direction of travel of the car).
The starters are equipped with an electromagnetic traction relay and a lever drive with a roller freewheel clutch. The blocking relay is located in the medical compartment and serves to prevent the starter from turning on when the power source is connected.
The wire from the relay goes to the central contact of the variator (with three coils) or to the coil connection contact (with two coils). This helps to strengthen the spark during engine starting.
Where is the turn signal relay located?
In UAZ vehicles, the turn signal circuit includes a steering switch, a turn relay, an hazard warning light and six bulbs.
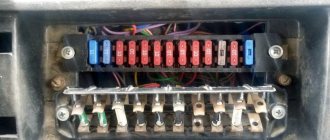
This system is protected from overloads by several fuses:
- F8 – 10 A (for alarm);
- F20 – 7.5 A (for direction indicators).
Turn signals without a relay will not blink , so its malfunction is easy to determine.
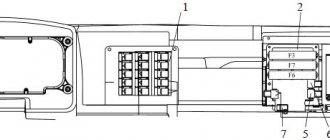
It is located in the mounting block, on the left side, at the driver’s feet. In ambulances and utility vehicles such as UAZ, the turn relay is installed on the partition, behind the driver's seat.
If the relay malfunctions, it must be removed, and the use of metal objects is not allowed.
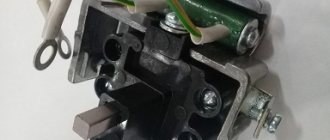
Well, that’s how many cars I’ve had with ZMZ 406,405, 409 engines and new-style generators - they all have the same problem: chronic undercharging of the battery. I once read in “Behind the Wheel” that you can insert a diode into the power supply gap of the generator brushes, the voltage increases by 1 volt, but this is a collective farm, and besides, the generator continues to be afraid of water. After every puddle or engine wash, it takes a long time for the generator to come to its senses. The gene is new, rated at 100A, but the battery is chronically undercharged, and if you turn on the lighting, chandelier, or press the brake, it generally goes into minus. The question is, is there any point in buying a 100A gene if it cannot provide the required current? The reason lies in the design of the generator and the operating principles of its relay. The generator relay consists of a transistor configured so that the current is limited (as intended by the designers) within 13.2 -13.9V. The generator armature is excited by the plus from the ignition switch, and the minus to the brush passes through the transistor on the brush assembly. The transistor stupidly turns off the minus when the maximum current is reached (13.9V). He does this with a decent frequency, so the headlights do not blink. The problem is that the transistor gets very hot, and there is no heat sink on it. As the temperature rises, the resistance increases and the correct operation of the charging relay is disrupted. She works as she pleases. In addition, the relay does not “monitor” the voltage drop at the battery terminals well, since the distance along the wires is large, the voltage drop is good, but at the generator terminals everything is fine. During an imaginary overcharge, the relay limits the current. The battery, in turn, does not receive enough energy. Especially when consumers are turned on. In addition, I wanted to simplify the replacement of a burnt-out charging relay. I decided to intelligently correct the situation by returning to the old working charging scheme. In the store I bought an external relay from the Volga / Gazelle with the number 131.3702-03, it is dual-mode “min / max”. I used a standard brush assembly, on which the transistor burned out, and removed all the contacts that go into the transistor. I connected the positive contact to the standard one as it was, and from the mass contact of the relay I brought out a wire that connects to terminal “Ш” of the external relay. I brought out a wire from the relay and threw it on a permanent plus closer to the battery. I mounted the relay on the bracket of the expansion tank with good ground. Now the relay will not be afraid of water and overheating, since it has a good heat sink. The test showed that at idle the generator freely produces 14.2 V, and when the heater fan, low beam and chandelier are turned on, the drop is approximately 1 V. The photos will show the low beam and heater buttons, as well as the standard voltmeter and the onboard voltmeter. computer. The lower right toggle switch forcibly turns on two Niva fans connected via two relays and a fuse block (you can see it in the photo):
Malfunctions and repairs
- Lack of battery charging occurs when the drive belt slips due to wear or low tension. Repair consists of installing a new part and adjusting the tension. Another reason may be wear on the brush assembly, which needs to be cleaned of dirt and carbon deposits. At the same time, it is recommended to inspect and clean the collector; if there is severe wear, the surface is worn away.
- Constant overcharging of the battery occurs due to a breakdown of the voltage regulator or damage to the power circuit of the integrated unit. The burnt part is replaced with a new one.
- Low generator power occurs when the belt slips or the regulator is damaged. It is also possible that there is an interturn short circuit inside the stator windings, which will have to be replaced. It is recommended to check the functionality of the diode bridge.
- Accelerated wear of the brushes occurs when the commutator beats or the surface of the unit becomes oily. Repair consists of grinding the surface and degreasing it with gasoline.
How to check
Testing the generator is carried out using a test device that is connected to the positive terminal and the housing. The voltage should be in the range of 13.5-14.6 V.
The voltage regulator is tested using a lamp and applying increased voltage. You can thoroughly check the generator in a workshop using a special stand.
Replacing the alternator belt
The type and size of the belt depends on the engine model. For example, the ZMZ-409 injection unit uses a poly-wedge part with a length of 1220 mm. To remove the element, you need to loosen the tensioner pulley and then unscrew the generator mount. After this, the belt is removed from the pulleys and a new part is mounted.
To replace the V-belt used on carburetor engines, you need to loosen the generator. After installing the new part, tension is ensured by moving the housing along the guide bracket. It is important to align the generator and crankshaft pulleys in the same plane, which extends the life of the belt and reduces noise during operation.
How does a generator work?
Structurally, the device replicates an ordinary electric motor with the difference that the rotor is driven by a belt drive from the crankshaft pulley and by its rotation activates alternating current in the winding, which is converted into constant current with the help of a rectifier unit.
But the magnitude of this current depends on the rotor speed and, accordingly, the motor speed. Therefore, the generator is equipped with an output voltage regulator, which equalizes it. The mechanism operates regardless of the rotor speed.
What characteristics does the generator have?
The factory UAZ is a fairly low-power vehicle. On earlier releases, the output current of its generator was only 40A. Then the parameter increased to 60A. The design of the rectifier unit and voltage regulator . What kind of standard generator did the UAZ “ Bukhanka ” have? Model 452 is a very unreliable unit. Fortunately, you can easily find out about its problems using the ammeter built into the dashboard. Another feature of the old generator is the voltage regulator , made in the form of a separate unit. If it malfunctioned, due to self-excitation of the winding, the engine refused to stall when the ignition was turned off.
New generators have a different design and, accordingly, a different connection diagram. Here the voltage regulator is built into the brush holder and is made as a single unit. The differences also apply to the drive belt. Old devices were driven by a narrow belt, new ones by a wider, poly-V belt. The UAZ Patriot generator
Characteristics of the generator for UAZ
One of the main components of the machine
The UAZ car breaks down with the same frequency as many other cars. There are also problems with the generator. Not every car owner knows how to connect a generator to a UAZ Patriot and UAZ 469.
The UAZ 469 model has a standard alternator. This unit is necessary to power the car with electricity and recharge the battery. The unit works only if there is a battery itself and a voltage regulator. The generator connection diagram is single-wire, the output contact is “minus”. There are also additional outputs that are necessary to connect the unit to the vehicle system.
To ensure high-quality operation of the device, it must be maintained correctly and in a timely manner. You should take care of the cleanliness of the mechanism. Before each departure, it is necessary to check the performance of the unit using an ammeter. When undergoing maintenance, the assembly fastenings and belt tension are checked. At the end of the season, you need to remove the mechanism and clean it of dust and dirt. When components wear out, they should be replaced with new ones.
When unstable operation of the device is observed or noise is heard, the mechanism should be replaced with a new one. In rare cases, it is necessary to change the rectifier unit. This need arises in the absence of stable operation of the diodes.
It is recommended to disassemble the mechanism only in a special service. When disconnecting the wires, you must pull out the block itself. Under no circumstances should you pull on the wires.
Checking the rectifier unit is impossible in several cases. For example, if the DC source shows more than 12 V. It is not recommended to use an AC meter. There must be a control lamp connected to the system.
There is no need to replace the lubricant, as it lasts for the entire life of the generator.
Connection features
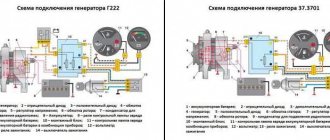
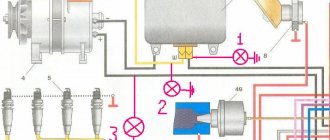
There are quite a few ways to connect the device. The fact is that depending on the type of generator (with an external voltage regulator or built-in), a variety of connections are possible. In all cases, the UAZ generator is connected using three wires. This is a common plus for the battery, the ignition switch, the warning light and the voltmeter on the dashboard. There are quite a few options for upgrading the connection. And all of them require a fairly serious knowledge of the principles of operation of automotive electrics. Otherwise, at least a short circuit in the rectifier unit is possible.
Repair of UAZ Generator
UAZ
tadpole, engine 409, replacing belts.
Unit connection
Unit connection diagram
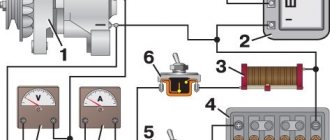
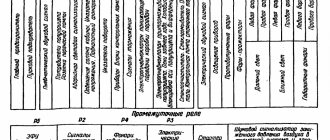
For convenience and understanding of the actions carried out with the generator, it is recommended to study the connection diagram. The figure shows a diagram of the wires that are used during the charging process.
Particular attention must be paid to the size of the belt, which is an important component in the operation of the generator. UAZ is usually equipped with a 6 РK 1275 belt.
Any work is carried out in stages. The success of the operations depends on compliance with the sequence of actions. To connect the generator to the car system, just follow 5 simple steps.
- The first step is to turn off the electricity supply.
- Turn on and warm up the gas generator.
- Connect the unit to the network.
- Disconnect the generator from the backup network and turn it off. If this is done incorrectly, the unit may be damaged and become unusable.
- Connect the power supply.
Unit connection process
The vehicle must be prepared for repairs. Before turning off the generator for replacement, you must place the vehicle on a level surface and secure it. A prerequisite is to clean all elements of the machine, including the bottom.
Work should only be carried out in the presence of a mechanic. Repairs in a workshop will cost more, but the quality of the work will be much better. You should consider the price of the generator itself. Since the market situation is unstable, the cost of the unit can change quickly. When purchasing new equipment, you should pay attention to the warranty period and workmanship. It is recommended to purchase products only from well-known manufacturers.
Drive belts
As already mentioned, there are many modifications of generators for UAZ. Many of them are installed only on specific engines, including UMP. Due to the fact that the timing drive on these engines is chain driven, the generator pulley is combined with the coolant pump and the radiator impeller. The UAZ alternator belt has a fairly large size. It ranges from 1030 to 1238 mm in length.
The main model is 6РК1220. In addition, there are modifications with power steering. A separate drive belt of shorter length is installed for its pump. On the UAZ "Patriot" the timing drive is a belt drive. What modifications does the alternator belt have? The diesel-type UAZ "Patriot" can be equipped with various such elements. On cars before 2012 it is 6РК 2100 (one belt), after 2012 – with two 6РК 1220 belts. When choosing a suitable element, you must be guided by the operating instructions, as well as the parts catalog for a particular engine.
Dismantling the device
How is the generator removed or replaced? UAZ “ Bukhanka ”, like any other car, also requires maintenance or repair from time to time. It should be noted that the process of dismantling the device is somewhat different from that on VAZ models - a longer belt, or even two, as well as driving auxiliary units, which complicate the work. Before starting the operation, be sure to remove the negative terminal of the battery. Next, all wires and terminals are disconnected from the device itself, which generates current.
To remove the UAZ generator, you need to remove the power steering belt (if there is one), loosen the generator tension bar and remove the belt completely. The two bolts holding the upper mounting bar are unscrewed. Next, unscrew the long bolt securing the generator to the cylinder block from below. After this, the generator is successfully removed from the car. The UAZ “Patriot” has a certain peculiarity - it does not require removing the second belt, and the tension is regulated by a special roller. Installation of the device is carried out in the reverse order.
How do you know if the battery is fully charged?
Given the technical complexity of the process, it is recommended to use a simpler method - checking with a voltmeter. Basic Principle: Place a voltmeter across the battery
with charging.
If within an hour the voltage does not increase while the charging current does not change, then the battery
100% charged
Interesting materials:
How to transfer photos from computer to iPhone without iTunes? How to transfer photos from a laptop to an iPhone via Bluetooth? How to transfer photos from iPhone to iPad? How to transfer an image from an iPhone to an LG TV? How to transfer an image from an iPhone to a Philips TV? How to transfer a picture via bluetooth on an iPhone? How to transfer contacts from iPhone to Android? How to transfer contacts from iPhone? How to transfer Life photos to another iPhone? How to transfer Live photos to iPhone?
Possible improvements to the mechanism
The operation of the generator on UAZ vehicles raises many questions and problems. This primarily concerns old structures and connections. The radical method is to completely replace the generator with installation on a suitable pulley removed from the old device, or select a new one. Due to the fact that nowadays UAZs are used as off-road vehicles for hunting, fishing or extreme sports, a large amount of additional electrical equipment is installed on them.
The standard UAZ generator cannot cope with the increased load and requires replacement of individual parts or the entire device in the event of, for example, a stator short circuit. But you can also modify the old mechanism by installing additional diodes in the rectifier unit. Motorists modify the voltage regulator. And if it is a new model, then a three-level element with an external control unit is installed. The best results, of course, are obtained by replacing with a foreign generator (for example, from Toyota, 120A). The modification comes down to only replacing the crankshaft pulley.
Basic faults
The most common breakdown is breakdown of diodes in the rectifier unit (the so-called “horseshoe”). In this case, the entire unit must be replaced. Also, the UAZ generator malfunctions due to the failure of the voltage regulator. Because of this, the voltage in the on-board network drops when the engine is running. The battery is undercharging. Also, during operation, the brushes in the brush assembly are worn out. Here, too, the voltage in the on-board network drops under load. Due to the natural wear and tear of carbon brushes, they shorten and are less able to press against the slip ring during operation.
Another malfunction is wear of the rotor axis bearings. It can be natural or caused by excessive tension on the alternator belt. In this case, to replace the bearings (there are two of them - front and rear), they should be pressed out of their seats and replaced with new ones. In all cases, the generator must be removed from the vehicle for maintenance and prevention. The long-term and uninterrupted operation of the device is affected by the condition of its drive belt. Scuffs and cracks are a sign of wear. This belt must be urgently replaced.
How to test a generator with a multimeter
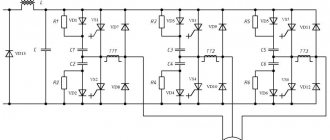
The diode bridge of the generator can be checked with a multimeter, but you can also use the stand that was used to check the regulator.
But before that, first of all, without removing the rectifier bridge from the generator, connect the red wire of the tester to terminal 30 of the generator, and the black wire to the housing. Set the tester operating mode to dial (diode icon). If it is not there, then set it to 1-2 kOhm. The multimeter should show infinity. If the readings are different, the diode bridge is faulty.
Then check the current rectifiers for breakdown. Leave the positive (red) probe on terminal 30, touch the negative one to the bridge mounting bolts one by one. The multimeter display should show infinity in all cases; any others mean a breakdown.
Next, connect the positive probe to the axle mounting bolts, and the negative probe to the generator housing. In this case, the tester should also output infinity.
But in practice, such verification is most often not enough. In most cases, it is necessary to ring the generator in more detail.
Careful testing
To do this, unscrew the fastening bolts of the rectifier unit, disconnect the copper wires of the stator winding and remove the diode bridge from the generator. Now you can test each semiconductor individually. Before checking, it is advisable to rinse the stabilizer with running water using a medium-hard brush, and then dry thoroughly. For quick drying, a hair dryer is quite suitable.
Attach one of the tester probes to the diode plate, connect the second to the central terminal of each diode fixed to this plate. Then swap the probes. In one case, the multimeter should show infinity, in the other - a nominal resistance of approximately 570-590 Ohms. Rectifiers are considered faulty if:
- In the first and second measurements (when the polarity was changed), the multimeter readings are the same;
- Diode resistance is greater or less than nominal values.
Perform the same actions with the second plate of the diode bridge. If a fault is detected in one or more diodes, it will be easier to replace the entire rectifier unit. True, there are craftsmen who replace failed diodes individually, but such work requires a certain skill and dexterity.
Checking the armature and stator windings
Further inspection requires completely disassembling the generator. First of all, visually check the anchor. Brush rings should not show any blackening, chipping or wear on the treadmills. Blackening and slight wear can be smoothed out with zero-grade emery cloth. Rings with deep grooves must be replaced or, if the thickness of the rings allows, turned on a lathe.
The armature winding should not clearly smell like burning . The color of the winding must be uniform and free of damage and breaks. To check the armature winding for a break, you will need a multimeter. Set the operating mode to continuity testing or resistance measurement and connect the probes to the brush rings. The winding resistance should be within 3-5 Ohms. Then leave one probe on the ring, connect the other to the body. The multimeter display should show infinity.
The generator stator is diagnosed after removal from the housing. First of all, carry out a visual inspection. There should be no visible damage to the wire or its insulation. Then connect the tester wire to the stator housing. With the second wire, touch the terminals one by one. There are only three of them. The tester must be in dialing mode. If the display shows infinity, this indicates that the stator is working properly.
Further testing consists of diagnosing the windings. The resistance of all three windings must be the same.
Before assembling the generator, you need to check and, if necessary, replace the bearings. When turning, they should not jam or make a creaking sound. This means that they are very worn out and will soon fail. Therefore, it is better to replace them immediately .