This article discusses the fuse and relay diagrams of the Mazda 3 bk (Mazda 3bk) first generation, from the Japanese concern Mazda Motor Corporation, produced in 2003, 2004, 2005, 2006, 2007, 2008 and 2009 with engines of 1.4 liters, 1.6 liters . and 2.0 l.
Interesting fact: in its homeland (Japan) this model is called Mazda Axela.
During this time, the sedan and hatchback managed to undergo restyling.
The location and decoding of fuse and relay blocks may differ from that discussed below, depending on the configuration and modification, as well as the year of manufacture, of your Mazda 3 bk.
This vehicle is equipped with 2 main fuse and relay mounting blocks located in the passenger compartment and under the hood.
Where are the fuses located?
In first-generation Mazda 3 cars (2003-2009), one unit is located under the hood, the second in the cabin. A special feature of the second generation vehicle (2009-2013) is the presence of a fuse box and a relay box, which are located under the hood, and another one is located in the cabin. When developing the third generation cars (2013-2018), engineers returned to the scheme implemented in the original version of the Mazda 3.
In cars manufactured before 2009, the fuse box in the passenger compartment can be found directly under the dashboard. While in the cabin, you should pay attention to the area on the left side of the steering column. In the next generation of cars, the fuses were located under the glove box, hidden by a massive plastic casing. In order to open the interior unit, you need to press the small transparent latch.
DETAILS: Renault Logan remove replacement repair Removal and disassembly of the Renault Logan fuel pump
Owners of the latest version of the Mazda 3 need to go down to the area located to the side of the driver's feet. The plastic cover immediately comes into view, which hides the fuses.
The current generation car is equipped with a fuse box on the right side of the driver (rib area). It is securely hidden by a casing; the design includes brackets and plugs for fastening. Having opened the block, you can study all the presented fuse designations.
The second generation Mazda 3 hides fuses in approximately the same place as the latest car models. It is worth noting the smaller size of the casing. The plug is located on the back side, which makes access to the fuses somewhat difficult. In terms of the location of this block, there are no differences from the first generation machines.
Blocks under the hood
There are 3 blocks with fuses and relays in the engine compartment.
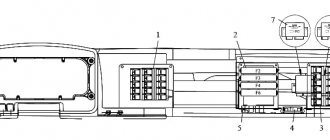
Main block
Located on the left side under the hood.
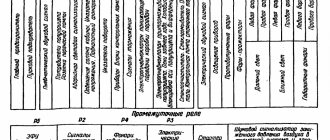
Scheme
Purpose of fuses
| 1 | 40A FAN 2 Electric cooling fan motor |
| 2 | 40A ENG MAIN Electronic engine control unit |
| 3 | 50A BTN 1 For protection of various circuits |
| 4 | 7.5A A/C MAG Air Conditioner |
| 5 | 20A H/L HI High beam headlights |
| 6 | 15A FOG Fog lights |
| 7 | 20A H/L WASH Headlight washers |
| 8 | 15A SUNROOF Hatch |
| 9 | 40A F.DEF RH Windshield heater right side |
| 10 | 40A F.DEF LH Windshield heater left side |
| 11 | 40A FAN1 Cooling fan motor |
| 12 | 15A ROOM Interior lighting |
| 13 | 15A TEM Electronic transmission control module |
| 14 | 20A DSP ABS/ESP System |
| 15 | To protect various circuits |
| 16 | AT PUMP Transmission pump |
| 17 | 40A HEATER Air conditioner |
| 18 | 30A INJ Injector |
| 19 | 30A R.DEF Heated rear window |
| 20 | 40A IGKEY 2 Main ignition circuits |
| 21 | 40A IGKEY 1 Main ignition circuits |
| 22 | 15A HORN Horn |
| 23 | 15A STOP Stop lights |
| 24 | 10A ENG+B Engine management system |
| 25 | 25A FUEL PUMP Fuel system |
| 26 | 40A ABS ABS |
| 27 | SEAT WARM Seat heating |
| 28 | 80A EHPAS Electro-hydraulic power steering |
| 29 | Reserve |
| 30 | 7.5A ABSIG ABS |
| 31 | 7.5A SWS Air Cushion |
| 32 | 15A HZLLO RH Low beam headlight (right) |
| 33 | 15A H/LLO LH Low beam headlight (left) |
| 34 | 7.5A ILLUM Dashboard illumination |
| 35 | 15A TAIL Tail lights |
| 36 | 15A ENG INJ Engine control system |
| 37 | 15A ENG BAR Engine control |
| 38 | 20A ENG BAR 2 Engine control |
| 39 | 15A ETV Electric Butterfly Valve |
Relay designation
| R1 | Fuel injector relay (L3 C TC) |
| R2 | Low headlight relay |
| R3 | Automatic transmission main relay (LF, L5) / Fuel pump speed control relay (L3 WITH TC) |
| R4 | High beam relay |
| R5 | Fuel pump relay |
| R6 | DXO relay |
| R7 | Starter relay |
| R8 | Supercharger relay |
| R9 | Horn relay |
| R10 | TNS relay / Dimension relay |
| R11 | Rear window defroster relay |
| R12 | Air conditioner relay |
| R13 | Main relay |
Additional block
Scheme
Decoding
| 1 | Glow plug relay |
| 2 | Headlight washer relay |
| 3 | Rear fog lamp relay |
| 4 | Turbocharger intercooler fan relay (TC) |
| F77 | 30A Cooling fan |
| F78 | 30A Cooling fan |
Battery block
A 100A high-power main fuse (Generator) made in the form of a fuse link can be attached to the positive terminal of the battery.
Decoding Mazda 3 fuses
The car fuse diagram is important information, in case of damage to one or another fuse, you need to know the location of the fuses. The engine compartment block is represented by fuses Fc 1 to 36.
Fuse No. 1 is responsible for the electric fan and cooling. Number 2 – electric power steering pump. No. 3 – alarm signals and window washing, central locking and dimensions. No. 4 - headlights, No. 5 - RTS circuit, 7, 8, 19 - ABS, directional stability system, 9 - power circuit.
Sensors 11 and 12 – ignition and starter relay. Number 13 - connects when ignition and disconnects when the starter is turned off (unlike 11). 15 - climate control, 17 - for heated rear windows. F20 - fog lights. Sound signals - No. 21. No. 23 – headlight washer fuse.
In the cabin there are sensors from 37 to 86:
- D/LOCK 2 – central locking;
- 39-40 — high beam;
- 43 – cigarette lighter;
- 44 – audio;
- 45 – mirrors;
- 46 – right dimensions;
- 47 – connectors for diagnostics;
- 49 – lock chain;
- 50 – control of electrical devices;
- 51 – turn signals and electric alarm;
- 52 — sunroof;
- 53 — glass washing;
- 55-56 – glass lifting;
- 57 – security system;
- 58 – heating;
- 60-61 – low beam;
- 65 – airbag;
- 67 – stability, steering;
- 68 – glass cleaning;
- 69 – engine control;
- 70 – glass cleaner;
- 74 – seat heating system;
- 75 – central lock;
- 76 – air conditioning compressor;
- 77-78 – glass lifting;
- 79 – light during reversing;
- 80 - roof hatch;
- 81 – left dimensions;
- 82 – fog lighting, dashboard lighting;
The missing numbers are backup safety elements. These also include fuses F83 - F86. In the interior mounting block there are relays No. 23 - low beam, 24 - automatic transmission selector, 25, 26 - speed of glass cleaning, 27, 28 - high beam and dimensions, respectively.
Decoding.
Purpose.
portal-diagnostov.ru
Block in the Mazda 3 BL interior
It is located on the left side of the instrument panel behind the protective cover.
Photo example
Scheme
Description
| 1 | 30A BOSE Model with Bose audio system |
| 2 | 30A PSEAT Power Seat |
| 3 | 30A P.WIND Glass Lifter |
| 4 | 25A D LOCK Door lock motor |
| 5 | — |
| 6 | — |
| 7 | 15A ESCL Electric steering wheel lock |
| 8 | 15A SAS Airbag system |
| 9 | Reserve |
| 10 | 15A HAZARD Hazard warning lamps |
| 11 | 15A METER For protection of various circuits |
| 12 | 15A OUTLET Sockets for powering additional accessories |
| 13 | 15A R WIPER Rear wiper |
| 14 | 15A CIGAR Cigarette lighter |
| 15 | Reserve |
| 16 | 10A HEATER Heating and ventilation fan motor |
| 17 | 10A MIRROR Exterior mirror gear motors |
| 18 | 10A ST SIG Starter signal |
| 19 | Reserve |
| 20 | 7.5A AUDIO Audio system |
| 21 | 7.5A M.DEF Heated exterior mirrors |
| 22 | 7.5A AFS Adaptive Side Cornering Light System |
| 23 | Reserve |
| 24 | 20A ENG Engine control system |
| 25 | Reserve |
| 26 | Reserve |
| 27 | Reserve |
| 28 | Reserve |
| 29 | Reserve |
| 30 | 25A P. WIND Window lifter |
| 31 | Reserve |
| 32 | 25A F WIPER Windshield wiper and washer |
| 33 | Reserve |
| 34 | Reserve |
For the front cigarette lighter there is fuse number 14 at 15A, A for additional sockets 12.
Procedure for replacing fuses
If necessary, the owner himself can replace failed fuse blocks (for example, headlight washers, climate control, etc.). It is enough to know the layout of the sensors and the functions that they mean (deciphering the diagram). Mazda fuses are replaced in the following order:
- The ignition must be turned off;
- Disconnect the battery from the power supply;
- Dismantle the outer protective cover of the fuse box;
- Deactivate the pads and harnesses that are connected to the fuse block;
- Use a screwdriver to unscrew the fastening screws;
- Using the latch, remove the device;
- Install a new fuse and repeat the procedure in reverse order.
- Oil change Mazda 6 GJ Photo instructions on how to change the oil on a third generation Mazda 6
- Changing automatic transmission oil Mazda 3 Video
- Replacing fuses on a Kia Rio 3 Photo instructions on how to change fuses on a Rio 3
- Changing the oil in the Mazda 3 engine
Fuses and relays in the cabin
The Mazda 3 bk interior mounting block of fuses and relays is located under the glove compartment on the passenger side.
Most fuses are located in this block.
In order to get to the cabin fuses and relays, you must:
- Pull out the plastic clip from the right protective cover in the passenger footwell and move it to the side;
- Remove the protective plastic fuse cover by pressing out the two plastic clips located on both sides of the protective cover;
- Next, you need to rotate both fasteners (on both sides) by 90%, which hold the mounting block;
- Now the block can be lowered down and pushed forward a little for the convenience of replacing fuses and relays, thanks to special bracket holders.
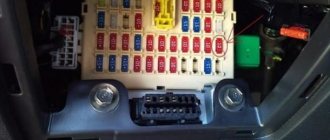
General view of the Mazda 3 bk interior fuse box
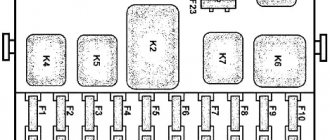
Diagram of fuses and relays in the Mazda 3 bk interior
| No. on the diagram | Fuse rating | Protected circuit |
| 37 | 15 A | Central locking (D/LOCK 2) |
| 38 | Empty or 10A (on later models; depending on configuration) | Empty (Reserve); On later models - STOP LAMP Fuse, Horn (STOP LAMP/HORN) |
| 39 | 10 A | High beam (Left headlight) (HEAD HIGH L) |
| 40 | 10 A | High beam (Right headlight) (HEAD HIGH R) |
| 41 | — | Empty (Reserved) |
| 42 | — | Empty (Reserved) |
| 43 | 15 A | Cigarette lighter Mazda 3 (Lighter/Cigar) |
| 44 | 7.5 A | Stereo, Audio system, Radio (RADIO) |
| 45 | 10 A | Electric adjustment of side rear view mirrors (Mirror) |
| 46 | 7.5 A | Dimensions (Right side front and rear marker lights), Number plate (registration plate) illumination (TAIL R) |
| 47 | 10 A | Diagnostic connector (OBD) |
| 48 | — | Empty (Reserved) |
| 49 | 20 A | Ignition switch circuit (TR/Lock) |
| 50 | 10 A | Electronic control unit for electrical equipment (CPU PWR, microcomputer start) |
| 51 | 15 A | Hazard lights (hazard warning lights) and turn signals (direction indicators) (HAZARDs) |
| 52 | 20 A | Sunroof (its electric drive) (SUN ROOF) |
| 53 | 20 A | Front windshield washers (WASHER) |
| 54 | — | Empty (Reserved) |
| 55 | 30 A | Power windows on the right side (front and rear) (P/WIND R) |
| 56 | 30 A | Window lifters on the left side (front and rear) (P/WIND L) |
| 57 | 7.5 A | Security alarm (ALARM) |
| 58 | 7.5 A | Heated exterior mirrors (electrically heated windows) (M/DEF) |
| 59 | — | Empty (Reserved) |
| 60 | 15 A | Low beam (Right headlight) (HEAD LOW R), lamp adjustment |
| 61 | 15 A | Low beam (Left headlight) (HEAD LOW L), lamp adjustment |
| 62 | — | Empty (Reserved) |
| 63 | — | Empty (Reserved) |
| 64 | — | Empty (Reserved) |
| 65 | 10 A | Airbag system (SRS Airbag) |
| 66 | 10 A | Immobilizer (anti-theft system), Instrument panel/instrumentation, ignition key interlock system (METER) |
| 67 | 20 A | Anti-lock braking system (ABS), directional stability control (DSC), power steering and electric pump (EHPAS), (IGNITION) |
| 68 | 20 A | Wipers (windshield wipers) (WIPER) |
| 69 | 20 A | Electronic engine management system (ENGINE) |
| 70 | 10 A | Egnition lock; Automatic wiper (IG SIG) (some models) |
| 71 | 7.5 A | Airbag system (SRS 2) |
| 72 | — | Empty (Reserved) |
| 73 | — | Empty (Reserved) |
| 74 | 20 A | Heated seats (heating) (SEAT WARM) |
| 75 | 25 A | Central locking (D/LOCK 1) |
| 76 | 10 A | Air conditioning, air conditioning compressor clutch, (A/C) |
| 77 | 30 A | Front right window regulator P/WIND R |
| 78 | 30 A | Front left window regulator P/WIND L |
| 79 | 10 A | Reversing lights (lamp lights when moving backwards) (BACK) |
| 80 | 7.5 A | Sunroof (electric) (SUN ROOF) |
| 81 | 7.5 A | Tail light (left), front marker light (left) (TAIL L) |
| 82 | 7.5 A | Fog lights (fog lights), instrument panel and control module lighting/illuminations (ILLUMI) |
| 83 | — | Empty (Reserved) |
| 84 | — | Empty (Reserved) |
| 85 | — | Empty (Reserved) |
| 86 | — | Empty (Reserved) |
The cigarette lighter fuse is number 43 with a current of 15 Amps. Depending on the modification of the car, there may be other problems; we also recommend checking number 28 for 10 Amperes under the hood.
Relay box in the cabin
You can get to the main relay blocks/sensors in the Mazda 3 bk interior after you completely remove and disconnect from the plugs that fit it, the interior mounting block with fuses and open (unscrew) the white plastic case protecting the main board where the relays are located.
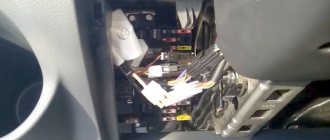
Remove the fuse and relay mounting block
The protective casing was removed. Assembly block disassembled.
The relay circuit is shown in the figure above along with the fuses. Explanation in the table below.
| No. on the diagram | Protected circuit |
| R11 | Relay for reduced (first) speed of front wipers (windshield wiper) |
| R12 | Relay for the second speed of the front wipers (windshield wipers) |
| R13 | High beam headlight relay unit |
| R14 | Relay for turning on side lights/lanterns |
| R15 | Empty (Reserved) |
| R16 | Empty (Reserved) |
| R17 | Relay for blocking the central locking drives (closing the lock) |
| R18 | Relay for unlocking the central locking drives (opening the lock) |
| R19 | Relay for turning on the rear wiper (wiper), if equipped |
| R20 | Empty (Reserved) |
The video below clearly demonstrates the location of the relays responsible for the wipers and the removal of the mounting block where they are located.
Detailed guide to replacing the Mazda 3 fuse box
Mazda 3 fuses, like any other car, are designed to interrupt the circuit if the current exceeds the permissible value. In this way, consumers and wiring are protected, which can be damaged by high voltage. Voltage surges usually occur due to damage in the circuit or short circuit. Without fuses, no electrical system works. If the circuit were not protected by safety elements, the equipment would fail much more often, and the likelihood of a vehicle fire would increase many times over.
Scarlet Mazda 3 car
Where are the Mazda 3 fuses located?
Like most cars, the Mazda 3 has 2 fuse boxes. The first one in the cabin, depending on the year of manufacture of the model, can be located to the left of the steering column under the dashboard of 2008 and 2009 or earlier models. Or on the right side under the glove compartment in later models.
The second is located under the hood and contains the most electrically intensive consumers, designed for high conductivity.
In some modifications, the interior section is located under the glove compartment. How to proceed in this case and replace the cigarette lighter fuse yourself is shown in the video from the Do-It-Yourself Auto Service channel.
Removal and replacement instructions
It is worth saying that Mazda developers have done everything to make it extremely convenient for those who will operate the car to change consumables, including fuses. In order to get to the compartments there is no need to remove any components or systems.
Preparation
If a consumer fails, use the diagrams to find out in which block it is located. For example, the element responsible for the headlight washers in the Mazda 3 is installed in the engine compartment. And for the headlights and the cigarette lighter in the cabin. Further in the table we find that the headlight washer is number 9, similarly we determine the location of the elements protecting the headlights and the cigarette lighter.
Steps
If the element is placed in a compartment located in the engine compartment of the Mazda 3, then we proceed according to the following scheme.
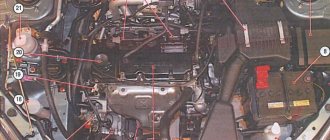
Engine compartment
- Open the hood cover and fix it.
- Finding the location of the block. It's not difficult; it's located on the right. In the photo there is a red arrow pointing to it.
- Next, we find the lever located at the back.
- Pull it and open the lid. There is a diagram on the reverse side.
- We find in it the element we are interested in, a headlight washer or another.
- Let's take it out.
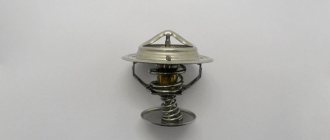
- We check visually. If the fuse is blown, there may be traces of melting on it or a burnt-out spiral may be visible. To determine more precisely, you can use a tester.
- Next, instead of the blown one, we install a new fuse of the same rating.
Decoding the engine compartment section
- If we have problems with the fuse located in the passenger compartment of the Mazda 3, then we need to find where it is located.
- Next, remove the holder (made of plastic).
- We remove the cover itself.
- Now you need to press out the holders that secure the compartment cover.
- Remove the cover.
- We find two latches with the help of which the block is secured.
- Let's lower it down.
- Next, we do everything as in the engine compartment.
Interpretation of the salon section
Recommendations for use
- Electrical fuses can only be replaced with ones of the same nominal value. If a fuse is installed whose rating is higher than the one that was installed previously, it will not be able to protect the consumer. If it is less, it will most likely burn out immediately.
- Once and for all, forget about any bugs and metal jumpers that careless drivers sometimes install instead of electrical fuses. At best, the consumer will be damaged; at worst, such actions can lead to a fire.
- Carry a set of protective elements of various ratings in the glove compartment. It is quite possible that some element will burn out when you are away from the places where they are sold.
- Elements that protect consumers such as the cigarette lighter and headlight washers often burn out, so you should definitely have electrical fuses of the appropriate rating with you in the glove compartment or other place.
- Also, the cigarette lighter fuse may blow if any equipment incompatible with its power is connected to its socket.
Video “Changing power electrical fuses yourself”
This video shows how you can save a significant amount by replacing the power fuse yourself.
Reasons for fuses failure on Mazda 3
- Violation of the schedule developed by the manufacturer for routine technical inspection of the vehicle;
- Purchase of non-original components, low-quality wiring;
- Violation of installation technology;
- Damage to adjacent mechanisms, which resulted in failure of the power supply unit;
- Short circuit in the electrical supply circuit;
- Damage to the insulation layer;
- Oxidation of contacts;
- Loose terminal fixation;
- Moisture getting inside, condensation forming.
Recommendations for servicing the mounting block
- Periodically check the condition of the fuses, replace with new ones as necessary;
- After long trips through puddles or in the rain, check for moisture and condensation in the mounting block. Dry the board with a stream of compressed air;
- Install modules with similar current strength (amperage). Do not exceed (underestimate) Amperes;
- If the mechanism suddenly stops functioning, do not rush to replace it with a new one. Check the module status, use a multimeter to diagnose;
- During preventive maintenance, check the quality of fixation of terminals and limit switches. Press with pliers as needed.
Despite the apparent simplicity of the design of the mounting block, carry out diagnostic work at a service station. Unprofessional intervention in repairs leads to undesirable consequences.