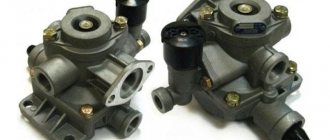
MAZ balancing suspension device
The design of the MAZ balancer suspension looks like this. The brackets are rigidly installed in the lower rear part of the car frame, where the short axles of the balancers are mounted using sliding bearings. Balancers are also installed on the axles using bearings. They play one of the key components in the suspension. They are otherwise called “hubs” or “shoes”. This is important to consider when making repairs and purchasing these parts.
Inverted floor elliptical springs are attached to the balance beams on top using stepladders. Brackets and balancers are installed between the middle and rear axles of the car, due to which the spring support is located on the axle beam. Fixation occurs using support brackets. Another element is the reaction rods. They are attached to the bottom of the bridge beams. Two pieces for each bridge. The rods are also fixed on the reverse side on the brackets of the balancer axis. Also, two rods for each bridge are located above the bridges. On one side they are attached to the bridge, the other side is attached to the bracket.
Buy a MAZ balancer axle nut in our online store
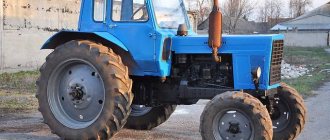
With this arrangement, the structure, rear axles and suspension, forms a trolley. This structure can swing freely as a single unit on the axes of the balancers. Thanks to this, the car can overcome major imperfections on the road. Physics is that the rocking of the structure eliminates its roll or torsion during unevenness and turns. But at the same time, independence of the structure is formed in the vertical plane thanks to springs and reaction rods. It is this solution of MAZ designers that allows smoothing out road unevenness. Most models of multi-axle MAZ semi-trailers and three-axle MAZ vehicles are currently equipped with this type of suspension
Malfunctions of MAZ balancers. Consequences and timely repairs
The work of the suspension in difficult conditions of increased loads does not go unnoticed. Due to the colossal loads on various components, sometimes tens of tons, the service life is limited. There are common cases when balancers, springs, reaction rods, and brackets break. Various oil seals, seals and other parts also often fail. It is worth noting that if a fault is detected in the rear suspension of the balancing type, there is a need to immediately repair the breakdown in order to avoid a lot of problems that this breakdown may entail.
Cracks and breaks in brackets and balancers are the most common malfunction
What happens if the crack is not fixed? In this case, the risk of complete destruction of the component increases significantly. Most often, cracks are repaired by conventional welding. But here it is important that the size of the crack falls within the tolerances. If the crack is too large, the effectiveness of this repair is reduced to zero. The saddest consequence of such a breakdown may be the failure of the bracket or balancer while moving. This will cause the structure to tilt and may lead to an accident when the vehicle is moving.
Buy MAZ balancer axle in our online store
That is why it is very important to monitor the general condition of the entire balance suspension and each of the components, as well as timely inspection and diagnostics. The inspection method is a visual inspection of units and components for the presence of external damage and cracks. It is also worth using a hammer to determine the wear of the bearings and the sliding of the bushings. It is important to promptly replace oil seals and other seals, as well as lubricate the connections of some components.
Replacing balancer bushings
Preface
The most common “sore” is wear of the balancer bushings! The second problem is the wear of the cheeks under the spring. The permissible gap between the axle and the balancer bushings according to the manufacturer's passport is 1 mm. In fact, with such a gap, enormous loads are placed on the bushing, especially during turns.
Bushings
There are 4 types of bushings made of different materials: bronze bushings, aluminum with zinc, just aluminum and plastic! We use alloy bushings: aluminum with zinc, bronze, I’ll tell you why! If the balancer axis is in normal condition, that is, its cylindrical wear is 0.1 - 0.2 mm, then you can safely use zinc bushings, they are quite strong and one and a half times cheaper than bronze ones, but they are quite fragile; shoulder". If the axle is worn more than 0.2 mm, it is advisable to use bronze bushings, since bronze is more viscous than zinc and can withstand heavy loads, especially, I repeat, when turning! We don’t use aluminum and plastic bushings for the reason that with today’s overloaded machines, they simply cannot withstand the loads and after 2 years of operation they simply break, at least on grain trucks.
Clearances and boring of bushings
Now let's talk about clearances and bushing boring. Initially, you need to choose the right bushings according to its dimensions, namely the outer and inner diameters. In order for the bushing to be tightly pressed into the balancer, its outer diameter must be 100.2 - 100.3 mm; on bronze bushings up to 100.5 mm is permissible. The inner diameter of the bushing must be 0.5 - 1 mm less than the nominal value in order to accurately bore the balancer with bushings in one installation. Boring the bushings first in a lathe and subsequent pressing will not give the desired result, since the balancer itself often has an elliptical and conical seat, the bushing also has an allowance of 0.2 - 0.3 mm on the outer diameter, so after pressing the bushings on both sides, the alignment between them will not be ideal, the internal size of the bushing will repeat all the errors of the balancer, and as a result it is almost impossible to adjust the axle diameter in this way. Therefore, we press the bushings into the balancer, install them on a boring machine and bore 2 bushings at once from one installation. The bored diameter of the bushings should be 0.05 - 0.08 mm larger than the axis of the balancer. The diameter of the standard axle is 88, then the diameter of the seat in the balancer is 88.05 - 88.08. The smaller the gap between the axle and the bushings, the longer it will take until it wears to a critical size. With every tenth mm. When the bushing wears out, the wear rate increases significantly, since the gap allows the balancer to swing in different planes, thus wearing out the axle and the bushings themselves. Therefore, our experience in repairing the balancer allows us to say that the maximum gap before replacing the balancer bushings should be no more than 0.5 mm.
About wear of the balancer axis
Now let's touch on the wear of the balancer axis itself. The technological process for manufacturing balancer axes is quite complex and can only be carried out in a factory setting. What is the difficulty? This is not only turning, grinding the ends for the shoes, pressing into brackets, but most importantly, it is the heat treatment of the places for the bushings. Ideally, as was the case in Soviet times, the area for the bushings was carburized, hardened and ground. The hardness of the bushing places is 62 - 64 HRs according to Rockwell, this is the hardness of a file. The balancer bushing is a softer material, so it is a replaceable part. Since in the old-style shoes the bushings were lubricated with a “tap” poured into the shoe itself, excellent sliding was ensured; the hardness of the axle prevented the material of the bushing from sticking to it. If the shoe bushings were changed in time and lubrication was not lost, the axle could last up to 30 years, with minimal wear of up to 0.2 mm. In today's conditions, without quality control and loss of production culture, the quality of spare parts does not stand up to criticism, so it is not surprising that modern balancer axles are not heat treated at all. on new KAMAZ trucks that are 2 years old, the wear of the axle (where there are plastic bushings in the shoes) was up to 1 mm. Lubrication in these shoes is provided only through grease fittings; there are no oil seals. Therefore, when moisture gets into the shoe and it is not pumped in a timely manner, dirt and rust accumulate inside the bushings, which works like sandpaper, wearing out the axle. Moreover, when our cars are overloaded, especially grain trucks, which are loaded like railway cars, the plastic bushings are simply interrupted by the axle, reaching the body of the shoe. What can be advised when the axle wears out? The balancer axis is developed mainly from below and barrel-shaped, but that part of the axle where there is no contact with the bushings does not wear out, this is a gap of 20 mm where the bushings in the shoe have a distance between them. Therefore, even if the axle is worn out, the size of the shoe bushings when replacing must be standard (88.05 mm), otherwise it simply will not sit in its place.
What and how we do
We practice working on the axle on site, without removing the axle itself from the car. You take a machine cable, a ruler or just a square, a micrometer, and with a certain skill and practice, the axis is aligned with cylindricity within a range of up to 87.5 mm. This way the life of this axis is extended. In another case, the axle is removed from the machine, installed on a cylindrical grinding machine and the journals under the bushings are ground, the recommended size depending on wear is minimal to 86 mm. Then repair bushings are pressed into the shoe and bored to fit the axle; bushings are ordered specifically for repairs. In this case, the cementation completely disappears, the axis becomes “raw”, but cylindricity is restored. It is recommended to install such axles on dump trucks, where the axle load is less than on grain trucks!
And finally...
The 3rd method is surfacing, turning and grinding the axle. We made a dozen such axes and abandoned this method. Every second axle broke; during surfacing, the structure of the metal changes and the axle, unable to withstand the previous loads, breaks.
Conclusion
That's all I wanted to tell you about replacing the balancer bushings. Goodbye everyone, watch our blog on Youtube
Rate the material
(57 Votes)
MAZ balancer - repair features
The MAZ balancer or balancing device consists of 2 axes. Includes springs, brackets, bushings. All MAZ spare parts are made of anti-corrosion materials to increase the service life of the parts. The MAZ balancer is connected to the brackets with a special tie. “AutoResurs” will tell you why you need a MAZ balancer and how to repair this MAZ spare part.
Balancer Maz and its diagnostics
The rear suspension of most MAZ trucks is of the balancing type. It is with the help of the MAZ balancer that a stable position of the truck is achieved. The reliability of the entire vehicle structure also increases. However, despite the strength of the spare parts, the MAZ balancer wears out over time.
Therefore, if you do not want to damage the truck axle shafts, monitor the condition of the oil balancer. In order to prevent damage to the axle shafts and vehicle axles, we recommend regular maintenance of the truck.
Carefully monitor the condition of the MAZ balancer, or rather its bushings, bearings, and brackets. Ideally, the parts should not show signs of deformation, cracks or breaks. If you find that the MAZ balancer is faulty, immediately replace the parts by purchasing new MAZ spare parts.
Also periodically lubricate parts of the balancer structure. However, for a more accurate diagnosis of the MAZ spare part, we recommend changing the balancer play. When turning the car, check the run-up of the axles. Then determine the amount of play. MAZ balancer and its repair
A faulty MAZ balancer can lead to breakdown of vehicle components. Therefore, we recommend repairing the MAZ balancer in a timely manner. Also, replacing the balancer is usually done in auto repair shops. But if you are confident in your abilities, try replacing the balancer yourself.
Repair of balancers is often associated with diagnostics and replacement of brackets and bushings. If parts are worn out, replace the parts. However, if you find a small crack, weld it. But you should not save in case of more serious breakdowns, otherwise repairing the balancers will not be beneficial. Pay special attention to consumables - bushings, brackets.
Repair of balancers is necessary when breaks or cracks occur. Usually the bushings wear out. Therefore, periodically check the fit of the bushings with light blows of a hammer. If the fit is loose, replace the pins with new ones. Carefully press out the bushings using a mandrel.
Repair of balancers, or rather bushings, is carried out when consumables wear down to a size of 90.20 mm. Repair of balancers is also necessary if the brackets are damaged. As with the bushings, there should be no breaks or cracks on the bracket. If you notice signs of wear, replace the parts immediately. Repair of balancers includes welding of cracks in MAZ spare parts. We allow wear of the bracket hole up to 100.6 mm.
Repair of balancers is carried out less frequently if the oil in the crankcase is changed periodically. To do this, you need to remove the cover of the MAZ balancer. Then drain the old oil and carefully rinse the lid. Next, fill in new oil.
Repair of balancers is necessary only in rare cases. This can be avoided if you take care of your pendant. If oil leakage occurs, replace the seals. Repair of balancers also includes tightening the cover bolts and replacing the balancer covers. “AutoResurs” still advises not to skimp on your safety. If you find wear on the MAZ balancer, repair the part immediately. It is best to buy a new MAZ balancer. This way, you are guaranteed to avoid more serious truck breakdowns in the future.
You can also follow our company’s blog on social networks twitter, facebook, contact, google+.
About company
Volvo tractors and dump trucks (Volvo FM, FH, FMX), Renault (Renault Magnum, Midlum, Keraks) with Meritor drive axles 21713142, 21942500, 20836860
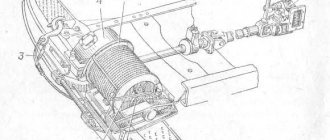
equipped with block hubs. The weak point is the hub axis. At the moment, based on statistics collected in cooperation with other service stations, on the number of calls regarding hub failure, the malfunction that has arisen is not an exceptional case.
The process of wheel bearings jamming occurs in a relatively short period of time, which reduces the likelihood of timely detection of a malfunction, which inevitably leads to deformation of the axle seating surface. Due to damage to the axle, installation of a new bearing is impossible.
In addition, this unit, due to its design features, is not serviceable. Accordingly, diagnosing the condition of this type of hub requires some mechanic experience and the use of special devices, since the maximum allowable play of this unit is 0.1 mm.
Service centers do not repair such breakdowns under warranty, offering the owner to purchase a new or used “stocking” at his own expense. Official dealers do not refuse to pay for the hub, but the costs of repairing the drive axles of Volvo tractors and dump trucks are still impressive.
What can you do when faced with the need for such repairs?
The first option, usually offered by dealers, is to replace the stocking drive axle housing with a new one.
Significant disadvantages of this method: • High cost and inevitable loss of time. • Cost of parts and service work at the dealer
will be approximately 850 thousand rubles. • While the work is underway, your car will be idle, since the replacement work is large, you also need to take into account the delivery time, as a rule, this type of spare part is not available in the warehouse, it is delivered within 2 weeks to infinity)
You can reduce costs by using the second option – installing a used “stocking”. The cost will be halved, but such repairs also have negative aspects: • Due to the ellipse on the hub axis, a used “stocking” will not last long; • The loss of time is no less than when replacing it with a new one.
What do you get by contacting?
The technology we use makes repairing the drive axles of Volvo FMX, FM, FH trucks simple and effective. Its features can significantly reduce the time required for installation. • The hub axle of Volvo FM, FH, FMX dump trucks and tractors is changed directly on the vehicle. • There is no need to heat the seat and remove the axle and gearbox. • All service work will take no more than one day. • The quality of the parts used is a guarantee of long-term operation of the vehicle after replacement.
The cost of repairs is also significantly lower than in an official service center.
Scania truck P380, P420 balancer bracket VT201, VT300, despite its reliability, can also fail due to increased wear of the balancer axis. Faced with such a problem, in order not to lose profit, you want to solve it as quickly as possible.
What is offered to the car owner in such cases?
The first option is to replace the balancing trolley with a new one 1485729, 1486740, 1915130
.
Its disadvantages are obvious: you will lose time and money. • The purchase of a new cart and installation work will cost approximately 1 million 100 thousand rubles. • Repair will take approximately 5 days.
The second option is to install a used cart.
Cash costs are reduced by three times, but there are also disadvantages in such repairs: • The service life of used balancing trolleys is almost exhausted; • After some time, repairs will be required again; • Installation also takes time, which means you lose up to 5 days.
What do we offer you?
repairs the balancer axle, saving both time and money. Savings are possible due to the technical features of the repair. • Work is carried out directly on the Scania P380, P420. • Repairs will only take one business day. • Minimal preliminary preparation, only removal of wheels and springs with balancer brackets is required. • High-quality parts with an increased safety margin are used, which guarantees trouble-free operation for a long time. • The cost of repairs is significantly lower, because the Scania P420, P380 balancer axle will cost less than the balancer trolley.
To contact us you can: Request a free call back Call: +7 916 322-34-69, +7 916 757-58-52 Write to us
Repair of KAMAZ balancer axle
Today we will use an example to look at the repair of the KAMAZ balancer axle step by step.
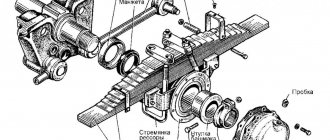
The rear suspension of KAMAZ vehicles has a balancing device suspended in the balancing shaft bracket and serves as a coupler. Replacement springs and lower reaction arms are removed for improved maintainability. The stands are secured against movement of the mounting plates. To limit the travel of the bridges on the spring supports, oscillating bridge supports are installed.
When restoring a balanced suspension, the condition of the fluid connections, springs, ladders and balance boots is first checked. If the wear of the axles and balancer bushings is higher than permissible, grind the axles until signs of wear are removed and install repair bushings reduced by the inner diameter.
The axle dimensions are 88 millimeters, the shoe bushing is 87.5 mm, and the repair bushing is about 84 millimeters. The nominal clearance between the axle and bushings should be 0.120-0.305 mm. The permissible gap between the axle and bushings without repair does not exceed 1.0 mm. If the bushings move freely, they must be replaced with new or repair ones, as well as balancing collars, boot and nut, touch the shoe through the grease nipple. If cracks are found in the weight sheets, they should be replaced with a nominal root sheet thickness of 12 millimeters, maximum 18 millimeters. It is recommended to measure the sheet using a tape measure and caliper to provide accurate information to the seller. When assembling the springs, lubricate the friction surfaces of the sheets with graphite grease, and also lubricate the ears and pins of the front springs. Front and rear springs are installed on the car in pairs with a difference in deflection of no more than 10 mm.
To adjust the axial play in the balancer shoe:
It is necessary to lift the car behind the frame and place it on supports. Provide the ability to rotate the balance bar by separating the ends of the rear spring from the axle support or removing the springs. Wrap the shear nut so that the scale cannot be turned by hand, unscrew the nut 1/6 turn, tighten the clamp bolt and check that the rocker can be turned by hand. If the rocker does not rotate, loosen the cutting nut further, first loosen the clamp bolt. Stepladders with necessary replacements should also be measured. Measure the thread, thread pitch, seat width and ladder length from the seat. When inspecting the reaction rods, you should pay attention to the fit of the fingers in the bracket, with free movement of the fingers, the fingers must be replaced. The nominal seat size is 43 millimeters. With more detail, you can try the fingers of a Kamaz vehicle. Fingers touch the grease nipple. When using plastic bushings, the balancing clamp is not used; the bushing is immediately lubricated with the special packaging included in the kit.
4.2.1. Spring suspension. Maintenance and repair
Maintenance
Maintenance of springs consists of lubricating the spring fastening pins in the brackets, checking the fastening of the springs, lubricating the spring leaves and checking the fastening of the liners of the rear spring brackets. Longitudinal mutual shift of the sheets may indicate a cut of the center bolt, so it is necessary to promptly check the relative position of the spring sheets. To avoid cutting off the central bolts, the spring ladders should be tightened, and they should only be tightened when the springs are straightened. The tightening torque of the stepladder nuts for the front springs is 40-45 kgf.m, for the rear springs ( MAZ-54322) - 60-64 kgf.m. If creaking occurs, the springs must be lubricated with graphite lubricant. To do this, the car is lifted by the frame, the springs are released and the sheets separate. Graphite lubricant is introduced into the gaps formed between the sheets. Maintenance of the rear suspension of the MA3-64227 car comes down to checking the tightness of all bolted connections. Particular attention should be paid to the fastening of brackets 11 (see Fig. 69) to the car frame and the tightening of the stepladders, as well as the connection of the reaction rod hinges and the nuts 10 of the tie rod 12. Tightening the nuts of the rear spring stepladders should be done on an unloaded vehicle, tightening torque 70 -80kgs.m. The tightening torque for nuts 10 is 32-40 kgf.m, and the tightening torque for the reaction rod brackets is 18-20 kgf.m. During seasonal maintenance, you need to change the oil in the balancer housing, for which you need to remove the balancer cover, drain the oil, wash the cover and replace it. Clean oil is poured to the level of the filler hole. During operation, you need to ensure that there is no leakage of lubricant through the covers and the oil seal of the balancer axis. Elimination of leaks is carried out by replacing the oil seals, gaskets of the balancer covers and tightening the bolts securing the covers
Repair
Spring repair. Before you begin to remove the spring, you need to brake the car with the parking brake, install chocks under the wheels, and loosen the nuts securing the wheels and spring ladders. The procedure for removing the front and rear (MAZ-54322) springs is as follows: · use a jack to unload the wheel on the side of the spring being removed and install a stand under the frame side member; · remove the wheel, disconnect and remove the shock absorber (for the front suspension); · unscrew the nuts of the stepladders securing the spring, place chocks under the drum and, lowering the jack, release the beam from the spring until the drum is seated on the chock; · remove the wedge securing the spring pin, knock out the pin, remove the eye from the front bracket and remove the spring. To restore a broken spring, it must be sorted out in order to replace the broken leaf. When assembling the spring, the step-ladder nuts for fastening the overhead eyelet are tightened with a torque of 2-4 kgf.m and unscrewed at two opposite points. In fastening the front end of the spring, the pins and bushings are subject to the greatest wear. Pins and bushings are replaced if the gap in the joint is more than 2 mm. In fastening the rear end of the spring, the top and side liners are subject to the greatest wear, which are replaced as they wear out. If they are not replaced in a timely manner, the walls of the brackets wear out. If there is wear on the walls with a thickness of more than 2 mm, the brackets must also be replaced. You should pay attention to the uniformity of shrinkage of the right and left springs. If the difference between the shrinkage of the left and right springs on a loaded vehicle is more than 15 mm, then the spring with greater shrinkage is replaced. The spring brackets must be replaced if cracks or breaks are detected (welding is not allowed), as well as if the holes for the rivets are worn. If the holes for the rivets are slightly worn, temporary fastening of the brackets to the frame with bolts is allowed; the holes for the bolts are pre-reamed to the required size. The springs are also assembled using a device with a screw or hydraulic clamp. Before assembly, the spring leaves must be lubricated with graphite lubricant, assembled and tightened with a center bolt. Installation of springs on a car is carried out in the reverse order of removal.
Repair of the rear suspension of the MAZ-64227 car. The procedure for removing the rear suspension is as follows: · disconnect the driveshafts from the middle and rear axles; · disconnect the pneumatic system pipelines going to the bridges: · knock out the pins of the upper reaction rods 1 (see Fig. 69), after unscrewing the nuts, and remove the rods; · unscrew the bolts securing the balancer brackets 4 to the frame; · use a lifting device to lift the rear part of the car by the frame and roll out the axle trolley from under the car frame. The upper brackets of the reaction rods on the axle gearbox housings must be tied together with wire so that when the trolley is rolled out, the axles do not tip over and come out from under the springs; · Place the rear part of the car frame on trestles. Disassembly of the rear trolley must be done in the following order: · unscrew the nuts of the stepladders 2; · supporting the 8 balancer axis with a lifting device so that it does not fall, remove the spring ladders; · remove the springs; · unscrew the pin nuts of the lower reaction rods, knock out the pins and remove the rods 13; · roll back the rear and middle axles; · remove the balancer covers, drain the oil, unscrew the nut 7, remove the lock washers 6 and lock washers 5, unscrew the ring nuts and remove the balancers assembled with bushings and oil seals. Broken or cracked spring leaves, broken center bolts and clamps must be replaced. Cracks in clamps can be welded and cleaned flush with the main surface. The first main sheets, which have a wear thickness of more than 4 mm, are swapped with the second sheets of springs. Root sheets with a wear thickness of more than 6 mm are replaced with new ones. Sheets with residual deformation (sagging) are straightened. Spring mounting ladders that have cracks or broken threads are replaced with new ones. Before assembly, the leaf springs are lubricated with graphite lubricant, assembled, and the spring is tightened with a center bolt. Bushings and oil seals of balancers, pins of reaction rods, worn out during operation, must be replaced with new ones. Installation of the rear suspension on the car is carried out in the reverse order of removal. The nominal and permissible dimensions of the rear suspension parts of the MAZ-64227 without repair are given in table. 10.