Actually, I went to remove the gearbox and noticed that the play was somehow too big.
I started googling and can’t find anywhere how long it should be. Actually photos of extreme positions
Comments 42
normal play, I have more than almost a quarter of a turn, I think the teeth are like sharpened steel, there is noise not without this, if you are meticulous about mm, then definitely change the pair))), if there is play in the shank along the axis, the washer must be removed
How do you determine from two identical static photos what kind of backlash a person means? No matter how much I looked at these photos and how much I re-read the author’s text, I still didn’t understand what kind of backlash the author was talking about. I read the comments, you tell the author about one backlash, he tells you about another, but everyone seems to understand something, although reading the comments I understand that one is about warm, and the second is about sweet. Author, if you want to ask about backlashes, don’t be lazy to make a video and ask a question specifically based on the video.
PS: I’ll answer on my own, if you are concerned about the play in the gears of the GP, especially since you determined it by rotating the shank or wheel, this does not mean that there is play in the GP, maybe you have slightly worn splines on the axle shafts, if there is no audible knock when at the beginning of the movement, you shouldn’t bother just yet. If your shank is loose in any of the planes, remove the bridge and troubleshoot all the giblets, otherwise it may be too late.
About two weeks ago I noticed a strong vibration when driving and a leaking shank seal. I pulled the shank, the play was very noticeable. I wanted to change the bearing on the shank, but that was not the case. They removed the bridge and took it to an aggregator at one of the auto companies. There the bridge was opened, it turned out that the star came to literally everything. The shank bearings need to be replaced, the shank thrust bearing is loose, the GP driven gear is chipped, the differential bearings are both blackened, change all this. These are all the consequences of driving on water after an ambush. The entire repair costs about 10k.
Adjustment of the gaps in the meshing of gears and in the bearings of the drive axle of UAZ-3741, UAZ-3962, UAZ-3909, UAZ-2206, UAZ-3303 cars is carried out only when replacing gears or bearings, or when axial clearance appears in the driving or driven gears of the main transfers. Replacement of main gears should only be done as a complete set.
Adjusting the bearing of the drive gear of the main gear of the drive axle UAZ-3741, UAZ-3962, UAZ-3909, UAZ-2206, UAZ-3303.
Adjustment of the bearing of the drive gear of the main drive of the drive axle must be done by selecting the thickness of the shim pack and tightening the flange nut. The bearing must have such a preload that there is no axial movement of the drive gear and the gear can be rotated by hand without much effort.
Check the bearing preload with a dynamometer. At the same time, disconnect the left half of the crankcase. Remove the drive gear bearing cap so that cuff friction does not affect the dynamometer readings. With proper adjustment, at the moment of turning the drive gear by the hole in the flange, the dynamometer should show a force of 1.5-3 kgf for run-in bearings and 2.0-3.5 kgf for new bearings.
When replacing the cover, align the lubrication holes in the crankcase, gasket and cover. The tightening torque of the drive gear flange nut should be 17-21 kgcm. You cannot even unscrew the nut a little in order to ensure that the cotter pin hole matches the slot in the nut. If the nut is not tightened sufficiently, the inner rings of the bearing may rotate and, as a result, wear of the adjusting shims and the appearance of dangerous axial play.
If axial play of the drive gear appears during vehicle operation, tighten the flange nut. If the axial play is not eliminated, then reduce the thickness of the shim pack and adjust the bearing as indicated above.
After adjustment, monitor the heating of the bearings while driving. A slight heating of the bearing is not dangerous, but if the neck of the drive axle crankcase heats up to a temperature of 90 degrees or higher, the water on the crankcase boils, this means that the bearing has been overtightened and the overall thickness of the gaskets should be increased.
Adjusting the differential bearings of the drive axle UAZ-3741, UAZ-3962, UAZ-3909, UAZ-2206, UAZ-3303.
Adjustment of the differential bearings must be done by selecting the thickness of the package of adjusting shims installed between the ends of the inner rings of both bearings and the gearbox. When replacing main gears and differential bearings, make adjustments in the following sequence:
How to identify faults and repair the front axle of a UAZ
UAZ is a common car on Russian roads. Its design features allow you to move without problems on paved areas, as well as off-road. Repairing the front axle of a UAZ is impossible without knowing the diagram of the wheel gearbox, the design of which is similar to a similar part of the rear axle. The key difference is the peculiarity of fastening and installation of the main gear, the design parameters of the ball bearing located in a special compartment-cup.
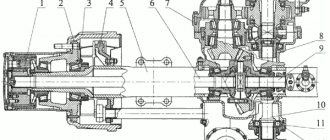
Connection diagram
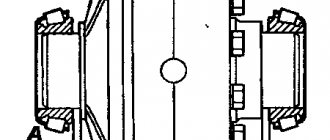
Shaft 11 rotates in a roller bearing, which is installed in the wheel gear housing cover, and a bronze bushing located inside the axle 18. At the end of shaft 11 there is a mechanism that disables the front wheels of the machine. The device consists of movable couplings 14 and 15. They are located on the splines of the shaft and bolt 17 and 16 with a spring and a ball.
These movable couplings, with their external splines, are connected to the internal splines of the drive flanges 13 and 14, which are bolted to the wheel hubs. In order to reduce wear on the metal surfaces of the parts of the front axle of the UAZ 469, as well as to save fuel when driving on paved roads, it is recommended to also turn off the front wheel hubs while disabling the front drive axle.
To carry out such a shutdown, it is necessary to remove the protective caps 16 and 18. Next, unscrew the bolts 16 and 17 from the shaft hole 11. Place the coupling in such a position that the signal ring groove “a” on its plane is in the same plane as the end of the flange. When the coupling is installed in the required position, the protective caps must be tightened.
Device and characteristics
The design of the UAZ front axle in older models has few differences from the similar design in new models (Spicer). The main differences lie in the design of the crankcase, the dimensions of the components of the drive gear and differential, and in a number of units used.
The design of the old model is in many ways similar to the rear axle of the UAZ and consists of the following components:
- The key place is occupied by the split crankcase, consisting of 2 separate parts.
- Each half is equipped with press-in housings with internal axle shafts.
- Safety valves on the casings, responsible for controlling the growth of oil volume in the mechanism.
- The differential and main gear of the casing are made according to the standard design: a small-diameter drive gear is located in the horizontal plane, in contact with the cardan.
- The large driven gear in the longitudinal plane is in mesh with the main gear. It has a built-in differential of 4 satellites.
- The edges of the crankcase housing are equipped with pivot joints made of ball joints with a rotating housing.
A design feature of the Spicer bridge is the presence of a contact system between the wheel hub and the axle shaft. It is a coupling responsible for connecting and disconnecting 2 elements. The mechanism ensures the transmission of torque to the wheel from the differential. The disconnected clutch leads to free rotation of the wheel on the axle, and the vehicle receives a 4*2 wheel arrangement. The engaged clutch leads to the connection of the hub, differential and axle shaft, the car turns into a 4*4 all-wheel drive.
Old UAZ car models were distinguished by the presence of hubs with drum brake units.
Their wheel rotation angle is no more than 29°. The knuckle and linkage arms connected to each other are a wheelbase control tool. In new models (Spicer), the angle of rotation reaches 32°. The rest of the bridge structure is similar.
What is the difference between a UAZ military bridge and a civilian one?
The military axle, unlike the civilian Spicer front axle, is equipped with final drives. This design feature caused the following differences between military models:
- Gear axles are located 4 cm above the wheels. This difference helps to increase vehicle clearance - the distance between the supporting surface and the bottom of the bridge.
- The main pair is smaller in size and has a small number of large teeth, which increases the reliability of the design. The unit weighs more.
- The gear ratio is 5.38 (traction, but not speed).
- The length of the rear propeller shaft is 1 cm shorter.
Advantages of military bridge models:
- increased ground clearance by 8 cm;
- high torque, allowing you to transport heavy objects, tow and move at low speeds over difficult terrain;
- load evenly distributed between the main and final drives;
- larger teeth increase reliability;
- limited slip differential for off-road driving.
The military design of the UAZ was thought out to accompany tank colonies, which indicates the power and reliability of the design.
How to turn on the front axle on a UAZ
Engaging the front gear may be necessary if it is necessary to turn from an asphalt road surface onto a country road or terrain with potholes and mud. In the new conditions, rear-wheel drive will not cope with difficulties. Engaged front-wheel drive is a means of solving the problem.
System startup sequence:
- Stop the car and check the operation of the front wheel quick release clutch. It is turned on by turning the wheels clockwise until they stop.
- Move the rightmost lever forward to switch the front wheels to driving status. Now their rotation will be equivalent to the rear.
If the road condition worsens while driving, it becomes more and more difficult to continue driving, the engine stalls, you need to stop the vehicle and engage a lower gear. To do this, you will need to move the middle lever back. In low gear, all 4 speeds are available, and driving becomes easy and smooth again.
Malfunctions and repair work
Common malfunctions of the UAZ front axle and possible repairs:
- Leakage of lubricating fluids. Check the tubes and connecting elements for mechanical damage - the cuffs and flange for functionality, the oil container for the optimal fluid level.
- High wear of fasteners.
- Bearing defects caused by the use of poor quality material by the car plant.
- Broken axle teeth. Adjustment will not help; parts need to be replaced.
- Mechanical defects of the beam.
- Wear of elements. The situation is resolved by replacing it with new spare parts.
- Poor grip of the bearings and main gears indicates the need for tension adjustment.
Bridge repairs begin after diagnosing and searching for the cause of problems in the functioning of the mechanism, which are diverse:
- transmission components of a rear-wheel drive vehicle are faulty due to regular movement over difficult terrain;
- use of consumables and lubricants of unsuitable quality;
- Failure to monitor tire pressure can lead to shaft and bearing failures.
Most often, car owners are faced with a violation of the axial space of the kingpins and are knocked out of the required position. To diagnose, you need to jack up the front of the vehicle and move the wheel in a vertical plane. The presence of axial play indicates the need to adjust the clearance of the pins.
How to adjust bridges
You can adjust the UAZ axles yourself. This will require a number of tools and good knowledge of the mechanism. Access to the necessary parts and assemblies is possible after dismantling the structure and separating the crankcase parts. The first sign of the need to adjust the gearbox is loud noise and malfunctions of the part. Such work is required after diagnosing the condition of bridges. Adjustment includes a number of activities.
At the first stages of repair work, ensure that the nuts of the brake elements can be loosened freely. The tools you will need are a split wrench, brake fluid and a mixture of WD-40. The bridge is dismantled as follows:
- remove the fasteners between the drive gear flange and the propeller shaft;
- secure the shaft to the side;
- place the front part of the vehicle on jacks, raising the wheels above the surface;
- additionally install safety supports;
- remove the nut between the brake pipe and hose and close the hole with a plug to avoid large losses of fluid;
- after removing the lower fasteners and moving the shock absorbers from the axle, the bridge will lower;
- remove the stepladder nuts and roll out the bridge (without wheels it weighs more than 100 kg).
For adjustment and repair work, you will again need a split wrench, a metal corner with pins, a universal puller, a container with brake fluid, transmission oil (if you don’t want to fill in the old one), a set of bearing spacers for adjusting the driven gear and a micrometer. Preparatory work:
- remove 10 bolts connecting the axle shafts to the hubs;
- remove the axle shaft from the crankcase;
- Unscrew the fasteners of the brake pipes;
- remove the tee from the bracket;
- remove the connecting elements between the crankcase parts, keeping the gasket;
- Remove the differential housing and driven gear, outer rings.
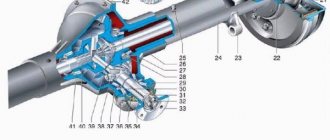
The main support of the drive gear, which determines the reliability of the bridge, is a tapered roller bearing located in the front part, consisting of 2 rows. A similar part on the opposite side performs an auxiliary function. To repair, you will need to remove the right drive gear by removing the bolts.
All disassembled components should be inspected for wear and replaced if necessary. The shims are located in the middle of the inner rings of the bearing. Their thickness is measured with a micrometer, the part with the smallest value is removed to create preload in the bearing. Adjust the part until the dynamometer shows a resistance of no more than 3.5 kgf. Otherwise, you will need to remove another gasket. Tight turning indicates the need to increase the thickness of the gasket pack. After determining the desired value, you can put the unit back together.
The next step is to adjust the differential bearings:
- press in the outer and inner rings;
- mount the differential with the main gear into the crankcase;
- install the gasket;
- separate the crankcase parts;
- remove the differential, check the clearance of the differential and bearing rings;
- install the main gear mechanism on the right side of the crankcase;
- install the drive shaft;
- pull together the crankcase halves, observing the required gap size, adjusting it if necessary with cardboard spacers.
After all the work, it is necessary to assemble the bridge back and install it on the car. At the same time, you can lubricate the parts and replace worn fasteners.
How to remove the shank
It is possible to repair, replace and adjust the shank only after removing it. To do this, it is necessary to check the backlash at the beginning of work. Then you will need to perform the following operations:
- Turn the cardan clockwise until it stops. At this point, make a mark on the body of the structure.
- Turn the cardan in the opposite direction until it stops. Make a second mark.
- Control between the designated positions of the maximum permissible distance is 11 mm.
- Removing the cardan flange, tightening the nuts.
- Checking the backlash. Removing the front axle.
- Removing the nut and shank.
- Removing oily liquid.
After this, the wheels and steering controls can be removed.
How to shorten a bridge
Before shortening the axles, it is necessary to remove the axle shafts. You will need to perform the following manipulations:
- cut the stocking;
- select a pipe of suitable diameter and install it inside;
- welding work;
- cut off the axle shaft;
- cut a hole on a lathe and mount the axle shaft into it;
- Weld the resulting structure on both sides, remove excess parts.
In this way you can make a bridge for 80 cm gauge.
Replacing the bearing and shank oil seal
Replacing the front axle shank bearing and oil seal includes the following activities:
- Dismantling old parts (bearings and oil seal).
- Replacing a worn bushing to prevent damage to new components.
- Installation of new parts, flange and fasteners.
The tightening of the nuts during operation must be controlled with a dynamometer to create the necessary resistance. For new bearings, the preload is greater than for used parts. Upon completion of the work, it is necessary to install the axle shafts and cardan, add oil.
Video: How to Remove the Rear Axle Shank of a UAZ
The next step is to adjust the differential bearings:
- Press down on the outer and inner rings;
- Installation of differential with main gear in the crankcase;
- Install the gasket;
- Disconnect the crankcase parts;
- Remove the differential, check the clearance size of the differential and bearing rings;
- Install the main gearbox mechanism on the right side of the crankcase;
- Install the drive shaft;
- Tighten the crankcase half to the required clearance, adjusting with cardboard spacers if necessary.
After completing the work, it is necessary to assemble the bridge back and install it on the machine. In this case, the parts can be lubricated and worn fasteners can be replaced.
How to remove the shank
Repair, replacement and adjustment of the shank are possible only after its removal. To do this, check the game at the beginning. Then you will need to perform the following operations:
- Turn the propeller clockwise until it stops. At this stage, make a mark on the body of the structure.
- Turn the driveshaft in the opposite direction until it stops. Make a second assessment.
- The control between the specified positions of the maximum permissible distance is 11 mm.
- Removing the cardan flange, tightening the nuts.
- Check for backlash. Dismantling the front axle.
- Removing the nut and shaft.
- Removing oily liquid.
Increasing the service life of the structure
There are several ways to increase the service life of the UAZ structure. The presence of a front axle in a vehicle imposes special requirements for operation. If you monitor and disable the hubs of the axle shafts and wheels at the right time, this will help increase the service life of the mechanism parts when the front-wheel drive is turned off. To prevent mechanical damage to drive components, turn on after the couplings. After switching from off-road to highway, you should immediately switch to rear-wheel drive. Another reason that contributes to rapid wear of rubber is constantly working clutches.
Machine maintenance must meet a number of requirements:
- Periodicity.
- Regular check of main components and mechanisms.
- Timely replacement of worn parts.
- Monitoring the level of oil and other liquids.
- Checking and adjusting wheel bearings.
- Monitoring the functionality of the main gear axial clearance components.
- Use of high-quality consumables and mixtures.
Regular maintenance, careful operation and following the manufacturer’s recommendations are the key to long and reliable operation of the vehicle.
Maintenance
Maintenance allows you to maintain the front drive axle of the vehicle in working condition. Thanks to maintenance, the wear rate of parts and components is reduced. It is important that when it is carried out, the occurrence of malfunctions is prevented; they are identified at an early stage for timely elimination.
- daily – EO;
- first – TO-1;
- second – TO-2;
- seasonal – CO.
The frequency of maintenance-1 and maintenance-2 is regulated by GOST 21624-81.
Replacing the shank bearing of a UAZ loaf
mnbv May 25, 2013, 08:54
civil axle front shank bearing
mitek May 25, 2013, 11:07
civil axle front shank bearing
mitek May 28, 2013, 00:06
civil axle front shank bearing
Pal Sanych May 28, 2013, 18:11
civil axle front shank bearing
Engineer May 28, 2013, 6:36 pm
Shop of the gonchely gonchel!
civil axle front shank bearing
svh701 05 Jun 2013, 21:28
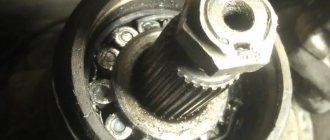
Maybe it will be useful for someone, I managed to remove it this way, although the method is controversial (without adjustment), we'll see how it goes. 1) Unscrew the shank flange. 2) Remove the cover with the oil seal. 3) We put on the flange and tighten the nut. 4) We continue to carefully tighten the nut, due to the rotation of the oblique teeth of the differential, the bearing assembly comes out of the bridge. 5) We’re going to look for a press; mine was pressed in with such force that I couldn’t remove the clip with a puller. 6) Immediately we change the bearing, and, pressing it with a press, we adjust the number of gaskets; I had to disassemble and reassemble three times. 7) Press the race together, leaving one last bearing. We go back to the garage, chamfer the end of the shank to make it easier to get into the bearing remaining in the bridge. 9) We put the shank in the bridge, take the flange, put it on the shank and with light blows, moving away the hand with the flange, push the shank into place. 10) Install the bearing race. 11) We install the gaskets, the second bearing and the thrust washer - we assemble everything completely.
My axial play has disappeared, but the radial play of 10 degrees remains, how critical is this?
civil axle front shank bearing
mitek 05 Jun 2013, 21:48
civil axle front shank bearing
Evgen989 05 Jun 2013, 22:23
civil axle front shank bearing
Engineer 05 Jun 2013, 22:24
and then into oncoming traffic and under a KAMAZ!
civil axle front shank bearing
Evgen989 Jun 05, 2013, 10:26 pm
civil axle front shank bearing
svh701 05 Jun 2013, 22:33
civil axle front shank bearing
Pavel77 Jun 6, 2013, 10:10
civil axle front shank bearing
svh701 06 Jun 2013, 14:10
civil axle front shank bearing
svh701 Sep 18, 2013 10:01 pm
civil axle front shank bearing
Vitya 10 June 2022, 21:32
civil axle front shank bearing
Evgen989 11 Jun 2022, 01:07
civil axle front shank bearing
Bald 11 Jun 2022, 15:47
civil axle front shank bearing
Sergey Akatiev 11 June 2022, 18:36
civil axle front shank bearing
Vitya 11 June 2022, 20:26
civil axle front shank bearing
GOA 13 June 2022, 21:40
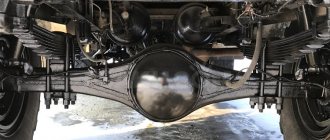
Repair of the rear axle gearbox (Gearbox hum, bridge hum) UAZ Patriot.
Hello dear reader!
Before owning Patr, the most difficult car repair I ever had to do was replacing the spare tire. With the purchase of the patent, I began to remember more and more often the dream of one mechanic “to keep the file from getting hot.” After 100,000, the car began to mope, and the rear gearbox suddenly began to howl under load.
I examined the shank - the shank nut was unscrewed, I tightened it, the noise remained.
I removed the gearbox cover to inspect the main pair.
According to an entry in the technical journal, not long ago I replaced the ZM shank oil seal and in response to my question about the tightening torque, the mechanic said that he determined it by hand.
I started studying the topic, I don’t know any specialists, I decided to try to learn how to repair it myself.
Before starting work, I ordered the missing tool (hour indicator, etc.) and spare parts (main pair, etc.), the estimate turned out to be impressive. I agreed to provide a lift for a couple of days. After dismantling, a preliminary inspection did not seem to reveal critical wear on the main pair or bearings. It was not possible to really see the contact patch, but it seemed like the shank went towards the cardan and a stain along the outer edge (dusted from a can of spray paint, the special paste I ordered - Permatex Prussian Blue - Article 80038 has not yet arrived). I measured the gap between the driven and driving gears with an indicator - 0.5 mm, twice as large as required (bumps were felt in the transmission).
I decided that I was still missing one more “device” (for measuring the distance to select an adjusting ring for the shank), a bearing puller, few adjusting rings of different ratings, to limit myself to replacing the bearings on the shank, the oil flinger ring, the flange and the oil seal and adjusting the tightening of the shank nut (with replacing the nut and a new bushing). The idea of the cage and the rollers of the shank bearings are worn out and the shank has sagged. The mechanic from the service center helped me remove the large bearing from the shank using an angle grinder (I haven’t acquired an angle grinder yet). Next, I knocked out the old ones and hammered new ones into the crankcase, and pressed the new one onto the shank using the old bearing. The shank nut for the thread lock was cored. Replaced the gasket on the gearbox cover, the cover with sealant, replaced the cover bolts. Based on the results of the work
the side clearance is 0.32, I’m thinking of installing a 3.6 mm washer (stock differential 3.5 mm, shank 2.8 mm) and stop there for now. When I took it out for a test drive, the car started off surprisingly quietly. I went to Moscow (donated unnecessary spare parts - GP, etc.), and checked at the same time, the hum did not go away at all, now it is there with a sharp release of gas, the crankcase does not seem to heat up much, I threw snowballs, the snow melts quickly, but the water does not hiss.
Blog about UAZ
Adjustment of the gaps in the meshing of gears and in the bearings of the drive axle of UAZ-3741, UAZ-3962, UAZ-3909, UAZ-2206, UAZ-3303 cars is carried out only when replacing gears or bearings, or when axial clearance appears in the driving or driven gears of the main transfers. Replacement of main gears should only be done as a complete set.
Adjusting the bearing of the drive gear of the main gear of the drive axle UAZ-3741, UAZ-3962, UAZ-3909, UAZ-2206, UAZ-3303.
Adjustment of the bearing of the drive gear of the main drive of the drive axle must be done by selecting the thickness of the shim pack and tightening the flange nut. The bearing must have such a preload that there is no axial movement of the drive gear and the gear can be rotated by hand without much effort.
Check the bearing preload with a dynamometer. At the same time, disconnect the left half of the crankcase. Remove the drive gear bearing cap so that cuff friction does not affect the dynamometer readings. With proper adjustment, at the moment of turning the drive gear by the hole in the flange, the dynamometer should show a force of 1.5-3 kgf for run-in bearings and 2.0-3.5 kgf for new bearings.
When replacing the cover, align the lubrication holes in the crankcase, gasket and cover. The tightening torque of the drive gear flange nut should be 17-21 kgcm. You cannot even unscrew the nut a little in order to ensure that the cotter pin hole matches the slot in the nut. If the nut is not tightened sufficiently, the inner rings of the bearing may rotate and, as a result, wear of the adjusting shims and the appearance of dangerous axial play.
If axial play of the drive gear appears during vehicle operation, tighten the flange nut. If the axial play is not eliminated, then reduce the thickness of the shim pack and adjust the bearing as indicated above.
After adjustment, monitor the heating of the bearings while driving. A slight heating of the bearing is not dangerous, but if the neck of the drive axle crankcase heats up to a temperature of 90 degrees or higher, the water on the crankcase boils, this means that the bearing has been overtightened and the overall thickness of the gaskets should be increased.
Adjusting the differential bearings of the drive axle UAZ-3741, UAZ-3962, UAZ-3909, UAZ-2206, UAZ-3303.
Adjustment of the differential bearings must be done by selecting the thickness of the package of adjusting shims installed between the ends of the inner rings of both bearings and the gearbox. When replacing main gears and differential bearings, make adjustments in the following sequence:
1. Press the inner rings of the differential bearings onto the journals of the assembled differential so that there is a gap of 3-3.5 mm between the ends of the gearbox and the ends of the inner rings of the bearings.
2. Remove the axle shafts and install the differential assembly with the driven gear into the crankcase, install the gasket and cover, tighten the cover mounting bolts and, turning the driven gear with a mounting blade through the neck of the crankcase, roll the bearings so that the rollers take the correct position. Then use fasteners to evenly and completely connect the cover to the crankcase.
3. Unscrew the fasteners again. Carefully remove the cover, remove the differential from the axle housing and use a feeler gauge to measure the gaps A and A1 between the ends of the gearbox and the ends of the inner rings of the bearings.
4. Select a package of gaskets with a thickness equal to the sum of gaps A+A1. To ensure preload in the bearings, add a 0.1 mm thick spacer to this package. The total thickness of the gasket package should be A+A1+0.1 mm.
5. Remove the inner rings of the differential bearings. Divide the selected pack of gaskets in half. Install the gaskets on the journals of the satellite gearbox and press the inner rings of the bearings until they stop. After this, adjust the side clearance by moving the driven gear.
When replacing only the differential bearings, measure and compare the height of the new and old bearing assemblies. If the new bearing is higher or lower than the old one by some amount, then reduce the thickness of the existing gasket package in the first case and increase in the second case by the same amount.
Adjustment of the side clearance and position of the main gears of the drive axle UAZ-3741, UAZ-3962, UAZ-3909, UAZ-2206, UAZ-3303.
Adjustment of the side clearance and position of the main gear gears must be done only when replacing old gears with new ones in the following sequence:
- first adjust the drive gear bearings and differential bearings as indicated above, - then proceed to adjust the lateral clearance in the meshing of the final drive gear teeth.
The lateral clearance in the meshing of the gears must be adjusted by moving the shims from one side of the differential box to the other. If you remove shims from the side of the driven gear, the gap in the mesh increases, but if you add shims, the gap decreases. The gaskets only need to be rearranged without changing their total thickness, so as not to disturb the tension of the differential bearings.
The circumferential side clearance should be in the range of 0.35-0.77 mm. Measure on the flange of the drive gear at a radius of 40 mm, check in four positions of the drive gear after each revolution. Having finished assembling the drive axle, you need to check its heating after the car is moving.
If the heating of the crankcase in the area of the double-row bevel bearing, drive gear or differential bearings is over 90 degrees, the water on the crankcase is boiling, then it is necessary to increase the total thickness of the package of selected gaskets for the double-row bevel bearing of the drive gear. And for differential bearings, reduce the thickness of the gaskets on the crankcase side, with a circumferential side clearance of 0.64 mm or more, or on the cover side, with a circumferential side clearance of less than 0.64 mm.
Adjustment
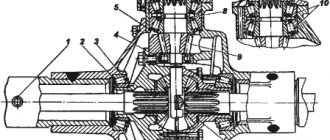
Before you start adjusting, prepare everything you need: bushings for the axle (if there is a groove on the axle), 4 thrust bushings, as well as oil seals. The main condition for adjustment is that the two halves of the CV joint do not dangle, both during straight-line movement and when turning! The procedure is as follows:
- Take the ball joint and press the bushing into it so that half of the CV joint does not hang out in the ball joint.
- There is a thrust washer on top; be sure to install a new one, even if the old one appears to be in good condition.
- Take a metal shaft (you can make it from a valve, for example) with cones on both sides and put a washer on it with a diameter similar to the central ball, that is, 27 mm. Place one edge against the center of the kingpin. Ideally, the second edge should also be in the center of the kingpin. If this is not the case, place the adjusting washers in the same place where the thrust washers are, or rather, under it.
Adjustment
- It is necessary to try on the steering knuckle body over the ball joint and make sure that the center of the large hole in the steering knuckle coincides with the center of the support. If it is shifted by at least 3 mm, the CV joint cannot be assembled, since there is already a bushing there. And to adjust in the center, place a certain number of adjusting washers under the left or right kingpin, depending on which direction and how many mm you need to move the central axis.
- The kingpin must be tightened so that by hand you can turn the ball joint back and forth. If the seat for the king pin is broken and the king pin rotates together with the ball, grind off a few millimeters on the king pin and install it through the bushing. Rotation or play is unacceptable, since they lead to rapid wear of both the kingpin and the seat under it.
- It is better to replace the bushing in the axle itself (both front and rear). If necessary, adjust the size using a reamer. It is important to note that each half of the CV joint needs to be done differently. There shouldn’t be any play, but if half of the CV joint is too tight, then it’s better to remove it with a larger reamer.
- It is extremely important that the bushings are in place as shown in the image. If you place the bushing on only one side, then when the wheel turns, most of the load will fall on it, as a result - rapid wear, the appearance of play, and then the CV joint needs to be replaced. Bronze bushings should be located in these places
During the assembly process after repair, it is necessary to lubricate all the bolts with nigrol so that next time everything can be easily unscrewed. All mating surfaces (the junction of the axle and the steering knuckle housing) must be cleaned of dirt. It is not recommended to lubricate the CV joint with grease, as it is thick. When heated under the influence of centrifugal force, all the solid oil will be scattered over the walls of the ball joint, and it is necessary that the CV joint balls be generously lubricated. To do this, it is recommended to dilute the solid oil by half with nigrol.After final assembly and repair, one more important adjustment needs to be made. We are talking about an adjusting rotary bolt. This is the bolt that limits the maximum angle of rotation of the wheel. It is important not to overdo it; do not tighten the bolt all the way - otherwise the wheel will jam. Tighten almost to the end, and then try to turn the wheel (more precisely, the shaft on which it will stand). It is necessary to unscrew the bolt back until the wheel stops wedging. The rotation angle should be no lower than the factory one. Well, now you yourself can repair the front axle on the 469 UAZ!