9.1.4. Removing and adjusting doors
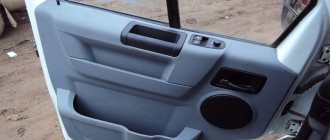
The door can be removed assembled or disassembled. We remove the outside rear view mirror, door trim, lock, window regulator and both windows (see 9.1.2. Removing and replacing windows and body windows).
Use thin pliers to unsplint the door stop pin.
Take out your finger.
Using a 10mm socket, unscrew the two bolts securing the limiter.
We remove the stopper from the inner cavity of the door.
Using a wrench or a 12mm socket, unscrew the four bolts securing the hinges.
. and remove the door. We install the door in the reverse order, lubricating the stopper parts with any grease, and the hinges with transmission oil.
Removing the sliding door and disassembling its moving mechanism
We work together or three, as the door is heavy. We remove the upholstery (see section “9.1.3. Removing the dashboard, upholstery and interior partition”).
Using a wrench or a 14mm socket, unscrew the two bolts securing the door movement mechanism along the middle guide. Remove the bolts along with the plate.
Holding the door suspended, remove the middle door opening mechanism from it.
Using a 6-point hex key, unscrew the two screws securing the door to the upper support.
Having lowered the door slightly (by 2–3 cm), we remove the lever of the lower door opening mechanism from engagement with the lower guide.
. and remove the door.
Using a 14mm wrench, unscrew the three bolts securing the lever.
. and remove the lower mechanism lever from the door. We install the door in this sequence. First, we attach the upper support to the door. Then we install the middle guide mechanism on the door. The last thing we install on the door is the lower mechanism lever, having previously engaged the lever roller in engagement with the lower guide. After installation, we adjust the position of the door (see below “Adjusting the sliding door”).
Removing the sliding door opening mechanisms
Remove the sliding door (see above “Removing the sliding door”).
Using a wrench or a 8-mm socket, unscrew the four bolts securing the upper guide casing.
We remove the casing. After loosening the locknut, unscrew the bolt securing the upper support to the roller carriage (see below “Adjusting the sliding door”).
Disconnect the upper support from the carriage.
Remove the carriage with the roller from the top guide.
Using a 10mm socket, unscrew the four bolts securing the upper guide.
Remove the top guide.
Using the same key, unscrew the two bolts securing the upper guide support to the body.
We remove the support.
By prying the 12 clips (see section “Removing the sliding door trim”), remove the hardboard trim above the right rear wheel arch.
Using a “13” socket, from the interior side, unscrew the four nuts of the studs securing the middle guide.
Using a 12mm wrench, unscrew the bolt on the outer fastening of the middle guide.
Remove the middle guide. A rubber sealing gasket is installed between the guide and the body.
Use a screwdriver to pry up and remove the plug (or lampshade) in the body step lining.
In the opened niche, use a 12mm head to unscrew the bolt for the front fastening of the lower guide.
Using a 10mm socket, unscrew the other three bolts securing the lower guide.
Remove the bottom guide. We install the sliding door guides in the reverse order and coat their working surfaces, as well as the axes of the small rollers of the middle guide and the bearing of the upper roller with Litol-24 or CV joints-4 lubricant.
Sliding door adjustment
It is more convenient to work together. We adjust the door in the opening after replacing it, as well as in case of violation of its correct position during operation. It is more convenient to make adjustments with the latches removed (see section “9.1.5. Removing door locks”).
Door height adjustment
Use a 17 wrench to loosen the locknut.
. and, turning the adjusting bolt of the upper support with a 14 key, raise or lower the front edge of the door, achieving a uniform gap between it and the middle pillar. Tighten the locknut of the adjusting bolt. We remove the door trim (see section “9.1.3. Removing the dashboard, upholstery and interior partition”).
Using a 14 key, loosen the two bolts securing the door movement mechanism along the middle guide, and raise or lower the rear edge of the door, achieving a uniform gap between the door and the side of the body. While holding the door in the required position, tighten the bolts securing the mechanism.
Adjusting the door position “in depth” Loosen the locknut of the adjusting bolt of the upper door support (see above “Removing the sliding door opening mechanisms”) and moving the support within the adjustment slot, move the upper edge in a horizontal plane, and then tighten the locknut.
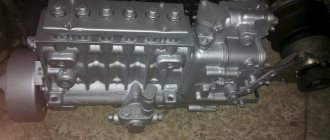
Device and tools for work
Adjustment of the Gazelle front doors is shown after their installation. To do everything correctly, you should study the principle of operation of the canvas. Most Gazelles have a sliding door; let’s take a closer look at the design:
- the sash opens to the side, parallel to the body;
- special fastenings help to travel;
- due to the clamps, bearings and running belt, the movement is smooth;
- during closing, the canvas reliably fixes the closing device;
- movable handles allow you to open the door from the inside or outside if the door is not locked.
For self-repair, you will need key No. 6, 14, 17.
Gazelle sliding door carriage
modification of the gazelle sliding door carriage — search on DRIVE2
modernization of a sliding door. This is probably true for someone.
GAZ Gazelle
gaselvagen › Logbook ›
modernization of the sliding door
. Probably someone will definitely need this. I’m absolutely sure.
As a rule, the designers of autogas are woeful. They joked as best they could. The problem with the sliding
door
is that the central roller is designed in such a way that there is a gap.
Replaced the sliding door mechanism - GAZ Sobol, 3.0 l., 2003.
Greetings to all! One wonderful, sunny day, a little trouble happened - one of the three bearings on the sliding
door
.
I was very worried about the fact that I would have to remove the door
, but everything turned out to be much simpler.
Adjusting, lubricating and replacing rollers on the sliding door.
Door
It rattled a lot and now it was her turn, I bought plastic clamps on the recommendation of the master, they are silent and I came to a man who knew his business, after fiddling around for about half an hour he changed the iron rollers.
Door repair. Part 2 - swing door theory.
GAZ Gazelle
3221 › Logbook ›
Door
.
Part 2 - swing door
.
This is what they look like directly on a gazelle
. While I was standing in the store I looked out the window and saw a gazelle
But for me it’s movable
exactly what you need! There is no need to dance around the gate.
Door repair. Part 1 - GAZ Gazelle, 2.5 l., 1996
I mean, I’m following my brother from one part of the city to another, it’s hot, the windows don’t really roll down, the sunroof doesn’t help, I turn into my brother and feel the breeze with freshness, I think, oh, how good it is.
Remaking the side door steps - GAZ Gazelle, 2.9 l., 2003.
The repair of the side step began with cutting out the rotten and unnecessary parts, and then I thought for a long time about how to do everything, because, firstly, there are no repair inserts for the step, and secondly, the outer part under the sliding part is no longer needed
mechanism.
Adjusting the side door according to the rules - GAZ Sobol.
On the carriage
I replaced the rollers with bearings.
I completely removed the door
in the opening (male and female).
Then, controlling the gaps with a caliper, I positioned the door
as exactly as I could in the opening (width and height), tightening and releasing, twisting and unscrewing in turn at all nodes.
Repair of sliding doors - Hyundai H-1, 2.5 l., 2009.
Removed the carriage
second
door
.
And I also drilled the axles. Then I collected everything. The doors
worked perfectly, closing and opening very
Perhaps someone will find the idea of using such rollers on
sliding door
carriages useful. Including me - when replacing the lower rollers.
Adjusting the sliding door - GAZ Gazelle, 2.0 l., 1998.
Hello to those who stopped by! I want to complain... I spent two days jumping around the car, trying to tune and adjust the sidewall. I was very NOT happy with the result, it’s terribly crooked and I don’t understand what to do! If anyone knows, tell me if my hands are crooked or my car is crooked.
Sliding door - GAZ Gazelle, 2.5 l., 2007
For about a week and a half now, in the evenings, after work, I have been trying to set up the sliding
door
.
The reason for these manipulations is biting on the rotation of the middle carriage
. I replaced two small bearings, lubricated all the rubbing elements and the lock.
Opening methods
If the Gazelle Next does not open, or the side sliding door is jammed, then professional and homemade methods for repairing the door leaf are used. When the lock is blocked and it is not possible to get inside, you can choose any of the options listed below to correct the situation. To work, you will need some tools that are in every driver’s car.
It will not be possible to open the door itself from the outside without a key without damaging the structure. First you need to get into the salon.
Screwdriver and seal
If the side door on a new Gazelle is jammed in winter, you can still try to open the door without a key; for this you need:
Using a screwdriver, you can unscrew the side door bumper; the round fasteners on the Gazelle are hidden under plastic plugs.
If you have a strong wooden stick or an iron rod with a hook at the end at hand, you can try using them to unlock the mechanism. The wedge needs to rest between the frame and the stand. It is important to act carefully so as not to damage the paintwork. When a gap appears between the glass and the seal, you can lower the window or press the lock.
A loop
To get into Gazelle Next when the sliding door is jammed, use a wire. Its length should allow you to reach the locking button. You need to make a loop at the end of the metal cord. In size it should be slightly larger than the opening button. Lowering the glass a little, the wire is lowered into the target and placed on the blocker button.
Deutz-Fahr tractors
The German brand Deutz-Fahr specializes in the production of agricultural machinery and tractors. The golden rule of a manufacturer is to invest in development and innovation. As a result, modern and reliable agricultural equipment comes off the assembly line, which makes work easier and increases productivity significantly. Today, about 1 million tractors of the brand are in use around the world.
Products
The brand produces a large number of agricultural equipment, the most popular being tractors, precision farming systems and combines.
Today the following series of tractors are produced:
- 6G.
- Episode 9 TTV.
- Episode 6.
- Episode 7 . . . .
- Agrotrac 130/150/170. .
- Agrofarm G410/430. . .
- Agroclimber F.
- Agroplus FVS.
Precision farming systems are used in many modern agricultural enterprises. Automated control and synchronization of operations significantly increases work efficiency. Deutz-Fahr offers reliable and highly precise automation. The precision farming system from Deutz-Fahr is:
- Reception of signals using all satellite systems, including corrective ones.
- A single interface for all processes and applications. Its diagonal can be 8 or 12 inches.
- Steering systems are represented by visual, power steering.
- High-precision sectional control that eliminates overlaps and skips.
- Possibility of complete automation of data management.
- A security system for large tractors has been introduced; the cameras have a wide viewing angle.
- .
- HTS 6060/6090/6095. .
History and demand
The history of the brand began much earlier than 1977, which appears in many sources. The main character was Nikolaus August Otto, who founded the world's first company specializing in the production of engines in 1864. Already in 1890, a thresher was invented. 4 years later, the first Deutz tractor with a 26 hp gasoline engine was released. In 1927, the first diesel tractor Deutz MTN222 was produced, which in fact became the beginning of mass production of standard and now familiar tractors.
Since 1936, small agricultural enterprises have already begun to use mechanization and its face - the Deutz F1V 414, with a power of 11 hp.
In 1937 Klöckner was acquired, which became Klöckner-Humboldt-Deutz or simply KHD. This company becomes the largest conglomerate of the Reich. At that time, KHD worked in all areas related to engine production.
Since 1949, the production of tractors with a diesel engine and air cooling Deutz F1514 and F2514 has been launched. Already in 1955, the 100 thousandth copy was produced.
1961 – start of cooperation with Fahr AG. It was made possible through the exchange of shares in KHD. In 1968, KHD bought part of the shares of Fahr AG and a brand appeared that is today recognizable in many countries - Deutz-Fahr.
Installation of central locking in Gazelle minibuses
Most minibuses produced today are equipped with a sliding passenger door. In a regular car, even if central locking is not initially provided, it will always be easy to install actuators and connect them to the lock rods. Installing a central lock on a Gazelle, if we are talking about a sliding door, looks a little more complicated. But still, this task is completely solvable, even for beginners. The main thing is that when installing the actuator, the door itself does not need to be removed. Further, all operations are considered in more detail.
Removing the sliding door and disassembling its moving mechanism
We work together or three, as the door is heavy.
1. Using a wrench or a 14mm socket, unscrew the two bolts securing the door opening mechanism to the middle guide. Remove the bolts along with the plate.
2. Holding the door suspended, remove the middle door opening mechanism from it.
3. Using a 6-point hex key, unscrew the two bolts securing the door to the upper support.
4. Lowering the door slightly (2–3 cm), remove the lever of the lower door opening mechanism from engagement with the lower guide
5. Remove the door
6. Using a 14mm wrench, unscrew the three bolts securing the lever
7. Remove the lower mechanism lever from the door.
We install the door in the following sequence.
First, we attach the upper support to the door.
Then we install the middle guide mechanism on the door.
We install the lower mechanism lever on the door, having previously engaged the lever roller with the lower guide.
After installation, adjust the position of the door.
Removing and installing the side door
Having the necessary equipment, assistants and work space at hand, the removal of the structure occurs in several stages:
- Removing the middle guide - remove the facing panel. To do this, you will need to use a 14mm wrench to remove the screws, then the retaining plates.
- To remove the middle mechanism, the door is held suspended.
- Use a hexagon to unscrew the top bolts that connect the sash to the main support.
- The door lowers a little. This allows you to remove the lever of the mechanism, which is located in the lower part.
- The web is removed after unscrewing and removing the three screws on the lever fastener.
Reinstallation is performed in reverse order. It should be noted that in this process the upper support is attached first, and then the lower one.
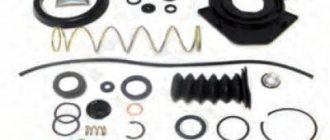
First we need to consider how exactly the standard casing is dismantled. We note the following: it is impossible to gain access to the pawl rod without removing the main lock completely. These are the design features of Gazelle cars. The photo will show what a lock with a rod looks like, and you will understand what you need to connect the actuator to. Let's start dismantling.
Cause of the malfunction
The malfunction of the upper shutter was as follows. That the spring installed on the tongue jumped out of its place and it did not return to its original position. As a result, the upper shutter jammed. Force was required to open the door.
It is important to properly adjust the fit of the doors. For this purpose, there are guide pins at the bottom. They move relative to the mounting bolts. The doors should be pressed evenly along the entire perimeter of the fit. And have the same gaps. Uneven fit should not be allowed. This may cause the doors to jam. And uneven pressing force.
Replacing the rear door lock on a Gazelle Next car is not difficult. But it can be avoided if the cause of the malfunction is eliminated in time.
Source