The UAZ distributor is considered one of the important components of the ignition system in a vehicle. Correct adjustment of this mechanism ensures optimal operation of the power unit as a whole. You can learn more about the principle of operation of the ignition system and how to set it up correctly with your own hands from this material.
Adjusting the distributor of the UAZ 421 engine
I set it to “feels” (at 50 km/h in direct transmission, gas to the floor and detonation should be average).
In this case, the position of the distributor adjustment is in the middle or slightly in the plus direction. Then I checked it with a strobe light - the ignition timing turned out to be greatly advanced, almost 10 cm (I checked it using the first spark plug). I set it closer to how it should be according to the manual - the distributor went almost all the way into the minus, while while driving the car became very sluggish, the idle speed dropped, but the engine runs smoother. Although I wouldn’t say that before that he worked hard.
How to properly adjust the ignition timing on a 421 carb engine? The head is most likely not sawn, the fuel is 92 benz.
I set it to “feels” (at 50 km/h in direct transmission, gas to the floor and detonation should be average). In this case, the position of the distributor adjustment is in the middle or slightly in the plus direction.
Then I checked it with a strobe light - the ignition timing turned out to be greatly advanced, almost 10 cm (I checked it using the first spark plug). I set it closer to how it should be according to the manual - the distributor went almost all the way into the minus, while while driving the car became very sluggish, the idle speed dropped, but the engine runs smoother. Although I wouldn’t say that before that he worked hard.
How to properly adjust the ignition timing on a 421 carb engine? The head is most likely not sawn, the fuel is 92 benz.
Source
A guide to replacing a distributor with an oil pump drive
Before installing a new distributor with a drive, you need to weigh your strengths, since it is not recommended to make mistakes when performing work.
So, how to replace and install the distributor:
- Turn off the ignition and remove the distributor cover; the tips and high-voltage cables are connected to it.
- Then you need to disconnect the wire connected to the switch from the distribution mechanism. You also need to disconnect the pipe connected to the vacuum regulator.
- Taking a 13mm wrench, unscrew the two nuts securing the device and remove the mechanism along with the oil pump drive from the power unit.
- After completing these steps, you will be able to see the gasket located under the drive. If as a result of these actions the position of the crankshaft has not changed, then simply install a new mechanism, making sure that the slider is located opposite the mark. All actions are performed in reverse order. When the installation is completed, the advance angle is adjusted.
- If, as a result, the location of the shaft has changed, then before installation it is necessary to move the piston of cylinder 1 to top dead center. You need to ensure that the marks on the pulley align with the pointer on the motor itself.
How to properly install the ignition on a UAZ 421 engine
Engine UMZ-421. Guide - part 35
A distributor sensor with a faulty centrifugal regulator must be repaired
The regulator is adjusted by changing the tension of the weight springs due to
bending the posts on which they are attached.
The small spring of the centrifugal regulator (weaker) should have an initial
condition there is a slight preload, which is ensured by the position of the strut and spring. Lack of tension (at low engine speeds) leads to an arbitrary change in the ignition timing.
6.9 REPAIR OF SENSOR-DISTRIBUTOR.
Repair of the distribution sensor consists of replacing worn or faulty
parts with mandatory subsequent adjustment, ensuring compliance of the characteristics of the regulators with the parameters specified above.
Disassembly of the distribution sensor for repair must be performed as follows:
in order: – remove cover 11 and slider 15 (see Fig. 6.23); – remove the low voltage terminal; – unscrew three screws 19 securing stator 20 and remove it; – remove the felt felt 16 and unscrew the screw 17 securing the rotor 10 and remove it; – remove vacuum regulator 6; – unscrew two screws 3 and remove the stator support with bearing 23; – if necessary, remove springs 24 and the movable plate of the centrifugal regulator; – if necessary, remove the retaining ring 30 from the roller coupling 32; – knock out pin 31 from the roller coupling and remove the roller.
6.11.2 Checking the condition of parts
Inspection and verification of the sensor-distributor parts must be performed as follows:
In order: – thoroughly clean the lid and slider from dirt. The nests should be cleaned especially carefully
terminals of high-voltage wires of the cover. The terminals inside the cover and the current carrying plate must be wiped without using any tools, as this may lead to an increase in the gap in the high-voltage circuit, which is unacceptable. The lid and slider with cracks and burnouts must be replaced;
– check whether the central contact of the cover moves freely, check with an ohmmeter
ohmic resistance of the central contact. The resistance should be within 8000...13000 Ohms. The runner must fit tightly onto the rotor. Check the presence of a flat spring in the slider socket;
– inspect the inner surface of the stator. There should be no
traces from touching the rotor poles. Check the resistance of the stator winding, which should be 770 Ohms, as well as the integrity of the wire connecting the stator terminal to the sensor terminal;
Blog about UAZ
With the UMZ-421 engine not running, the ignition timing setting angle at the end of compression in the first cylinder should be 5 degrees before top dead center. In this case, the second mark on the damper part of the engine crankshaft pulley should be located opposite the indicator rib of the timing gear cover.
Setting the ignition timing on the UMZ-421 engine.
— remove the cover of the sensor-distributor; — Unscrew the spark plug of the first cylinder; — close the hole for the spark plug of the first cylinder with your finger; — turn the engine crankshaft until air begins to escape from under the pin. This will happen at the beginning of the compression stroke; - making sure that compression has begun, carefully turning the engine shaft, align the hole on the crankshaft pulley with the pin on the timing gear cover; — making sure that the slider electrode is installed against the terminal on the cover marked with the number “1” , the terminal for the ignition wire of the first cylinder spark plug, tighten the bolts so that the octane-corrector indicator of the distribution sensor coincides with the middle division of the octane-corrector; — loosen the bolt securing the octane corrector plates to the sensor-distributor body; — holding your finger on the slider against its rotation, to select the gaps in the drive, slowly turn the housing until the mark on the rotor aligns with the arrowhead on the stator of the sensor-distributor; — tighten the bolt securing the octane corrector plate to the sensor-distributor body and install the cover of the sensor-distributor in place; — install high-voltage wires into the cover of the sensor-distributor in accordance with the operating order of the cylinders 1-2-4-3, counting counterclockwise.
After each setting of the ignition timing, check the accuracy of the ignition setting by listening to the engine while the car is moving. For this :
— warm up the engine to a temperature of 60-90 degrees, driving in direct gear on a flat road at a speed of 20-40 km/h; — give the car acceleration, sharply, all the way, by pressing the throttle pedal; - if a slight and short-term detonation is heard, then the ignition timing is set correctly; — in case of strong detonation, turn the housing of the distribution sensor one division of the octane corrector scale counterclockwise, each division of the scale corresponds to a rotation of the crankshaft by an angle of 4 degrees; — in the complete absence of detonation, turn the sensor-distributor housing one notch clockwise.
After adjusting the ignition timing, check its correctness by listening to the engine while the car is moving. It is necessary to adjust the ignition so that only a slight detonation is heard when the engine is under heavy load. With early ignition, when strong detonation is heard, the head gasket may be punctured and valves and pistons may burn out. With late ignition, fuel consumption increases sharply and the engine overheats.
Precise ignition setting using a strobe light.
A more precise setting of the ignition timing is made using a strobe light. To do this you should:
— connect the strobe sensor to the high voltage wire of the spark plug of the first cylinder; — start and warm up the engine; — check the engine and, if necessary, adjust the crankshaft speed at idle within 700-750 rpm; — turn on the strobe and point it at the indicator rib on the camshaft gear cover, while the indicator rib and three fixed marks on the crankshaft damper pulley should be visible.
When the ignition is installed correctly, opposite the indicator edge there should be an area between the first and second marks of the damper pulley. If the position of the indicator rib and marks does not correspond to the specified ones, then it is necessary to loosen the bolt securing the sensor-distributor to the drive housing and, with the engine running and the strobe light on, rotate the housing of the sensor-distributor to the optimal position of the indicator rib and marks.
Ignition installation UMZ 421
Step-by-step instructions for adjusting the ignition timing of the UMZ 421 engine installed on UAZ and GAZelle cars. ➤ Using the starting handle (from the car tool kit), set the crankshaft to the position corresponding to the ignition timing angle of 5°.
➤ To do this, align the middle mark on the crankshaft pulley with the boss on the block cover at the end of the compression stroke in the first cylinder.
➤ If the distributor sensor is not removed from the engine, then the compression stroke of the first cylinder is determined by removing the distributor cap. The slider should stand against the internal contact of the cover, connected by a wire to the spark plug of the first cylinder. Or we turn out the spark plug of the first cylinder. Closing the hole with a paper stopper, rotate the crankshaft. The moment the plug comes out corresponds to the beginning of the compression stroke.
➤ Use a 10mm wrench to loosen the octane corrector bolt.
➤ and set its scale to zero division (middle of the scale).
➤ Use a 10mm wrench to loosen the bolt securing the octane corrector plate.
➤ and, turning the housing of the sensor-distributor, we align the marks (red mark on the rotor and arrow on the stator). Holding the sensor in this position, tighten the bolt.
Make sure that the slider is located against the contact of the cover of the first cylinder and check that the high-voltage wires of the remaining cylinders are connected correctly - counting counterclockwise from the first cylinder in the order 1-2-4-3. We recommend that you additionally check the correct ignition timing while the vehicle is moving. To do this, moving in fourth gear at a constant speed of 50–60 km/h, sharply press the gas pedal. If in this case detonation (the sound is similar to the knocking of valves) appears briefly - for 1-3 s, then the ignition timing is chosen correctly. Prolonged detonation indicates excessive ignition timing. We reduce it with an octane corrector by one division. The absence of detonation requires an increase in the ignition timing, after which the test must be repeated.
© 2016-2021 24techno-guide.ru
All rights reserved.
Use of site materials is possible only if you install an active direct link to our resource. FEEDBACK
Home
(Main page of the site)
Auto
(Reviews, reviews, test drives of cars)
Engines
(Description and design of various engines)
Techno
(Articles about equipment and mechanics)
Tuning
(Review of tuned cars)
Repair
(Do-it-yourself repairs)
Tractors
(Tractor special equipment)
Osago
(All about car insurance)
Car audio
(Music for the car)
Car LAWS
(Traffic rules, fines and car laws)
Lifehacks
(Tricks of life)
Photo/Video
(No comments)
All articles
(All publications that are on the site)
Ignition — UAZ 3962, 2.0 l., 1995 on DRIVE2
After replacing the high-voltage wires, the ignition did not give me peace. I drove, and it seemed to me that it shouldn’t drive like that. Well, since there was nothing to compare with. I decided to double-check the ignition... Having read the Kama Sutra and the BZ of my comrades, I picked up the tool... and work began... The first thing I do is set the TDC.
And I discover that the slider is looking in a different, abnormal direction for it.
It was no longer possible to adjust the octane corrector to “-”; it was at the maximum “+”. And he ran into the engine.
I remove the distributor and pull out the oil pump drive. To watch him live. There were no problems with removal. More on assembly later.
Using a control, I look for the moment of spark. But I see this kind of nonsense.
We clean the contacts and set the required gap.
Let's Start...And! There is a knocking and grinding noise in the engine, in the oil drive area. I saw a similar problem in one of the Flight Logs. It turns out that the drive blade did not get into the pump bushing. 10 attempts to insert everything were unsuccessful. I also tried to put matches... The whole evening passed like in a cartoon about Winnie the Pooh. “It comes in and comes out...It comes out great.” Having abandoned everything, I go home to re-read the primers. And I find installation instructions.
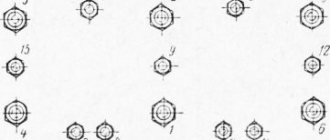
I do all these manipulations. Everything seems to be in place but does not reach its seat by 5 mm. Most likely the angle of the bushing is knocked off as in the diagram under the letter “c”. We are waiting for the weekend to continue the installation.
PS That's it, without waiting for the weekend I ran to the garage. I bought a long, wide screwdriver. And just like in a pharmacy. The bushing is 30 degrees, the drive is 45 degrees. and voila...everything is in place. I turned the crankshaft several times by hand... I listened and the blade didn't catch anything... I started it, warmed it up, everything was fine! All that remains is to check the accuracy of the ignition settings while driving.
Communities › UAZ drivers › Blog › Underwater ignition on UMP 421. Review and installation.
Comments 13
do the spark plugs need to be changed? the spark became more powerful. Or am I wrong? tell. if so, which ones?
It was so . As an intermediate option towards perfection, 421 will do. Mikas rules, since you still can’t beat an automatic ignition advance with a dual-circuit one.
what kind of starter do you have? it spins like crazy))
Please tell me what the wire braid is from and is it possible to use one Boshev coil instead of 2?
unfortunately not. but there are videos with his participation on the channel.
Yes, it has already been discussed a bunch of times on UAZBUKE... the plate must be U-shaped, otherwise the axial play will damage the sensors. At one time I assembled everything on one sensor and a two-channel switch. True, I still had two sensors and the switches were also installed in pairs, but this was simply duplication of systems, in case something failed...
Engine Modifications
Trying to eliminate the shortcomings, the designers constantly refined and corrected the unit. As a consequence, fixation of changes led to the appearance of modifications of the model, the performance characteristics of which differed.
The base engine “4218.10”, which became the basis for the rest of the modifications, had a defect due to which coolant penetrated into the oil through aluminum pores. It was not possible to eliminate the defect by replacing seals and gaskets. The designers used the technology of impregnating the frame with resin, after which the defects disappeared, and the modification received the marking “421.10”.
In order to increase the impulse at lower speeds and the power of the unit, an improved resonator was supplied to the product and the compression ratio in the combustion chamber was increased. Modification “421.10-30” after modification is installed on the Gazelle car. The same engine with a modernized power supply and exhaust gas removal mechanism is marked as “4215.10-30”.
Engine Description
The UAZ-421 engine has been produced at the plant in Ulyanovsk since 1993. The motor is used for installation on UAZ cars: “469”, “Bukhanka”, “Bars”, “31519”, “Hunter”, etc. The designers decided to replace the outdated “417” unit with a motor, introducing new trends into it.
Thus, an original design of an aluminum frame was used, in which dry liners with thin, cast-iron walls are filled. This made it possible to increase the cross-section of the chambers to 100mm, and leave the same size between the cylinders, 116mm. The solution had a positive effect on the service life of the unit, since rigidity increased and the tendency of the cylinders to become “oval” during operation decreased.
The changes affected the piston; the distance between the bottom of the displacer and the pin axis was reduced by 7.5 mm, which reduced the weight of the product. In addition, the length of the connecting rod has increased by 7 mm, reducing the force on the side surface.
Since the distance between the axes of the chambers remained unchanged, most of the components of the “417” and “421” power plants remained mutually interchangeable. The unification affected the cylinder heads, part of the chamber volume was transferred to the piston bottom, in the form of a cone. This increased the volume of the combustion chamber by 12 cm3.
The engine uses a disposable oil filter element, borrowed from the VAZ-2101. The rear crankshaft oil seal is made as a full rubber seal, rather than stuffed with cord.
The negative aspects of the UAZ-421 engine are insufficient quality of components, and increased fuel consumption. Fitting causes frequent leaks of liquids, and surface treatment affects the resource and potential of the unit.
Adjusting the Ignition on the UAZ 417 Engine
Modern developments and technologies are not aimed at the reliability and durability of engines, and it is no coincidence that experienced users are afraid to remember Russian units, such as the UAZ 417 engine. Despite discussions about the inconsistency of this type of installation and premature release, no real replacement has been found. Although this example of the auto industry shows the wonders of viability and practicality.
When creating the UAZ 417, the designers made several major updates to the mechanism, which made it possible to “revive” the engine again and again. Together with the restoration, the installation is undemanding in operation and shows acceptable power, and the carburetor eliminates the tendency to use expensive fuel. These reasons, coupled with pricing, became fundamental in shaping the popularity of the engine, which is still observed.
Description of engine 417
The UAZ 417 electric station is made at the car plant in Ulyanovsk. The collection began in 1989 and is not ending now. The engine is designed for UAZ jeeps: “469”, “452”.
Structurally, the power plant is a 4-cylinder engine with cameras arranged in a row and a compression of 7.0. The aluminum head makes the product lightweight and increases fuel economy. The formation of the working consistency of the 417 UAZ engine is carried out in the carburetor. The gas distribution device places the valve at the top, the camshaft is located at the bottom, ignition is carried out through a contact distributor, these characteristics simplify the design.
The drawback of the motor is cast iron capsules embedded in the frame with rubber rings, which reduce stability. In addition, the collection and production of certain items is lame. The device is susceptible to overheating due to problems with cooling. The quality of the gasket and sealing is impaired, which leads to oil leakage and the formation of antifreeze.
But the engine was simple and durable, which affected its durability and service life of 150,000 km. Popularity forced designers to take the path of modernization, which led to modifications of the model.
Characteristics of the UAZ 417 engine
The basis for the power plant of the UAZ 417 was the 414 engine, which was produced previously. Compared to its predecessor, the unit received a new cylinder head and an increased compression ratio. As for the gas distribution, there is a new camshaft and intake valve (the cross section has become larger). The head frame received a rounded profile of the output channels according to the mechanism of formation of a consistency with 2 chambers.
Properties of the UAZ 417 engine:
The power plant has certain features that are not typical for engines of this type, including:
- Sealing of the sleeve in a frame with rubber rather than copper rings;
- The first motors were made without rigidity, later 4 ribs appeared;
- Cooling water supply and flow from the core head;
- Combined exhaust manifold;
- The shape of the combustion chamber dome.
417 engine modifications
Since the power plant has been improved and improved more than once, engine modifications have been developed over 30 years of production.
Engine modifications with carburetor (417.):
In addition, an engine was made on the basis of the UMP-417 with the introduction of the UMP-420 injector. But the modification did not spread, and the carburetor version of the UMZ-421 took root. You can also read about which springs are best installed on the UAZ Patriot.
Maintenance and repair of the UAZ 417 engine
In order for the electric station to work for the set time, work is being carried out to configure and refine the unit. Replacement of consumables and manipulations with the engine are carried out in the following periods:
- Replacing lubricating fluids and filter parts of the engine: mileage 7500-10000 km;
- Valve adjustment on a UAZ 417 engine: mileage 15,000 km;
- Replacing the engine air filter element: once every couple of years;
- Engine exhaust manifold: once every couple of years;
- Replacing the engine fuel filter element: mileage 30,000 km;
- Spark plugs and engine battery: 60,000 km;
- Engine sump ventilation: every three years;
- Changing engine cooling water: mileage 40,000 km.
Engine ignition
Ignition mechanisms, components of the power plant. Combustion and detonation of the fuel load is directly related to the correct configuration and operation of the structure. For this reason, mechanisms and components are checked and adjusted from time to time.
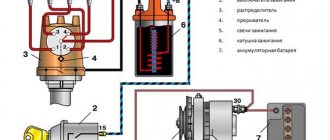
Car contact ignition:
Operating principle
Setting up the ignition of the UAZ 417 is a procedure that cannot be ignored. Starting the motor, operation and condition of the unit are components that depend on manipulation. Each engine cylinder is equipped with a spark plug, between the gaps of which a spark appears that ignites the fuel. The spark plugs work in the required sequence, applying the charge at the required time and power.
Without an ignition mechanism, the battery cannot create the necessary effective electronic field to ignite the fuel. This is due to the lack of device characteristics and the ability to generate a fixed current. The ignition increases the current, which causes the fuel mixture to be refueled.
Stages before starting the power plant:
- Fixing the contact in the keyhole and the subsequent rotation provokes the accumulation of electricity in the inductor;
- High voltage on-board coil processing (from 12 to 30,000 V);
- Dispersal and transportation of payment for cars with candles;
- Generation of a spark, ignition of fuel.
Ignition with missing contacts:
Varieties
Currently, three types of ignition are used in internal combustion plants. The type of “417” installed on the engine depends on the modification of the device.
An obsolete type used on most machines. The principle is based on the shock that is generated in the distributor. The design of the mechanism is ordinary, self-tuning and repair are likely, and the price of spare parts is likely. The ignition contains: a coil, a distribution device, an interruption device, a charge accumulation device, spark plugs;
- Without contact ignition.
The advantage is the formation of a strong arc. This is due to the voltage generated by the 2nd winding of the inductor, a product based on electricity and magnetism levels the block. The ignition must be lubricated by the drive every 10,000 km. To repair the mechanism you need to have special equipment.
A modern and precious device that is installed on the latest brands of cars. The mechanism is complex, but the adjustment is easier than previous types, and there are no contact spots prone to oxidation. On-site repair is not possible.
Ignition settings
Follow these steps to install the ignition:
- Before installing the ignition on the UAZ 417, lock and turn off the car with the hand brake. Then turn the crankshaft so that the first chamber switch is set to the highest position. At the same time, the coincidence of the mark on the pulley with the mark of the gear cap is checked;
Description of SZ on UAZ
How is the ignition circuit installed, configured and adjusted on the AUZ 417 or any other? We will talk about this below. But first, let's understand the principle of operation of the node, as well as the types of SZ.
Operating principle of SZ
As already said, the ignition on an UAZ performs one of the main functions when starting the power unit. Thanks to this system, the procedure for igniting the air-fuel mixture in the cylinders of the power unit is carried out by supplying a spark. The spark is directly supplied to the spark plugs; one spark plug is installed on each cylinder. All of these safety devices operate in sequence mode, igniting the combustible mixture in the required period of time. It is also necessary to take into account that the ignition system on cars not only provides a spark, but also determines its strength.
The vehicle battery is not able to produce the voltage and current required to ignite the mixture, since this device only produces a certain amount of current. The help comes from the ignition system, the purpose of which is to increase the power of the car’s battery. As a result of using the SZ battery, it is possible to transmit sufficient voltage to the spark plugs to ignite the mixture.
Types of ignition systems
Today there are three main types of ignition systems that can be installed on cars:
- Contact SZ. It is considered obsolete, but continues to be successfully used on domestically produced vehicles. The principle of operation is that the system produces the necessary impulse, which appears due to the operation of the distribution component. The contact-type device itself is simple, and this is a plus, because in the event of a breakdown, the driver can always diagnose and repair it himself. The cost of replacement components is not high. The main components of a contact type system are a battery, a short circuit, a drive, spark plugs, a capacitor, and a breaker with a distributor.
- A non-contact ignition system called transistor. Many vehicles are equipped with this type. When compared with the type described above, the system is characterized by a number of advantages. Firstly, the generated spark has greater power, which is due to the increased voltage level in the secondary winding of the ignition coil. Secondly, the contactless system is equipped with an electromagnetic device that allows for stable operation, as well as energy transfer to all nodes. As a result, with proper tuning of the internal combustion engine, this allows not only to increase operating power, but also to save fuel. Thirdly, it is convenient in terms of node maintenance. To ensure long-term performance, after setting up and installing the distributor drive, this element must be lubricated from time to time. To ensure normal operation, the element is lubricated every ten thousand kilometers. As for the disadvantages, it is the difficulty of repair. It is impossible to repair the device yourself; this requires special diagnostic equipment, which is only available at service stations.
- Another option for SZ is electronic, which is the most technologically advanced and expensive today, which is why new vehicles are equipped with it. Unlike the two systems described above, the electronic ignition system is characterized by a complex device that ensures the functionality of not only the torque, but also other parameters. Currently, all modern cars are equipped with electronic systems. The key advantage is a more simplified procedure for setting the advance angle, as well as the absence of the need to periodically check the contacts for oxidation. In practice, the air-fuel mixture in engines with electronic combustion almost always burns completely. This type also has its disadvantages, in particular in the matter of repairs. It is impossible to produce it with your own hands, since this requires equipment. Detailed instructions for adjusting the ignition using a light bulb are presented in the video below.
Review of SZ on famous UAZs
What is the connection diagram for electronic or contactless ignition on a UAZ 417, how to convert contact ignition to contactless? Why does the coil heat up and how to adjust and adjust the advance angle? First, let’s look at the main points regarding the action and types of SZ.
Operating principle of SZ
Contact system diagram
The ignition system, or rather its correct setting, plays a big role in the operation and starting of a car engine. With correct adjustment, the combustible mixture will burn correctly in the power unit as a result of the supply of charge through the spark plugs. A spark plug is placed on each cylinder of the UAZ engine, each of which is turned on in a certain order, in turn, delivering a discharge to the cylinder after a certain time. It must be taken into account that any SZ makes it possible not only to deliver the required discharge, but also determines its strength.
Due to its technical characteristics, the car’s battery cannot produce the voltage and current required to ignite the mixture. This is due to the fact that the battery can only produce a current of a certain strength. And thanks to the correct operation of the system, the current value increases significantly, which allows you to successfully ignite the air-fuel mixture.
The operating principle of the system consists of several stages:
- First, the driver inserts the key into the ignition and turns it, electrical energy is stored in a coil.
- Then the coil converts the low-voltage voltage in the on-board network of 12 volts into high-voltage. As a result, the voltage value increases to 30 thousand V.
- After this, the discharge is distributed and supplied to one or another spark plug.
- The candle itself produces a spark that ignites the mixture.
Diagram of the UAZ contactless system
What types of SZ are there?
Domestic UAZ vehicles can use one of three ignition systems; let’s look at each of them in detail:
- Contact view. This type of SZ is outdated, however, it is used on most machines. In such a system, the principle of operation is to issue a certain impulse that is formed in a distributor - a distribution device. The contact system is considered one of the simplest in terms of design, which is an advantage, since if a malfunction occurs, the car owner will be able to independently check and repair the system. In addition, prices for structural parts of the contact system are usually affordable, which is good news. The contact SZ includes a coil, a switchgear, a breaker, a capacitor and spark plugs.
- Non-contact type, also called transistor type. Compared to the contact system, the contactless system has more advantages. The resulting spark has a higher power, which is achieved due to the formation of high voltage in the secondary winding of the coil. Also, contactless systems are equipped with an electromagnetic device, which makes it possible to achieve more stable operation of the engine. Ultimately, if the UAZ power unit is configured correctly, then by using a contactless system you can not only increase its power, but also achieve fuel savings, albeit insignificant. Also, such systems are easier to maintain. One of the main nuances in terms of maintenance is the need to periodically lubricate the distributor drive - at least every 10 thousand kilometers. One of the main disadvantages is the difficulty of repair. In practice, repairing a contactless SZ will be problematic, since diagnosing the system will require equipment that is usually available at a service station.
- The ignition system can also be electronic. This option is currently considered one of the most progressive and expensive; it is installed mainly on new cars. Compared with contact and non-contact systems, the electronic system has a more complex structure. The main advantage of this system is that, if necessary, the process of adjusting the ignition angle will be much easier. In addition, there are no contacts in the electronic system that are susceptible to oxidation. It should also be noted that in practice, the combustible mixture in the cylinders of a power unit with an electronic system almost always burns completely. But despite all the advantages, electronic repair systems also have their disadvantages, which relate to device repair. It is almost impossible to repair such an SZ with your own hands, since to perform this task, again, you will need equipment (video published by Nail Poroshin).
How to use the ignition timing indicator to set the ignition timing
Note. This post may contain affiliate links. This means we may receive a small commission at no extra cost to you on qualifying purchases.
You will need to adjust the timing on the car for many older models (those with a distributor) to maintain the best performance. If you neglect timing, you could experience poor gas mileage, less power when you hit the gas, and ultimately worsen problems that could interfere with your engine's performance.
Although you can have a mechanic adjust the timing for you, it is a fairly simple process and you can save a lot of money if you learn how to do it yourself. Double check your car before you jump in.
Most produced since the early 90s have an electronic ignition system and do not require this maintenance. In these cases, it is best to use a scanning tool.
What are deadlines?
Before we learn how to set ignition timing, we need a little lesson on how engines work. Simply put, an engine works by using small explosions of gasoline to force the pistons to move up and down.
We install and configure the ignition, change the distributor drive on UAZ vehicles
The UAZ distributor is considered one of the important components of the ignition system in a vehicle. Correct adjustment of this mechanism ensures optimal operation of the power unit as a whole. You can learn more about the principle of operation of the ignition system and how to set it up correctly with your own hands from this material.
How to set it correctly?
After connection, how is the ignition installed for proper engine operation?
What is the procedure and how to correctly set the node settings, read below:
- To begin, the vehicle must be secured in place, and turn on the handbrake. The piston of the first cylinder must be installed at top dead center; note that the hole on the crankshaft pulley must coincide with the mark located on the timing gear cover.
- The cover must be removed from the switchgear. Having done this, you will see a slider located opposite input 1, inside the cover. If it is not there, then the crankshaft must be turned 180 degrees and the octane corrector set to 0. Using a wrench, screw the pointer to the distributor controller body so that it is aligned with the middle mark on the octane corrector. Loosen the screw securing the plastic to the distribution controller housing a little.
- Carefully turn the housing, holding the slider with your finger so that it does not rotate. This way you can eliminate gaps in the drive. The housing is rotated until the sharp part of the petal on the stator is aligned with the red mark on the rotor. Secure the plate with a screw to the controller body.
- The next step will be to install the controller cover in place and diagnose the high-voltage wires. They must be installed in accordance with the order of operation of the cylinders, that is, first, second, fourth, third. When the ignition timing is set, it is necessary to diagnose the correctness while driving.
- Start the power unit and warm it up for about ten minutes until the temperature is about 80 degrees. Moving on a flat and straight road at a speed of approximately 40 km/h, sharply press the gas pedal. If, when accelerating to 60 km/h, you feel or hear detonation, it should be short-lived, then everything has been done correctly. If the detonation is very strong, then the distribution controller must be turned half or one division counterclockwise. In the complete absence of detonation, the set advance angle should be increased, that is, the controller should be turned clockwise.
Expert recommendations on how to configure correctly
So, how to set the advance angle yourself in order to achieve proper operation of the UAZ engine:
- First of all, you must lock your car in one place by pulling the parking brake lever. Rotate the crankshaft so that the piston of cylinder 1 reaches TDC (top point). In this case, you need to ensure that the hole on the crankshaft pulley coincides with the mark marked on the timing gear cover.
- After this, remove the cover from the distribution mechanism. After dismantling, you will be able to see the slider, which is located inside the cover itself, opposite the contact. If there is no slider, you should turn the crankshaft 180 degrees again, and then set the octane corrector to 0. Using a wrench, you will need to screw the pointer to the distribution mechanism housing so that it aligns with the middle mark. When these steps are completed, the fastening bolt with which the plates are attached to the distributor body must be loosened slightly.
- Then, holding the slider in one place with a finger to prevent it from rotating, you need to carefully rotate the housing itself, this will allow you to remove possible backlash in the drive. The housing must be rotated until you achieve alignment of the sharp end of the stator mechanism petal with the red mark located on the rotor device. After this, the plate itself must be secured to the body using the appropriate bolt.
- Once you have completed these steps, you need to replace the controller cover and check the high voltage cables. You need to make sure that these wires are installed in the correct sequence, taking into account the firing order of the cylinders. When you manage to correctly adjust the lead angle, you need to make sure that the entire procedure was performed correctly.
- To diagnose the correctness of the actions performed, you need to start the engine of your UAZ and wait about 5-10 minutes until the power unit warms up. The operating temperature of the engine is about 90 degrees; you can wait until the internal combustion engine warms up to 80 degrees. Then you need to drive onto a flat road and accelerate the car to 40 km/h, after which you should sharply press the gas. At this moment, the car will accelerate and if, when the speed increases to 60 km/h, a short-term detonation (metallic knock) is heard from under the hood, then this indicates that all actions were performed correctly. If the detonation is too long, the system will need to be adjusted. To do this, the housing of the distribution mechanism will need to be turned one notch or half, and it must be turned counterclockwise. If the diagnostics showed that there is no knocking of the “fingers” at all, then the advance angle should be increased. To do this, the mechanism should be turned in the opposite direction.