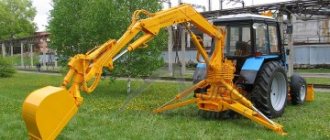
Kun is one of the main tractor attachments. He performs a large number of different jobs. The units are sold in trade, offering a price that does not suit all farmers. Many owners of agricultural machinery save significant sums by making a kun on the T-25, a universal mounted loader. It is used in construction, agriculture and households, when transporting crushed stone, snow, sand, and grain. It is indispensable for planning and leveling the soil. Having the necessary auxiliary materials for the bucket, you can create it at low cost.
How to make kun on T-25 at home
Before determining the dimensions of the kun on the T-25 and starting to manufacture it yourself, you need to familiarize yourself with its main advantages. First of all, this is a significant cost savings compared to purchasing a factory-made kuna, which allows farmers to reduce their costs.
In addition, other advantages of a homemade tool should be mentioned:
- versatility. A kun made independently can be used with various models of tractor equipment;
- ubiquitous equipment and tools are used to manufacture the device;
- simple design, easy to maintain and repair.
However, it should be remembered that making kuna yourself has a number of disadvantages, the main one of which seems to be the probable lack of necessary materials from the farmer. This will lead to the fact that due to the purchase of missing blanks and parts, the cost of the product may increase slightly.
Most often, you need to make a rear-mounted coon, which will require the following elements:
- metal profiles, steel sheets;
- hinged-cylindrical elements, which should be selected in accordance with the dimensions of the unit;
- 3 hydraulic cylinders.
You will also need various hand tools, welding equipment, a circular saw or a gas cutting machine. In order to avoid mistakes, it is advisable to adhere to the following procedure:
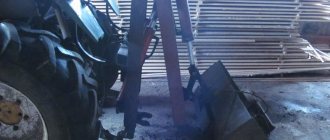
- Assemble a rectangular kun base using metal pipes. Its rear part is fixed to the attachment, slightly exceeding its boundaries.
- In the middle of the base it is necessary to place another rectangular element made of pipes into which the hydraulic cylinder is mounted.
- In the upper part of such a rectangle there is a spacer and 4 hinges for securing the boom.
- Make an arrow using a metal profile. On top of the assembly you will need to place fasteners for the hydraulic cylinder and base.
- Mount the hinges in the middle part of the tractor.
- Assemble the bucket using a large sheet of steel, as well as 4 smaller pieces. The parts of the bucket are connected to each other by welding.
After successful manufacturing, you need to install the kun on the general structure, which will allow it to be used in the future. In order to avoid mistakes, you can read the special video instructions.
Universal mounted bucket
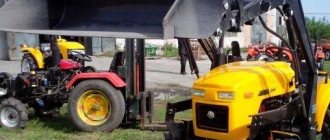
A homemade KUHN for a mini tractor is one of the types of front loaders. It is indispensable when you need to transport or load large volumes of bulk (and other) materials, such as sand, crushed stone or grain.
The mini tractor itself differs in size from a full-fledged tractor. Using a bucket allows you to turn a simple tractor into a universal vehicle for a wide variety of types of work.
Front loaders have a number of advantages:
- easy maintenance;
- reliability;
- ease of installation and dismantling of equipment;
- serious load capacity for a small-sized tractor;
- ease of control due to enhanced hydraulics.
Making a ladle
You can buy a bucket for a mini tractor at any hardware store, but this is not the cheapest pleasure, so it’s easier to make it yourself. You don't need any special knowledge or materials here. To work, you need to stock up on drawings, a grinder, a welding machine and the material itself.
Advice! A metal sheet with a thickness of 6 mm or more and pipes of various diameters are best suited for these purposes.
- First you need to make the fasteners. It is welded to the box and engine, and a metal corner is welded underneath for reinforcement.
- The KUN itself is made from pieces of sheet metal. There is no point in bending the sheet to fit the shape of the ladle. It is much easier to cut rectangles of the required size and weld them together to form a ladle. The durability of the product depends on the quality of the seams. It is better to use pipes with a diameter of 100 mm for racks, and 50 mm for rods.
- The next stage is the installation of the hydraulic booster. For greater mobility, it is recommended to use a pipe with a diameter of 30 mm (it should not be more than 50 mm, otherwise the pipes will not move well inside each other).
- Now the support is welded to the front of the tractor and combined with the racks; gussets are used for reinforcement.
- A cylinder is used to control the rotation of the bucket. It is usually installed to the right of the bucket.
Safety precautions when working with a bucket
Making a bucket for a mini tractor is not very difficult, the main thing is to have knowledge and experience in working with welding, and be able to work with drawings. In order for the attachments to work correctly, you need to approach the work responsibly and do everything strictly according to plan, otherwise the result may not meet expectations, and the mini tractor itself with KUN will pose a danger to the operator.
Advice! If you have doubts about the success of the event, you should refrain from making the KUN yourself and purchase it in the store.
To ensure safety during operation, you should follow the operating rules:
- KUN can be used only for its intended purpose;
- When working, you should carefully monitor the bucket;
- When driving with a loaded bucket, you need to keep it lowered, that is, near the ground.
Drawings with dimensions
In order to independently produce a high-quality, reliable and durable structure, the craftsman will need to use the Kuna drawing for T 25. This will ensure that the finished product meets the required dimensions and parameters, which will make it possible to use it together with a tractor.
The kun can be placed in the rear of the unit or the front at the master’s choice. But it must be taken into account that the length of the boom on which it is supposed to be placed should not exceed 2 meters. Otherwise, when operating and loading the bucket, the tractor may overturn.
To successfully make a bucket, the craftsman will need the following components:
- several steel sheets, whose dimensions must correspond to the dimensional parameters of the tractor for which the kun is being made;
- 2 large and 2 small hydraulic cylinders;
- connecting elements - bolts, nuts and others;
- necessary tools.
The last point requires a separate explanation, since to perform most manipulations you will need a grinder, a drill, and a welding machine. In this case, hand tools are also necessary, for example, pliers, screwdrivers and wrenches.
When carrying out work on self-assembly of such a structure, it is important to pay due attention to collecting all the necessary parts, as well as drawing up drawings. The last point is especially important, since the result of the work directly depends on the accuracy of the drawings.
When producing workpieces, it is recommended to use devices for gas cutting of metals, as they allow you to achieve a perfectly even cut, which is necessary when assembling a kun. The welding machine must have the necessary power to connect structural parts.
The thickness of the metal sheets that are used as the basis for the bucket must be selected individually, in accordance with the dimensions of the tractor, as well as taking into account the expected weight of the structure. If it is too large, the likelihood of the equipment tipping over due to lack of balance will increase significantly.
Video of making homemade kun
When planning to make a bucket for a tractor with your own hands, it is advisable to follow simple instructions that will allow you to achieve the desired result without serious difficulties. In order to eliminate the possibility of error, it may be useful to use a special video that details the entire procedure for manufacturing such an element.
The main stages in the manufacture of a front-mounted coon:
- Install supports under the hinged mechanism of the equipment, and then make special recesses in them intended for installing rods.
- Make an arrow using 2 profile contours, which are placed at an angle of 30 degrees. The circuits are connected to each other using jumpers located in the main parts of the structure.
- Using a welding machine, you will need to weld vertically located supports so that they protrude at the top of the future kun. They will also need to weld spacers attached to the corner of the boom.
- Using steel sheets, you will need to make eyelets - the boom will be attached to the bottom, and hydraulic cylinders prepared in advance will be mounted on the top.
- The other end of the cylinders is attached to a corner located right in the middle of the tractor boom.
- Install the finished bucket onto the attachments of the tractor being used.
This kind of design provides that large cylinders are responsible for the bending movements of this instrument, and small cylinders are responsible for the turning movements. This design option is perfect for use with attachments located on the front side of the structure.
For such a mechanism, it is especially important that its mass corresponds to the parameters of the tractor and does not contribute to its overturning.
Instructions for making KUN
Before work, you should carefully read the instructions on how to make a KUN on a mini tractor with your own hands, and watch the videos. Then you need to prepare the drawings. You can download them ready-made, or you can do them yourself, adjusting them strictly to the size and modification of the tractor.
Be sure to read: Mounted excavator for mini tractor
The pattern of the parts is transferred to cardboard (corrugated cardboard from old boxes is suitable) in full size and cut out. Steel parts are marked and cut out using them. It is most convenient to mark with a marker - it does not erase, and after painting the marks will not be visible.
Necessary materials
For production you will need:
- For arrows: channel 10, sheet steel 4 mm.
- For racks: channel 18, sheet steel 10 mm.
- Fingers with blanks under them.
- Hydraulic cylinders grade 80-40-400 and 80-40-630.
- Loading lugs.
- Primer and paint for metal.
- Cardboard for cutting out templates.
- Tools you will need:
- Welding machine.
- Bulgarian.
- Metal scissors.
- Marker for marking.
The KUN for the rear linkage of the T 40 tractor is made of channel and steel. Factory structures are welded from the same material. The channel is used to manufacture the basic structure, onto which the actual working equipment is then hung: boom, loader forks, bucket.
A drawing is required for work
Working equipment can also be made independently from channel and sheet steel, but, of course, it is better to do without it - perhaps you can find a bucket from an old excavator in the garage or you can buy a used boom. The fact is that without a sheet bending machine it is quite difficult to bend sheet steel exactly to size, and manufacturing using a vice and scissors will take so much time that the question of the payback of such a “homemade product” may arise. Hydraulic cylinders and lugs can be removed from an old truck or purchased at a wrecking yard.
As a rule, any craftsman has a certain supply of channel bars, but even if you need to buy all the materials at the base, it will be almost half the price than buying ready-made equipment. You can also consider purchasing metal from your own hands. If it was stored correctly, it will not be inferior in quality to a new one, and will cost significantly less.
Be sure to read: Gasoline trimmer Shtil
Procedure
Manufacturing steps:
- Weld the right and left half frames.
- Secure the working equipment to the front (right) half-frame.
- Weld the left half-frame to the left side member, and the right half-frame to the right.
- Connect the half-frames with crossbars. The result is a supporting frame.
- Install hydraulic cylinders on the frame and connect them to the tractor hydraulic system.
- Before installation, the structure must be primed and painted to protect it from corrosion.
- A properly manufactured KUN is capable of lifting up to 800 kg with a loader and up to 600 kg with a bucket or mounting hook.
It is very important not to try to increase the weight of the hitch in an attempt to achieve more power. You need to focus on the capabilities of the tractor, and the 0.9 class, although it has wide capabilities, still refers to light semi-professional machines
Constant overload will lead to wear and tear of the chassis, engine, and transmission.
I want to buy a factory model for the T-25 tractor, but I don’t know which one to choose.
Questions can only be asked after registration. Please login or register.
Hello dear forum users. I would like to get advice on which factory model is best for the T-25 tractor. I want to buy, but I don’t know which one to choose. Homemade is not an option for me (I won’t do it myself). So far the SDSM PK-4 Barnaul has come to mind. I would be very grateful for any information. With respect, Roman.
Last year I took the SDSM PK-4 before the New Year, the discount was good. I took it without a bucket. I'm happy with the purchase. There were no problems when installing it on the tractor; the only thing was that I used additional washers to select the gaps on the pins.
Is this this one?? Since there seem to be no others on the T-25.
Name is Roman. We have: MTZ-82, MTZ-82.1, YuMZ. (Sold T-40) Occupation: Logging, sawmill, carpentry shop.
Since there seem to be no others on the T-25.
I think you answered your own question.
Well, yes, probably the only ones left, advertising only from SDSM everywhere. I saw in real life an AZAS loader, also from Barnaul, with unloading at the rear and one cylinder for eversion of the bucket, but their proposals are not visible. Salskselmash also had a PKU-0.3, it was definitely discontinued. Now it’s a shame to buy, but in the meantime I’ll think about it and these will stop selling.
Since there seem to be no others on the T-25.
I think you answered your own question.
Are you thinking out loud or something? Or did you just decide to check in?? Maybe they sell other loaders with spacers for T-25 there.
Alteration of the front drive axle of the T-40AM tractor. | Topic author: Zahidah
Conversion to a non-spring type.
Roman (Gracja) An axle is welded inside with stainless steel and is held tightly on it by two bearings, one support bearing is pumped onto the axle at 45mm and the bottom at 30mm, both conical rollers are tightened at the bottom with a nut when there is play inside, a thick lubricant is screwed in with an oiler.
Roman (Gracja) the dimensions of the bearings will be but when I change them
Roman (Gracia)
Roman (Gracja) axle welded to bracket
Andrey (Kevalini) I don’t understand the point of doing this?
Important Meaning of computer diagnostic error codes for KamAZ Euro-4 trucks
Roman (Gracja) Andrey, I didn’t have a choice, either this way or buy a new bridge, everything was broken, the crackers no longer held the wheels, they fell off, they were dangling. That’s why I remade it now normally, for anyone who has the same problem, I advise you to redo it this way (as the most budget option )
Andrey (Kevalini) Roman, okay!
Alekrandr (Mujib) Describe in more detail what you did. Do I need to sharpen something or not?
Roman (Gracja) Alexander, you need to yearn and draw too
Roman (Gracja) Sharpen)
Alekrandr (Mujib) Can you help with this question? Thank you.
KUHN for mini tractors
This site was created for those who want to assemble a KUN for their mini tractor. The site contains drawings (not all of them yet) of the front loader that I made and tested on my tractors (T-25 and df-244).
This KUN throws snow and sand into a cart to a height of more than 2 m. KUN lifts four people weighing 90 - 110 kg.
KUN was tested in work with tractors KhTZ T-25 and DongFeng df-244.
To assemble this KUN, see the drawings below. The site contains drawings for bending, turning and laser cutting in jpg format. Please ask your questions about the drawings or missing dimensions in the comments to a specific drawing.
To cut parts using a CNC laser, you will need to redraw the drawings in dxf format. Or order such drawings from me. A set of drawings for laser cutting on a CNC machine in dxf format costs 10,000 rubles. I take this nominal fee for drawings to purchase metal for my next projects. At the moment, the metal is waiting for a sawmill and a CNC coordinate milling machine, the drawings of which I will also post on the website.
Contacts: tel: +7 950 807 4410 Viber: +7 950 807 4410 Whatsapp: +7 950 807 4410 mail:
Attention! The site is in the process of being filled. Some drawings have not yet been posted.
kun with a modified copier system
How to make a T-25 kun with your own hands, photo drawings
A tractor kun is a useful equipment for farming that allows you to level the top layer of soil, break up rubbish heaps and load trucks. Of course, such multifunctional special equipment is quite expensive. In this regard, many enthusiastic farmers decide to assemble a loader themselves, especially since making a kun for a tractor is not as difficult as it seems.
The most important advantage of a homemade kun is its low cost. Naturally, you will have to spend a little money during assembly, but at the final price, homemade tractor loaders will still be significantly inferior to their factory-made counterparts.
The second important advantage of the kun is that such an excavator can be used to work not only with domestic MTZ or Agromash tractors, but also with Kioti, Subaru tractors, as well as equipment from other imported brands.
The third advantage of a homemade kun is the simplicity of its design - this greatly simplifies its repair and maintenance.
The main disadvantages of creating a homemade loader include:
- a shortage of certain materials and equipment on the farm will lead to its purchase, which significantly increases the cost of a homemade kuna;
- Before assembly, you will need to practice a little in working with a grinder, a welding machine and a drill - this will allow you to more confidently hold the equipment in your hands directly when making a kun, as well as achieve better quality and balance when operating a tractor with a bucket.
In addition to the listed disadvantages, one more drawback should be highlighted in the form of a large amount of time spent on production. However, a properly made tractor bucket will quickly pay for itself due to its versatility and reliability.
Homemade plow for a mini tractor with your own hands. Which design should you choose?
Do-it-yourself moldboard plow.
Plow designs are varied and depend on the types of soil being cultivated and the types of work being performed. The following modifications are distinguished:
- Ploughshares - have a working tool in the form of wedges, with the help of which the soil layer is cut, moved and painted. Used on mini tractors and walk-behind tractors in small farms.
- Disc - used on hard and heavy soils for preliminary plowing. Freely rotating knives in the form of metal disks cut the top layer, and the dump elements located further down turn the layer over.
- Rotary - a modern model of a plow, where several working knives are mounted on a movable shaft. This design provides high performance, but is difficult to manufacture independently.
The most common option is a homemade double-furrow plow with working tools in the form of ploughshares and moldboards. This model has been tested by time and the experience of numerous farmers. Such structures are often complemented by skimmers that cut off the top turf layer of soil.
Homemade loader for the rear linkage of an agricultural machine
This homemade bucket is considered the simplest option for use on T-25, T-40 tractors and other units whose design includes a rear linkage mechanism. This kun differs from a front loader in its ease of manufacture and installation on a tractor.
At the first stage of production, you will need to carefully study the drawings. They must indicate the size of each part used, as well as the method and sequence of its fixation in the overall structure.
After studying the diagrams, you will need to prepare the materials necessary for the work.
These include:
- metal profile and steel sheets - these will be used when assembling the base of the loader. The thickness of the metal used should be selected taking into account the size of the kun;
- swivel cylindrical joints – also selected based on the dimensions of the loader;
- 3 cylinders taken from the hydraulic system of any equipment unnecessary on the farm. Two of them must adjust the angle of the bucket. The third and largest cylinder is responsible for raising and lowering the boom.
From those used during work you will need:
- large hammer, mounting bolts, washers;
- screwdrivers, wrenches, pliers;
- powerful welding machine;
- gas cutter or grinder, capable of providing a perfectly even cut of metal parts.
The tractor loader is manufactured in the following order:
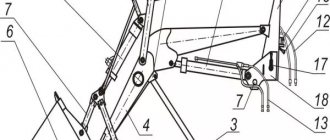
- First you need to assemble a base that is reliable and resistant to heavy weight. It should be taken into account that the frame will hold not only the bucket, but also the load it carries. The base of the kun should look like a rectangle assembled from square pipes. The lower part of the frame must be fixed to the tractor's hinged mechanism in such a way that it protrudes slightly beyond its edges. In the middle part of the frame you will need to install another rectangle welded from pipes. Next, you will need to install the largest cylinder on the inner rectangle. In its upper part you will need to first make 4 hinged joints to fix the boom, and a spacer;
- Next, the homemade loader must be equipped with a boom. It is assembled from a metal profile, the parts of which must be attached to each other at an angle of 30⁰. The hydraulic cylinder mount and the ends of the previously created base will need to be welded into the upper part of the boom;
- In the middle part of the boom you will need to install a hinge mechanism with a cylindrical shape. 2 movable joints are mounted into the mechanism, fixing 2 smaller cylinders together, as well as a crossbar used to install the bucket;
- The last step is to assemble the tractor bucket. To make it, you need to use one large steel sheet and 4 smaller parts. You will need to cut out rectangles from them, which, in the future, need to be welded to each other. In this case, the front sheet must be welded to the overall structure of the bucket at a certain angle. The video will tell you more about the manufacture of the loader.
During manufacturing, it must be remembered that a loader whose boom exceeds 2 meters in length will outweigh the tractor. To prevent this from happening, the front part of the agricultural implement will need to be weighted.
How to choose
When choosing equipment that is necessary for loading operations, it makes sense to compare the characteristics of construction machines of the same type: DT-75 and MTZ.
For DT-75
This machine can have several sets of attachments: for agricultural work, for general construction work, and drilling. A front-end loader on the DT-75 can be installed thanks to the installation of side-mounted semi-mounted equipment.
The updated modification of the DT, the engine for which is now produced in the city of Vladimir, has a new, more ergonomic cabin.
Loader specifications vary by model. PG 2 has a bucket with a capacity of 1.5 m³, the unloading height reaches 2.7 m with an angle of 50°. The width of the bucket edge (grip) is 2028 mm.
The PFP 1.2 front-end loader has a narrower specialization. It is designed for loading bulk materials and fertilizers. Its parameters:
- bucket capacity 0.9 m³;
- unloading height 2.5 m;
- working width 2035 mm.
In addition, combined and homemade loaders are used.
For MTZ
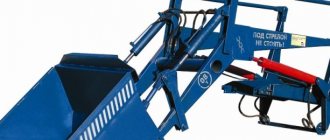
A loader based on the MTZ produced by the Minsk Tractor Plant is obtained by installing mounted units on the tractor. Its basis is a wide bucket with a grab for bulk materials. In the standard version (for example, the MTZ-1221 front loader) consists of:
- a controlled frame with a hydraulic system is the main part of the structure;
- chassis;
- nozzles
The MTZ-82, which has a kun as additional equipment, has also proven itself well. This is a swept unit controlled by four hydraulic drives. Two of them work in the horizontal plane, and two more regulate the movement of the bucket.
Manufacturing a front loader for a tractor
The front loader differs from the previous bucket in that it is mounted on a mounted mechanism located in the front of the tractor. In the future, such an excavator can be actively used for snow removal, leveling the site and clearing debris.
As in the first case, before manufacturing the loader you will need to study the drawings. They must be as accurate as possible so that the finished loader is extremely balanced and reliable.
Next, you need to collect all the materials and tools necessary for the work.
The work must be performed using the following raw materials and equipment:
- several sheets of steel - their sizes are selected depending on the dimensions of the loader;
- 2 large and 2 small hydraulic cylinders;
- bolts, nuts and hinge joints;
- grinders and drills;
- welding machine;
- pliers, screwdrivers, wrenches.
The sequence of manufacturing a front loader for a tractor should look like this:
- First of all, metal platforms must be installed under the front linkage mechanism of the tractor to serve as a support for the loader. In the installed platforms, you will need to make recesses for mounting rods;
- The next step is to assemble the arrow. To manufacture it, you will need to make 2 contours from profiles, which must be connected to each other at an angle of 30 degrees. Both circuits must be attached to each other by means of jumpers located in the lower, central and front parts of the structure;
- One vertical support must be welded to each circuit so that each of them protrudes in its upper part. One additional spacer must be welded to each support, the second side of which must be attached to the corner located in the central part of the existing boom;
- Eyelets need to be made in the back of the bucket welded from steel sheets. You will need to attach a boom to the bottom eye, and 2 small hydraulic cylinders to the top eye. The second ends of the hydraulic cylinders must be attached to the angle located in the central part of the boom. Large cylinders must be carried from the central part of the boom to a support installed in a vertical position;
- At the final stage, you will need to install the finished structure on the front linkage of the tractor.
In a self-assembled front loader, front hydraulic cylinders are responsible for its rotation, and large rear cylinders are responsible for bending and extending the boom.
Having studied the procedure for making the front and rear buckets, almost every farmer will be able to make a tractor with two buckets - such a unit will have the highest possible performance and will help in performing various agricultural and household tasks.
Homemade front loader on T 25
How to make a homemade bucket for a mini tractor
As a rule, you make a bucket for a tractor yourself using a special hydraulic installation, as well as adjustable supports. This makes it possible to make the operation of the tractor more reliable, and control of the attached equipment as simple as possible.
Making a bucket for a mini tractor with your own hands is not so difficult. Many farmers who have already done this post their work online, so finding diagrams and drawings related to the design is quite possible.
Those who have made attachments themselves argue that you will first need to make the most reliable load-bearing element. As a rule, its role is played by a frame made of metal corners welded together. Sometimes it is permissible to use a frame that was on an old mini tractor (if you had one).
In addition, you need to take care of installing a special support platform, which is attached to the sides of the installed frame. It is necessary to ensure the presence of support shoes that will prevent the tractor from tipping over when working with the bucket. To construct them, you need to use metal pipes, the diameter of which is about 10 cm.
Important Operating principle of a hydraulic excavator
In addition, you need to make the ladle itself. Usually, for this purpose, metal sheets are used, bent to the desired shape, as well as 2 pairs of hydraulic cylinders, thanks to which you can make a lifting boom. In some cases, it is allowed to use hydraulic units borrowed from trucks.
It is possible and not even very difficult to make a bucket for a mini tractor yourself, but this process is labor-intensive and can take a lot of time. In addition, if you are not confident in your abilities and have never done anything like this before, it may be better for you to go to a store and buy a structure there. If this is not your first time making something and you strictly follow the drawings, then when welding of good quality, such a homemade product will not be inferior to the finished product made by the factory, either in performance or in reliability of use.
Read also: Hedgehog wants summer description
To carry out work on large farms or personal farms, it is impossible to do without process automation. Loaders make it easier to carry out work on land management, clearing the area of unnecessary debris, loading crops, and transporting various cargoes. The industry has launched the production of several models of such devices, but if there is a lack of funds to purchase them, you can make a loader for the rear linkage of a tractor yourself.
DIY attachments for the T-25 tractor
There is a large selection of trailed attachments for the T-25 tractor, so we will not only talk about homemade plows. If the user is not able to purchase factory units, then there are several methods of self-assembly. Detailed instructions for making all types of attachments with your own hands, as well as video tutorials, will help you assemble the device correctly and reliably.
Homemade plow
The manufacture of attachments is carried out in several ways. If you do not have special rollers at hand for bending metal sheets, then use simpler manufacturing methods. The plow must withstand heavy loads, so alloy steel with a thickness of at least 3-5 mm, which is protected from corrosion, is used during assembly.
An important part of the unit is the plowshare, which must be made durable, adjustable and removable in order to be able to vary the depth and avoid damage to the structure.
The first case of assembly involves making a blade from a metal pipe with a diameter of 55-60 cm. The thickness of the steel should be at least 0.4 cm. A template for cutting out structural parts from steel is made according to the drawings from thick cardboard. Rollers for bending steel sheets will speed up the manufacturing process. The blanks are cut from cardboard exactly to size and fed onto rollers at an angle of 20°. After bending, the structural parts are easily brought to the desired shape with a hammer on an anvil.
The second method is labor-intensive and does not involve the use of rollers. The blank for the dump is heated in the forge for subsequent processing. Here it is preferable to use a ready-made blade from old equipment for the T-25. The cut templates are applied to the blade at an angle of 20°, preliminary marking is carried out with chalk on a surface sanded. Otherwise, the process repeats the first method, and a gas welding machine is used to cut out parts.
Welding work is carried out by fastening the plowshares with the blade and the metal sheet under which the shield is placed. The blades of the share must be at the correct angle, as well as the top edge. To connect the parts of the plow structure together, welding is also performed. In order for the plow to hold the furrow, its design includes a wheel unit, the height and angle of which are varied by a bushing with a notch. The diameter of the wheel must be at least 20 cm. This process is discussed in more detail in training videos for homemade plow making.
After assembly and minor adjustments, the plow should work properly if you have maintained the correct angle of the plowshares relative to the location of the blade.
DIY potato digger
Making a potato digger for the T-25 tractor is a less labor-intensive process than assembling a plow, but is carried out strictly according to the diagrams. The mechanism of its operation is simple: the ploughshare opens the soil, the elevator grabs the tubers, passes them along the grate, clearing them of soil, and dumps the peeled fruits.
The frame of the unit is made of metal sheets, which are best connected not by fasteners, but by welding. The elevator casing is installed on the frame and secured through holes that need to be drilled. When attaching to the frame, it is important to use bolts that will allow you to change the angle of inclination of the elevator and the plowshare with which it will be attached. The ploughshare is made of thick alloy steel and is shaped like a bucket, the corners of which must be rounded.
The manufacture of the digger drive is carried out using gears, hubs and shafts. The mechanism is quite simple; at this stage it is important to follow the assembly algorithm described in the diagram. A more complex design is the cleaning drum, consisting of two chains that are strung on steel pins and fastened with metal sheets. This mechanism is driven by a shaft. The connection to the T-25 shaft is carried out using a structure with a shaft, bearing and pin.
Homemade coon
On the T-25 tractor it is possible to install a front factory load of no more than 200 kg with a low load capacity, since the design of the tractor cannot withstand heavy loads. There are few examples of assembling a homemade kun, since experienced users note a high risk when using homemade structures, especially those with a large weight.
DIY cutter
The answer to the question of how to make a cutter yourself is simple. The body of a homemade cutter is made of steel sheets 1 cm thick and a 12 U channel. The main unit is a gearbox and a transmission connection, which can be used as a ready-made unit from a similar old device; there are options, for example, a bridge from a Zhiguli car. The side mechanism is assembled using oiled gears.
Knives for the cutter are made from durable thick metal and are cut according to a template using a gas welding machine. After sharpening on a machine and sanding, the knives are attached to the shaft. The connection to the body and PTO is carried out through a bearing mechanism and bolted fastening.
Front and rear axle conversion
The front axle of the Lipetsk tractor has a design flaw in the spring unit, which leads to the appearance of lateral play and premature failure of the support bearings, king pins, crosspieces and gearbox units. To improve the reliability of the unit and control accuracy, the bridge suspension needs to be modified.
The traverse blocks should be dismantled and the factory pins from the stockings should be cut off (along the weld seam). An electric arc welding machine is used to perform surfacing in the areas of work on the pins. After this, to return the required geometry, they are turned on a lathe, and bolts are welded to the internal parts to secure the king pins in the steering knuckle.
The restored part is welded into its original place. For the steering knuckles, prefabricated spacer bushings (load-bearing and fixing) are machined, which are installed in place of the spring units. During assembly, standard support bearings are used, O-rings are installed under the bushings, and the kingpins are fixed from below the steering knuckles using nuts.
Such a design change will make the tractor more rigid, but will improve handling, reduce the load on the power steering and make the unit more durable. The tractor frame has a large margin of safety, so the increased load on the side members will not affect its service life.
The rear axle only needs modification when using twin rear wheels. To do this, spacers 270-320 mm long are made from thick-walled pipes, which are fastened with standard bolts on the outer sides of the wheels.
Homemade hitch
To make a simple rear hitch, you will need channels 10 cm thick, connecting beams and coupling devices from any small tractor. Holes are cut in the channels to allow them to be attached to the tractor frame. After this, the crossbars are pulled together by coupling devices crosswise and hung on the connecting beam. It is necessary to cut holes at the opposite end of the channels. They will allow you to attach a trailer or hitch for attachments to the hitch.
DIY cabin
For the manufacture of the cabin frame, the best material is a profile pipe to which the glass seal is attached. The dimensions of the glass pattern are determined by the size of the cabin and the thickness of the seal. It is best to use chipboard sheets as a template, which will allow you to most accurately select the desired size.
To fix the seals, thin steel strips are used, which are welded to the supporting pillars of the cabin frame. The cabin structure is welded separately, in parts, and then assembled into a single structure. Corner beams must be made of durable material that is not subject to deformation when shaking. After the cabin body is welded, you can begin cutting out the glass and glazing itself. To install the stove, it is necessary to additionally insulate and seal the tractor cabin.
Stove for tractor
Air heating in the T-25 cabin is done by many amateurs. The main heating element will be a cooling fan, from which a tube is passed into the cabin, which will pump warm air. It is important to insulate the tube with sealant at both ends so that the efficiency of the homemade stove increases. This will prevent exhaust gases from entering the cabin. The on and off function can be adjusted by installing the damper from the stove of any passenger car.
DIY trailer
The single-axle cart design for the T-25 tractor is the most suitable option. The average weight of the standard design is 800 kg, which will allow it to transport loads up to 2 tons. The cart frame is made by welding spars at least 10 cm thick. A complete axle of a small tractor can be used as an axle and wheels for the cart.
To equip the trailer with a blade option, it is necessary to reinforce the frame with a beam in the middle part. A socket is welded to the beam for installing a cylinder, which will be responsible for the dump of the body, and a reinforced support for installation. The hydraulic cylinder most suitable for a small-sized cart blade is PTS-9. The maximum output of the cylinder is 85 centimeters, which will allow the body platform to become at an angle of 50 °.
Source