- home
- Media center
- Articles
- Brake system GAZ 3307: design and principle of operation
Menu
- News
- Articles
- Video materials
- Photo materials
- Publication in the media
- 3D tour
03.03.2020
The brake system is the most important structural element of any vehicle. The safety of driving the machine directly depends on it. The GAZ 3307 truck consists of 3 brake systems: working (affects all wheels), spare (the function is performed by the circuit of the working system), parking (affects the brake mechanisms of the wheels located at the rear).
The brake itself is controlled by the main brake cylinder, which is combined with hydraulic drive amplifiers. The entire brake system of a truck operates on separate axles. Thanks to this, it is possible to minimize the load from the body on the transmission in the event of a sudden stop. The brake is initially activated on the rear axle, and then only on the front axle. When a trailer is connected, it will brake first.
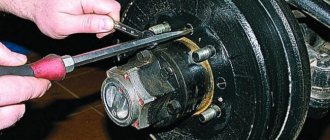
The structural elements of the gaskets are almost the same. The main differences are only in the sizes of specific parts. To inspect the pads to determine their level of wear, a special hole is provided. Using the reservoir, you can visually determine the level of brake fluid in the system.
How to Bleed Brakes on Gas 3307
Repairing a GAZ-3307 car
The GAZ 3307 dump truck is not particularly difficult to repair; you can understand its structure without having high qualifications. It is not difficult to buy spare parts for the 3307 - they are sold in specialized stores, and there are quite a lot of such stores.
This is what a classic GAZ 3307 truck looks like
As necessary, the clutch, engine, steering, brake system, and chassis have to be repaired on the 3307 model.
Brake device
The brake system of the GAZ 53 is also a representative of the previous generations of the automotive industry and cannot boast of a minimum braking distance or extremely effective braking. As a rule, it is generally impossible to stop this car abruptly, but, equivalent to this fact, it does not accelerate to too high speeds. But those who still operate this car still have to somehow monitor its technical condition of the braking system. This is what we will talk about today.
Repair manual
Due to the fact that GAZ-3307 and GAZ-3309 trucks are domestic vehicles, their repair usually does not become an impossible task. Spare parts are available in any dismantling or automotive market.
Buying them is not a problem, and thanks to the availability of an accessible and understandable instruction manual, not only the service station technician, but also the owner of the car can replace relatively simple spare parts.
Getting a car owner's manual is not a problem. It can be downloaded from specialized websites on the Internet or bought a printed version in a store or market.
Name: GAZ-3307, 3309. Operating and technical manual
maintenance and repair.
Publisher: Third Rome
Number of pages: 186
Of course, if we talk about more serious breakdowns, then the owner will not be able to do the kind of diagnostics that can be carried out by technicians at a service station on his own. In addition, there are a sufficient number of users on the Internet who have been communicating with GAZ 3307 and GAZ 3309 for a long time and will be able to share their experience. You can meet such people on forums dedicated to the repair and maintenance of this car.
Engine repair process
GAZ 3309 diesel who has problems with brakes
Questions can only be asked after registration. Please login or register.
Hello! I am the owner of GAZ-3309. I heard from many that there is a problem with the brakes (hydro-pneumatic), especially everyone complains about airing the circuits. I think that there are people to whom this problem is very close and there will be experts on this car.
What kind of hydro-pneumatic brakes are these?
This is when the car is tangled with valves and pipes. The point is that a pneumatic chamber is screwed to the main brake. The air presses on the chamber, and the main brake fluid presses on the wheels. There are three main ones on Gaza, two on the back and one on the front. The car has two systems: pneumatic with all taps, valves, and hydraulic. There were these on Pazakh, but they switched to pneumatic ones. The Urals have always had and still have such brakes. I myself worked in the Urals and have never met a worse system.
This is when the car is tangled with valves and pipes. The point is that a pneumatic chamber is screwed to the main brake. The air presses on the chamber, and the main brake fluid presses on the wheels. There are three main ones on Gaza, two on the back and one on the front. The car has two systems: pneumatic with all taps, valves, and hydraulic. There were these on Pazakh, but they switched to pneumatic ones. The Urals have always had and still have such brakes. I myself worked in the Urals and have never met a worse system.
I know it. I work on a lawn like this. but I asked because the brakes there are not called hydro-pneumatic, but pneumatic-hydraulic. There's also ABS there.
We have 2 of these on our farm. I myself have driven with the pedal to the floor, and the braking is somehow sluggish. Well, it’s actually a handbrake.
We have 2 of these on our farm. I myself have driven with the pedal to the floor, and the braking is somehow sluggish. Well, it’s actually a handbrake.
Brake system repair
Malfunctions of the brake system must be eliminated immediately or as soon as possible - brakes are directly related to traffic safety. Malfunctions include:
- Increased free play of the brake pedal, in some cases the brakes do not grab the first time, and the part requires two pedal strokes or more;
- Pedal hardness. The pedal becomes tight, and braking efficiency decreases;
- The brake fluid level light in the car lights up, indicating a lack of fluid in the brake system;
- The brake pedal grabs at the very beginning or there is no free play at all.
Diagram of the brake system of GAZ 3307
- The master brake cylinder has failed. As a rule, one of the two circuits stops working in it. A malfunction of the brake master cylinder (MBC) is accompanied by increased travel or failure of the brake pedal;
- The brake booster diaphragm is torn. With such a defect, the brake pedal becomes hard and difficult to press;
- Brake pads are incorrectly adjusted or worn. The malfunction is characterized by increased pedal travel. The eccentrics on which the pads are attached may also be worn out;
- Air getting into the brake system. In this case, the brakes become hard and braking efficiency is lost. If air gets in, it is necessary to bleed the brakes;
Brake parts
You can try to repair or replace components such as the vacuum booster and the brake master cylinder. In GTZ, cuffs and pistons mainly need to be replaced. If there is significant wear of the internal cavity of the cylinder body, repair becomes impossible and the entire part is replaced.
Do-it-yourself vacuum booster should only be done if you have some experience, since repairing it is quite complicated.
By the way, the main brake cylinder is a problematic part on GAZ models due to poor workmanship.
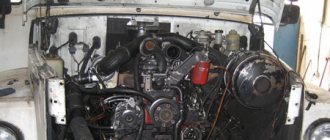
Brakes on conversion of GAZ 3307 to diesel D 240.
At the request of the workers, I am showing the brake system on my GAZ car.
How to bleed brakes alone, without outside help.
I have been using this simple method for many years. I’ll add that when filling an empty system, it is recommended first...
This is what a brake cylinder for GAZ 3307 looks like
If there is no free play in the brake pedal, it can be adjusted using the GTZ rod. The brakes on the 3307 are bled in a specific order. You need to start with the farthest wheel, and then continue as you get closer to the driver. That is, for a 3307 machine, the pumping scheme will look like this:
The principle of braking GAZ 53
The gas brake system 53 includes actuators and mechanisms that activate the actuators. That is, the mechanism itself is located on the wheel of the car and is engaged in slowing down the rotation of the wheel at the right moment, when the driver desires it. The drive runs throughout the machine and is a way to control the mechanism. First we will discuss how exactly it works. Drive includes:
- Brake pedal.
- Master brake cylinder.
- Hydraulic vacuum booster.
- Circuits and connecting pipes.
The pedal is located inside the car between the accelerator and clutch pedals; it is the pedal that the driver presses when he wants to slow down the car. When the driver presses on it, a force is created that is perceived by the brake master cylinder. The cylinder has the same shape and contains a small piston with a valve. When you press the pedal, the valve in the cylinder closes and the fluid in the circuit cannot leave it, since the circuits of the brake mechanism are completely sealed. The piston with the valve closed begins to move down and builds up fluid pressure in the system. The circuits from the main brake go to each wheel of each axle, so there are two brake circuits. This was done more for security reasons than for technical reasons. Technically, it would have been easier to do one, but if the entire circuit was depressurized, it would be impossible to stop the “lawn.” But if only one fails, then pressing the pedal will still somehow change the situation, but it will be possible. A hydraulic vacuum booster is also installed here, which creates additional pressure on the main brake piston, in order to increase the pressure in the system to a greater extent than can be achieved by pressing the pedal with one foot. The gain is created due to the vacuum that appears in the engine intake manifold. The vacuum booster redirects part of it to the brake cylinder, which creates additional pressure. The condition of the hydraulic vacuum booster must be constantly monitored, because if it depressurizes, air will leak into the intake manifold and this, at a minimum, will cause the car to stall. At most, this can lead to engine failure.
The mechanism itself has a fairly simple design in the form of the use of brake drums on all wheels of the car. There are actually drums on both the front and rear axles, with the only difference being that they are smaller in size at the front. The rear ones have protective screens that prevent failure of the brake mechanism. The moving part here is the drum body itself, which is tightly screwed to the wheel and rotates with it. Inside there are two pads with springs and working cylinders. Springs are necessary to restrain the pads from spontaneous pressing and return them to their original position when the driver releases the pedal. When you press the pedal, the pressure in the circuits presses on the working cylinders, and they press the pads against the horizontal surface of the drum body. The pads are equipped with special friction linings that prevent them from quickly rubbing off on the drum. On trucks, drum brakes have shown pretty good results so far, so if they are kept in good enough condition they can last quite a long time.
Clutch repair
3307 trucks often operate at maximum loads. A fully loaded car cannot drive in one gear when going uphill, and shifting gears in this mode forces the clutch to work quite hard. In addition, the 3307 gearbox is not synchronized and requires double squeezing when changing from one gear to another. Due to the heavy load on the clutch, it often fails and has to be repaired.
Signs of poor clutch are determined by pedal pressure:
- It fails, the gears cannot be engaged;
- Doesn’t squeeze out completely and sticks up;
- The pedal is too “soft”;
- Large free movement, squeezing occurs at the very end.
There are cases when the pedal pressure is normal, but when turned on
transmission, the car does not move.
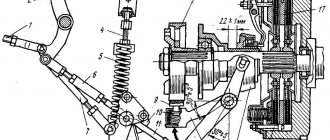
Clutch diagram for GAZ 3307
The cause of the malfunction can be almost all clutch parts. Often fail:
- “Basket” and clutch disc;
- Release bearing;
- Master and slave cylinder;
- Clutch fork.
A little more detail about each detail:
- Driven clutch disc. The wear of the disc linings can be determined without removing it from the car. You need to remove the clutch housing tray - and then the disc linings can be seen. Linings that are too thin indicate the need to replace the part. Sometimes the disc hub breaks, and then the car does not move when the gear is engaged. Such a malfunction can also be determined on the spot. Two people need to do the check. One squeezes the clutch with the engine not running, the other moves the disc with a screwdriver. The break will be noticeable by the uneven movement of the disk.
- Clutch drive disc (“basket”). The “basket” of a gasoline engine is claw-type (three legs), the height of the legs is adjusted using nuts. Accuracy is very important here - incorrect adjustment affects the movement of the car: when starting off and when changing gears. The car can:
- twitch at the beginning of movement;
- gears on an unadjusted clutch engage with a crunch;
- the clutch can “drive”, but the car will not move.
- Release bearing with bore. The unit consists of two parts - the hub and the bearing itself. The hub has an oiler - the rubbing surface on which the hub moves is lubricated. The bearing itself must have a lithol type lubricant inside. A dry bearing can jam, and in this case the varnishes of the clutch “basket” will instantly wear out.
- Clutch master and slave cylinders. If the master cylinder fails, the pedal becomes soft (“wobbly”) and the clutch periodically disappears. A faulty slave cylinder usually leaks. You can try changing the cuffs inside the cylinders, but if the parts are old enough, it is better to replace them.
- Release bearing fork (clutch fork). The part is very simple, but its malfunction can most often be seen only when the fork is removed. Three characteristic defects of the part:
- the tips in connection with the release bearing hub are worn out;
- the fork bursts in the area of the swivel joint (“soldier”) or in the place where the rod is attached;
- the fork bends.
Steering repair
Steering malfunctions also affect traffic safety, as do brake system malfunctions, and operating a vehicle with such defects is prohibited. Problems must be corrected immediately after they are discovered. Malfunctions of the model 3307 include:
- steering wheel play exceeds the permissible norm;
- knocking when turning the steering wheel;
- tight turning of the steering wheel;
- oil leak from the steering mechanism (gearbox).
Steering mechanism diagram
- play in the steering rod joints or steering tips;
- wear of the worm pair in the gearbox;
- play in the crosspieces of the steering driveshaft;
- jamming of steering joints and rods;
- play in the steering gear bearings.
In the 3307 steering mechanism, you can adjust the clearances in the worm pair and in the bearings, thereby reducing the backlash.
The worm pair is adjusted as follows:
- the cap nut at the end of the gearbox housing is unscrewed;
- the lock washer is removed (it has an asterisk shape along the outer diameter);
- the screw under the cap nut is turned clockwise until a tight rotation begins, then loosened slightly;
- install the lock washer and check the play. If the steering wheel turns tightly, then turn the screw back a little counterclockwise. If the desired position is found, replace the cap nut.
The clearance in the gearbox bearings is adjusted with the mechanism removed:
- The oil is drained from the mechanism. This is done by loosening the four bolts securing the cover;
- Remove the cover. There are gaskets underneath. Gaskets can be of different thicknesses;
- By selecting the thickness of the gaskets, the backlash is removed.
In a book or manual from the Internet you can find a description of all the components and assemblies of the 3307 car. Using the description, you can overhaul the engine, do maintenance, and repair the chassis of the gas 3307 engine.
Proper bleeding of the brake system
Then it turned out that not all people know how to correctly do this generally simple procedure.
And since this unit is one of the most important in the car, the life and moral health of all citizens in the car directly depend on it, I think it makes sense to take it from the comments. I also think it makes sense to add this to the FAQ.
The procedure for bleeding the brake system, according to the Workshop Manual
. 1. The procedure is done together. Before pumping, in any case, we strictly cut off the ABS, if there is one, otherwise pumping can damage it. The ABS is disabled by removing the corresponding 40-amp fuse link in the engine compartment relay/fuse box.
2. Put the car on the parking brake and start the engine. Under no circumstances should you pump it with the engine not running, because then it will be bad for the vacuum booster.
3. Remove the cap from the cylinder filler neck. Top up to full level. We make sure that during pumping the liquid is always at least 1/2 level.
Bleeding the master cylinder:
4. Disconnect from it the tube (near one) going to the rear wheels. Check the fluid level. 5. We give the command to smoothly depress the brake pedal and leave it depressed. 6. We pinch the hole in the cylinder with our finger and give the command to smoothly release the pedal. 7. Release your finger when the pedal returns to its original position. 8. We repeat what is indicated in paragraphs 4-7 until liquid begins to pour out of the hole, while constantly making sure that the liquid level does not drop by more than 1/2.
9. Connect the removed tube to the cylinder and tighten the nut.
10. We give the command to smoothly depress the pedal and hold it.
11. Loosen the nut on the tube. Then press it back. We give the command to smoothly release the pedal.
13. Repeat steps 10-11 until air stops escaping.
14. Similar to the above, then repeat steps 4 to 13 for the tube going to the front wheels.
Bleeding calipers.
15. For right-hand drive cars, the order of bleeding the calipers is: left rear, right rear, left front, right front. For left-hand drive: right rear, left rear, right front, left front.
16. We put a tube on the nipple, which we lower into a jar partially filled with brake fluid. Place the head on the screw. 17. We give the command to pump the pedal three times
at intervals of 1 pump per second
and then hold it.
18. We loosen the screw, watch how the liquid flows out of the tube, then, when it stops flowing, we tighten it. 19. We give the command to smoothly release the pedal. 20. Repeat steps 17-19 until the bubbles stop coming. Usually you have to do this up to 15 times for the rear wheels, and up to 10 times for the front wheels. If air does not flow, then the main cylinder remains air-filled; we carry out the cylinder bleeding described above. 21. After successfully pumping one, we move on to the next wheel. 22. After completing the entire process, we check the result: depress the pedal. If we feel that the pedal is “soft,” we repeat the entire procedure from the very beginning.
23. During the process, we continue to monitor the level. After each wheel, add fluid to the maximum level.
24. After successfully completing the procedure, we close everything with a lid, and if the rubber membrane is jammed, we correct it.
Spare parts for trucks
Full model range: GAZ-3307, 53, GAZ-3309, GAZ-66, 3308, 33081, 33086, GAZ-33104
Brake system of GAZ-3307, GAZ-66 cars
The GAZ-3307, GAZ-66 car is equipped with three brake systems: a working one, acting on all wheels of the car and a spare one, the function of which is performed by one of the circuits of the working brake system, as well as a parking one, acting on the brake mechanisms of the rear wheels.
Working brake system of the GAZ-3307, GAZ-66 car
The GAZ-3307, GAZ-66 vehicles are equipped with a brake drive with a fault signaling system, with separate axle braking (Fig. 1) and having a hydraulic vacuum booster and a vacuum cylinder with a shut-off valve in each circuit.
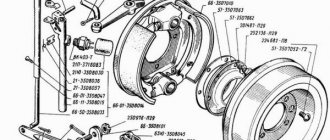
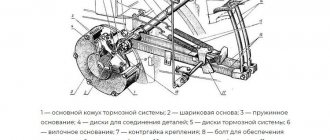
Rice. 1. Drive diagram of the brake system GAZ-3307, GAZ-66
I—vacuum; II—air; III—brake fluid; 1—engine inlet pipe; 2—shut-off valve; 3—vacuum cylinder of the front circuit; 4—signalling devices; 5—hydraulic vacuum amplifier of the front circuit; 6—vacuum cylinder of the rear circuit; 7—rear wheel brake mechanism; 8—rear axle housing; 9—pressure regulator; 10—hydrovacuum amplifier of the rear kennel; 11—air filter; 12—sensor for emergency brake fluid level drop; 13—filling tank; 14—main cylinder; 15—front wheel brake mechanism
Vacuum cylinders provide independent power to each circuit. The vacuum level is monitored by vacuum sensors with red indicators (on the instrument panel) for each circuit. The lighting of one of the indicator lamps indicates insufficient vacuum in the corresponding circuit.
A brake pressure regulator is installed in the hydraulic drive of the brake mechanisms of the rear wheels of GAZ-3307, GAZ-66. Its functions in the event of failure of any of the two circuits are performed by the remaining serviceable circuit (front or rear axle).
At the same time, there is an increase in pedal travel by 90-115 mm. In this case, braking can occur with a gap between the pedal and the cabin floor of 15 mm.
Parts of the brake drive GAZ-3307, GAZ-66
The main brake cylinder GAZ-3307, GAZ-66 (Fig. 2) creates pressure in two independent hydraulic circuits of the brake drive with pistons 10 and 18. Primary cavity I ensures the operation of the rear brake circuit, and secondary cavity II ensures the operation of the front brakes.
Structural elements of the brake drive
The main brake cylinder builds up pressure in 2 independent hydraulic circuits using pistons. The primary cavity is responsible for the functioning of the rear brake circuit, and the secondary cavity is responsible for the front brake circuit. The pistons of the main brake cylinder are equipped with floating heads, the main task of which is to act as a bypass valve.
In the initial position, under the influence of the return springs, a gap is provided between the piston and the head. The cavities of the circuits (front/rear) are connected to the tank. The seal occurs due to rubber rings located in the piston heads. The valves are responsible for maintaining excess brake fluid pressure.
If one of the circuits breaks down, an increase in pedal travel is observed as a result of idle movement of the piston of the faulty circuit. If the circuit is in working condition, the required level of pressure is provided, which facilitates the braking process.
To replace deformed and worn parts, the vehicle unit is dismantled: the body is disconnected, the thrust bolts are unscrewed, and then the pistons are removed. Before starting assembly, all structural parts should be washed with brake fluid. It is important to prevent dirt, dust, small debris, oil and various particles from entering the assembly. When assembling the unit, the thrust bolts must fit into the grooves of the pistons.
The GAZ brake system is powered by the provided tank. When the sensor is removed and if there are new brake linings, the fluid level should be within the Max mark. If there is a decrease in the amount of fluid and the brake system as a whole is in good technical condition, then the main reason for this is the natural wear of the linings.
Activation of the liquid level drop alarm in most cases occurs due to a decrease in the tightness of the system.
Sources:
https://remont-gazeley.ru/gaz/poryadok-prokachki-tormozov-gaz-3307.html https://adaptsport.ru/uhod/kak-prokachat-tormoza-na-gaz-3307.html
GAZ-3307 car repair
The GAZ 3307 dump truck is not particularly difficult to repair; you can understand its structure without having high qualifications. It is not difficult to buy spare parts for the 3307 - they are sold in specialized stores, and there are quite a lot of such stores.
This is what a classic GAZ 3307 truck looks like
As necessary, the clutch, engine, steering, brake system, and chassis have to be repaired on the 3307 model.
Repair manual
Due to the fact that GAZ-3307 and GAZ-3309 trucks are domestic vehicles, their repair usually does not become an impossible task. Spare parts are available in any dismantling or automotive market.
Buying them is not a problem, and thanks to the availability of an accessible and understandable instruction manual, not only the service station technician, but also the owner of the car can replace relatively simple spare parts.
Getting a car owner's manual is not a problem. It can be downloaded from specialized websites on the Internet or bought a printed version in a store or market.
Name: GAZ-3307, 3309. Operation, maintenance and repair manual. Publisher: Third Rome Year: 2007 ISBN: 5-88924-367-3 Number of pages: 186 Format: PDF Size: 93.33 MB Language: Russian
Of course, if we talk about more serious breakdowns, then the owner will not be able to do the kind of diagnostics that can be carried out by technicians at a service station on his own. In addition, there are a sufficient number of users on the Internet who have been “communicating” with GAZ 3307 and GAZ 3309 for a long time, and will be able to share their experience. You can meet such people on forums dedicated to the repair and maintenance of this car.
Engine repair process
Brake system repair
Malfunctions of the brake system must be eliminated immediately or as soon as possible - brakes are directly related to traffic safety. Malfunctions include:
- Increased free play of the brake pedal, in some cases the brakes do not grab the first time, and the part requires two pedal strokes or more;
- Pedal hardness. The pedal becomes tight, and braking efficiency decreases;
- The brake fluid level light in the car lights up, indicating a lack of fluid in the brake system;
- The brake pedal grabs at the very beginning or there is no free play at all.
see also
Which brake fluid is better
- 6 0 10k
Replacing brake fluid
- 28 0 25k
How much brake fluid do you need to change?
- 65 1 102k
Master brake cylinder repair kit
- 10 0 27k
Brake fluid DOT 4
- 72 1 80k
Knowing how to bleed brakes will be useful to any driver, since the procedure is not very complicated, and it must be performed after many manipulations related to the brake system. So why waste extra money once again by sending your car for service when you can pump the brakes alone?
By following the instructions and avoiding the mistakes described below, it is quite possible to remove the air from the brakes yourself, with or without ABS. Bleeding brakes with ABS is by no means more difficult, but still it is a separate topic worthy of its own article.
It is only worth noting that if there is an anti-lock braking system with ESP and SBC modules, then the path lies with a service that has the necessary equipment.
Clutch repair
3307 trucks often operate at maximum loads. A fully loaded car cannot drive in one gear when going uphill, and shifting gears in this mode forces the clutch to work quite hard. In addition, the 3307 gearbox is not synchronized and requires double squeezing when changing from one gear to another. Due to the heavy load on the clutch, it often fails and has to be repaired.
Signs of poor clutch are determined by pedal pressure:
- It fails, the gears cannot be engaged;
- Doesn’t squeeze out completely and sticks up;
- The pedal is too “soft”;
- Large free movement, squeezing occurs at the very end.
There are cases when the pedal pressure is normal, but when the gear is engaged, the car does not move.
Clutch diagram for GAZ 3307
The cause of the malfunction can be almost all clutch parts. Often fail:
- “Basket” and clutch disc;
- Release bearing;
- Master and slave cylinder;
- Clutch fork.
A little more detail about each detail:
- Driven clutch disc. The wear of the disc linings can be determined without removing it from the car. You need to remove the clutch housing tray - and then the disc linings can be seen. Linings that are too thin indicate the need to replace the part. Sometimes the disc hub breaks, and then the car does not move when the gear is engaged. Such a malfunction can also be determined on the spot. Two people need to do the check. One squeezes the clutch with the engine not running, the other moves the disc with a screwdriver. The break will be noticeable by the uneven movement of the disk.
- Clutch drive disc (“basket”). The “basket” of a gasoline engine is claw-type (three legs), the height of the legs is adjusted using nuts. Accuracy is very important here - incorrect adjustment affects the movement of the car: when starting off and when changing gears. The car can:
- twitch at the beginning of movement;
- gears on an unadjusted clutch engage with a crunch;
- the clutch can “drive”, but the car will not move.
- Release bearing with bore. The unit consists of two parts - the hub and the bearing itself. The hub has an oiler - the rubbing surface on which the hub moves is lubricated. The bearing itself must have a lithol type lubricant inside. A dry bearing can jam, and in this case the varnishes of the clutch “basket” will instantly wear out.
- Clutch master and slave cylinders. If the master cylinder fails, the pedal becomes soft (“wobbly”) and the clutch periodically disappears. A faulty slave cylinder usually leaks. You can try changing the cuffs inside the cylinders, but if the parts are old enough, it is better to replace them.
- Release bearing fork (clutch fork). The part is very simple, but its malfunction can most often be seen only when the fork is removed. Three characteristic defects of the part:
- the tips in connection with the release bearing hub are worn out;
- the fork bursts in the area of the swivel joint (“soldier”) or in the place where the rod is attached;
- the fork bends.
Bleeding a car clutch: symptoms, preparation, stages
Clutch “diseases” can lead to problems at the start and when braking. Unfortunately, it is impossible to diagnose system problems based on external signs. Monitor its operation, pay attention to your own sensations when pressing the pedal, and if you notice jerks when starting the engine and switching the gearbox, go for diagnostics.
Car clutch system
When is clutch bleeding required?
The operation of the clutch system is based on the laws of physics - the properties of hydraulic/brake fluid to compress/decompress under load. If air gets into the system, its properties change. As a result: the hydraulics stop responding to pressure or react late, which leads to jerks and jolts when pressing the pedal.
Signs of “airing” of the system
If the following symptoms appear, it's time to change the hydraulic fluid:
- the pedal is depressed too easily, but the gear does not change;
- the pedal moves normally, but the gear engages with vibration or delay;
- the clutch pedal “sticks” to the floor, slowly returning to the top position.
Even one of these signs is enough to check the system.
“Sinking” can also be caused by a broken return spring.
Before bleeding the clutch, find out that the spring mechanism is not the cause of the malfunction.
In what cases is the clutch hydraulic drive pumped?
Bleeding of the clutch and braking systems is mandatory if:
- the liquid used has already served its purpose
. Changes in physical and mechanical properties over time are the norm. The recommended period of use for hydraulics is 1-2 years (as a rule, the period is indicated on the container).The liquid loses its properties, even if stored in an airtight container.
- the clutch or brake system is being repaired
. When cuffs, seals, seals are changed, leaks are eliminated, depressurization occurs. Result: leakage of working fluid and airing. Needs replacement.It is easy to speed up new bleeding if you loosely tighten the fastenings of the clutch mechanism units. Air leaks freely through the micro-holes.
- Clutch/braking system components are severely worn
.In case of wear of parts, only bleeding is not enough, because the cause of airing does not disappear. To fix the problem, you must first repair or change the functional elements, and then change the working fluid.
What is required for pumping?
- tools: keys, screwdrivers, pliers;
- elastic transparent hose for draining old fluid. Make sure that the diameter of the tube connection matches the drain fitting connector;
- a reservoir into which the liquid will be drained;
- new working fluid;
- personal protective equipment: gloves, sleeves, goggles.
Technical fluids are chemically aggressive; if they come into contact with the skin and mucous membranes, they can cause burns.
Ideally, bleeding the clutch system should be carried out by two people. One person presses the pedal, the second drains the fluid and diagnoses faults. If necessary, you can do without an assistant. In this case, you will need a reliable means to secure the pedal.
For example, a suitable size stone or brick.
Is it possible to cope with the procedure on your own?
Are you sure that you can quickly and efficiently bleed the clutch yourself? Even if you have the slightest doubt, contact a professional service center.
Without knowing the nuances, you may simply not notice the defect, so repairs will be pointless.
Preparing for pumping
Preparing to bleed the clutch
The fluid from the hydraulic system is not “poured out”, but is pushed out thanks to the cylinder piston pusher.
Preparation is carried out in stages:
- checking the volume of liquid in the expansion tank - the level should be within normal limits. If it reaches the desired level, you need to top it up;
- cleaning the valve cap on the cylinder from accumulated contaminants;
- removing the cap from the air inlet valve on the working cylinder;
- connecting the drain hose to the valve fitting.
The second end of the hose is lowered into a container into which fresh working fluid is poured. The end of the tube should be immersed 5-10 cm into it.
Do not remove the hose from the tank until work is completed.
After the preparatory work, the clutch is adjusted. This allows you to make sure that the movement is free and, in addition to airing the system, there are no other malfunctions.