Brake pads for UAZ Bukhanka are produced by a small number of companies. The most common products on the market are Riginal products. The average price of the article RG469-3502090 is 300-650 rubles. Despite their low cost, the pads provide comfortable and reliable braking. At the same time, brake disc wear remains minimal. Effective braking is guaranteed over a wide temperature range.
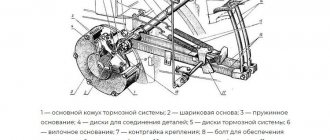
First, use a jack and a wrench to remove the wheel. After this, you need to bring the brake pads together. To do this, the wheel rotates forward, and at the same time the eccentric bolt rotates until the wheel brakes. In this case, the adjusting bolt rotates in the direction of wheel movement. For mixing you will need a key “17”.
Next, the eccentric is slowly lowered until the wheel begins to rotate freely without touching the drum with the block. The gap of the second pad is adjusted in the same way. After the above manipulations, the screws (3 pieces) securing the brake drum are unscrewed.
The brake drum is removed. If necessary, the drum is removed from the hub using a mallet or a wooden block and a hammer. Next, the tension springs of the pads are removed. For this operation it is best to use special forceps.
After this, you need to hold the head of the brake pad rod with one hand and press the cup, compressing the spring. The spring cup must be rotated 90 degrees. As a result, the slot on the cup should align with the tip of the pad support pin.
Next, the cups with the spring are removed, and the rod is removed from the hole on the brake shield. Then the nut of the block support pin is unscrewed. For such an operation, a key “19” is required. The support pin is removed. Together with it, the bronze bushing and washer are removed. The block is removed.
The second block is removed in a similar way. Next, new pads along with bushings and washers are installed on the fingers. The pins are fixed to the brake shield using nuts. It is important to pay attention to the fact that the marks on the end of the fingers should look towards the tees of the brake cylinders. After this, rods with springs and cups are installed on the pads. Tension springs are installed. The eccentric bolts are turned until the pads are brought together. Finally, the brake drum is installed on the hub. It is necessary to separate the drum and block to their previous state. Replacement details can be found in the video -
Adjusting the brakes on Bukhanka
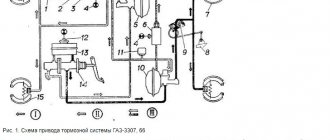
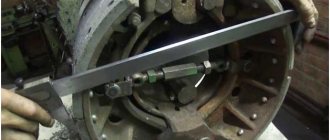
If necessary, replacing the pads is accompanied by adjusting the brakes. The vehicle is placed on a flat surface, the gear is engaged, the front axle is engaged and the handbrake is disengaged. For safety, wheel chocks are installed. Next you need to separate the pads. The car will be jacked up, for example, the rear left wheel. The adjusting bolt is turned in the direction indicated by the red arrow towards the yellow dotted arrow (in the image below). At the same time, you must turn the wheel by hand until it slows down.
Next, the above bolt must be turned in the opposite direction until the block begins to cling to the drum and a shuffling sound is heard. In this case, the wheel should rotate without difficulty, which will mean that the distance between the drum and the block is optimal.
The adjusting bolt of the rear right wheel is turned in the opposite direction. This operation can be seen schematically in the figure.
Blog about UAZ
Full adjustment of the service brakes of utility vehicles of the UAZ-452 family includes adjustment of the gaps between the pads and brake drums, as well as adjustment of the free play of the brake pedal and its position in the cabin relative to the floor.
Adjusting the service brakes of UAZ-452 vehicles.
Adjusting the gaps between the pads and brake drums is necessary because as the friction linings wear, the gaps between the pads and brake drums increase, and the brake pedal travel increases during braking. To restore the normal size of the gaps and reduce the pedal travel, it is necessary to adjust the brakes with eccentrics, the axle heads of which are moved outward.
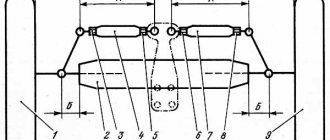
Both eccentrics for the service brake of the rear wheel are located slightly above the wheel axis, and for the front wheel brakes, the front shoe eccentric is located below the wheel axis, and for the rear shoe - above the axis.
Adjusting the gaps between the pads and brake drums of UAZ-452 cars.
It is carried out in the following sequence:
1. Jack up the wheel whose brake is adjustable. 2. While rotating the wheel, gradually turn the adjusting eccentric until the wheel brakes. 3. Gradually releasing the eccentric, turn the wheel until it turns freely, without the drum touching the pads. 4. Adjust the gaps between the pads and drums of the remaining brakes in the same way.
When adjusting the front brake pads, as well as the front brake pads of the rear brakes, the wheel must be rotated forward. When adjusting the rear brake pads, the wheel should be rotated backwards. To reduce the gaps, the eccentrics must be turned in the direction of rotation of the wheel, and to increase them, on the contrary, against the rotation.
5. Check while the car is moving that the brake drums do not heat up and that the brakes operate evenly when braking.
When adjusting, do not unscrew the nuts of the pad support pins and disturb the factory setting of the pins. For rear wheel brakes, the support pins are located at the bottom of the brake support disc; for front wheel brakes, the support pin for the front pad is located at the bottom, and for the rear brake pad, at the top. These fingers need to be adjusted only when installing new pads or new friction linings.
With correctly adjusted gaps between the pads and the brake drum, complete braking should occur within 1/2-2/3 of the brake pedal stroke. UAZ-452 vehicles with a full load, with correctly adjusted service brakes on a horizontal section of a dry concrete road should stop:
- when driving at a speed of 30 km/h: at a distance of no more than 6 meters, - when driving at a speed of 70 km/h (except for buses): at a distance of no more than 53 meters - when driving a UAZ-452V bus at a speed of 60 km/h : At a distance of no more than 37 meters.
Adjusting the service brakes when changing brake pads or friction linings.
When replacing friction linings or brake pads, it is necessary to adjust the installation of the pads. To do this you need:
1. Raise the wheel with a jack. 2. Slightly unscrew the support pin nuts and set the support pins to their initial position. For rear wheel brakes, the marks on the ends should face each other. For front wheel brakes, the marks should be located along the cylinder axis. 3. Pressing the brake pedal with a constant force of 12-16 kgf, turn the support fingers so that the ends of the shoes on the finger side rest against the brake drum. Tighten the support pin nuts in this position, making sure that the pins do not turn. 4. Turn the adjusting eccentrics until they stop against the pads. 5. Stop pressing the pedal and turn the adjusting eccentrics in the opposite direction so that the wheels rotate freely.
When installing new pads, when the friction linings have not yet been worn in to the surface of the drums, the brake drums may heat up somewhat after the indicated adjustment. If the heating is small and the hand is comfortable touching the drum rim, then after several braking the pads will wear in and the heating will stop.
If the brake drums are very hot, you need to use the adjusting eccentrics to slightly move the pads of the heating brake away from the brake drum. Both routine and installation adjustments of service brakes are carried out when the brake drums have completely cooled down and the wheel bearings are correctly adjusted.
Adjusting the free play of the brake pedal.
It consists of setting the correct clearance between the pushrod and the master cylinder piston. The gap should be in the range of 1.5-2.5 mm, which corresponds to a free play of the brake pedal of 8-14 mm. The gap is adjusted by changing the length of the pusher.
To make adjustments, it is necessary to install the brake and clutch pedals at the same height from the body floor, and the pedal travel to the floor should be 150+-5 mm. Then, having released the pusher locknut, rotate the pusher by the hexagon until the free play of the brake pedal is established within the specified limits and tighten the locknut.
This gap is necessary to ensure that the master cylinder piston returns to its original position when the brake pedal is released to avoid the inner cuff from blocking the compensation hole.
Interesting upgrade to the brake system
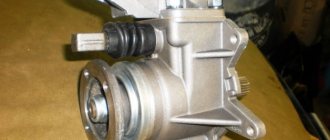
The civil axle of the front axle is undergoing some structural modifications. With some modifications, disc brakes are installed instead of drum brakes. The operation is performed in several stages. To begin with, the wheel and brake drum are usually removed, and the hub nuts are unscrewed.
After this, the hub with the bearing is removed. Next, unscrew the 6 bolts securing the brake shield. The shield is removed with all its contents. Next, the view reveals the mounting location for installing disc brakes.
Afterwards, the Willis fork elements are installed. Then the caliper mounting bracket is put on, and the protective shield is fixed to the bolts. The hub with the bearing is returned to its place, a toothed washer is installed and the first nut is tightened. The wheel bearing is adjusted and a washer with petals is put on. Next, the second nut is tightened, one petal is tightened onto it and the structure is closed.
After this, 3 shims are installed for each wheel. Next, the brake disc is put on. The shims are pre-adjusted to center the brake disc relative to the caliper. The next step is to lubricate the caliper guides and then install the pads. In the process, the bolts are shortened by 1.5 cm and engravers are placed under them.
After this, a new brake hose is installed. It is easier to connect and connect it by preheating it. It is connected directly to the brake system, and connected to the wheel through an adapter. Finally, the brakes are bled. It checks whether the system is working correctly or not.
Malfunctions and repair of transmission elements
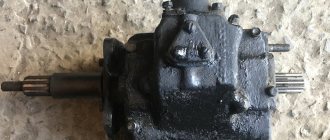
Transmissions are the mechanisms that connect the engine and chassis. This includes the transfer case, gearbox, clutch and driveshafts.
Transfer case repair
Reasons for repairs may be:
- grease drips;
- the appearance of noise and vibrations;
- problems with switching to different positions;
- unplanned exit from the enabled mode.
Stages of repair work:
- Dismantling and disassembling the transfer case.
- Fault detection.
- Elimination of the causes of problems (replacement or rehabilitation of elements).
- Assembly, installation in a regular place, configuration.
Almost all parts of the box are connected to the lid, are clearly visible and accessible for removal. The gears are engaged only when the front drive axle is connected.
How to bleed the clutch
The UAZ clutch serves to disconnect the engine shaft and gearbox when shifting.
It may be necessary to adjust the clutch on a UAZ in case of deviations in operation, after replacing parts or the entire mechanism. The unit is bolted to the flywheel of the ZMZ engine; the position after balancing is indicated as “O”.
The UAZ clutch is adjusted in a stationary state on the vehicle by controlling the length of the pusher and horizontal rod (free play - 150 mm) and in the removed state using a driven disk template.
To bleed the hydraulic drive, you need to add fluid to the tank on the main fluid pump, put a hose on the valve and insert the other end into the container. The further sequence is similar to pumping the GTZ.
Replacing the clutch master cylinder
Replacing the brake master cylinder (MBC) and replacing the clutch master cylinder if it is impossible to repair are similar, only access to the MBC is worse: you need to disconnect the MBC from the lever, unscrew the end connection and two mounting bolts. Before doing this, drain the fluid, as it may spill in the cabin.
Craftsmen install a unit from a VAZ classic on old car models with minor modifications.
Changing the oil in the box
Unscrew the magnetic plugs in both boxes and drain the waste. It is better to drive 20-30 km before the procedure to warm up the oil if the replacement is performed in the cold season.
To change the oil in the box, you will need a device consisting of a 0.5 liter plastic bottle and a hose that must be tightly inserted into the lid. After the waste has drained, tighten the plugs cleared of steel shavings and add fresh oil.
Transmission repair
Repairing a UAZ gearbox is difficult to do on your own: to do this you need to unscrew the cardans and cushions from the frame.
The UAZ gearbox is removed together with the transfer case. To repair a manual transmission, you need knowledge of basic mechanics, the ability to see play on the shaft, and distinguish a working bearing and synchronizer from a faulty one.
The Ulyanovsk Automobile Plant did not provide for repairing the gearbox alone, therefore, when you put the gaskets and gearbox covers in their original places, the assembly is not completed. Reinstallation is a procedure that requires effort and patience.
Adjusting gearbox rods
The rods on the box are adjusted in this order:
- move the PP lever to the neutral position;
- loosen the nuts on the rods on the gearbox and the rocker;
- place the flags down, perpendicular to the ground;
- Set the shift lever to the middle of neutral and tighten the nuts.
Several adjustment cycles may be required.
Clutch replacement
Before the operation, it is necessary to drain the oil from the gearbox and gearbox. Mark the positions and unscrew the cardan shafts. Disconnect the muffler.
Then it goes like this:
- We remove the protection, lever rods and brake cable.
- Disconnect the wires and remove the slave cylinder.
- Unscrew the 4 gearbox fastening nuts.
- Unscrew and pull off the box.
- Mark the location of the flywheel and basket and disconnect it.
- We replace the clutch disc or install a new basket according to the marks, tighten it with a cross, and assemble it.
How to remove the clutch pedal
Shoot as follows:
- remove the stopper from the pedal axle;
- pull out the axle and spring;
- Using a screwdriver, remove the pedal and remove the bushings.
Shank Bearing Replacement
Turn the cardan all the way to the right and put a mark on the bridge itself. Move it to the extreme left and mark it. The further sequence is as follows:
- Unscrew the cardan flange.
- Open the lid.
- Remove the oil washer.
- Remove the shank bearing.
- If necessary, remove the play using spacers.
- Install the new bearing and reassemble in reverse order.
Replacing the driveshaft cross
When the crosspiece fails, it most often rings when starting off - these are the first signs of a malfunction. Change it like this:
- We remove the cardan and clamp it in a vice. When working with rotating machinery, you should, if possible, mark all positions before separating the parts.
- We take out the locking rings.
- First, we pump out the old cross from the cardan, then from the cup.
- We inspect the seat for defects. We straighten them if necessary and install the new part with gentle blows.
See » How to make external and internal tuning of a UAZ farmer car
Replacing the front axle oil seal
If lubricant leaks, the shank oil seal needs to be replaced. We make marks and unscrew the cardan.
We take out the cotter pin, mark it again and unscrew the axle nut. We remove the part and use a flat-head screwdriver to remove the oil seal.
We wash everything, wipe it, and, putting the old oil seal in place, fill in a new one. We assemble in reverse order according to the marks.
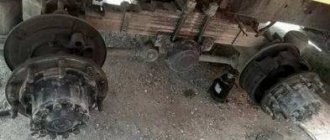
Dismantling the front and rear axles
To repair the front axle of a UAZ, you will need a jack and wheel chocks. We work according to the following scheme:
- We place stops under the rear wheels of the car.
- Disconnect the hoses and pipes from the drums.
- Disconnect the shock absorbers at the bottom.
- We unscrew the cardan and the rod from the bipod.
- We remove the spring ladders.
- Using the frame, we lift the front of the car.
- We roll out the bridge, dismantle it and repair it.
Dismantling the UAZ rear axle is done in the same way.
When should you change the pads?
The front and rear brake pads on the UAZ Bukhanka are replaced with a residual thickness of 2 mm, preferably more (up to 5 mm). It is also worth paying attention to the fact that deterioration in braking is possible due to a violation of the tightness of the brake system.
In some cases, it is enough to add brake fluid, while in others it is necessary to replace the consumables of the vehicle's brake system. Sometimes it’s enough just to bleed the braking system and not change consumables. This procedure is carried out, for example, when replacing cylinders, hoses, pipes, and even when updating brake fluid.
Body repair
When repairing the body of a UAZ, it should be taken into account that the most vulnerable metal is located at the bottom of the car. Corrugated floors, wings, beams and partitions are susceptible to corrosion. The weakening of rigid structural elements causes a body lift.
When dismantling the seats and interior trim, it is easy to gain access to any parts. In case of major repairs, the body can be strengthened by replacing standard load-bearing units and installing additional stiffening elements. It is better to coat unwelded seams with sealant - this will eliminate unnecessary noise.
Cars of the UAZ family lend themselves well to tuning and modifications. All-terrain tires, electric winches are installed on them, spring spacers are made, and the transmission is strengthened to compensate for the wide tires.