Adjusting the UAZ Patriot axle is quite a lengthy and labor-intensive process, which includes many nuances that must be consistently carried out in order to avoid problems during repairs.
Axle adjustment is needed if problems arise in the form of broken teeth, oil leaks, wear of bearings, etc. This is possible not because the quality of the parts leaves much to be desired, but because of improper operation of the car, as well as if the clearance in the bearings is incorrectly set main gear drive, lack of oil or poor quality.
The consequences of this can be extraneous noise in the bridge, fuel consumption, deterioration in controllability, increased wear of parts, and you may even catch the wedge of the bridge. To prevent this from happening, it is necessary to carry out special repair work in a timely manner, such as replacing oil seals, replacing bearing adjustments.
Upon completion of such work, you should check the correctness of the bridge adjustment, which can be determined by the temperature of the bridge after a fast drive. Remember that timely oil changes help extend the life of your parts! If you have a problem with fuel consumption, then Adjusting the carburetor 4178 on the UAZ will help you
Rear axle structure and diagram
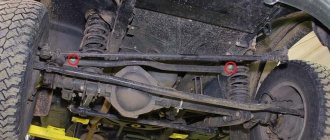
The rear axle “Spicer” on the UAZ Patriot is a cast crankcase with pressed-in axle shafts, on which platforms are provided for springs. Inside the housing there is a bevel main pair and a differential, the gears are mounted on tapered roller bearings and bronze bushings. Lubrication is carried out by splashing, the oil is stored in the lower part of the crankcase. There is a plug on the side of the housing for checking the level and filling in fresh fluid.
The design of the front axle of the UAZ Patriot differs from the design of the rear beam. The front wheels are mounted on steering knuckles, which are equipped with constant velocity joints. To transmit power to the main pairs, cardan shafts are used, connected to a 2-speed transfer gearbox.
Replacing UAZ Patriot axle seals
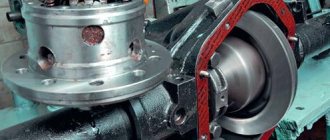
How to replace the rear axle oil seal. Replacing the axle gear oil seal on a UAZ Patriot: Correctly installed high-quality oil seals last a very long time. Never reinstall removed oil seals that have been removed. Buy quality seals. If high-quality oil seals quickly begin to leak, then the reason should be sought not in the oil seals, but in the adjustment of the axle, the fastening and quality of the propeller shaft, the crosspieces, and the suspension bearing. — Unscrew the driveshaft. — Unscrew the nut securing the flange (nut of the drive gear shaft of the rear axle gearbox). — Remove the flange. — Remove the oil seal from the neck of the gearbox using a flat-head screwdriver. — Clean the oil seal installation area with a degreasing agent (white spirit or kerosene). — Before installation, lubricate the inner part of the oil seal, the one that should be in contact with the shaft and oil, with transmission oil. — When installing, an old oil seal is sometimes used as a pressure test. It is advisable to rinse such an oil seal so as not to cause an infection. — The process of installing the oil seal in place must be careful, without distortion both as a result of installation and during the pressing process. — After installation, the inner (working) part of the oil seal, i.e. friction points, lubricate again with the fluid in which it will work - transmission oil. — Install the parts in reverse order. When installing the flange, when tightening the nut, turn it past the flange so that the bearing rollers snap into place.
Adjusting the main pair of the UAZ Patriot axle
1 - bolt; 2, 33 — spring washers; 3 - driven gear; 4, 24 — axle shafts; 5 — adjusting ring; 6, 22 — bearings; 7 — spacer sleeve; 8 — outer race of the outer roller bearing; 9 — roller bearing; 10 — thrust ring; 11 — oil seal; 12 - reflector; 13- flange; 14 — washer; 15 — nut; 16 — axle housing; 17 — adjusting ring of the drive gear; 18 — outer race of the internal roller bearing; 19 — internal roller bearing; 20 — oil deflector ring; 21 — shaft with drive gear; 23 — adjusting nut of differential bearings; 25, 39 — right and left parts of the differential housing; 26 - bolt; 27, 40 - support washers for axle gears; 28, 43 — axle gears; 29, 45 — differential satellite axes; 30, 41, 44, 46 — differential satellites; 31, 38 — differential bearing covers; 32 — retainer for the differential bearing adjusting nut; 34, 36, 37 — bolts; 35 — main gear housing cover; 42 — final drive housing cover gasket
The UAZ Patriot axle is adjusted by selecting adjusting rings and tightening the differential and final drive bearings. The selection of adjusting rings ensures correct engagement of the main gear gears. The correct engagement of the main gear gears is checked by the contact patch. The correct tightening of bearings is determined by the total torque, the value of which is measured in Nm. Naturally, in practice no one is interested in these units of measurement. The process of tightening bearings is determined solely by the ability and experience of the technician. To check that the bridge is configured correctly, special measuring instruments are used.
After repairing and adjusting the UAZ Patriot axle, it should not “buzz” from the very beginning of operation. If the bridge hums during the first days of operation, then after running-in the hum will not disappear. During running-in, a serviceable and correctly adjusted bridge does not hum. Without proper repairs, “humming” bridges will not hum less.
Important nuances before starting work
Before starting the adjustment, you need to replace worn parts, and then prepare the tools and accessories:
- control indicator and micrometer, which are used to measure the distances between elements;
- viewing mirror on the sliding handle, allowing you to examine the prints of the contact patch on the teeth.
When purchasing spacer rings, it is recommended to check the thickness with a micrometer. Spare parts are not of high quality; in addition, there are elements with erroneous markings (manufacturer defect).
Main pair adjustment
After repairing the front axle associated with replacing gears, it is necessary to adjust the contact patch:
- Select a spacer ring (parts are produced with a tolerance of 0.025 mm in both directions) that provides the required clearance in the tapered bearings of the drive shaft. When selecting, the distance between the center of the axle shaft and the lower edge of the spacer sleeve (parameter A) is taken into account. It is also necessary to take into account the gap between the edge of the inner ring and the opposite edge of the outer ring (parameter B). The thickness of the ring is determined by the formula C=A-(111.96+B).
- Place the ring in the seat.
- Insert the outer bearing races of the drive shaft into the crankcase.
- Place the oil drain ring onto the drive shaft, and then mount the rear bearing.
- Install the spacer sleeve and insert the shank into the crankcase.
- Place the 2nd bearing on the drive shaft, the ring is mounted until it stops.
- Install the washer on the spline part, and then put on the flange (used to connect the driveshaft).
- Secure the ring and flange with a nut, tighten the threaded connection until the axial play is eliminated. The shaft rotation force should not be higher than 2.0 N*m if new bearing supports are used. If old bearings are used, the torque value is 0.4-0.8 N*m. The tightening torque of the nut should be in the range from 180 to 250 N*m; when increased force is applied, the spacer sleeve is compressed.
- Apply marks to the surface of the flange and nut (for example, with oil paint or nitro enamel), which are used for further adjustment of the bridge.
- To mount the differential in the crankcase cavity, you need to purchase several sets of adjusting washers that differ in thickness.
- Install the original washer (which was used with the old gears), and then open the structure with the nut, which is located on the right side.
- Apply oil paint or other coloring material that does not dry for 30-40 minutes to the gear teeth.
Turn the gears 3-4 turns and inspect the imprint that appears on the drive gear. If the spot has an oval configuration and is located in the central part of the teeth, then the adjustment is correct. The shift of the spot towards the top of the tooth indicates the need for the shank to move closer to the differential gear, but at the same time the driven wheel is moved away from the drive gear.
If the spot is shifted to the base, then the drive wheel is moved away from the driven wheel (by reducing the thickness of the adjusting ring). To keep the side clearance within acceptable limits, it is necessary to move the driven gear towards the drive gear. When the spot moves to the narrow or wide end of the tooth, it is necessary to move or move the driven gear accordingly.
After the adjustment is completed, an oil seal is installed to prevent oil leakage. Then the shank bearings are tightened (until the paint marks align). To prevent spontaneous unscrewing of the threaded connection, the nut flange is jammed into a special groove provided on the side surface of the shaft.
Read: why install hubs on UAZ?
Assembling and adjusting differential bearings
Assemble the differential in the following order:
- Before assembling the differential, lubricate the axle gears, pinions, thrust washers and pinion shafts with transmission oil.
- Install thrust washers onto the journals of the axle gears.
- Install the axle gear and thrust washer assembly into the left gearbox.
- Install the satellites on the axis of the split cross.
- Install the detachable crosspiece (Fig. 168) with satellites in the left satellite box.
Rice. 168. Installation of a detachable cross with satellites in the left satellite box
Install the axle gear with thrust washer assembly into the right gear box. Holding the axle shaft gear, install the right satellite cup on the left one so that the marks (Fig. 169) (ordinal numbers) of both cups are aligned.
Rice. 169. Installation of satellite boxes according to marks
- Connect the halves with bolts and tighten them. Tightening torque 32-40 N*m (3.2-4.0 kgf*m).
- Install the main drive driven gear onto the gearbox, aligning the bolt holes. Install the bolts and tighten them. Tightening torque 98-137 N*m (10-14 kgf*m).
For the assembled differential, the axle gears must be rotated using a splined mandrel from a force of no more than 59 N (6 kgf) applied over a radius of 80 mm.
Adjust the differential bearings (if they are replaced) in the following order:
- Press the inner rings of the bearings (Fig. 170) of the differential onto the journals of the assembled differential so that there is a gap of 3.5-4.0 mm between the ends of the satellite box and the ends of the inner rings of the bearings.
Rice. 170. Pre-pressing of the inner rings of the differential bearings
Install the differential assembly into the crankcase, then the gasket and crankcase cover and, turning the cover by the casing, roll the bearings so that the rollers take the correct position (Fig. 171). Then use bolts and nuts to evenly connect the cover to the crankcase.
Rice. 171. Rolling differential bearing rollers
Unscrew the bolts again, carefully remove the cover, remove the differential from the crankcase and use a feeler gauge to measure the gaps A and A1 (Fig. 172 and 173) between the ends of the inner rings of the bearings and the gearbox.
Rice. 172. Clearance measurements when adjusting differential bearings
Rice. 173. Gaps A and A1 between the ends of the inner rings of bearings and the satellite box
Setting up the rear axle
Since the design diagrams of the gearboxes in UAZ Patriot axles are the same, the procedure for setting up the rear main pair is identical to setting up the transmission in the front axle. After performing the adjustment work, it is necessary to fill the crankcases with transmission oil, and then carry out a test drive. During operation, lubricant must not leak through the seals or from under the drain plug.
Possible malfunctions and their causes
The design of the front axle is reliable and unpretentious to operating conditions. Most malfunctions that arise during the operation of a car can be fixed by a person with minimal technical knowledge. Below are the most common faults that require unit repair. You can also read about the Front Axle of the UAZ “Loaf”.
Oil leakage
The presence of grease drips indicates a violation of the crankcase seal. The cause of lubricant leakage may be a failure of the gaskets or wear of the seals. If a malfunction is detected, it is necessary to replace worn gaskets or seals.
When installing, the gaskets must be treated with sealant.
Increased noise
Loud noise during operation of the unit may indicate wear of the gears or bearings. To troubleshoot problems, you will need to disassemble the unit. Failed parts must be replaced with new ones.
Deterioration of lubricant quality
The cause of strong noise during operation of the unit may be poor quality of lubricant. It is necessary to regularly change the lubricant in the gearbox housing. Regular use of the vehicle for off-road driving or fording can cause water to enter the crankcase. Water prevents the rotating parts of the mechanism from being lubricated, which can lead to complete jamming.
How to check the correctness of the work done
A basic check of the bridge's performance is carried out by measuring the crankcase temperature. The car must be driven on a dry road for 25-30 km; an electronic thermometer is used to check the degree of heating. The plant allows the crankcase temperature to increase near the installation sites of the liner bearing supports to 90°C. Water can be used to roughly estimate the degree of heating: the liquid applied to the bridge body should not boil. At elevated temperatures, the axial clearance in the bearing supports is re-adjusted.
During operation, increased noise, which occurs due to the gap between the gears and the displacement of the contact patch, is not allowed. During the grinding process of parts, the extraneous sound does not disappear, but only increases due to accelerated wear of gears and bearings. A knocking noise in the axle that occurs during sudden acceleration or release of gas indicates an excessive gap between the teeth. If extraneous sounds are detected, you need to return to the repair area and check the adjustment of the gaps in the main pair.
Similar articles
UAZ crosspiece Rear universal joint UAZ Patriot Gearbox UAZ Patriot How to change the clutch on a UAZ Patriot
The UAZ Patriot car is equipped with all-wheel drive, which makes it possible to call it an SUV. Torque from the engine to all four wheels is transmitted through the rear and front axles. UAZ Patriot, like the UAZ-3160, is equipped with single-stage drive axles. In this article we will take a closer look at the bridge, which is called “Spicer”. The front and rear axles have similar designs.
The rear axle design is presented in the form of a rigid steel hollow pipe. The ends of this tube are equipped with wheel bearings with hubs. The main pair and differential (gearbox) are located inside the drive wheel structure. In this case, torque is transmitted from the transfer case, through the cardan to the gearbox, through the axle shafts to the hub and to the wheels, respectively. Thus, the movement of the UAZ-3160 and UAZ-3163 vehicles is carried out. In this material we will pay attention to such topics as the design of the rear axle, its malfunctions and repair methods.
Gear axle - what is it?
A bridge is a beam connecting the wheels that takes on the power of the load, softens it through springs and transmits torque to the wheels. Without this part, the car would not be able to solve daily work tasks; it is an integral part of the car.
There are 2 main types of bridges: civil (also called collective farm) and gear (military). There are also tuning versions. For example, portal axles that turn an SUV into a stunning all-terrain vehicle.
Patriot front axle
The military bridge has a device called the UAZ final drive. Civilians do not have a final drive. The torque of the latter falls exclusively on the main pair of wheels, while for the military it is distributed between the gearboxes and the main pair. Thanks to its durability and reliability, the gear axle has found its application in military equipment. Collective farm and civil bridges are installed on ordinary passenger cars that do not require fantastic cross-country ability.
Military bridges are represented by a U-shaped beam of a rather complex design; they are installed on UAZ vehicles. Citizens also drive UAZs, but warriors offer better opportunities. They are especially advisable when you often need to overcome off-road conditions.
Advantages of gear axles over civil ones.
- The military bridge has greater ground clearance than the civilian one: 30 cm versus 22 cm.
- The gear axle has a high traction, thanks to which the car becomes capable of transporting large loads, can be an excellent tow vehicle, and can pass through mud at low speeds.
- The military bridge is considered more reliable. These units were developed for the needs of the army and approved by the Russian Ministry of Defense.
- Warriors are inexpensive. Despite the complexity of the design, their repair does not take much effort and time, they are easy to operate.
Design features of the product
Structurally, the rear axle of the UAZ Patriot SUV has the following form:
The Spicer Bridge consists of the following main parts:
- differential;
- two axle shafts;
- main couple.
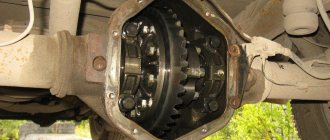
The internal structure of the rear axle, or rather its gearbox, has the following form, shown in the diagram below.
All these parts are located in the bridge structure. The crankcase cover 35 together with the gasket 42 ensures the tightness of the internal structure of this design. Inside the device is filled with lubricant – oil. The rotation of gears and the friction of bearings requires careful treatment, which is ensured thanks to the lubricant. The owner of the SUV can only monitor the oil level in the axle, which can decrease due to deterioration of tightness. The design of the UAZ-3163 gearbox is not particularly difficult and allows you to repair the product at home.
Characteristic features of the Spicer node
Spicer acquired its name from the name of the owner and the name of the American corporation. The license was purchased by the Soviet automobile industry to introduce various technical innovations . Since 1935, cooperation ceased; each had its own technological path. Collapsible devices were forced out of production, and instead they were replaced by all-welded structures, which in Russia are called continuous or solid.
In 1990, the Spicer drive axle was produced at the Ulyanovsk Automobile Plant and installed on the new UAZ-3160 car. The unit does not have a transverse connector, therefore the design is highly rigid. There are no connections between the cover and the crankcase, and there is no possibility of joint leaks. The main gear and differential are placed in a single housing, this gives precise engagement and creates good conditions for the bearings.
Spicer UAZ bridge width:
- Patriot – 0 cm .
- Hunter - 45 cm .
The nodes are endowed with characteristic properties:
- Affordable repairs.
- One-piece crankcase.
- Sturdy build.
- High ground clearance.
- Disc brakes.
- New CV joints.
- Maneuverability.
- Dynamics.
- Speed.
- Ease of maintenance.
- Wide selection of parts.
- Light weight and noisy.
Maintenance of such devices is expensive. The crankcase is like a shovel that is capable of scooping up debris. The weakness of the front cover has been noticed; it is installed on a spring with additional modifications.
Why is adjustment needed?
Adjusting the device on a UAZ Patriot SUV is necessary for:
- improving vehicle handling and stability;
- reducing fuel consumption;
- reduction or disappearance of extraneous sounds produced by the device.
The differential has two component areas:
- rings located outside, which are pressed into the bridge;
- inner rings that are pressed onto the unit.
The device with rings is separated using special shims. Of course, adjusting the front device is not an easy process, but if you have the will, anything is possible. Thus, knowing why differential adjustment is needed, let’s proceed to the actual process.
Features of setting up the front gearbox
Shank bearing
Shank bearing
Post by BLLUVD » Sun Jan 11, 2009 11:16
Post by NATOvec » Sun Jan 11, 2009 12:46
Post by Maks » Sun Jan 11, 2009 15:43
Post by NATOvec » Sun Jan 11, 2009 15:52
Post by BLLUVD » Sun Jan 11, 2009 16:05
Post by NATOvec » Sun Jan 11, 2009 16:07
Post by Alexander Sr. » Sun Jan 11, 2009 16:28
Post by NATOvec » Sun Jan 11, 2009 16:47
Post by Alexander Sr. » Sun Jan 11, 2009 16:50
Post by NATOvec » Sun Jan 11, 2009 16:55
Post by Kaban » Sun Jan 11, 2009 16:58
". I don’t like it when people get into my soul, especially when they spit on it. » V.S. Vysotsky.
Com Great. Com Almighty. Punishment is inevitable because gee