Owners of domestic SUVs know that the repair and maintenance of UAZ bridges is a separate concern and, at times, a serious expense item. But at the same time, independent troubleshooting and even more so tuning is not an option. There are many reasons, and among the main ones:
- wide variety of units - Timken, Spicer, “collective farm”, civilian, military;
- different repair algorithms for the front and rear axles of the UAZ;
- unpredictability of structures - UAZ bridges are sensitive to the correct arrangement of interconnected parts and assemblies.
Features of modifications require a professional approach to any SUV from the Ulyanovsk Automobile Plant.
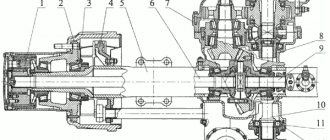
Assembling and adjusting differential bearings
Assemble the differential in the following order:
- Before assembling the differential, lubricate the axle gears, pinions, thrust washers and pinion shafts with transmission oil.
- Install thrust washers onto the journals of the axle gears.
- Install the axle gear and thrust washer assembly into the left gearbox.
- Install the satellites on the axis of the split cross.
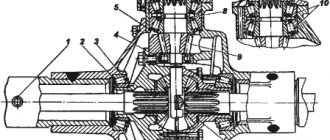
- Install the detachable crosspiece (Fig. 168) with satellites in the left satellite box.
Rice.
168. Installing a split crosspiece with satellites in the left gearbox. Install the axle gear with thrust washer assembly in the right gearbox. Holding the axle shaft gear, install the right satellite cup on the left one so that the marks (Fig. 169) (ordinal numbers) of both cups are aligned.
Rice. 169. Installation of satellite boxes according to marks
- Connect the halves with bolts and tighten them. Tightening torque 32-40 N*m (3.2-4.0 kgf*m).
- Install the main drive driven gear onto the gearbox, aligning the bolt holes. Install the bolts and tighten them. Tightening torque 98-137 N*m (10-14 kgf*m).
For the assembled differential, the axle gears must be rotated using a splined mandrel from a force of no more than 59 N (6 kgf) applied over a radius of 80 mm.
Adjust the differential bearings (if they are replaced) in the following order:
- Press the inner rings of the bearings (Fig. 170) of the differential onto the journals of the assembled differential so that there is a gap of 3.5-4.0 mm between the ends of the satellite box and the ends of the inner rings of the bearings.
Rice.
170. Preliminary pressing of the inner rings of the differential bearings Install the differential assembly into the crankcase, then the gasket and crankcase cover and, turning the cover by the casing, roll the bearings so that the rollers take the correct position (Fig. 171). Then use bolts and nuts to evenly connect the cover to the crankcase.
Rice. 171. Rolling differential bearing rollers
Unscrew the bolts again, carefully remove the cover, remove the differential from the crankcase and use a feeler gauge to measure the gaps A and A1 (Fig. 172 and 173) between the ends of the inner rings of the bearings and the gearbox.
Rice. 172. Clearance measurements when adjusting differential bearings
Rice. 173. Gaps A and A1 between the ends of the inner rings of bearings and the satellite box
Steering torques
| Steering torque table | ||
| Pairing name | Thread | Tightening torque, kgf m |
| 1. Main joints with mandatory torque control: | ||
| Bolt securing the crankcase cover to the distributor housing Bipod counter nut | 5,50 — 7,0 5,50 — 7,0 | |
Blog about UAZ
Adjustment of the gaps in the meshing of gears and in the bearings of the drive axle of UAZ-3741, UAZ-3962, UAZ-3909, UAZ-2206, UAZ-3303 cars is carried out only when replacing gears or bearings, or when axial clearance appears in the driving or driven gears of the main transfers. Replacement of main gears should only be done as a complete set.
Adjusting the bearing of the drive gear of the main gear of the drive axle UAZ-3741, UAZ-3962, UAZ-3909, UAZ-2206, UAZ-3303.
Adjustment of the bearing of the drive gear of the main drive of the drive axle must be done by selecting the thickness of the shim pack and tightening the flange nut. The bearing must have such a preload that there is no axial movement of the drive gear and the gear can be rotated by hand without much effort.
Check the bearing preload with a dynamometer. At the same time, disconnect the left half of the crankcase. Remove the drive gear bearing cap so that cuff friction does not affect the dynamometer readings. With proper adjustment, at the moment of turning the drive gear by the hole in the flange, the dynamometer should show a force of 1.5-3 kgf for run-in bearings and 2.0-3.5 kgf for new bearings.
When replacing the cover, align the lubrication holes in the crankcase, gasket and cover. The tightening torque of the drive gear flange nut should be 17-21 kgcm. You cannot even unscrew the nut a little in order to ensure that the cotter pin hole matches the slot in the nut. If the nut is not tightened sufficiently, the inner rings of the bearing may rotate and, as a result, wear of the adjusting shims and the appearance of dangerous axial play.
If axial play of the drive gear appears during vehicle operation, tighten the flange nut. If the axial play is not eliminated, then reduce the thickness of the shim pack and adjust the bearing as indicated above.
After adjustment, monitor the heating of the bearings while driving. A slight heating of the bearing is not dangerous, but if the neck of the drive axle crankcase heats up to a temperature of 90 degrees or higher, the water on the crankcase boils, this means that the bearing has been overtightened and the overall thickness of the gaskets should be increased.
Adjusting the differential bearings of the drive axle UAZ-3741, UAZ-3962, UAZ-3909, UAZ-2206, UAZ-3303.
Adjustment of the differential bearings must be done by selecting the thickness of the package of adjusting shims installed between the ends of the inner rings of both bearings and the gearbox. When replacing main gears and differential bearings, make adjustments in the following sequence:
1. Press the inner rings of the differential bearings onto the journals of the assembled differential so that there is a gap of 3-3.5 mm between the ends of the gearbox and the ends of the inner rings of the bearings.
Malfunctions and repair work
Common malfunctions of the UAZ front axle and possible repairs:
- Leakage of lubricating fluids. Check the tubes and connecting elements for mechanical damage - the cuffs and flange for functionality, the oil container for the optimal fluid level.
- High wear of fasteners.
- Bearing defects caused by the use of poor quality material by the car plant.
- Broken axle teeth. Adjustment will not help; parts need to be replaced.
- Mechanical defects of the beam.
- Wear of elements. The situation is resolved by replacing it with new spare parts.
- Poor grip of the bearings and main gears indicates the need for tension adjustment.
Bridge repairs begin after diagnosing and searching for the cause of problems in the functioning of the mechanism, which are diverse:
- transmission components of a rear-wheel drive vehicle are faulty due to regular movement over difficult terrain;
- use of consumables and lubricants of unsuitable quality;
- Failure to monitor tire pressure can lead to shaft and bearing failures.
Most often, car owners are faced with a violation of the axial space of the kingpins and are knocked out of the required position. To diagnose, you need to jack up the front of the vehicle and move the wheel in a vertical plane. The presence of axial play indicates the need to adjust the clearance of the pins.
How to adjust bridges
You can adjust the UAZ axles yourself. This will require a number of tools and good knowledge of the mechanism. Access to the necessary parts and assemblies is possible after dismantling the structure and separating the crankcase parts. The first sign of the need to adjust the gearbox is loud noise and malfunctions of the part. Such work is required after diagnosing the condition of bridges. Adjustment includes a number of activities.
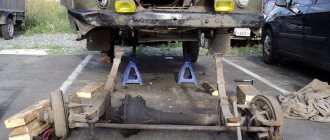
At the first stages of repair work, ensure that the nuts of the brake elements can be loosened freely. The tools you will need are a split wrench, brake fluid and a mixture of WD-40. The bridge is dismantled as follows:
- remove the fasteners between the drive gear flange and the propeller shaft;
- secure the shaft to the side;
- place the front part of the vehicle on jacks, raising the wheels above the surface;
- additionally install safety supports;
- remove the nut between the brake pipe and hose and close the hole with a plug to avoid large losses of fluid;
- after removing the lower fasteners and moving the shock absorbers from the axle, the bridge will lower;
- remove the stepladder nuts and roll out the bridge (without wheels it weighs more than 100 kg).
For adjustment and repair work, you will again need a split wrench, a metal corner with pins, a universal puller, a container with brake fluid, transmission oil (if you don’t want to fill in the old one), a set of bearing spacers for adjusting the driven gear and a micrometer. Preparatory work:
- remove 10 bolts connecting the axle shafts to the hubs;
- remove the axle shaft from the crankcase;
- Unscrew the fasteners of the brake pipes;
- remove the tee from the bracket;
- remove the connecting elements between the crankcase parts, keeping the gasket;
- Remove the differential housing and driven gear, outer rings.
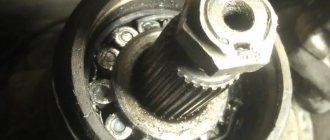
The main support of the drive gear, which determines the reliability of the bridge, is a tapered roller bearing located in the front part, consisting of 2 rows. A similar part on the opposite side performs an auxiliary function. To repair, you will need to remove the right drive gear by removing the bolts.
All disassembled components should be inspected for wear and replaced if necessary. The shims are located in the middle of the inner rings of the bearing. Their thickness is measured with a micrometer, the part with the smallest value is removed to create preload in the bearing. Adjust the part until the dynamometer shows a resistance of no more than 3.5 kgf. Otherwise, you will need to remove another gasket. Tight turning indicates the need to increase the thickness of the gasket pack. After determining the desired value, you can put the unit back together.
The next step is to adjust the differential bearings:
- press in the outer and inner rings;
- mount the differential with the main gear into the crankcase;
- install the gasket;
- separate the crankcase parts;
- remove the differential, check the clearance of the differential and bearing rings;
- install the main gear mechanism on the right side of the crankcase;
- install the drive shaft;
- pull together the crankcase halves, observing the required gap size, adjusting it if necessary with cardboard spacers.
After all the work, it is necessary to assemble the bridge back and install it on the car. At the same time, you can lubricate the parts and replace worn fasteners.
How to remove the shank
It is possible to repair, replace and adjust the shank only after removing it. To do this, it is necessary to check the backlash at the beginning of work. Then you will need to perform the following operations:
- Turn the cardan clockwise until it stops. At this point, make a mark on the body of the structure.
- Turn the cardan in the opposite direction until it stops. Make a second mark.
- Control between the designated positions of the maximum permissible distance is 11 mm.
- Removing the cardan flange, tightening the nuts.
- Checking the backlash. Removing the front axle.
- Removing the nut and shank.
- Removing oily liquid.
After this, the wheels and steering controls can be removed.
How to shorten a bridge
Before shortening the axles, it is necessary to remove the axle shafts. You will need to perform the following manipulations:
- cut the stocking;
- select a pipe of suitable diameter and install it inside;
- welding work;
- cut off the axle shaft;
- cut a hole on a lathe and mount the axle shaft into it;
- Weld the resulting structure on both sides, remove excess parts.
In this way you can make a bridge for 80 cm gauge.
Replacing the bearing and shank oil seal
Replacing the front axle shank bearing and oil seal includes the following activities:
- Dismantling old parts (bearings and oil seal).
- Replacing a worn bushing to prevent damage to new components.
- Installation of new parts, flange and fasteners.
The tightening of the nuts during operation must be controlled with a dynamometer to create the necessary resistance. For new bearings, the preload is greater than for used parts. Upon completion of the work, it is necessary to install the axle shafts and cardan, add oil.
How to rebuild the rear axle
For repair work and replacement of worn parts, you will need to go through the structure. Sequencing:
- Disassembling the UAZ rear axle begins with removing the fastening elements of the washer, shank and flange.
- Removing the bearing cover.
- Disconnecting the additional gear, removing the differential.
- Working with the satellite box: all components must be removed and inspected for wear.
- We remove the rear axle.
- When everything is disassembled, diagnose the components for mechanical damage and the need for lubrication.
- Replacement of old parts with new elements.
The assembly of the structure occurs in the reverse order.
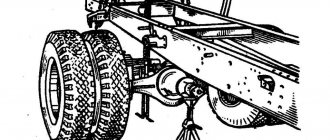
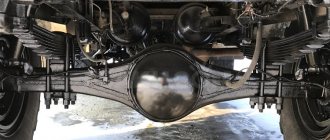
Rear axle structure and diagram
The rear axle “Spicer” on the UAZ Patriot is a cast crankcase with pressed-in axle shafts, on which platforms are provided for springs. Inside the housing there is a bevel main pair and a differential, the gears are mounted on tapered roller bearings and bronze bushings. Lubrication is carried out by splashing, the oil is stored in the lower part of the crankcase. There is a plug on the side of the housing for checking the level and filling in fresh fluid.
The design of the front axle of the UAZ Patriot differs from the design of the rear beam. The front wheels are mounted on steering knuckles, which are equipped with constant velocity joints. To transmit power to the main pairs, cardan shafts are used, connected to a 2-speed transfer gearbox.
Main pair adjustment
After repairing the front axle associated with replacing gears, it is necessary to adjust the contact patch:
- Select a spacer ring (parts are produced with a tolerance of 0.025 mm in both directions) that provides the required clearance in the tapered bearings of the drive shaft. When selecting, the distance between the center of the axle shaft and the lower edge of the spacer sleeve (parameter A) is taken into account. It is also necessary to take into account the gap between the edge of the inner ring and the opposite edge of the outer ring (parameter B). The thickness of the ring is determined by the formula C=A-(111.96+B).
- Place the ring in the seat.
- Insert the outer bearing races of the drive shaft into the crankcase.
- Place the oil drain ring onto the drive shaft, and then mount the rear bearing.
- Install the spacer sleeve and insert the shank into the crankcase.
- Place the 2nd bearing on the drive shaft, the ring is mounted until it stops.
- Install the washer on the spline part, and then put on the flange (used to connect the driveshaft).
- Secure the ring and flange with a nut, tighten the threaded connection until the axial play is eliminated. The shaft rotation force should not be higher than 2.0 N*m if new bearing supports are used. If old bearings are used, the torque value is 0.4-0.8 N*m. The tightening torque of the nut should be in the range from 180 to 250 N*m; when increased force is applied, the spacer sleeve is compressed.
- Apply marks to the surface of the flange and nut (for example, with oil paint or nitro enamel), which are used for further adjustment of the bridge.
- To mount the differential in the crankcase cavity, you need to purchase several sets of adjusting washers that differ in thickness.
- Install the original washer (which was used with the old gears), and then open the structure with the nut, which is located on the right side.
- Apply oil paint or other coloring material that does not dry for 30-40 minutes to the gear teeth.
How to check the correctness of the work done
A basic check of the bridge's performance is carried out by measuring the crankcase temperature. The car must be driven on a dry road for 25-30 km; an electronic thermometer is used to check the degree of heating. The plant allows the crankcase temperature to increase near the installation sites of the liner bearing supports to 90°C. Water can be used to roughly estimate the degree of heating: the liquid applied to the bridge body should not boil. At elevated temperatures, the axial clearance in the bearing supports is re-adjusted.
During operation, increased noise, which occurs due to the gap between the gears and the displacement of the contact patch, is not allowed. During the grinding process of parts, the extraneous sound does not disappear, but only increases due to accelerated wear of gears and bearings. A knocking noise in the axle that occurs during sudden acceleration or release of gas indicates an excessive gap between the teeth. If extraneous sounds are detected, you need to return to the repair area and check the adjustment of the gaps in the main pair.
Important nuances before starting work
Before starting the adjustment, you need to replace worn parts, and then prepare the tools and accessories:
- control indicator and micrometer, which are used to measure the distances between elements;
- viewing mirror on the sliding handle, allowing you to examine the prints of the contact patch on the teeth.
When purchasing spacer rings, it is recommended to check the thickness with a micrometer. Spare parts are not of high quality; in addition, there are elements with erroneous markings (manufacturer defect).
Repair of bridges on UAZ 469
Many Internet users enter a similar request in Yandex or Google - “repair of the front axle of UAZ 469”. This means that they are interested in how to repair the front or rear axle on a UAZ themselves. Of course, the procedure for dismantling and repairing the bridge is described in special books on repair and operation, which are now not a problem to obtain. However, disassembling with your own hands both the front and rear axles down to the last screw is, to put it mildly, not an easy task. It may turn out that you just need to replace some small part, to access which you don’t have to disassemble everything.
Front axle UAZ 469
Here are just some possible options for bridge failures on the UAZ 469 (Hunter, Patriot, “loaf”):
- The differential is worn out, the gear housing is bent
- Critical wear of the main gear in the gearbox
- Wear of the steering knuckle (ball joint, axle) on the front axle
- The appearance of large gaps in the pivot joints
- Bearing wear, resulting in the need for adjustment or replacement
- Injection of elements requiring lubrication
It can be difficult to understand which of the above happened to your car, however, it is often possible to roughly localize the problem even by ear. If you hear increased noise or a hum from the front or rear axle (even in neutral gear), the gearbox is most likely worn out (needs repair), or the bearings require lubrication. If your car “yaws” from side to side and the steering is fine, the problem may be stuck in the axle, CV joint, or incorrect installation of the pins that secure the ball joint, as a result of which play appears and the wheel begins to “walk.”
What does a CV joint consist of?
A very common malfunction is the flyout of the ball bearings that are located in the CV joint. They fly out precisely because of incorrect adjustment of the pins, as a result of which the geometric center of the CV joint and the axle do not coincide. As a result, the axle shaft “walks” in the seat and gradually breaks down. The CV joint itself is also damaged. And when turning, you can hear a crunching sound from the side of the wheel and the wheel may jam. During the repair process, some craftsmen simply throw out all the balls, except for the centering one (additionally welding it) - in order to get rid of the problem of their constant flying out.