Gearbox cover UAZ loaf
The gearbox cover on a UAZ loaf, like on any other car, is an important part of the gear shift control mechanism - if a malfunction occurs in it, driving the car is either impossible due to the inability to engage the gear, or is dangerous due to the fact that only some of them work from the steps.
The cover itself is the main part of the gearbox. In this regard, in case of any problems with the lever or suspicious noises from the box, it is recommended to check its condition - perhaps this part needs a complete replacement rather than minor repairs.
Diagram and features of the UAZ 452 gearbox
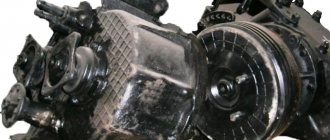
The UAZ gearbox is designed to transfer the force created by the car's engine to the transmission, stepwise changing the speed of rotation and, accordingly, the speed of the vehicle. It provides reverse gear and the ability for the car to stand with the engine running. The gearbox on the UAZ 452 is located under the bottom of the vehicle between the clutch and the transfer case and is attached with studs to the clutch housing. Its weight is about 34 kg.
The operating principle of the UAZ 452 gearbox is based on the mechanical transmission of torque through pairs of toothed gears with different numbers of teeth and different gear ratios. The UAZ loaf gearbox provides 4 forward driving modes with the following gear ratios: 4.12; 2.64; 1.58; 1.00. The reverse gear ratio of the UAZ 452 gear shift mechanism is 5.23.
Repairing the gearbox cover on a loaf
Repairing the gearbox cover on a UAZ loaf will differ depending on what problems have arisen in it.
For example, in a situation where the bushings are worn out, you can do the following: make new bushings and put the cover back, first boring out the space for it (in this case, the axles are replaced with completely new ones).
Oil dripping from axles due to worn bushings can be eliminated in another way. To do this, you will need to remove the levers, cut off pieces of small thickness from a pre-selected hose that is resistant to oils and gasoline (which is selected individually for the cover), insert them onto the axles and tighten them with the levers.
In this case, the levers will turn a little tighter, but the gear shift speed will remain the same.
Some users, if they encounter similar problems associated with wear of the splines on the axles and non-engagement of gears, advise not to repair the cover, but to purchase a new one.
In this case, the new UAZ loaf part must be upgraded before installation. To do this, fluoroplastic bushings are installed in place of the rubber bushings.
The removed bushings are cut and installed on the shafts under the levers, which ensures the absence of backlash and protects this part of the mechanism from dirt and water getting into it.
If one of the gears starts to slip out, it’s worth checking:
- the condition of the balls and springs in the gearbox cover , which fix the rods when changing gears - perhaps the cause of the problem lies in their wear, and these components require replacement;
- the condition of the gears - this can also cause gear failures;
- bushings - if the problem is in them, then this part can be strengthened.
Most often, the reason for knocking out gears lies in worn gears and balls, as well as broken springs.
In addition, before repairing the gearbox cover, you should pay attention to the general condition of the mechanism - perhaps a major breakdown, which is clearly noticeable, hides several minor problems, or the entire mechanism is so worn out that it would be wiser to replace it with a new one.
Source
Subtleties of maintenance of UAZ 469
During the operation of each vehicle, its technical condition deteriorates; the UAZ 469 is no exception. In order to increase the service life of the machine and prevent malfunctions in time, it is necessary to know the subtleties of its maintenance, namely the subtleties of maintenance of all existing mechanisms.
Let's look at some of the most important points:
First of all, pay attention to the frequency of oil changes. It is recommended to do this every 5,000 kilometers.
In this case, during the operation of the SUV, it is allowed to reduce the oil by 10-12 mm relative to the lower edge of the filler hole. It is also necessary to periodically carry out maintenance of the gas distribution mechanism, which consists of cleaning the valves from carbon deposits and grinding them in. The oil filter is changed by unscrewing it from the cylinder block counterclockwise. Before installing a new oil filter, its O-ring must be lubricated with engine oil. The new filter is wrapped to the extent that no oil leaks. The crank mechanism of a car needs to tighten the cylinder mounting nuts every 1000 km. mileage The engine cooling system must be filled with soft fresh water with a low salt content and, during operation, periodically remove scale and debris from the system, as well as adjust the tension of the fan belt. The clutch mechanism also needs maintenance. In addition to the fact that you need to promptly lubricate the clutch release bearing located on the right side of the crankcase, it is also necessary to clean the lower part of the crankcase after driving on dirty roads. As for servicing the gearbox, it all comes down to periodic lubrication of the part; this should also not be forgotten.
Question about the box and the loaf
Recommend where to watch:
The situation is as follows: The loaf was rolling normally until the clutch began to bleed. It was poisoning and at some point after engaging 4th gear, the reverse gear did not go out, so it got stuck in 4th speed. They crawled under the car, knocked out the transmission and pulled the lever on the box back. Speeds include 1,2,3. 4 turns on, but in 70% of cases it doesn’t come back out on its own, it also bites. However, when any gear is engaged (1,2,3,4), there is no feed to the cardan, although there is a click when engaged. The clutch was checked - the discs move away, press back, etc. . but there is no supply.
Question: What's in the box?
Re: Question about the box and the loaf IMHO due to problems with the clutch, the gear shift lever was probably twitching somewhat nervously, as a result of which the forks for moving the gears along the shafts were bent, or parts of the shift mechanism were damaged. IMHO You need to remove the cover from the box and look at the condition of the forks and the shift mechanism. Well, as for the clutch, you have to deal with it separately (to be honest, I didn’t understand what “the clutch is leaking”) means.
Best regards, aas
Re: Question about the box and the loaf The clutch releases: What I wanted to say is that when you squeeze and try to keep the pedal “to the floor”, after 5-10 seconds the clutch begins to “drive”, i.e. the rod goes back. The problem was solved by replacing the upper cylinder, because... On the old one the cuff was leaking.
Is it possible to remove the box cover without removing the box?
PS I apologize for the possibly stupid questions, but I ride a Gazelle, and then the company bought a UAZ, they asked me to “bring it to mind.” Here we have to figure it out. The engines seem to be the same, but there is a problem with the gearboxes and transfer cases.
Re: Question about the box and the loaf. I think the lid can be removed without removing the box. I didn’t take it off myself, but it doesn’t seem to interfere with anything. The only thing is that there is such a feature: the gearbox and transfer case have, in fact, a common oil bath, that is, oil can flow from the box to the transfer case and back.
Source
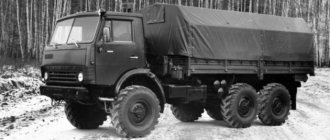
Meet UAZ 452
The car was a cargo-passenger version of an off-road vehicle with a 4x4 wheel arrangement. The Ulyanovsk Automobile Plant mastered production of the model back in 1965.
You can evaluate its capabilities by watching the following video:
The UAZ 452 is capable of transporting cargo weighing up to 700 kg in the back. In addition, it can tow a trailer weighing 850 kg. The vehicle became very popular not only in Russian off-road conditions, but was also successfully used in large cities in various capacities (pictured in the article).
- Like a traffic police car;
- As a fire engine;
- Ambulance car;
- Grocery store;
- Utility vehicle, etc.
Electronic components
The electrical wiring of the UAZ 452 was a simple single-wire circuit.
Structurally, it had the following solutions:
- The role of the second wire was played by the metal body and the components and assemblies attached to it;
- All electronic components and actuators had a “-” displayed on the housing. The cost of such a solution justified the imperfection of the scheme.
For reference: The instructions provided for regular checking of contacts. When oxidized, they should have been cleaned with sandpaper.
Power unit
The engine compartment is located directly inside the car, as this is due to its design.
Access to components and assemblies is also provided from the passenger compartment by removing the cover, which:
- Provided protection for the driver and passengers from the penetration of exhaust gases;
- Protected from dust and dirt;
- Served as an additional heating element (passive - from heating).
The previously used engine from Pobeda was replaced with a more modern engine from the 21st Volga. This was facilitated by the launch of a production line at the Zavolzhsky Motor Plant in 1964.
Passive vehicle safety
The design of the "Baton" with a cabover layout also initially raised a number of questions regarding safety. However, a series of crash tests conducted back in 1971 at the Dmitrov test site proved that in most emergency situations the driver and passengers of the UAZ 452 have a chance to avoid injury.
A striking example of comprehensive testing of “Tablets”
how to install the cover with forks?
how to install the cover with forks?
slava_uaz_kiev » Fri Versnya 13, 2013 9:47
Good afternoon UAZ 469B. Gearbox - 4 mortar of the old style (synchronized 3/4 gear). Oil was constantly pouring from the gearbox (from the place of the cover with the gear selector lever) I decided to fix the problem, since adding 1 liter of oil after each train was not glamorous. I removed the cover with the lever, looked for no cracks and no gasket. I cut out the gasket and, like, well done, put it back. I wiped everything dry, where the lid fits to the box, washed it with gasoline... in general, everything is beautiful and good. But . when removing, I accidentally grabbed the lever itself and it flew off neutral.. that is, 1 - gearbox in neutral (the secondary shaft spins, the one that goes to the transfer case and rear driveshaft) and in the book it was written that you need to put it in neutral and only then remove 2 - forks didn’t move and are also in the neutral position (I hope I didn’t move them along the axis) 3 - and the rod itself that moves these forks - the lever - moved somewhere and now .. in general, scold me .. that I did something wrong and how to choose neutral in a car... but it turns out - I put everything back - but the lever is dead in position and doesn’t switch anywhere at all. In general, I accidentally misplaced the position of the lever. 1. how to check, just in case, whether the forks are positioned correctly in neutral 2 - how to set the lever to neutral? Thank you.
Just in case, how can I check if the forks are in neutral? — to be sure that they are in neutral. I’m just sitting and turning over different options in my head... what if
Re: how to install a cover with forks?
Airi » Friday Wednesday 13, 2013 10:50
Every person is an egoist, so he loves most what he has invested himself in most. Always smile. You will extend your life, please your friends, and annoy your enemies.
Re: how to install a cover with forks?
slava_uaz_kiev » Friday 13, 2013 11:37
Re: how to install a cover with forks?
slava_uaz_kiev » Friday 13, 2013 11:40
Re: how to install a cover with forks?
Airi » Friday Wednesday 13, 2013 11:54
Every person is an egoist, so he loves most what he has invested himself in most. Always smile. You will extend your life, please your friends, and annoy your enemies.
Re: how to install a cover with forks?
slava_uaz_kiev » Friday 13, 2013 12:02
along the way, for the future so that you don’t knock on the forum at night - if the forks are not in neutral, is it difficult to put them in neutral? the forks themselves without a stem
the box is in neutral for sure - since the secondary shaft (where the rear cardan is “soldered”) is spinning) now all that remains is to get in with the forks and the rod)
UAZ 3303 GОL0VⓐSTジ › Logbook › Replacing the shaft and gear shift lever
Hello everyone... in general, I solved my small problem. Now I’ll explain how I decided not to lose the balls that will fly out when the rods are knocked out.
If you remove or disassemble the cover, place each fork on its own stem when removing it.
To begin with, I replaced the o-ring under which my transmission was leaking.
Here is approximately the new and old lever, the new one comes with an additional washer.
The rollers... the new shaft turned out to be hardened, and the thread was no longer 8, but 10. It fit into the old coupling as if it were original, there was a slight play left, but not much at all.
The shaft is assembled with a thrust washer, a coupling and some other washer. In such an assembly it should be located in the gearbox cover.
But it’s in its proper place... I installed it without any problems. There’s a spring on top, a lid and that’s it...
Start of the process. To remove the shaft, I needed to knock out two rods that hold the forks.
The first small problem with this ball can be solved by pressing on the side and gently tapping the rod. Don't forget to lose it.
I installed the second fork... In fact, I removed the forks twice, at first I think I’ll do some hard work and install the forks... I installed it, which means I need to move on. And then, paying attention to the shaft, I understand that I’ll install it with three horseradish forks. I had to remove them again and install the shaft with the coupling.
This is exactly my first part of the assembly.
All the plugs are in place, the main thing is not to confuse which side goes where and which side goes where,
This ball can be thrown into place at the very last moment, otherwise it will interfere with the installation of the third fork.
Collected everything, business
with my slowness, and two assemblies, for a couple of hours
.
Repairing the UAZ 452 Gearbox Cover with Your Own Hands
If you are the owner of a UAZ and there are suspicions that the transmission has failed, then you should definitely undertake repairs. The unit fails when the driver has to hold the gearshift lever while driving, when they begin to shift on their own (to prevent this, drivers tie them with ropes). Squeaks are heard from time to time.
To get acquainted with the repair technology, read about repairing the UAZ 452 gearbox yourself. First you need to find the type of UAZ gearbox that is on the car. Despite the differences between car models, they are equipped with similar transfer cases. Therefore, we can assume that the repairs are carried out virtually identically. To do this, you will need a set of keys, some tools and auxiliary aids (their list is given below).
On most car models of this type, both parts are one piece. The weight of such a unit reaches 75-82 kg, so you will need an assistant. If the vehicle being repaired has a safety cage, then you can use a hand winch to remove the UAZ 452 gearbox for repair.
The machine needs to be placed on a level place, because then it will have to be moved 0.5 m forward or backward. First drain the oil. Both boxes have the same volume, but the plugs for draining the water are separate. While the oil is pouring out, you need to remove the front seats and unscrew them, and then put the hatch halves on the floor of the car. Next comes the turn of removing the speedometer rods.
When the oil has drained, screw the drain plugs into place. There is a frame cross member under the handbrake drum that needs to be removed. Disconnect the front axle clutches and unscrew the front universal joint. If you find that the nuts on it are weak, then you need to remove this part.
Loaf. By purchasing and delivering? Krishka checkpoint
If a UAZ 3303 gearbox is being repaired, you need to be careful with the clutches. The car is moved 0.5 m (in either direction) and the rear cardan is removed through the hatch. Disconnect the muffler from the transfer box and loosen the clamp on it. Then the following parts are removed alternately:
- clutch pan;
- fastening the oiler from the input shaft (it is located on the right, on the bell);
- 4 bolts that hold the clutch fork housing;
- adjusting the cylinder rod and fork.
The transfer case is wrapped with a rope and suspended. Remove the following parts:
- pillow bolts;
- nuts holding the bell box fastening.
During these actions, when repairing the UAZ 452 gearbox on your own, the engine must be supported with a jack. When the box is free, it is lowered and removed from under the car. The levers must be removed in advance. The bell pins need to be replaced with new ones.
If it is necessary to repair the UAZ Patriot gearbox, then you need to take into account that the placement of the box and bell is reversed. This also applies to the location of the rods. But in general, the development of a UAZ 452 gearbox for repair on its own is suitable for use.
Unscrew the bolts and nuts, disconnect the box and its transfer case. There is a gasket between them, reinforced with sealant, so you will have to hit the bracket securing the unit to the frame a couple of times.
First you need to remove the input shaft cover and unscrew the left nut that is on it (see figure). Now you need to remove its bearing. If it fails, it needs to be replaced. Its roller “brother” is installed inside the shaft, it also needs to be changed. Then the retaining ring is removed from the secondary roll. Unscrew the double row bearing stopper. The shaft needs to be knocked out and the part replaced.
Next comes the third gear clutch assembly. Copper synchronizers are replaced together with crackers. Then comes the turn of the reverse gear. Unscrew the front bearing box of the intermediate shaft. Do not hit it with a hammer or core: it is made of silumin and may crack.
Try not to destroy its rubber gasket, as it is difficult to remove. On the removed shaft, the gears and all bearings are replaced. Then the box is assembled in reverse order. When installing the roller on the input shaft, it is generously lubricated with Litol. All components and parts are put in place alternately, so as not to make a mistake.
Loosen the nuts of the flanges and shafts and remove them. The handbrake needs to be checked for functionality; if it becomes useful, it needs to be replaced. Remove all covers and replace seals. Unscrew the speedometer linkage drive and the breather (it needs to be replaced). Bearings are inspected and replaced as necessary.
Meet UAZ 452
The car was a cargo-passenger version of an off-road vehicle with a 4x4 wheel arrangement. The Ulyanovsk Automobile Plant mastered production of the model back in 1965.
You can evaluate its capabilities by watching the following video:
The UAZ 452 is capable of transporting cargo weighing up to 700 kg in the back. In addition, it can tow a trailer weighing 850 kg. The vehicle became very popular not only in Russian off-road conditions, but was also successfully used in large cities in various capacities (pictured in the article).
In particular:
- Like a traffic police car;
- As a fire engine;
- Ambulance car;
- Grocery store;
- Utility vehicle, etc.
Electronic components
The electrical wiring of the UAZ 452 was a simple single-wire circuit.
Structurally, it had the following solutions:
- The role of the second wire was played by the metal body and the components and assemblies attached to it;
- All electronic components and actuators had a “-” displayed on the housing. The cost of such a solution justified the imperfection of the scheme.
Power unit
The engine compartment is located directly inside the car, as this is due to its design.
Access to components and assemblies is also provided from the passenger compartment by removing the cover, which:
- Provided protection for the driver and passengers from the penetration of exhaust gases;
- Protected from dust and dirt;
- Served as an additional heating element (passive - from heating).
The previously used engine from Pobeda was replaced with a more modern engine from the 21st Volga. This was facilitated by the launch of a production line at the Zavolzhsky Motor Plant in 1964.
Passive vehicle safety
The design of the "Baton" with a cabover layout also initially raised a number of questions regarding safety. However, a series of crash tests conducted back in 1971 at the Dmitrov test site proved that in most emergency situations the driver and passengers of the UAZ 452 have a chance to avoid injury.
Repairing the gearbox cover on a loaf
Repairing the gearbox cover on a UAZ loaf will differ depending on what problems have arisen in it.
For example, in a situation where the bushings are worn out, you can do the following: make new bushings and put the cover back, first boring out the space for it (in this case, the axles are replaced with completely new ones).
Oil dripping from axles due to worn bushings can be eliminated in another way. To do this, you will need to remove the levers, cut off pieces of small thickness from a pre-selected hose that is resistant to oils and gasoline (which is selected individually for the cover), insert them onto the axles and tighten them with the levers.
In this case, the levers will turn a little tighter, but the gear shift speed will remain the same.
Some users, if they encounter similar problems associated with wear of the splines on the axles and non-engagement of gears, advise not to repair the cover, but to purchase a new one.
In this case, the new UAZ loaf part must be upgraded before installation. To do this, fluoroplastic bushings are installed in place of the rubber bushings.
The removed bushings are cut and installed on the shafts under the levers, which ensures the absence of backlash and protects this part of the mechanism from dirt and water getting into it.
If one of the gears starts to slip out, it’s worth checking:
- the condition of the balls and springs in the gearbox cover , which fix the rods when changing gears - perhaps the cause of the problem lies in their wear, and these components require replacement;
- the condition of the gears - this can also cause gear failures;
- bushings - if the problem is in them, then this part can be strengthened.
Most often, the reason for knocking out gears lies in worn gears and balls, as well as broken springs.
In addition, before repairing the gearbox cover, you should pay attention to the general condition of the mechanism - perhaps a major breakdown, which is clearly noticeable, hides several minor problems, or the entire mechanism is so worn out that it would be wiser to replace it with a new one.
AutoNews / Reviews / Tests
Repairing the UAZ 452 Gearbox Do-It-Yourself Video
If you are the owner of a UAZ and there are suspicions that the transmission has failed, then you should definitely undertake repairs. The unit fails when the driver has to hold the gearshift lever while driving when they begin to shift on their own (to prevent this, drivers tie them with ropes). Creaks are heard.
Features of the modification with multifunctional control
Variations with the car body did not greatly affect its technical equipment. But when changes affected the governing bodies, they underwent modernization:
- Interior wiring for UAZ;
- Steering column control unit for turns and exterior lighting;
- Control unit for the operation of electric windshield wipers on the instrument panel.
Reason for modernization
On cars of the UAZ family, the windshield wiper control unit was located on the instrument panel. And since this did not meet safety requirements, then on all subsequent modifications:
- it was replaced with a more modern multifunctional unit located directly on the steering wheel;
- They began installing a new instrument panel.
Self-upgrade
Cars of new releases already have a multifunctional control unit in the database. But owners of early editions can re-equip the car with their own hands to meet modern safety requirements.
To do this you will need:
- Original UAZ 2206 wiring - as the most suitable for self-conversion;
- Factory instruction diagram, which allows you to correctly connect the steering column switches to the standard diagram;
- Desire to make high-quality installation.
The work algorithm will be as follows:
- Disconnect the battery;
- We remove the control unit from the instrument panel;
- We disconnect the wires, checking their compliance with the factory diagram in Fig. 1;
- Remove the standard switches from the steering wheel column.
To remodel, you will need to purchase several new parts:
- Block of multifunctional steering column switches from the UAZ 390995 model;
- Relay for the windshield wiper circuit (the VAZ model is best suited, as is wiring 2112, connecting the relay and the switch block);
- Contact blocks in the amount of 3 pieces (one 8-pin for the side of the steering column switches and two 6-pin for the relay and standard adapter).
Let's start installation:
- We replace the standard connector with a new one;
- We cut the 4x4 wire (in Fig. 2 indicated by a red cross);
Modernization scheme improved by car enthusiasts
Car enthusiasts improved the modification scheme proposed by the manufacturer, making some changes to it (in Fig. 3):
- A variable resistor R=10K was introduced into the circuit, thanks to which the pause value in the intermittent operating mode of the windshield wipers can be smoothly changed from 4 s to 15 s;
- Connect the resistor in such a way that the countdown of the operating mode begins from the moment the brush motor stops.
Conclusions: cars of the UAZ family are not only unitary multi-purpose SUVs, but also easy-to-maintain vehicles. Almost any car owner, armed with knowledge and colored electrical diagrams, is able to not only restore a failed component, but also carry out useful modernization of the car and its individual elements.
Heading
One of the most common problems with domestic cars is the breakdown of any electrical devices; an electrical diagram will help you figure this out. The only solution to this problem will be to check the condition of the fuses. The topic of today's article will be the electrical circuit of a UAZ Bukhanka car on an injector-type engine.
So, this article provides answers to these fairly common questions:
- What is the electrical circuit on a UAZ Bukhanka car with an injector type engine?
- How does the electrical circuit of the UAZ Bukhanka car work?
- Where are the fuses located on a UAZ Bukhanka car with an injector type engine?
- Repair of the mounting block.
Blog about UAZ
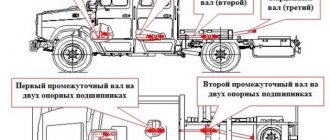
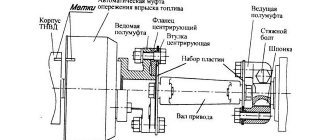
The gear shift mechanism of the four-speed semi-synchronized gearbox of the UAZ-452 family is mounted in the side cover of the gearbox. The gearshift forks are attached to the rods using a conical screw pinned with wire.
The movement of the forks when shifting gears occurs together with the rods, which have a socket for a locking screw and grooves for clamps and a locking device. The middle rod also has an intermediate pin of the locking device. When one of the gears is engaged, the rod moves and locks the adjacent rods with a rod through the cracks.
Thus, each of the remaining rods is locked with a key lock and cannot be moved out of the neutral position until the previously switched rod is returned to the neutral position. The same lock prevents two gears from being engaged at the same time.
The forks in the neutral position and in the positions with the gears engaged are fixed with balls. To switch the forks, a clutch with a lever is used, mounted on the splines of the vertical shaft. The head of the clutch lever fits into the grooves of the forks. The coupling can move along the roller in the axial direction. When the shaft rotates, the clutch rotates and its lever moves one or another fork.
In this case, in the uppermost position, the clutch is connected to the first and second gear forks, in the middle position - to the third and fourth gear forks, and in the lowest position - to the reverse fork. The middle position of the coupling is fixed by the coupling resting on the washer against which the spring rests. In order for the clutch to reach its lowest position, additional force must be applied to compress the spring. The outer end of the shaft is splined and threaded to accommodate the gear shift lever.
To move the coupling up and down, there is a control lever that rotates on the shaft and fits into the groove of the coupling. The outer end of the roller has splines and threads for attaching the outer lever. The rollers are sealed with round rubber rings.
The outer control and shift levers have a slotted hole at one end, and holes at the other end into which rubber pads with brass bushings are inserted. When installing control and shift levers on the splines, deviation from the positions is allowed within 5 degrees in any direction.
Positions of the outer gear shift levers.
Control mechanism of a four-speed gearbox UAZ-452.
This mechanism consists of two levers - control and switching, rotating in mutually perpendicular planes. Both levers are installed in a bracket that is attached to the cab. At the end of the long arm of the control lever there is a hole for connecting the rod; at the end of the short arm there is a fork into which the lever fits. In the middle position, the lever is fixed with a locking ball.
The shift lever is connected at one end to the rod, and at the other to the main gear shift lever using a forked protrusion with holes. The main lever is mounted on an axis that is screwed into the body of the shift lever. The axle is locked with a locknut. The main shift lever hinge is protected from dust by a polyethylene seal that covers the hole in the cabin air duct. The edges of the hole are sealed with foam rubber, pressed with a steel clip.
The main lever first rotates laterally relative to the shift lever and then rotates only with the shift lever to engage the desired gear. The vertical rod is attached to the control lever using a pin, cotter pin, flat and spring washers. The shift lever is connected to the vertical rod with a pin and a cotter pin.
The lower ends of both rods have threads that allow you to change their length. To adjust the length of the rods, pins are placed on their threaded ends, secured with two nuts. By unscrewing or screwing the nuts, you can change the length of the rods without disassembling the connection.
The cylindrical parts of the pins with square heads are connected to the intermediate arms using cotter pins, flat washers and spring washers. The intermediate lever assembly is mounted on the second cross member of the vehicle frame. All intermediate levers are mounted on one axis: the upper intermediate control lever is knurled, the lower intermediate control lever is secured with a radial pin, the intermediate shift lever is freely mounted on a bronze bushing. The axle has holes for lubricant supply.
The intermediate levers are connected to the gearbox levers by horizontal rods, the opposite ends of which are connected to the gearbox levers using pins with square heads.
Operation of control and gear shift mechanisms of the UAZ-452 gearbox.
The lever in the cabin can move in two planes - parallel to the axis of the car and perpendicular to it. When this lever moves perpendicular to the axis of the car, its lower end moves the control lever and, through a system of rods and intermediate levers, inserts the shift clutch into the desired position.
When the horizontal rod moves backward, the shift clutch is connected to the first and second gear forks, and when moving forward, it is connected to the reverse fork.
When the lever moves in the cabin in a direction parallel to the axis of the car, the gear selected by the previous movement is switched. The control lever of the control mechanism remains stationary, and only the shift lever rotates.
Adjustment of control mechanisms and gear shifting of the UAZ-452 gearbox.
The control mechanism and gear shift mechanism after adjustment should ensure proper operation of the gearbox and comfortable operation for the driver. The adjustment procedure is as follows:
— Set the levers on the gearbox cover to the neutral position. — By changing the length of the horizontal rods, install the intermediate levers so that their lower arms are directed vertically downward. — By changing the length of the vertical control rod, install the mechanism control lever on the clamp. — Then select the length of the vertical shift rod so that the lever handle in the cockpit is in the middle position between the instrument panel and the hood. — Securely fasten the rod nuts.
Operating principle
In order to understand and imagine how the process of changing the speed modes of the engine and the corresponding indicator of the permissible speed occurs, let us turn to a short explanation. The lower stages, which ensure the vehicle starts, are activated by the most powerful gear, which moves along special skids located on the driven shaft. This action allows you to transfer enough force to a heavy car for the car to start moving.
As soon as the car starts moving, you can switch to second gear, due to which the car does not stop and its movement is not very fast. However, the second speed stage will not be enough if you need to reach a speed of about 40-50 km/h. In this case, higher gears will be required.
As for the 3 and 4 speed modes and the corresponding gears, which provide a high number of revolutions per second, they are controlled by a synchronizer clutch. Some modifications of the gearbox on the UAZ 452 were produced, where the switching of 1st and 2nd speed modes of the transmission was also carried out using an additional synchronizer clutch. However, in this case we are considering a transmission option with one synchronizer clutch.
The UAZ gearbox has a synchronizer, which is designed to smoothly switch on modes by equalizing the rotation speeds between the intermediate and driven shafts. This feature of the device not only provides more comfortable driving, but also protects the leading clutch mechanisms from damage and rapid wear.
Repair of UAZ Bukhanka gearbox (removal, repair, installation)
Rice.
114. Installing the sealing ring of the shift shaft cover Install the rubber sealing ring into the hole under the axis of the selective lever 23 (see Fig. 105).
Rice. 105. Gear shift mechanism for cars of the UAZ-3741 family: 1-reverse fork rod; 2-reverse fork; 3-rod fork for selecting III and IV gears; 4-fork III and IV gears; 5-fork 1st and 2nd gears; 6-rod fork for 1st and 2nd gears; 7- cotter pin wire; 8 - plug; 9-washer; 10-shaft gear shift; 11-side cover; 12-gear clutch; 13-locking spring; 14-gasket; 15-oil seal cover; 16-shift lever; 17-cork; 18,20-clamp springs; 19-key plunger; 21-ball retainer; 22-gear selection lever; 23-selective lever; 24-pin; 25-reversing light switch; 26-plug
Install the clutch (Fig. 115), thrust washer, spring thrust cup and spring onto the shift shaft. Insert the shaft into the side cover body and install the oil seal cover with the gasket, secure the cover with three bolts.
Rice. 115. Gear shift shaft assembly
- Install the selective lever assembly with the axle (Fig. 116) into the cover body so that the lever fits into the groove of the shift clutch. Lock the lever with a pin, which is driven in from below.
- Turn the side cover over with the machined flange up and insert the springs and rod balls of the 3rd and 4th gears and the reverse rod into the sockets of the retainers (see Fig. 113).
Rice.
113. Device for assembling rods and clamps: a-assembly of the clamp; b-installation of the rod Install the reverse fork on the rod on the side opposite to the lock, and, having sunk the ball of the lock (Fig. 117) into the cover body using a mandrel (see Fig. 113), set the rod to the neutral position. So sequentially assemble all the rods (Fig. 118) and forks. Install locking blocks between the rods.
Rice. 117. Assembly of the rod and reverse fork Fig. 118. Assembly of the rod and fork for shifting 3rd and 4th gears
Secure the forks to the rods with conical bolts and pin them with wire (Fig. 119), which should not interfere with the movement of the forks. When attaching the forks, the shift clutch lever must be in the groove of the forks.
Rice. 119. Cotter pinning the bolts securing the forks with wire: 1-bolt; 2-pin-wire
- Insert the ball and the retainer spring into the hole in the rod of the 1st and 2nd gears and tighten the plug. Please keep in mind that the rod lock spring for 1st and 2nd gears in the free state is longer than the other two rod lock springs.
- Install six plugs into the end holes of the cover body, a plug into the hole for the shift shaft and hammer them out.
- Install the selection and shift levers (Fig. 120) onto the shaft splines and secure them with nuts and spring washers.
Rice. 120. Installation of external select and shift leversThe correct position of the levers is checked with the gears in the neutral position in the gearbox after installing the shift mechanism on the gearbox in accordance with Fig. 121.
Rice. 121. Position of the selection lever and shift lever after installing the mechanism on the gearbox: A - corresponding to reverse; B-corresponding to the inclusion of III and IV gears; B-corresponding to the inclusion of 1st and 2nd gears; 1-selection lever; 2-shift lever (in neutral position)
Design and principle of operation
The gearbox diagram contains information about the main and additional elements of the system. The UAZ gearbox structure includes the following units and parts:
- Fully synchronized installation, ensuring speed equalization and smooth switching.
- Helical intermediate gears for shaft drive.
- An angular contact ball bearing, consisting of 2 rows and located on the rear of the shaft, is necessary to perceive and respond in a timely manner to loads arising during driving in the radial and axial planes.
- A transfer case consisting of a main axle shaft and a gear with a large working life.
Primary shaft on 2 supports.
Such design features make it possible to move in reverse. The mechanical type of gearbox has the main advantage of a long service life. A car with such a device copes well with difficulties while driving over rough terrain.
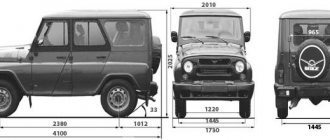
Technical characteristics of UAZ 469
Before getting into the intricacies of operating a car, it would be good to know about its technical characteristics.
The SUV is equipped with a 4-cylinder carburetor engine UMZ-451MI with a volume of 2.5 liters. This UAZ 469 engine is combined with a 4-speed manual transmission (with synchronizers in 3rd and 4th gears). Engine power reaches 75 horsepower with a torque of 2200 - 2500 rpm.
Gasoline A-72 or A-76 can be used as fuel. The car has two fuel tanks of 39 liters each, and fuel consumption at a speed of 90 km/h is 16 liters per 100 km. The maximum speed at full weight is 100 km/h.
Since the engine is the heart of any car, then it would be more logical to consider the intricacies of starting such a unit under different weather conditions, especially if your UAZ 469 is new.
Malfunctions and repairs
The first signs indicating a malfunction of the automotive system should force the car owner to carry out diagnostics. In some cases, this can be done on your own. Simple breakdowns can be repaired with your own hands. It is better to entrust more complex faults to a service center.
Signs indicating the need to repair the UAZ gearbox:
In most cases, when uncharacteristic noise is observed, the cause lies in wear or defect of the bearings and gears. Stiff gear shifting indicates a malfunction of the synchronizers.
The main reason for the problems that arise is the natural wear and tear of parts.
The need to check the transfer case is indicated by deterioration in wheel adhesion to the road surface and increased noise levels from the area where the unit is located. Damage is caused by: careless operation of vehicles, untimely maintenance, use of low-quality consumables, fuel and gear oil, lack of control over the volume of working fluids.
Another group of problems is related to the leakage of the oil mixture from the gearbox. Possible reasons:
- exceeding the maximum oil volume in the box;
- water entering the system when refueling;
- a crack on the unit cover or on the crankcase.
The UAZ high-speed gearbox consists of a large number of working elements and components. Their normal functioning and interaction ensure reliable use of vehicles. Gearbox repairs will not be required if you regularly inspect your vehicle.
Mechanism adjustment
After assembling and installing the new switching mechanism, it is necessary to adjust the rods and the entire system. The goal is achieved by changing the length of the vertical and horizontal rods. Do-it-yourself setup sequence:
- Move the gear shift lever to the neutral position, and move the element responsible for selecting the gear all the way.
- Move lever 1 to positions corresponding to speeds 1 and 2. While checking that the elements are not pulled up, connect and secure the selection rod.
- Similar actions must be carried out for other gear stages.
After work, you should check that the gears are fully engaged by starting first gear and reverse. The lever must not come into contact with other parts or controls. The optimal gap size is up to 3 mm.
Source
Checking the transfer case
The advantage of the unit that distributes the torque impulse is that the device requires minimal intervention and maintenance. Manipulations consist of monitoring the level and changing the lubricant, inspecting connections for damage. Before working with the box, the product is cleaned. This helps detect hidden cracks and leaks. If such symptoms are detected, they find out what the cause of the phenomenon is. Faulty parts are replaced, as a rule, these are sealing elements and oil seals.
After cleaning and visually inspecting the surface of the transfer case, check the lubricant level in the product. If there is not enough liquid, the substance is added. At the same time, check the lubricant in the gearbox; the value corresponds to the lower edge of the filling hole. If the fluid level in the transfer case is low, but is high in the gearbox, topping up is not necessary, since the total amount of the substance has not changed.