Author of the article: Svetlana Galitsina | Updated: 01/23/2022
False eyelash bundles of the Nesura brand, 12 mm, volume 10D curve B
450 ₽ More details
False eyelash bundles of the Nesura brand, 14 mm, volume 10D curve B
280 ₽ More details
Men's slim jeans
Any gardener, amateur gardener or farmer cannot imagine how you can cultivate your plot of land without using a rake - be it ordinary garden or industrial. With this tool you can cultivate the soil, harvest crops and keep the entire area clean. What types of rakes are there, what jobs are they intended for, and how can you make a wooden rake yourself?
Do-it-yourself rake. How to do it?
Sometimes a situation occurs that the owner of a personal plot urgently needs a rake for work, but unfortunately the old ones are out of order or they are missing altogether.
That is why the question arises of how to make them with your own hands without much effort. Gardeners and gardeners who cultivate their land with rakes, this object of labor is mandatory; it contributes to productivity. Using this tool, you can cultivate the soil, harvest crops, and clean the entire area. There are people who think that rakes come in one type for specific jobs. There are a huge variety of them and each of the models is designed for a specific job.
Constructions
Loosening the beds helps clear the area of dry leaves, helps collect mown grass and remove weeds; this tool is a real gardener's assistant.
Instructions for using this tool are very simple: a large handle which is a handle and a transverse bar with teeth. The cloves, in turn, can be different depending on the purpose of these cities. They come with more or fewer teeth, their shape, length and thickness often differ, and it happens that rakes are made from different materials.
The working part of the gabil does not have any specific requirements; it consists of various materials, but they directly depend on what this tool is intended for.
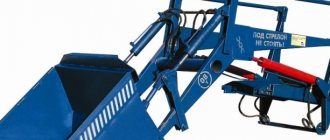
A rake for a walk-behind tractor is an indispensable equipment for the village
Residents of rural areas know that collecting hay, freshly cut grass and leveling the ground is difficult work.
Today, a walk-behind tractor is capable of replacing manual labor with automatic one. To do this, you need the cultivator itself and special attachments for it, in this case a rake. Their necessity will be appreciated by people who keep pets or have a large area of land that needs to be cultivated.
It is easier for a city dweller to understand why additional equipment is needed using specific examples. After plowing, the ground is uneven, full of furrows, depressions and clods - it needs to be leveled. It is difficult to do this with your hands and a regular rake; you need to put in a lot of effort and use a heavy tool.
Trailed rakes can get the job done quickly and easily. And their dimensions are so diverse that they can be used both for ordinary gardening farms and for small farms.
A person faces a similar situation when it is necessary to collect mown grass or hay and roll it into windrows for transportation and storage.
Homemade rake for walk-behind tractor
Variety
1. Painted iron. This type of tool is one of the heavy ones; unfortunately, the teeth on the rake quickly bend, so the degree of wear is very high.
2. Steel. Everyone knows that steel is a durable material, but it is worth understanding that these rakes are the heaviest.
3. Knee aluminum. This type is the most optimal in terms of weight and quality.
4. Plastic. A rake made of this material is very light, but as far as its strength is concerned, it leaves much to be desired.
5. Wooden rakes are very durable and lightweight.
A rake is great for loosening the soil, raking up leaves, extracting roots and breaking up the soil after digging has taken place.
Unusual twisted rakes are an excellent tool for breaking large blocks of earth and plowing the soil well. As for homemade rakes, they often have a large, wide base with short teeth. The main purpose of a homemade rake is to remove weeds and dry grass.
Possibilities of purchased and homemade rakes
Manufacturers offer a variety of types of attachments, as do craftsmen who create rakes for walk-behind tractors with their own hands. Before choosing a design, you should understand what work they are intended for.
In private farming, there is always work, at any time of the year, regardless of weather conditions. A rake is needed to perform the following tasks:
- leveling the land after plowing or planting crops;
- using them to create furrows for sowing;
- collection of mown grass;
- collection and rolling of finished hay;
- cleaning the area from weeds, branches, leaves.
- loosening the earth.
The selected equipment must be made of durable materials that are resistant to corrosion and do not require special care.
When making attachments yourself, craftsmen advise choosing high-quality steel with high strength values. After creation, it is best to treat the tool with anti-corrosion compounds and cover it with a layer of paint that prevents moisture penetration.
The rake's capabilities can make it a universal assistant
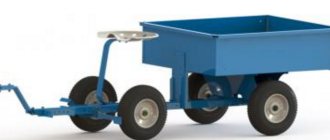
Making the base
You can make a wooden rake yourself; for this you will need a block of wood up to 60 cm long and 5 cm wide. You will also need a plane to do this work. Using this tool, you will have to cut out cloves no more than 3 cm high. The distance between the cloves is no more than 4 centimeters. This way you create square blanks for future teeth. Then you need to use a knife to cut out the required number of teeth and determine their length.
In fact, creating such a rake is not difficult, you just need to allocate some free time and effort to this event.
Basic properties of attachments
A walk-behind tractor is a universal equipment for private households. A rake is not the only attachment for it; the kit may include lugs, an all-terrain attachment, a lifting mechanism for the attachment, flat cutters, mulchers, a press, a cultivator and several more complex devices.
Each of them is characterized by the presence of such properties as:
- strength (important for working with heavy soil in difficult conditions);
- corrosion resistance;
- ease of installation;
- Possibility to rise and fall for convenient control.
The rake is also characterized by the presence of a coupling device and an adapter on the walk-behind tractor for installation on a specific model.
Main types of rakes
Purchasing equipment with a motorized power unit is a profitable purchase. It saves your own effort and time, makes it possible not to spend money on seasonal hiring of workers, saving money for your own needs.
The range of attachments makes the equipment also universal - it can be used to perform various household tasks.
If we talk specifically about rakes, then there are three main types:
- rollers for collecting hay and grass;
- the tedder is designed for turning hay during the drying period;
- transverse for tillage.
Craftsmen make homemade equipment, focusing on the tasks that the owner faces.
Appearance of a standard tedder
Construction and materials
The design of this garden tool is quite simple and consists of two parts: a handle and a transverse bar with teeth attached to it, which serves as the working part of the structure. The number and size of teeth may vary for different modifications of the tool and depend on its purpose and the material from which it is made.
Simple garden rakes are most often made from the following materials:
– iron coated with paint (disadvantages: large mass and rapid wear);
– steel (advantage: long service life; disadvantage: very heavy);
– aluminum (advantages: good quality and relatively light weight);
– plastic (advantage – lightness; disadvantage – low strength);
– wood (advantages: lightness and strength).
Currently, you can buy all the gardening tools in stores, but high-quality metal rakes are quite expensive, and wooden rakes are practically not available for sale at all. That is why many summer residents and gardeners prefer to make the tool they need with their own hands.
Making from wood
To make the handle and the main working part from wood with your own hands, you need to stock up on several types of wood. To make a cutting, it is better to take light wood species, for example, the following:
– pine – light, moisture-resistant, but not too durable;
– birch – light, durable, easy to machine;
– poplar – light and easy to process.
To make a working part with teeth with your own hands, you will need harder and more durable types of wood, such as oak, rowan, elm, etc. They are quite heavy and difficult to process, but they will last longer.
First you need to make a block of suitable wood measuring 60x5x3 centimeters and plan it using a plane. Then use a drill to drill several holes with a diameter of 1 to 1.5 cm in the resulting wooden block for the teeth at a distance of approximately 4 cm from one another.
The next stage is the production of teeth. It will be easiest to plan them from wooden blanks using a sharp knife. The length of the teeth is from 10 to 12 cm. Any shape, but the ends of the teeth must be sharpened. It is important to remember that the diameters of the tooth heads should be 1-2 mm larger than the diameters of the drilled holes in the block.
The tool handle is usually made straight. It is advisable to sand the surface of the wood with sandpaper. At one end of the future cutting, make a cut about 25 cm long and secure it with a coupling and nails. Then spread the sawn parts in different directions to a width of 15 cm and sharpen each one slightly.
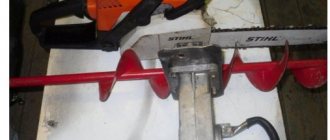
Manufacturing from metal pipes and fittings
In order to make a more durable metal rake from scrap materials with your own hands, you will need a welding machine.
First you need to find a suitable steel pipe with thin walls and cut two pieces of different lengths from it: one larger (from 30 to 35 cm), the other smaller (15 cm). Teeth will be welded onto the long section, and the short section will connect the handle and the working part. Then you need to make about 6-7 teeth up to 15 cm long, sawing them off from a reinforcing rod.
After this, you need to flatten a long piece of pipe to a flat state (for example, using a sledgehammer or hammer), then weld the teeth to the resulting strip at an equal distance from each other. In the middle of the strip, at an angle of 90 degrees to the teeth, weld a handle holder (a short piece of pipe), in which a hole should be drilled for attaching the handle using a self-tapping screw.
Types of devices
All rakes and tedders are classified according to several criteria, which makes it possible to find a certain difference between the entire assortment on the market.
If we take into account the nature of creating windrows from hay, then there are two types of units:
- Cross tedders;
- Side rake.
The difference lies in the movements performed relative to the collected hay and grass.
A significant distinguishing feature is the main working element with which the tedders are equipped.
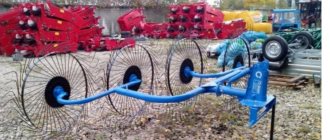
- Wheel-finger mechanisms. They allow you to collect dry grass and set the size of the windrows you need with your own hands. Such units have light shock absorption, which helps them adapt to even the most difficult land plots with far from even terrain. Turkish rakes are considered one of the most effective means for collecting hay. The Sun models got their name due to the shape of the working tools. Depending on the equipment, the device may have 4 or 5 wheels. With the help of such tedders, the efficiency of harvesting is significantly increased and the time spent on work is minimized.
- Drum assembly devices. The unit is based on a pipe of impressive wall thickness. This ensures a high level of structural strength. Drum mechanisms differ in that the raking wheels are located independently of each other.
- Dental mechanisms. These tedders are designed with special teeth that facilitate the collection of grass. They rotate in a plane and are located parallel throughout the entire structure. At the same time, the eccentric rotates around the unit in a constant mode. With the help of such a system, the rake changes the angle of inclination of the working teeth.
Depending on the maximum draft, the tedders can be divided into two
- Equine. Their power is insignificant, therefore they are used mainly with the help of a walk-behind tractor;
- Tractor. Here the main device is a tractor, which pulls a rake.
Taking into account the features of equipment and aggregation, three types of devices are distinguished. https://www.youtube.com/embed/Oc2KyWG4-Kk. https://www.youtube.com/embed/Oc2KyWG4-Kk
It is important to note that there are four types of tedder mechanisms:
- Rotary;
- Transverse;
- Wheel-finger;
- Wheeled.
Rotary units are the most functional, but therefore also the most expensive. If rotary models take first place, then the second line goes to the wheel-finger system. Like rotors, they rake and turn hay efficiently. At the same time, rotary ones are capable of collecting fresh grass with a moisture content of up to 70 percent, while wheel-finger ones can only collect dry hay.
Do not forget that spare parts for purchased agricultural machinery must be affordable and of high quality. If parts have to wait several weeks to arrive from overseas, this could have a negative impact on harvest rates. In addition, domestic manufacturers produce decent units, and spare parts for them are easy to find.
Working with a rake will not be difficult. Each assembler model comes with instructions. It details the design of the model and its technical characteristics.
Please pay attention to the recommendations for use, care and prevention provided. If the tedder breaks down, it is better to contact a service center, since the manufacturer provides a guarantee for its products. And after the warranty period has expired, feel free to repair the tedders yourself
It is not difficult
And after the warranty period has expired, feel free to repair the tedders yourself. It is not difficult.
Rake drawings
How to make a rake for a walk-behind tractor
The prototype of our device was horse-drawn rakes - they have been used by people for centuries, and even today in villages in the Russian outback you can find horse-drawn rakes.
First of all, we build the base - we put the wheels on the axle. We weld two platforms onto it to strengthen the fastening of the rake mechanism. Two thick steel strips are suitable as platforms. We strengthen them at a distance of 10–12 cm from each wheel. Then we fix the drawbar in the center of the wheel axis - it can be made from a thick-walled pipe. A loop is welded at the end of the drawbar - with its help the rake is docked with the walk-behind tractor. We've done the basics.
The next step is to manufacture the working mechanism itself. We weld racks onto the wheel axle, onto which we attach two pieces of pipe – cross-section 40 mm – by welding. You need to insert the rake axle into the pipe, which should rotate freely. We make locking rings on both sides of the mounting tubes to prevent the rake from moving to the sides. After these operations, we equip the rake with a lever. It will serve to raise and lower the teeth.
We attach the teeth themselves to the rake axis; a six-millimeter wire is suitable for their manufacture. From it we bend C-shaped elements of the required sizes. Their fastening can be achieved by welding or installation into holes made in advance with a drill.
We install the racks and drawbar
Now that we have an axis, we can gradually move “higher”. The next stage is installing support posts for the horizontal axis under the rake and welding the drawbar. Let's look at the process step by step.
We take 2 metal squares 25x25 mm, weld them to the axis (length around 120 cm). Here you need to adhere to the rule: fasten the axle strictly parallel to each other so that they do not stick out in different directions after finishing the work. If the lengths end up being different, you need to take a grinder and align them to the same line.
Installing the rake bar
Axle mount. 1.5 m is cut from the pipe and a working grip is made. The axle is then placed horizontally against the posts. The result is a pipe that rotates freely at the attachment point.
An ear is made. We weld a rod to the upper corner of the pipe, install the lower one with an eccentric - it should reach the center of the drawbar. By pressing the pipe, the rake can be raised or lowered.
At the end, lubricate the rake with grease for proper operation. After watching the video, you will get acquainted with detailed recommendations on how to create a rake for work on the site.
What are boosters for?
During the drawing process, engineers can identify weak points in a structure. A master can only learn about the presence of weak points through experience.
In order not to check from your own experience how strong the product is, it is necessary to first strengthen possible weak points.
Among the places most susceptible to fracture are the following:
- middle of the racks;
- connecting the racks to the drawbar;
- spacer at the bottom of the rod.
After the strengthening work has been completed, the structure can be considered ready. All that remains is to lubricate all moving parts and attach it to the walk-behind tractor for testing.
All that remains is to attach it to the walk-behind tractor and you can go into the field
DIY fan rake
Homemade fan rake made by yourself: photo and description of making a homemade product, as well as a video.
A rake is always useful in the household, raking out leaves in the garden or weeds in the vegetable garden. You can buy a rake in every hardware store, but craftsmen do not look for easy ways, but do everything with their own hands. This material provides a complete photo report on how to make a fan rake with your own hands, we look at the work of a craftsman.
To make a homemade product, the author needed a piece of 25-gauge metal pipe 30 mm long.
Next, the pipe needs to be flattened with a hammer, but not completely, in order to leave a gap, you can push a metal strip into the pipe.
Now you will need old spokes from a bicycle wheel; you need to cut off the caps from the spokes.
We collect the knitting needles in a bundle and put on our blank from a flattened pipe and weld the end.
Russian-made walk-behind tractor "Neva" and its factory attachment
The Neva brand equipment was created specifically for Russian realities; it is not afraid of difficult conditions and is suitable for all types of work - be it cleaning, mowing or collecting hay. Its main feature is the presence of a universal adapter for connecting any attachment.
The Neva rake is often supplied complete with an MB-2 walk-behind tractor. They can also be purchased separately.
The factory attachment for the Neva walk-behind tractor is characterized by high quality assembly and materials; it can withstand heavy loads and operates for several years.
Also worthy of special attention is the “Sun” type rake, which is easily attached to the walk-behind tractor and greatly simplifies the work with cut hay.
Craftsmen who are capable of creating equipment with their own hands almost always make rakes for walk-behind tractors themselves. This approach saves money. In addition, it becomes possible to make attachments that are best suited for a specific motor cultivator.
How to make a rake for a walk-behind tractor or mini-tractor with your own hands is shown in the video below.
Rake drawings
How to make a rake for a walk-behind tractor
The prototype of our device was horse-drawn rakes - they have been used by people for centuries, and even today in villages in the Russian outback you can find horse-drawn rakes.
First of all, we build the base - we put the wheels on the axle. We weld two platforms onto it to strengthen the fastening of the rake mechanism. Two thick steel strips are suitable as platforms. We strengthen them at a distance of 10–12 cm from each wheel. Then we fix the drawbar in the center of the wheel axis - it can be made from a thick-walled pipe. A loop is welded at the end of the drawbar - with its help the rake is docked with the walk-behind tractor. We've done the basics.
The next step is to manufacture the working mechanism itself. We weld racks onto the wheel axle, onto which we attach two pieces of pipe – cross-section 40 mm – by welding. You need to insert the rake axle into the pipe, which should rotate freely. We make locking rings on both sides of the mounting tubes to prevent the rake from moving to the sides. After these operations, we equip the rake with a lever. It will serve to raise and lower the teeth.
We attach the teeth themselves to the rake axis; a six-millimeter wire is suitable for their manufacture. From it we bend C-shaped elements of the required sizes. Their fastening can be achieved by welding or installation into holes made in advance with a drill.
Preparing to make your own adapter
Despite the simplicity of the design, making an adapter for a walk-behind tractor is not so easy. First of all, you need to pay attention to the drawing, diagrams and dimensions, because they can help you accurately create a homemade product the first time!
When assembling a homemade adapter, the following tools and materials will be useful:
- Steel sheet with a thickness of 0.5 cm;
- Several 1-inch square pipes;
- File;
- Welding;
- Hitch;
- Electric drill;
- Electric hacksaw;
- Square;
- Mounting kit.
If you plan to make an adapter with steering controls, all the parts described above will be useful, but you need to add the following to them:
- Ready seat;
- Steering;
The most key design elements are:
- Hitch. These are two parts of welded square pipes and a part of a water pipe. It is installed on the frame and secured with bolts.
- Wheel fixation unit. 2 pieces of pipe 10 centimeters long are welded at right angles. You need to insert a horizontal section into the mounting pipe, then fix it firmly and securely with a bolt. The axle and bearings with wheels are mounted on a vertical workpiece.
When all the necessary tools have been collected and the necessary parts have been made, you can begin assembling the adapter yourself.
Installing the rake bar
Axle mount. 1.5 m is cut from the pipe and a working grip is made. The axle is then placed horizontally against the posts. The result is a pipe that rotates freely at the attachment point.
An ear is made. We weld a rod to the upper corner of the pipe, install the lower one with an eccentric - it should reach the center of the drawbar. By pressing the pipe, the rake can be raised or lowered.
At the end, lubricate the rake with grease for proper operation. After watching the video, you will get acquainted with detailed recommendations on how to create a rake for work on the site.
Operation and care
To extend the life of your garden tool, you need to take a little care of it after use. After working in the garden, the rake must be cleared of earthen lumps and grass. Metal parts must be cleaned of rust using a brush or a special product.
Do not throw the rake around to avoid the risk of injury. After work, you need to learn to immediately put garden tools away in the designated place. Wooden handles should be sanded periodically to make them smooth. To prevent the wood from drying out, it is recommended to wipe them with linseed oil. Periodically you need to re-coat them with paint or varnish.
Note! A broken stem can be temporarily repaired using duct tape and glue. Home gardening tools are stored vertically or hung on the wall. This helps protect them from dampness.